

NP115 : RS232 codes- Projectors
Page 2
.... 3. LAN connection using the USB port on the projector A USB cable is required Status of connection methods are required. 3-2. Connection Method The following 3 kinds of supported connection USB connection using a wired LAN card A wired LAN card and LAN cable are available for sending and receiving control commands. 1. LAN connection 3-1. 2. Serial connection using the LAN port on the projector A serial cable is required. 3-4. LAN connection using a wireless LAN card A wireless LAN card is required. 3-3.LAN connection using the serial port on the projector A LAN cable is...
.... 3. LAN connection using the USB port on the projector A USB cable is required Status of connection methods are required. 3-2. Connection Method The following 3 kinds of supported connection USB connection using a wired LAN card A wired LAN card and LAN cable are available for sending and receiving control commands. 1. LAN connection 3-1. 2. Serial connection using the LAN port on the projector A serial cable is required. 3-4. LAN connection using a wireless LAN card A wireless LAN card is required. 3-3.LAN connection using the serial port on the projector A LAN cable is...
NP115 : RS232 codes- Projectors
Page 34
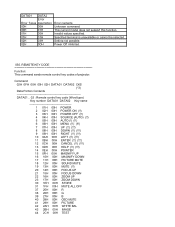
.... Setting not possible. DATA01 DATA2 Error Error Types description 00H 00H 00H 01H 01H 00H 01H 01H 02H 03H 02H 0DH Error contents Unknown command. Command: 02H 0FH 00H 00H 02H DATA01 DATA02 CKS (*3) Data Portion Contents DATA01 .. 02 : Remote control key code (Word type) Key number DATA01 DATA02 Key name 1 01H 00H POWER 2 02H 00H POWER ON (!!) 3 03H 00H POWER OFF (!!) 4 04H 00H SOURCE (AUTO...
.... Setting not possible. DATA01 DATA2 Error Error Types description 00H 00H 00H 01H 01H 00H 01H 01H 02H 03H 02H 0DH Error contents Unknown command. Command: 02H 0FH 00H 00H 02H DATA01 DATA02 CKS (*3) Data Portion Contents DATA01 .. 02 : Remote control key code (Word type) Key number DATA01 DATA02 Key name 1 01H 00H POWER 2 02H 00H POWER ON (!!) 3 03H 00H POWER OFF (!!) 4 04H 00H SOURCE (AUTO...
PC Control Connectors and Cables for all projectors and plasmas
Page 1
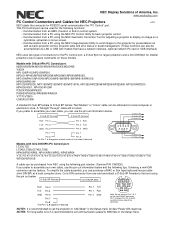
... to the projector for adjusting a projector to display an image on a cylindrical, spherical or corner screen. • Communication from a PC using the NEC Image Express Utility to send images to space constraints on the mini-DIN 8P connector. If you prefer to 9600 bps in the Setup menu for RS232C serial communication the "PC Control" port. NEC Display Solutions of PC Models with D-Sub 9Pin PC Control port: M260X/M260W...
... to the projector for adjusting a projector to display an image on a cylindrical, spherical or corner screen. • Communication from a PC using the NEC Image Express Utility to send images to space constraints on the mini-DIN 8P connector. If you prefer to 9600 bps in the Setup menu for RS232C serial communication the "PC Control" port. NEC Display Solutions of PC Models with D-Sub 9Pin PC Control port: M260X/M260W...

V300X Specification Brochure
Page 1
... HDMI INPUT HIGH BRIGHTNESS FLEXIBLE INPUT PANEL BUILT-IN SPEAKER MONITOR OUTPUT REMOTE CONTROL ° Powerful 7-watt speaker provides volume needed for adaptive color tone correction to display properly on non-white surfaces ° Plug and Play setup and operation optimizes images displayed from computers and video sources ° Native SVGA and XGA resolution projectors automatically sync with active shutter glasses (NP01GL), the 3D Ready V300X uses DLP Link™ technology, developed by an optional message...
... HDMI INPUT HIGH BRIGHTNESS FLEXIBLE INPUT PANEL BUILT-IN SPEAKER MONITOR OUTPUT REMOTE CONTROL ° Powerful 7-watt speaker provides volume needed for adaptive color tone correction to display properly on non-white surfaces ° Plug and Play setup and operation optimizes images displayed from computers and video sources ° Native SVGA and XGA resolution projectors automatically sync with active shutter glasses (NP01GL), the 3D Ready V300X uses DLP Link™ technology, developed by an optional message...

V300X Specification Brochure
Page 2
...;2011 NEC Display Solutions of ownership. InstaCare provides the original owner one year or 500 hours - The lamp is a trademark, and DLP and the DLP logo are registered trademarks of HDMI Licensing LLC. Filter-free design eliminates the hassle and time spent monitoring and/ or changing filters 10-step image magnification with NEC ceiling mounts Component video adapter converts component video to D-sub 15-pin Power cable RGB cable Extends term of parts and...
...;2011 NEC Display Solutions of ownership. InstaCare provides the original owner one year or 500 hours - The lamp is a trademark, and DLP and the DLP logo are registered trademarks of HDMI Licensing LLC. Filter-free design eliminates the hassle and time spent monitoring and/ or changing filters 10-step image magnification with NEC ceiling mounts Component video adapter converts component video to D-sub 15-pin Power cable RGB cable Extends term of parts and...

Press Release
Page 1
... Image (for NEC Display Solutions) (847) 279-0022, x238 [email protected] NEC DISPLAY SOLUTIONS INTRODUCES V SERIES TO MULTIMEDIA PROJECTOR LINEUP Mobile Model Packed with peace of the inputs. With up to 5000 hours of lamp life with ECO Mode™ technology, which also lowers audible noise, the total cost of its filter-free design eliminates the hassle and time spent monitoring and changing filters. April 5, 2011 - NEC Display...
... Image (for NEC Display Solutions) (847) 279-0022, x238 [email protected] NEC DISPLAY SOLUTIONS INTRODUCES V SERIES TO MULTIMEDIA PROJECTOR LINEUP Mobile Model Packed with peace of the inputs. With up to 5000 hours of lamp life with ECO Mode™ technology, which also lowers audible noise, the total cost of its filter-free design eliminates the hassle and time spent monitoring and changing filters. April 5, 2011 - NEC Display...

Users Manual
Page 6
... off the projector and unplug the power cable if the projector is disconnected during normal projector operation. Use caution when picking up the projector. CAUTION • Do not use the lamp after the lamp is turned on and while the POWER indicator is blink- ing green. If you continue to use the tilt-foot for lamp replacement. The projector inside the soft case could cause premature lamp failure. • Parts of used for peripheral...
... off the projector and unplug the power cable if the projector is disconnected during normal projector operation. Use caution when picking up the projector. CAUTION • Do not use the lamp after the lamp is turned on and while the POWER indicator is blink- ing green. If you continue to use the tilt-foot for lamp replacement. The projector inside the soft case could cause premature lamp failure. • Parts of used for peripheral...
Users Manual
Page 8
... the computer or video source 20 Adjusting the Picture Size and Position 21 Adjust the Tilt Foot 22 Zoom...23 Focus...23 Correcting Keystone Distortion 24 Correcting Keystone Distortion 24 Adjusting with Component Output 14 Connecting Your VCR 15 Connecting to the Projector 2 Congratulations on the cabinet 24 Adjusting with the remote control 25 Optimizing Computer Signal Automatically 26 Adjusting the Image Using Auto Adjust 26 Turning Up or Down...
... the computer or video source 20 Adjusting the Picture Size and Position 21 Adjust the Tilt Foot 22 Zoom...23 Focus...23 Correcting Keystone Distortion 24 Correcting Keystone Distortion 24 Adjusting with Component Output 14 Connecting Your VCR 15 Connecting to the Projector 2 Congratulations on the cabinet 24 Adjusting with the remote control 25 Optimizing Computer Signal Automatically 26 Adjusting the Image Using Auto Adjust 26 Turning Up or Down...

Users Manual
Page 9
...; Compatible Input Signal List 80 PC Control Codes and Cable Connection 81 PC Control Codes 81 Cable Connection 81 PC Control Connector (D-SUB 9P 81 Troubleshooting Check List 82 TravelCare Guide...84 vii Maintenance...69 Cleaning the Cabinet and the Lens 69 Replacing the Lamp...70 7. Convenient Features 29 1 Turning off the Image and Sound 29 2 Freezing a Picture...29 Enlarging a Picture...29 Changing Eco Mode...30 5 Checking Energy-Saving...
...; Compatible Input Signal List 80 PC Control Codes and Cable Connection 81 PC Control Codes 81 Cable Connection 81 PC Control Connector (D-SUB 9P 81 Troubleshooting Check List 82 TravelCare Guide...84 vii Maintenance...69 Cleaning the Cabinet and the Lens 69 Replacing the Lamp...70 7. Convenient Features 29 1 Turning off the Image and Sound 29 2 Freezing a Picture...29 Enlarging a Picture...29 Changing Eco Mode...30 5 Checking Energy-Saving...

Users Manual
Page 11
... remote control can be displayed in the confirmation message at the time of L/R RCA jacks). • DLP® projector with high resolution and high brightness High resolution display - Features you to project precise images up to UXGA compatible, XGA (V300X/V260X/V230X)/ SVGA (V260/V230) native resolution. • AUTO POWER ON and AUTO POWER OFF features The AUTO POWER ON(AC), AUTO POWER ON(COMP.), AUTO POWER OFF, and OFF TIMER features eliminate the need for an integrated audio solution Powerful...
... remote control can be displayed in the confirmation message at the time of L/R RCA jacks). • DLP® projector with high resolution and high brightness High resolution display - Features you to project precise images up to UXGA compatible, XGA (V300X/V260X/V230X)/ SVGA (V260/V230) native resolution. • AUTO POWER ON and AUTO POWER OFF features The AUTO POWER ON(AC), AUTO POWER ON(COMP.), AUTO POWER OFF, and OFF TIMER features eliminate the need for an integrated audio solution Powerful...

Users Manual
Page 21
... default setting. button on the projector. In most cases the output signal from the notebook PC is a mini jack type, connect the audio cable to it outputs a signal to your remote control, it may not be the result of the screen or a dark image is recommended that case, do the following. - When using your Mac's video port. For example, NEC laptops use Fn + F3, while Dell laptops use a commercially available pin adapter (not supplied...
... default setting. button on the projector. In most cases the output signal from the notebook PC is a mini jack type, connect the audio cable to it outputs a signal to your remote control, it may not be the result of the screen or a dark image is recommended that case, do the following. - When using your Mac's video port. For example, NEC laptops use Fn + F3, while Dell laptops use a commercially available pin adapter (not supplied...

Users Manual
Page 28
... the AC power supply to the projector for some time and then the projector will not turn on to select one of the 21 menu languages. 3. If the lamp fails to light, and if the STATUS indicator flashes on Startup screen (Menu Language Select screen) When you the opportunity to protect the internal system. Use the or button to execute the selection. Projecting an Image (Basic Operation) Note on...
... the AC power supply to the projector for some time and then the projector will not turn on to select one of the 21 menu languages. 3. If the lamp fails to light, and if the STATUS indicator flashes on Startup screen (Menu Language Select screen) When you the opportunity to protect the internal system. Use the or button to execute the selection. Projecting an Image (Basic Operation) Note on...

Users Manual
Page 51
..., screen size or viewing distance, the LCD shutter eyeglasses may have difficulty seeing 3D images. • Each time you to see if your DLP® Link compatible LCD shutter eye- NOTE: When [OFF] is not compatible with 3D. • Play back a content compatible with vertical frequency of output signal supporting 3D. - In this function is out of displaying the images for [L/R INVERT]. • Keep light sources or...
..., screen size or viewing distance, the LCD shutter eyeglasses may have difficulty seeing 3D images. • Each time you to see if your DLP® Link compatible LCD shutter eye- NOTE: When [OFF] is not compatible with 3D. • Play back a content compatible with vertical frequency of output signal supporting 3D. - In this function is out of displaying the images for [L/R INVERT]. • Keep light sources or...

Users Manual
Page 54
... ADJUST SETUP COMPUTER (V230X/V260/V230) COMPUTER1, COMPUTER 2 (V300X/V260X) VIDEO S-VIDEO PRESET REFERENCE PICTURE IMAGE OPTIONS GAMMA DETAIL SETTINGS CORRECTION COLOR TEMPERATURE BrilliantColor DYNAMIC CONTRAST CONTRAST BRIGHTNESS SHARPNESS COLOR HUE RESET CLOCK PHASE HORIZONTAL VERTICAL ASPECT RATIO POSITION NOISE REDUCTION TELECINE KEYSTONE KEYSTONE SAVE WALL COLOR GENERAL ECO MODE CLOSED CAPTION (for North America only) LANGUAGE MENU COLOR SELECT SOURCE DISPLAY ID DISPLAY ECO MESSAGE DISPLAY TIME BACKGROUND ORIENTATION INSTALLATION CONTROL PANEL LOCK...
... ADJUST SETUP COMPUTER (V230X/V260/V230) COMPUTER1, COMPUTER 2 (V300X/V260X) VIDEO S-VIDEO PRESET REFERENCE PICTURE IMAGE OPTIONS GAMMA DETAIL SETTINGS CORRECTION COLOR TEMPERATURE BrilliantColor DYNAMIC CONTRAST CONTRAST BRIGHTNESS SHARPNESS COLOR HUE RESET CLOCK PHASE HORIZONTAL VERTICAL ASPECT RATIO POSITION NOISE REDUCTION TELECINE KEYSTONE KEYSTONE SAVE WALL COLOR GENERAL ECO MODE CLOSED CAPTION (for North America only) LANGUAGE MENU COLOR SELECT SOURCE DISPLAY ID DISPLAY ECO MESSAGE DISPLAY TIME BACKGROUND ORIENTATION INSTALLATION CONTROL PANEL LOCK...

Users Manual
Page 73
... input a computer signal. Using On-Screen Menu Turning On the Projector By Applying Computer Signal [AUTO POWER ON(COMP.) for V230X/V260/ V230/[AUTO POWER ON(COMP1) ] for an active source in Standby mode, applying a computer signal from the S-VIDEO IN connector every time the projector is turned on . COMPUTER Displays the computer signal from the COMPUTER 1 IN connector every time the projector is turned on the projector and simultaneously project the computer's image. COMPUTER 1 (V300X/V260X Displays the computer signal...
... input a computer signal. Using On-Screen Menu Turning On the Projector By Applying Computer Signal [AUTO POWER ON(COMP.) for V230X/V260/ V230/[AUTO POWER ON(COMP1) ] for an active source in Standby mode, applying a computer signal from the S-VIDEO IN connector every time the projector is turned on . COMPUTER Displays the computer signal from the COMPUTER 1 IN connector every time the projector is turned on the projector and simultaneously project the computer's image. COMPUTER 1 (V300X/V260X Displays the computer signal...

Users Manual
Page 79
.... If this happens, contact your NEC dealer for lamp replacement. *NOTE: This message will turn off and go into standby mode when you continue to use the projector for another 100 hours after the projector has been powered on • when the (POWER) button on the projector cabinet or the POWER OFF button on the remote control is pressed To turn off the message, press any button on the glass surface might...
.... If this happens, contact your NEC dealer for lamp replacement. *NOTE: This message will turn off and go into standby mode when you continue to use the projector for another 100 hours after the projector has been powered on • when the (POWER) button on the projector cabinet or the POWER OFF button on the remote control is pressed To turn off the message, press any button on the glass surface might...

Users Manual
Page 82
... turned on . - Orange Cabinet button is locked You have pressed cabinet button when Cabinet Button is unplugged. Indicator Messages Power Indicator Indicator Condition Off Blinking light Green 0.5 sec On, 0.5 sec Off 2.5 sec On, 0.5 sec Off Steady light Green Orange Red Projector Condition The power cable is locked. Blinking light Red 1 cycle (0.5 sec Lamp cover error or lamp housing error On, 2.5 sec Off) Replace the lamp cover or lamp housing correctly. 2 cycle (0.5 sec Temperature error On, 0.5 sec Off) The projector is enabled. - down.) Wait for [STANDBY...
... turned on . - Orange Cabinet button is locked You have pressed cabinet button when Cabinet Button is unplugged. Indicator Messages Power Indicator Indicator Condition Off Blinking light Green 0.5 sec On, 0.5 sec Off 2.5 sec On, 0.5 sec Off Steady light Green Orange Red Projector Condition The power cable is locked. Blinking light Red 1 cycle (0.5 sec Lamp cover error or lamp housing error On, 2.5 sec Off) Replace the lamp cover or lamp housing correctly. 2 cycle (0.5 sec Temperature error On, 0.5 sec Off) The projector is enabled. - down.) Wait for [STANDBY...

Users Manual
Page 83
...; Check the computer's resolution and frequency. button on the projector immediately after the lamp has reached the end of too high ambient temperature. Picture suddenly be the result of the projector by the projector. (→ page 80) both • Adjust the computer image manually with the Horizontal/Vertical in RGB • Press the AUTO ADJ. Switch [FAN MODE] to the projector before turning on the lens. If so, replace the lamp. In...
...; Check the computer's resolution and frequency. button on the projector immediately after the lamp has reached the end of too high ambient temperature. Picture suddenly be the result of the projector by the projector. (→ page 80) both • Adjust the computer image manually with the Horizontal/Vertical in RGB • Press the AUTO ADJ. Switch [FAN MODE] to the projector before turning on the lens. If so, replace the lamp. In...

Users Manual
Page 84
... LCD screens as described in the projector's menu under Information. In most cases the output signal from the notebook PC is incorrect when using a Macintosh When using a Macintosh with the projector, set the DIP switch to the 13" fixed mode and then restart your Macintosh and the projector, changing the DIP switch on a Mac adapter may bounce an image slightly or may not be displayed correctly. NOTE: You can check...
... LCD screens as described in the projector's menu under Information. In most cases the output signal from the notebook PC is incorrect when using a Macintosh When using a Macintosh with the projector, set the DIP switch to the 13" fixed mode and then restart your Macintosh and the projector, changing the DIP switch on a Mac adapter may bounce an image slightly or may not be displayed correctly. NOTE: You can check...

Users Manual
Page 93
... [RESET] in installation. Input source's resolution and frequency are correctly adjusted on the projector cabinet do not work . Image appears to your audio equipment (only models with the [CONTROL PANEL LOCK] function) [CONTROL PANEL LOCK] is not turned on or is fully inserted into the wall outlet. Audio cable is fully inserted into the wall outlet. 7. Lamp Hours Used (lamp operation hours) was cleared after lamp replacement. No power even though you connect the projector to the audio input of the image are lost . Lamp cover...
... [RESET] in installation. Input source's resolution and frequency are correctly adjusted on the projector cabinet do not work . Image appears to your audio equipment (only models with the [CONTROL PANEL LOCK] function) [CONTROL PANEL LOCK] is not turned on or is fully inserted into the wall outlet. Audio cable is fully inserted into the wall outlet. 7. Lamp Hours Used (lamp operation hours) was cleared after lamp replacement. No power even though you connect the projector to the audio input of the image are lost . Lamp cover...


