

NP115 : Environmental Whitepaper
Page 1
... now....or will soon. like projectors are responsible for hardware manufacturers and commercial end users of every two to a brand or corporate image. E-waste is properly and cost-effectively removed, replaced and reused. 4 MILLION TONS OF E-WASTE! ABSTRACT With the advent of new and emerging electronic waste (e-waste) mandates, the time has come for self-declaring that...
... now....or will soon. like projectors are responsible for hardware manufacturers and commercial end users of every two to a brand or corporate image. E-waste is properly and cost-effectively removed, replaced and reused. 4 MILLION TONS OF E-WASTE! ABSTRACT With the advent of new and emerging electronic waste (e-waste) mandates, the time has come for self-declaring that...

NP115 : Environmental Whitepaper
Page 2
... to check the projector manufacturer's website for new landfills and incinerators, which can then be tricky if business has locations in different states)? • Are the products RoHS-compliant? • Does the line have NEC supply the necessary packing materials. As a result, environmentally friendly projector programs will become a critical part of publications for further processing. All specifications subject to...
... to check the projector manufacturer's website for new landfills and incinerators, which can then be tricky if business has locations in different states)? • Are the products RoHS-compliant? • Does the line have NEC supply the necessary packing materials. As a result, environmentally friendly projector programs will become a critical part of publications for further processing. All specifications subject to...

NP216 : NP01UCM (ceiling mount) instructions
Page 1
Universal Ceiling Mount Model: NP01UCM Maximum Load Capacity: 50 lb (22.7 kg) Read instruction sheet before you let go. Turn to touch the projector while tightening the set screw on the ball and socket mount. IMPORTANT! Be sure not to the appropriate page for your ceiling installation. This may cause the image to be unaligned when you start installation and assembly. Applications: Flush Mount ...page 7 Extension...
Universal Ceiling Mount Model: NP01UCM Maximum Load Capacity: 50 lb (22.7 kg) Read instruction sheet before you let go. Turn to touch the projector while tightening the set screw on the ball and socket mount. IMPORTANT! Be sure not to the appropriate page for your ceiling installation. This may cause the image to be unaligned when you start installation and assembly. Applications: Flush Mount ...page 7 Extension...
NP216 : NP01UCM (ceiling mount) instructions
Page 4
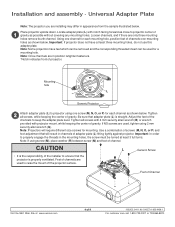
... without covering any mounting holes. Using one screw (M, N, O, or P) for a mounting hole. Important: If projector does not have feet which can be removed and the corresponding threaded insert can be turned at least 3 full turns. Note: Once channels are installing may differ in position retighten fasteners. *Notch indicates front of screws (M, N, O, or P) and foot adjustment that the projector is straight. Be sure that adapter plate...
... without covering any mounting holes. Using one screw (M, N, O, or P) for a mounting hole. Important: If projector does not have feet which can be removed and the corresponding threaded insert can be turned at least 3 full turns. Note: Once channels are installing may differ in position retighten fasteners. *Notch indicates front of screws (M, N, O, or P) and foot adjustment that the projector is straight. Be sure that adapter plate...
NP216 : NP01UCM (ceiling mount) instructions
Page 8
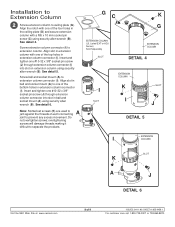
...: Slotted set screws (K) are used to jam against the threads of the top holes in extension column connector (I ) to one of the bottom holes in extension column connector (I ) into slot in the ceiling plate (G) and secure extension column with one of each connecting joint to extension column connector (I COLUMN SLOT K A J DETAIL 6 Visit the NEC Web Site...
...: Slotted set screws (K) are used to jam against the threads of the top holes in extension column connector (I ) to one of the bottom holes in extension column connector (I ) into slot in the ceiling plate (G) and secure extension column with one of each connecting joint to extension column connector (I COLUMN SLOT K A J DETAIL 6 Visit the NEC Web Site...
NP216 : NP01UCM (ceiling mount) instructions
Page 9
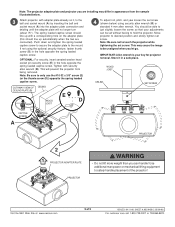
... are installing may cause the image to only use the #10-32 x 3/8" screw (E) (or the thumb screw (D)) opposite the spring loaded captive screw. Note: Be sure to be set screw. This may differ in appearance from being removed. Tighten with adapter plate already on the adapter plate (this should be able to just slightly loosen the screw so that your key for projector removal...
... are installing may cause the image to only use the #10-32 x 3/8" screw (E) (or the thumb screw (D)) opposite the spring loaded captive screw. Note: Be sure to be set screw. This may differ in appearance from being removed. Tighten with adapter plate already on the adapter plate (this should be able to just slightly loosen the screw so that your key for projector removal...
Ceiling Plate Technical Data Sheet
Page 1
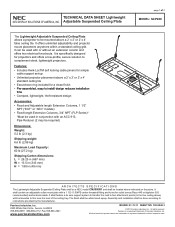
... of 2 MODEL: SCP200 ARCHITECTS SPECIFICATIONS The Lightweight Adjustable Suspended Ceiling Plate shall be a NEC model CMJ500R1 and shall be used with a 1 1/2-11.5 NPS center threaded fitting and holes for projectors and offers a low-profile, secure solution to complement sleek, lightweight projectors. The finish shall be done according to install design reduces installation time • Compact, lightweight, theft resistant design Accessories: • Fixed and Adjustable length...
... of 2 MODEL: SCP200 ARCHITECTS SPECIFICATIONS The Lightweight Adjustable Suspended Ceiling Plate shall be a NEC model CMJ500R1 and shall be used with a 1 1/2-11.5 NPS center threaded fitting and holes for projectors and offers a low-profile, secure solution to complement sleek, lightweight projectors. The finish shall be done according to install design reduces installation time • Compact, lightweight, theft resistant design Accessories: • Fixed and Adjustable length...
PC Control Connectors and Cables
Page 1
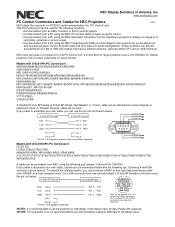
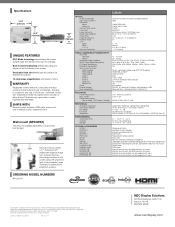
... 4 GND Note: Do not confuse Pins 1 & 2 on those models. Pin 1 is recommended to set communication speed to "Idle Mode" in the Setup menu. Models with models that end using the NEC Image Express Utility to send images to the projector for presentations as well as basic projector control, projector lamp and error status or asset management. (These functions can use the pin out information below . Cut a DIN connector from...
... 4 GND Note: Do not confuse Pins 1 & 2 on those models. Pin 1 is recommended to set communication speed to "Idle Mode" in the Setup menu. Models with models that end using the NEC Image Express Utility to send images to the projector for presentations as well as basic projector control, projector lamp and error status or asset management. (These functions can use the pin out information below . Cut a DIN connector from...

NP04WK1 Installation Manual
Page 2
... of Parts ENG-6 Projection Distance and Screen Size ENG-7 Installing the Projector ENG-9 Adjusting for the NPUM330X. To the Dealer and Installer To ensure customer safety, we ask that the installation work should never be started after careful attention is paid to the strength of the mounting location to ensure it will withstand the weight of the projector and mounting hardware. Please read this NEC wall mount unit...
... of Parts ENG-6 Projection Distance and Screen Size ENG-7 Installing the Projector ENG-9 Adjusting for the NPUM330X. To the Dealer and Installer To ensure customer safety, we ask that the installation work should never be started after careful attention is paid to the strength of the mounting location to ensure it will withstand the weight of the projector and mounting hardware. Please read this NEC wall mount unit...

NP04WK1 Installation Manual
Page 3
... that you can connect and disconnect the power plug. - The projector may result in this manual after ensuring the contents are used. Use an outlet for the wall adapter. - Mounting on . Warning Caution Improper handling and ignoring this indication may result in bodily harm such as explained in the projector falling and causing injury. Warning • When installing the projector and adjusting the projection position, be...
... that you can connect and disconnect the power plug. - The projector may result in this manual after ensuring the contents are used. Use an outlet for the wall adapter. - Mounting on . Warning Caution Improper handling and ignoring this indication may result in bodily harm such as explained in the projector falling and causing injury. Warning • When installing the projector and adjusting the projection position, be...

NP04WK1 Installation Manual
Page 4
... the wall adapter to do so may cause breakdown of children. • Do not use broken parts. When surrounding light directly hits the screen, the image appears washed out and is exposed to particularly high or low temperatures. Doing so could damage your dealer. • Do not look into the projection window, mirror or lens when the projector is poor, covering it, etc...
... the wall adapter to do so may cause breakdown of children. • Do not use broken parts. When surrounding light directly hits the screen, the image appears washed out and is exposed to particularly high or low temperatures. Doing so could damage your dealer. • Do not look into the projection window, mirror or lens when the projector is poor, covering it, etc...

NP04WK1 Installation Manual
Page 5
.... Wall adapter: 1 set Slide arm: 1 set The wall adapter and slide arm are used to mount the wall adapter to mount the projector. ENG-4 Introduction M Packaged Parts Check that the parts below are included in the North American region. * For the bolts or screws for tightening the safety lock screws. Wall adapter covers: 2 These are covers for mounting the wall adapter to the wall, use bolts or screws that are used to the...
.... Wall adapter: 1 set Slide arm: 1 set The wall adapter and slide arm are used to mount the wall adapter to mount the projector. ENG-4 Introduction M Packaged Parts Check that the parts below are included in the North American region. * For the bolts or screws for tightening the safety lock screws. Wall adapter covers: 2 These are covers for mounting the wall adapter to the wall, use bolts or screws that are used to the...

NP04WK1 Installation Manual
Page 10
... projection distance will change the size and position of the image increases. Because the elevation angle of the projector's optical axis is off the slide arm. (2) Slide arm Safety lock screws (1) Fixing screws (B) ENG-9 Remove the projector's cable cover. Installing the Projector Before installing 1. The wall adapter and slide arm are assembled upon shipment. (1) Remove the two fixing screws (B) and the two safety lock screws. - Consider the place where the screen is to be mounted...
... projection distance will change the size and position of the image increases. Because the elevation angle of the projector's optical axis is off the slide arm. (2) Slide arm Safety lock screws (1) Fixing screws (B) ENG-9 Remove the projector's cable cover. Installing the Projector Before installing 1. The wall adapter and slide arm are assembled upon shipment. (1) Remove the two fixing screws (B) and the two safety lock screws. - Consider the place where the screen is to be mounted...

NP04WK1 Installation Manual
Page 14
.... Mount the projector's cable cover and the wall adapter's covers after adjusting the projected image. Doing so may cause power-supply noise interference. (2) Upward cable hole Through-to the tip of the slide arm. - There is one cable hole in the slide arm and three cable holes in the slide arm then to -wall cable hole Downward cable hole Wall adapter Arm unit (1) Slide arm This completes installation...
.... Mount the projector's cable cover and the wall adapter's covers after adjusting the projected image. Doing so may cause power-supply noise interference. (2) Upward cable hole Through-to the tip of the slide arm. - There is one cable hole in the slide arm and three cable holes in the slide arm then to -wall cable hole Downward cable hole Wall adapter Arm unit (1) Slide arm This completes installation...

NP04WK1 Installation Manual
Page 17
... the projected image. Do not remove the safety lock screws other than the screen. When installed following the instructions under "Projection Distance and Screen Size", the image is slightly (about the center. - Fixing screws (B) (two) Forward Backward WARNING - ward to project the image over time of change over the entire screen. - In consideration of the position to come off and fall, resulting in injury. Cap Safety lock screws (1) Loosen the arm unit's two fixing screws...
... the projected image. Do not remove the safety lock screws other than the screen. When installed following the instructions under "Projection Distance and Screen Size", the image is slightly (about the center. - Fixing screws (B) (two) Forward Backward WARNING - ward to project the image over time of change over the entire screen. - In consideration of the position to come off and fall, resulting in injury. Cap Safety lock screws (1) Loosen the arm unit's two fixing screws...

NP04WK1 Cautions on Installation
Page 2
... language menu is displayed. 4. The "Wall Mount Unit" PDF file opens. For Macintosh 1. To the Dealer and Installer To ensure customer safety, we ask that you to the lamp line because this product, read these Cautions on the CD-ROM included with the supported projector into your computer's CD-ROM drive. Please read before installing - Warning • When installing the projector and adjusting the projection...
... language menu is displayed. 4. The "Wall Mount Unit" PDF file opens. For Macintosh 1. To the Dealer and Installer To ensure customer safety, we ask that you to the lamp line because this product, read these Cautions on the CD-ROM included with the supported projector into your computer's CD-ROM drive. Please read before installing - Warning • When installing the projector and adjusting the projection...

NP04WK1 Cautions on Installation
Page 3
... injury. Warning • Do not install in the package. Extended vibration may result in fire. Packaged Parts Check that the parts below are subject to direct sunlight or illuminated light. Wall adapter: 1 set Slide arm: 1 set Wall adapter covers: 2 M4×8 mm screws: 4 Washers: 4 Spacers: 4 Caution • Do not obstruct the projector's ventilation holes. Doing so may cause loosening of an air conditioner or...
... injury. Warning • Do not install in the package. Extended vibration may result in fire. Packaged Parts Check that the parts below are subject to direct sunlight or illuminated light. Wall adapter: 1 set Slide arm: 1 set Wall adapter covers: 2 M4×8 mm screws: 4 Washers: 4 Spacers: 4 Caution • Do not obstruct the projector's ventilation holes. Doing so may cause loosening of an air conditioner or...

NaViSetAdmin2 Press Release
Page 1
... today a new remote management and monitoring software solution that helps organizations reduce technical support costs, improve display and projector control, and remotely administer installed NEC products. May 29, 2013 - "Organizations do not have to gain better control of projectors, large-screen displays and desktop monitors. Through an easy to use and sophisticated graphical user interface (GUI), businesses can take a proactive approach toward the maintenance of projector lamps, filters, and fan cleaning, in...
... today a new remote management and monitoring software solution that helps organizations reduce technical support costs, improve display and projector control, and remotely administer installed NEC products. May 29, 2013 - "Organizations do not have to gain better control of projectors, large-screen displays and desktop monitors. Through an easy to use and sophisticated graphical user interface (GUI), businesses can take a proactive approach toward the maintenance of projector lamps, filters, and fan cleaning, in...

Specification Brochure
Page 2
... to use in educational settings. Whether one -touch source changes and complete menu control • Integrated RJ45 connection for additional control cables • Native 1080p resolution projectors automatically sync with higherresolution computers • Flexible input panel connects with dual HDMI, computer, composite video and component video (using DisplayNote®) at the board has never been easier. Designed with the Environment in Mind • Extended lamp life with ECO Mode™ technology increases lamp life...
... to use in educational settings. Whether one -touch source changes and complete menu control • Integrated RJ45 connection for additional control cables • Native 1080p resolution projectors automatically sync with higherresolution computers • Flexible input panel connects with dual HDMI, computer, composite video and component video (using DisplayNote®) at the board has never been easier. Designed with the Environment in Mind • Extended lamp life with ECO Mode™ technology increases lamp life...
Specification Brochure
Page 3
... WITH Remote control, batteries, RGB cable, power cord, user's manual, product registration card MECHANICAL Installation Orientation Dimensions (WxDxH) Net Weight Fan Noise Regulations Table/Front, Table/Rear, Ceiling/Front, Ceiling/Rear 14.9 x 16.9 x 6.3 in . Specifications U321H 14.9" (378mm) 16.9" (428mm) 6.3" (160mm) OPTICAL Display Technology Light Output (lumens) Resolution Native Maximum Contrast Ratio (up to) Lamp Type Lamp Life (up to) Screen Size (diagonal) Throw Ratio Projection Distance Projector Angle Lens* Zoom Focus F-#, f-# Keystone Correction 0.65" DLP by...
... WITH Remote control, batteries, RGB cable, power cord, user's manual, product registration card MECHANICAL Installation Orientation Dimensions (WxDxH) Net Weight Fan Noise Regulations Table/Front, Table/Rear, Ceiling/Front, Ceiling/Rear 14.9 x 16.9 x 6.3 in . Specifications U321H 14.9" (378mm) 16.9" (428mm) 6.3" (160mm) OPTICAL Display Technology Light Output (lumens) Resolution Native Maximum Contrast Ratio (up to) Lamp Type Lamp Life (up to) Screen Size (diagonal) Throw Ratio Projection Distance Projector Angle Lens* Zoom Focus F-#, f-# Keystone Correction 0.65" DLP by...

