
NP05LM1 Users Manual
Page 2
...;s en el que se use . For information on supported projectors, refer to the user's manual that use with the projector for installation or removal procedures and for use el dispositivo. Introduction 2 2. Set the Wireless LAN Unit in the NEC Projector for how to set the wireless LAN. ●Parts Included • Wireless LAN Unit 1 • Important Information (this document) ........ 1 2. Table of Supported Areas and Countries..........2 3. Refer to our brochures. Wireless LAN Unit NP05LM1 for utilizado...
...;s en el que se use . For information on supported projectors, refer to the user's manual that use with the projector for installation or removal procedures and for use el dispositivo. Introduction 2 2. Set the Wireless LAN Unit in the NEC Projector for how to set the wireless LAN. ●Parts Included • Wireless LAN Unit 1 • Important Information (this document) ........ 1 2. Table of Supported Areas and Countries..........2 3. Refer to our brochures. Wireless LAN Unit NP05LM1 for utilizado...
PJ control command reference manual appendixes
Page 1
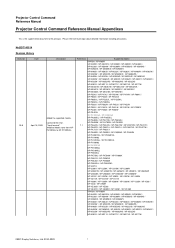
... / NP-M303WS / NP-M403H / NP-M323H / NP-M353HS / NP-M323HS / NP-M303HS NP-M402W / NP-M362W / NP-M402X / NP-M362X / NP-M322X / NP-M282X / NP-M322W / NP-M352WS / NP-M302WS / NP-M332XS NP-M361X / NP-M311X / NP-M271X / NP-M311W / NP-M271W ©NEC Display Solutions, Ltd. 2014-2020 1 Projector Control Command Reference Manual Projector Control Command Reference Manual Appendixes This is the supplemental document to the principal. No.BDT140014 Revision History Revision 20.0 Date April 16, 2020 Description Added the supported models.
... / NP-M303WS / NP-M403H / NP-M323H / NP-M353HS / NP-M323HS / NP-M303HS NP-M402W / NP-M362W / NP-M402X / NP-M362X / NP-M322X / NP-M282X / NP-M322W / NP-M352WS / NP-M302WS / NP-M332XS NP-M361X / NP-M311X / NP-M271X / NP-M311W / NP-M271W ©NEC Display Solutions, Ltd. 2014-2020 1 Projector Control Command Reference Manual Projector Control Command Reference Manual Appendixes This is the supplemental document to the principal. No.BDT140014 Revision History Revision 20.0 Date April 16, 2020 Description Added the supported models.

PJ control command reference manual appendixes
Page 2
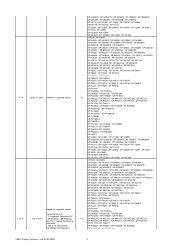
... 7.0 NP-PA622U / NP-PA522U / NP-PA672W / NP-PA572W / NP-PA722X / NP-PA622X / NP-PA621U / NP-PA521U / NP-PA671W / NP-PA571W / NP-PA721X / NP-PA621X NP-PA600X / NP-PA500X / NP-PA550W / NP-PA500U NP-PH3501QL / NP-PH2601QL NP-PH1400U NP-PH1202HL / NP-PH1002HL NP-PH1000U NP-PX1005QL NP-PX1004UL NP-PX803UL NP-PX750U / NP-PX700W / NP-PX800X NP-PX651X / NP-PX581W NP-PX620X / NP-PX550W NP-PX602UL / NP-PX602WL NP-U321H NP-U300X / NP-U250X / NP-U310W / NP-U260W ©NEC Display Solutions, Ltd. 2014-2020 2 19.0 September 30, 2019 Added the supported models...
... 7.0 NP-PA622U / NP-PA522U / NP-PA672W / NP-PA572W / NP-PA722X / NP-PA622X / NP-PA621U / NP-PA521U / NP-PA671W / NP-PA571W / NP-PA721X / NP-PA621X NP-PA600X / NP-PA500X / NP-PA550W / NP-PA500U NP-PH3501QL / NP-PH2601QL NP-PH1400U NP-PH1202HL / NP-PH1002HL NP-PH1000U NP-PX1005QL NP-PX1004UL NP-PX803UL NP-PX750U / NP-PX700W / NP-PX800X NP-PX651X / NP-PX581W NP-PX620X / NP-PX550W NP-PX602UL / NP-PX602WL NP-U321H NP-U300X / NP-U250X / NP-U310W / NP-U260W ©NEC Display Solutions, Ltd. 2014-2020 2 19.0 September 30, 2019 Added the supported models...
PJ control command reference manual appendixes
Page 3
...NP-PA672W / NP-PA572W / NP-PA722X / does NOT support the following NP-PA622X / NP-PA621U / NP-PA521U / NP-PA671W / NP-PA571W / command. "3. FILTER USAGE NP-PA600X / NP-PA500X / NP-PA550W / NP-PA500U INFORMATION REQUEST NP-PH3501QL / NP-PH2601QL ©NEC Display Solutions, Ltd. 2014-2020 3 NP-PA803UL / NP-PA653UL NP-PA803U / NP-PA723U / NP-PA653U / NP-PA853W / NP-PA703W / NP-PA903X 7.0 NP-PA622U / NP-PA522U / NP-PA672W / NP-PA572W / NP-PA722X / NP-PA622X / NP-PA621U / NP-PA521U / NP-PA671W / NP-PA571W / NP-PA721X / NP-PA621X NP-PA600X / NP-PA500X / NP-PA550W / NP-PA500U NP...
...NP-PA672W / NP-PA572W / NP-PA722X / does NOT support the following NP-PA622X / NP-PA621U / NP-PA521U / NP-PA671W / NP-PA571W / command. "3. FILTER USAGE NP-PA600X / NP-PA500X / NP-PA550W / NP-PA500U INFORMATION REQUEST NP-PH3501QL / NP-PH2601QL ©NEC Display Solutions, Ltd. 2014-2020 3 NP-PA803UL / NP-PA653UL NP-PA803U / NP-PA723U / NP-PA653U / NP-PA853W / NP-PA703W / NP-PA903X 7.0 NP-PA622U / NP-PA522U / NP-PA672W / NP-PA572W / NP-PA722X / NP-PA622X / NP-PA621U / NP-PA521U / NP-PA671W / NP-PA571W / NP-PA721X / NP-PA621X NP-PA600X / NP-PA500X / NP-PA550W / NP-PA500U NP...
PJ control command reference manual appendixes
Page 25
...; - * The following models use a different menu item name. ・NP4100 / NP4100W : Lamp Mode ・NP-PX620X / NP-PX550W : Lamp Mode 04h 05h - - - - - - - - LONG LIFE LONG LIFE - - - - - LONG LIFE - - - - - BOOST - - - BOOST - - - - - ©NEC Display Solutions, Ltd. 2014-2020...
...; - * The following models use a different menu item name. ・NP4100 / NP4100W : Lamp Mode ・NP-PX620X / NP-PX550W : Lamp Mode 04h 05h - - - - - - - - LONG LIFE LONG LIFE - - - - - LONG LIFE - - - - - BOOST - - - BOOST - - - - - ©NEC Display Solutions, Ltd. 2014-2020...
PJ control command reference manual appendixes
Page 27
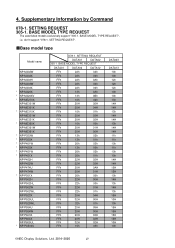
... Command 078-1. BASE MODEL TYPE REQUEST The asterisked models exclusively support "305-1. don't support "078-1. SETTING REQUEST". ■Base model type Model name NP-M402W NP-M402X NP-M403H NP-M403W NP-M403X * NP-M420X * NP-M420XV * NP-ME270X NP-ME301W NP-ME301X * NP-ME310X NP-ME331W NP-ME331X * NP-ME360X NP-ME361W NP-ME361X * NP-P350W * NP-P350X * NP-P401W * NP-P420X * NP-P451W * NP-P451X NP-P452H NP-P452W NP-P474U NP-P474W * NP-P501X NP-P502H NP-P502HL NP-P502W NP-P502WL NP-P523X NP-P525UL NP-P525WL NP-P554U NP-P554W NP...
... Command 078-1. BASE MODEL TYPE REQUEST The asterisked models exclusively support "305-1. don't support "078-1. SETTING REQUEST". ■Base model type Model name NP-M402W NP-M402X NP-M403H NP-M403W NP-M403X * NP-M420X * NP-M420XV * NP-ME270X NP-ME301W NP-ME301X * NP-ME310X NP-ME331W NP-ME331X * NP-ME360X NP-ME361W NP-ME361X * NP-P350W * NP-P350X * NP-P401W * NP-P420X * NP-P451W * NP-P451X NP-P452H NP-P452W NP-P474U NP-P474W * NP-P501X NP-P502H NP-P502HL NP-P502W NP-P502WL NP-P523X NP-P525UL NP-P525WL NP-P554U NP-P554W NP...

User Manual English
Page 3
... Pin assignments and signal names of Contents 5. About the ASCII Control Command 140 9-8. Connecting to a HDBaseT transmission device (sold commercially 95 5-6. Using the VIEWER ... 100 6-1. Cabinet Dimensions ...135 9-5. Changing the logo data (background image 109 7. Setting Up the Screen and the Projector 126 9-2. Connecting to a Wireless LAN (Optional: NP05LM series 92 5-5. HTTP server function ...120 8. Appendix ... 126 9-1. Projecting the pictures on a USB memory (basic operation 101 6-3. Things you...
... Pin assignments and signal names of Contents 5. About the ASCII Control Command 140 9-8. Connecting to a HDBaseT transmission device (sold commercially 95 5-6. Using the VIEWER ... 100 6-1. Cabinet Dimensions ...135 9-5. Changing the logo data (background image 109 7. Setting Up the Screen and the Projector 126 9-2. Connecting to a Wireless LAN (Optional: NP05LM series 92 5-5. HTTP server function ...120 8. Appendix ... 126 9-1. Projecting the pictures on a USB memory (basic operation 101 6-3. Things you...

User Manual English
Page 9
... 62471-5:2015. Doing so could result in vision impairment. • Check that is indicated near the lens on the projector. • Do not allow children to operate the projector alone. As with any bright light source, do not stare into the projector's lens. viii PROHIBITION When cleaning the projector • Do not use flammable gas sprays to fire. Be especially careful when children...
... 62471-5:2015. Doing so could result in vision impairment. • Check that is indicated near the lens on the projector. • Do not allow children to operate the projector alone. As with any bright light source, do not stare into the projector's lens. viii PROHIBITION When cleaning the projector • Do not use flammable gas sprays to fire. Be especially careful when children...

User Manual English
Page 10
... to the Ethernet/HDBaseT or LAN port could be sure to turn off the power, unplug the power cord from the power outlet and check that all connection cables connecting the projector to other devices have been disconnected. • When planning not to use a 2-core plug converter adapter. Do not use on networks subject to overvoltage. • Connect the projector's Ethernet/HDBaseT port and LAN port to a network for which there is...
... to the Ethernet/HDBaseT or LAN port could be sure to turn off the power, unplug the power cord from the power outlet and check that all connection cables connecting the projector to other devices have been disconnected. • When planning not to use a 2-core plug converter adapter. Do not use on networks subject to overvoltage. • Connect the projector's Ethernet/HDBaseT port and LAN port to a network for which there is...

User Manual English
Page 18
... subject the projector to protect the lens from the projector, pointing it may remain on vessels, etc. The projector could cause deterioration of the remote control - Doing so could be sure to set the [FAN MODE] to [HIGH ALTITUDE]. To interrupt the AC power supply while images are conveyed, or in such places as possible. Operate the remote control from within 7 meters from scratches. - Avoid using in...
... subject the projector to protect the lens from the projector, pointing it may remain on vessels, etc. The projector could cause deterioration of the remote control - Doing so could be sure to set the [FAN MODE] to [HIGH ALTITUDE]. To interrupt the AC power supply while images are conveyed, or in such places as possible. Operate the remote control from within 7 meters from scratches. - Avoid using in...

User Manual English
Page 20
.... STANDBY MODE (Factory preset: NORMAL) To control the projector from an external device via a LAN or serial cable connection, use the on-screen menu to your area, please visit the company website: URL: https://www.nec-display.com/global/support/index.html xix To find the appropriate model to change the settings for 1 and 2. 1. To reduce power consumption, the power management functions (1 and 2) are protected by copyright law. [ASPECT RATIO], [KEYSTONE...
.... STANDBY MODE (Factory preset: NORMAL) To control the projector from an external device via a LAN or serial cable connection, use the on-screen menu to your area, please visit the company website: URL: https://www.nec-display.com/global/support/index.html xix To find the appropriate model to change the settings for 1 and 2. 1. To reduce power consumption, the power management functions (1 and 2) are protected by copyright law. [ASPECT RATIO], [KEYSTONE...

User Manual English
Page 37
.... Projecting an Image (Basic Operation) 2-2. This section will show you a basic connection to fix the computer cable (VGA). 2. First connect the supplied power cord's three-pin plug to the projector. Do not use any plug converter. Connect your computer to the AC IN terminal of the projector, and then connect another plug of the supplied power cord directly in the condition of this projector flashes orange and the unit goes into the standby mode...
.... Projecting an Image (Basic Operation) 2-2. This section will show you a basic connection to fix the computer cable (VGA). 2. First connect the supplied power cord's three-pin plug to the projector. Do not use any plug converter. Connect your computer to the AC IN terminal of the projector, and then connect another plug of the supplied power cord directly in the condition of this projector flashes orange and the unit goes into the standby mode...

User Manual English
Page 99
... image contrast and increase detail in video. Select [AUTO] to stop beeping sound. Setting Audio [AUDIO SELECT] This selects the audio inputs of the HDMI 1 IN terminal, HDMI 2 IN terminal, LAN port and Ethernet/ HDBaseT port of your HDMI equipment or select [ENHANCED] to disable the [ENHANCED] feature of the unit. Enabling Key Sound and Error Sound [BEEP] This feature turns on or off the button sound or alarm when an error...
... image contrast and increase detail in video. Select [AUTO] to stop beeping sound. Setting Audio [AUDIO SELECT] This selects the audio inputs of the HDMI 1 IN terminal, HDMI 2 IN terminal, LAN port and Ethernet/ HDBaseT port of your HDMI equipment or select [ENHANCED] to disable the [ENHANCED] feature of the unit. Enabling Key Sound and Error Sound [BEEP] This feature turns on or off the button sound or alarm when an error...

User Manual English
Page 101
..., [STANDBY MODE] will not be selected automati- When [STANDBY MODE] → [NETWORK STANDBY] is projected. 80 When [NETWORK SERVICE] → [AMX BEACON] → [ON] is selected - To use the POWER button on automatically and the image is selected - Signal detection is done from a computer connected to the COMPUTER IN input, HDMI 1 IN, or HDMI 2 IN input will be affected even when [RESET] is performed for [DISABLE] and mounting the wireless LAN unit to [NETWORK STANDBY...
..., [STANDBY MODE] will not be selected automati- When [STANDBY MODE] → [NETWORK STANDBY] is projected. 80 When [NETWORK SERVICE] → [AMX BEACON] → [ON] is selected - To use the POWER button on automatically and the image is selected - Signal detection is done from a computer connected to the COMPUTER IN input, HDMI 1 IN, or HDMI 2 IN input will be affected even when [RESET] is performed for [DISABLE] and mounting the wireless LAN unit to [NETWORK STANDBY...

User Manual English
Page 161
.... 1. Connection via LAN) Item Communication speed Supported standard Information Set automatically (10/100 Mbps) IEEE802.3 (10BASE-T) IEEE802.3u (100BASE-TX, Auto-Negotiation) Use the TCP port number 7142 for this device Input command Input terminal HDMI1 HDMI2 COMPUTER HDBaseT USB-A LAN Response hdmi1 hdmi2 computer hdbaset usb-a lan Parameter hdmi1 or hdmi hdmi2 One among computer, computer1, vga, vga1, rgb, and rgb1 hdbaset or hdbaset1 usb-a or usb-a1 lan...
.... 1. Connection via LAN) Item Communication speed Supported standard Information Set automatically (10/100 Mbps) IEEE802.3 (10BASE-T) IEEE802.3u (100BASE-TX, Auto-Negotiation) Use the TCP port number 7142 for this device Input command Input terminal HDMI1 HDMI2 COMPUTER HDBaseT USB-A LAN Response hdmi1 hdmi2 computer hdbaset usb-a lan Parameter hdmi1 or hdmi hdmi2 One among computer, computer1, vga, vga1, rgb, and rgb1 hdbaset or hdbaset1 usb-a or usb-a1 lan...
User Manual English
Page 163
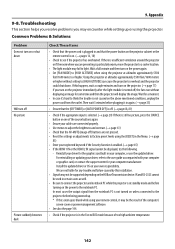
... power cord is plugged in and that the AV-MUTE (image off) buttons are not pressed. • Reset the settings or adjustments to factory preset levels using the projector. Wait a full minute and then turn on . (→ pages 16, 18) • Check to think the trouble is on the projector immediately after the light module is turned off . (→ page 68, 81) • Check if the appropriate input...
... power cord is plugged in and that the AV-MUTE (image off) buttons are not pressed. • Reset the settings or adjustments to factory preset levels using the projector. Wait a full minute and then turn on . (→ pages 16, 18) • Check to think the trouble is on the projector immediately after the light module is turned off . (→ page 68, 81) • Check if the appropriate input...

User Manual English
Page 165
... changes to owner's manual supplied with one of function keys will enable/ disable the external display. If it outputs a signal to a displayable mode and then restart the Mac again. Should this happen, select [View] → [Arrange] from a notebook PC is not an industry standard, the projected image may not be set the DIPswitch of the projector unless"mirroring"is incorrect when using a Mac When using a Mac with the projector, set...
... changes to owner's manual supplied with one of function keys will enable/ disable the external display. If it outputs a signal to a displayable mode and then restart the Mac again. Should this happen, select [View] → [Arrange] from a notebook PC is not an industry standard, the projected image may not be set the DIPswitch of the projector unless"mirroring"is incorrect when using a Mac When using a Mac with the projector, set...

User Manual English
Page 172
... user's manual. See also "Status Indicator (STATUS)". □ Power cord's plug is fully inserted into the wall outlet. □ Main power switch is displayed from [HIGH ALTITUDE] to [AUTO]. □ Image appears blurry or out of focus. □ Still unchanged even though you checked the signal's resolution on PC and changed it to projector's native resolution. □ Still unchanged even though you adjusted the focus. □ No sound. □ Audio cable is correctly connected to the audio input...
... user's manual. See also "Status Indicator (STATUS)". □ Power cord's plug is fully inserted into the wall outlet. □ Main power switch is displayed from [HIGH ALTITUDE] to [AUTO]. □ Image appears blurry or out of focus. □ Still unchanged even though you checked the signal's resolution on PC and changed it to projector's native resolution. □ Still unchanged even though you adjusted the focus. □ No sound. □ Audio cable is correctly connected to the audio input...

Quick Guide
Page 1
...) 3. SUGGERIMENTO: Premere il pulsante AUTO ADJ. or COMPUTER IN 5 Step Select a source. button to the projector using the supplied computer cable (VGA). ❷ Connect the supplied power cord. ❸ Remove the lens cap. ❹ Turn on the projector. Press the (POWER) button on the projector cabinet or the POWER ON button on the remote control. 2. Bringen Sie die Linsenkappe an. 4. English ❶ Connect your computer to adjust. ❼ Turn off the projector. © NEC Display Solutions, Ltd. 2018-2019...
...) 3. SUGGERIMENTO: Premere il pulsante AUTO ADJ. or COMPUTER IN 5 Step Select a source. button to the projector using the supplied computer cable (VGA). ❷ Connect the supplied power cord. ❸ Remove the lens cap. ❹ Turn on the projector. Press the (POWER) button on the projector cabinet or the POWER ON button on the remote control. 2. Bringen Sie die Linsenkappe an. 4. English ❶ Connect your computer to adjust. ❼ Turn off the projector. © NEC Display Solutions, Ltd. 2018-2019...

Installation Guide
Page 1
P525WL/P525UL/P605UL Installation Guide Desktop and Ceiling Mount Rev 1.1 Contents Product Description, Lens Specs, Screen/Aspect Ratio Notes Distance Charts and Formulas Ceiling Mount/Desktop Installation Lens Shift Adjustable Range Cabinet Dimensions Ventilation Requirements, Input Panel and Control Panel Control Codes Pg 1 Pg 2 Pg 3 Pg 4 Pg 5-6 Pg 7 Pg 8 Product Description Type: 3 panel LCD projector, 0.64" p-Si TFT w/MLA Dimensions: 18.9"(W) x 5.6"(H) x 16.0"(D) Weight: 21.3 lbs Resolution: P525WL: 1280 x 800 (16:10) P525UL/P605UL: 1920 x 1200 (16...
P525WL/P525UL/P605UL Installation Guide Desktop and Ceiling Mount Rev 1.1 Contents Product Description, Lens Specs, Screen/Aspect Ratio Notes Distance Charts and Formulas Ceiling Mount/Desktop Installation Lens Shift Adjustable Range Cabinet Dimensions Ventilation Requirements, Input Panel and Control Panel Control Codes Pg 1 Pg 2 Pg 3 Pg 4 Pg 5-6 Pg 7 Pg 8 Product Description Type: 3 panel LCD projector, 0.64" p-Si TFT w/MLA Dimensions: 18.9"(W) x 5.6"(H) x 16.0"(D) Weight: 21.3 lbs Resolution: P525WL: 1280 x 800 (16:10) P525UL/P605UL: 1920 x 1200 (16...

