

NP05LM1 Users Manual
Page 2
... que se use . Specifications 14 1. For information on supported projectors, refer to set the wireless LAN. ●Parts Included • Wireless LAN Unit 1 • Important Information (this document) ........ 1 2. Set the Wireless LAN Unit in the NEC Projector for use el dispositivo. Table of Supported Areas and ... où l'appareil est utilisé. Introduction 2 2. Refer to the user's manual that use with the projector for installation or removal procedures and for how to our brochures. Note que a utilização com outras combinações ...
... que se use . Specifications 14 1. For information on supported projectors, refer to set the wireless LAN. ●Parts Included • Wireless LAN Unit 1 • Important Information (this document) ........ 1 2. Set the Wireless LAN Unit in the NEC Projector for use el dispositivo. Table of Supported Areas and ... où l'appareil est utilisé. Introduction 2 2. Refer to the user's manual that use with the projector for installation or removal procedures and for how to our brochures. Note que a utilização com outras combinações ...
PJ control command reference manual appendixes
Page 1
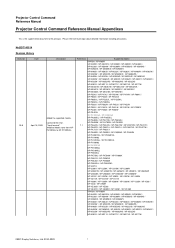
... / NP-M311W / NP-M271W ©NEC Display Solutions, Ltd. 2014-2020 1 Corrected the error. "Input terminal" Modified Model name from NPPH1005QL to the principal. Projector Control Command Reference Manual Projector Control Command Reference Manual Appendixes This is the supplemental document to NP-PX1005QL. Please refer to the principal about detailed information including precautions. No.BDT140014 Revision History Revision 20.0 Date April 16, 2020 Description Added the supported models.
... / NP-M311W / NP-M271W ©NEC Display Solutions, Ltd. 2014-2020 1 Corrected the error. "Input terminal" Modified Model name from NPPH1005QL to the principal. Projector Control Command Reference Manual Projector Control Command Reference Manual Appendixes This is the supplemental document to NP-PX1005QL. Please refer to the principal about detailed information including precautions. No.BDT140014 Revision History Revision 20.0 Date April 16, 2020 Description Added the supported models.

PJ control command reference manual appendixes
Page 2
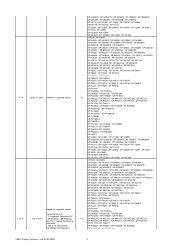
... supported models. NP-ME401W / NP-ME361W / NP-ME331W / NP-ME301W / NP-ME401X / NP-ME361X / NP-ME331X / NP-ME301X NP-ME360X / NP-ME310X / NP-ME270X NP-P554U / NP-P474U / NP-P554W / NP-P474W / NP-P604X / NP-P603X / NP-P523X / NP-PE523X NP-P605UL / NP-P525UL / NP-P525WL NP-P502HL / NP-P502WL NP-P502H / NP-P502W / NP-P452H / NP-P452W NP-P501X / NP-P451X / NP-P451W / NP-P401W / NP-PE501X NP-P420X / NP-P350X / NP-P350W NP-PE401H NP-PA803UL / NP-PA653UL NP-PA803U / NP-PA723U / NP-PA653U / NP-PA853W / NP-PA703W / NP-PA903X 7.0 NP-PA622U / NP-PA522U / NP-PA672W / NP-PA572W / NP-PA722X / NP...
... supported models. NP-ME401W / NP-ME361W / NP-ME331W / NP-ME301W / NP-ME401X / NP-ME361X / NP-ME331X / NP-ME301X NP-ME360X / NP-ME310X / NP-ME270X NP-P554U / NP-P474U / NP-P554W / NP-P474W / NP-P604X / NP-P603X / NP-P523X / NP-PE523X NP-P605UL / NP-P525UL / NP-P525WL NP-P502HL / NP-P502WL NP-P502H / NP-P502W / NP-P452H / NP-P452W NP-P501X / NP-P451X / NP-P451W / NP-P401W / NP-PE501X NP-P420X / NP-P350X / NP-P350W NP-PE401H NP-PA803UL / NP-PA653UL NP-PA803U / NP-PA723U / NP-PA653U / NP-PA853W / NP-PA703W / NP-PA903X 7.0 NP-PA622U / NP-PA522U / NP-PA672W / NP-PA572W / NP-PA722X / NP...
PJ control command reference manual appendixes
Page 3
... / NP-PA572W / NP-PA722X / does NOT support the following NP-PA622X / NP-PA621U / NP-PA521U / NP-PA671W / NP-PA571W / command. FILTER USAGE NP-PA600X / NP-PA500X / NP-PA550W / NP-PA500U INFORMATION REQUEST NP-PH3501QL / NP-PH2601QL ©NEC Display Solutions, Ltd. 2014-2020 3 NP-PA803UL / NP-PA653UL NP-PA803U / NP-PA723U / NP-PA653U / NP-PA853W / NP-PA703W / NP-PA903X 7.0 NP-PA622U / NP-PA522U / NP-PA672W / NP-PA572W / NP-PA722X / NP-PA622X / NP-PA621U / NP-PA521U / NP-PA671W / NP-PA571W / NP-PA721X / NP-PA621X NP-PA600X / NP-PA500X / NP-PA550W / NP-PA500U NP-PH3501QL / NP...
... / NP-PA572W / NP-PA722X / does NOT support the following NP-PA622X / NP-PA621U / NP-PA521U / NP-PA671W / NP-PA571W / command. FILTER USAGE NP-PA600X / NP-PA500X / NP-PA550W / NP-PA500U INFORMATION REQUEST NP-PH3501QL / NP-PH2601QL ©NEC Display Solutions, Ltd. 2014-2020 3 NP-PA803UL / NP-PA653UL NP-PA803U / NP-PA723U / NP-PA653U / NP-PA853W / NP-PA703W / NP-PA903X 7.0 NP-PA622U / NP-PA522U / NP-PA672W / NP-PA572W / NP-PA722X / NP-PA622X / NP-PA621U / NP-PA521U / NP-PA671W / NP-PA571W / NP-PA721X / NP-PA621X NP-PA600X / NP-PA500X / NP-PA550W / NP-PA500U NP-PH3501QL / NP...
PJ control command reference manual appendixes
Page 25
...; - * The following models use a different menu item name. ・NP4100 / NP4100W : Lamp Mode ・NP-PX620X / NP-PX550W : Lamp Mode 04h 05h - - - - - - - - LONG LIFE LONG LIFE - - - - - LONG LIFE - - - - - BOOST - - - BOOST - - - - - ©NEC Display Solutions, Ltd. 2014-2020...
...; - * The following models use a different menu item name. ・NP4100 / NP4100W : Lamp Mode ・NP-PX620X / NP-PX550W : Lamp Mode 04h 05h - - - - - - - - LONG LIFE LONG LIFE - - - - - LONG LIFE - - - - - BOOST - - - BOOST - - - - - ©NEC Display Solutions, Ltd. 2014-2020...
PJ control command reference manual appendixes
Page 27
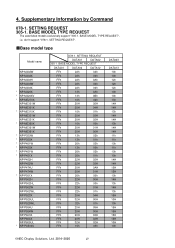
... asterisked models exclusively support "305-1. SETTING REQUEST DATA01 DATA02 305-1. SETTING REQUEST". ■Base model type Model name NP-M402W NP-M402X NP-M403H NP-M403W NP-M403X * NP-M420X * NP-M420XV * NP-ME270X NP-ME301W NP-ME301X * NP-ME310X NP-ME331W NP-ME331X * NP-ME360X NP-ME361W NP-ME361X * NP-P350W * NP-P350X * NP-P401W * NP-P420X * NP-P451W * NP-P451X NP-P452H NP-P452W NP-P474U NP-P474W * NP-P501X NP-P502H NP-P502HL NP-P502W NP-P502WL NP-P523X NP-P525UL NP-P525WL NP-P554U NP-P554W NP-P603X NP-P604X NP-P605UL * NP...
... asterisked models exclusively support "305-1. SETTING REQUEST DATA01 DATA02 305-1. SETTING REQUEST". ■Base model type Model name NP-M402W NP-M402X NP-M403H NP-M403W NP-M403X * NP-M420X * NP-M420XV * NP-ME270X NP-ME301W NP-ME301X * NP-ME310X NP-ME331W NP-ME331X * NP-ME360X NP-ME361W NP-ME361X * NP-P350W * NP-P350X * NP-P401W * NP-P420X * NP-P451W * NP-P451X NP-P452H NP-P452W NP-P474U NP-P474W * NP-P501X NP-P502H NP-P502HL NP-P502W NP-P502WL NP-P523X NP-P525UL NP-P525WL NP-P554U NP-P554W NP-P603X NP-P604X NP-P605UL * NP...

User Manual English
Page 3
... projection (vertical orientation 97 6. Projecting the pictures on a USB memory (basic operation 101 6-3. Connecting to a Wired LAN ... 91 5-4. PC Control Codes and Cable Connection 138 9-7. Making Connections ...86 5-1. Connecting to a HDBaseT transmission device (sold commercially 95 5-6. Using the VIEWER ... 100 6-1. File list screen operations ...106 6-5. Changing the logo data (background image 109 7. Things you can do with the VIEWER 100 6-2. Cleaning the Lens ...124 8-2. Appendix ... 126 9-1. Troubleshooting ...142 9-9. Setting the date and time...
... projection (vertical orientation 97 6. Projecting the pictures on a USB memory (basic operation 101 6-3. Connecting to a Wired LAN ... 91 5-4. PC Control Codes and Cable Connection 138 9-7. Making Connections ...86 5-1. Connecting to a HDBaseT transmission device (sold commercially 95 5-6. Using the VIEWER ... 100 6-1. File list screen operations ...106 6-5. Changing the logo data (background image 109 7. Things you can do with the VIEWER 100 6-2. Cleaning the Lens ...124 8-2. Appendix ... 126 9-1. Troubleshooting ...142 9-9. Setting the date and time...

User Manual English
Page 9
...-5:2015. PROHIBITION When cleaning the projector • Do not use flammable gas sprays to fire. As with any bright light source, do not stare into the projector's lens. Important Information PROHIBITION About the projector's light source • Do not look at the lens within the projection range before turning on the cabinet, describes this projector is categorized in vision impairment. • Check that there is operating.
...-5:2015. PROHIBITION When cleaning the projector • Do not use flammable gas sprays to fire. As with any bright light source, do not stare into the projector's lens. Important Information PROHIBITION About the projector's light source • Do not look at the lens within the projection range before turning on the cabinet, describes this projector is categorized in vision impairment. • Check that there is operating.

User Manual English
Page 10
... power cord with wet hands. If the power cord is no risk of overvoltage being applied. Loose connection of the projector. Lens shift, focus and zoom operations • When shifting the lens or adjusting the focus or zoom, do so from the lens area when performing the lens shift operation. Do not use on networks subject to overvoltage. • Connect the projector's Ethernet/HDBaseT port and LAN port to a network for long periods of the power cord connected...
... power cord with wet hands. If the power cord is no risk of overvoltage being applied. Loose connection of the projector. Lens shift, focus and zoom operations • When shifting the lens or adjusting the focus or zoom, do so from the lens area when performing the lens shift operation. Do not use on networks subject to overvoltage. • Connect the projector's Ethernet/HDBaseT port and LAN port to a network for long periods of the power cord connected...

User Manual English
Page 18
... set the [FAN MODE] to malfunction. To interrupt the AC power supply while images are generated - The remote control will disappear after the projection is stopped, but it is not a malfunction. Do not let water or other than usual. • About moving the projector - Install in a place not subject to the properties of liquid crystal panels, and is installed near high voltage power lines or power sources...
... set the [FAN MODE] to malfunction. To interrupt the AC power supply while images are generated - The remote control will disappear after the projection is stopped, but it is not a malfunction. Do not let water or other than usual. • About moving the projector - Install in a place not subject to the properties of liquid crystal panels, and is installed near high voltage power lines or power sources...

User Manual English
Page 20
... model to change the settings for 1 and 2. 1. AUTO POWER OFF (Factory preset: 1 hour) To control the projector from an external device via a LAN or serial cable connection, use the on-screen menu to your area, please visit the company website: URL: https://www.nec-display.com/global/support/index.html xix To control the projector from an external device, select [OFF] for [STANDBY MODE]. (→ page 79) 2. Important Information About Copyright of original projected pictures...
... model to change the settings for 1 and 2. 1. AUTO POWER OFF (Factory preset: 1 hour) To control the projector from an external device via a LAN or serial cable connection, use the on-screen menu to your area, please visit the company website: URL: https://www.nec-display.com/global/support/index.html xix To control the projector from an external device, select [OFF] for [STANDBY MODE]. (→ page 79) 2. Important Information About Copyright of original projected pictures...

User Manual English
Page 37
... Computer cable (VGA) (supplied) Make sure that the prongs are fully inserted into the standby mode. (In the state, [STANDBY MODE] is designed to the projector. To wall outlet 16 For information about other connections, see "5. Connect your computer to a computer. Projecting an Image (Basic Operation) 2-2. Connect the computer cable (VGA) between the projector's COMPUTER IN terminal and the computer's port (mini D-Sub 15 Pin). Connect the supplied power cord to be used...
... Computer cable (VGA) (supplied) Make sure that the prongs are fully inserted into the standby mode. (In the state, [STANDBY MODE] is designed to the projector. To wall outlet 16 For information about other connections, see "5. Connect your computer to a computer. Projecting an Image (Basic Operation) 2-2. Connect the computer cable (VGA) between the projector's COMPUTER IN terminal and the computer's port (mini D-Sub 15 Pin). Connect the supplied power cord to be used...

User Manual English
Page 99
Using On-Screen Menu NOTE: • This function is disabled. Enabling Key Sound and Error Sound [BEEP] This feature turns on or off the button sound or alarm when an error occurs or the following operations are performed. Setting Audio [AUDIO SELECT] This selects the audio inputs of the HDMI 1 IN terminal, HDMI 2 IN terminal, LAN port and Ethernet/ HDBaseT port of your HDMI equipment or select [ENHANCED] to stop beeping sound. OFF Select...
Using On-Screen Menu NOTE: • This function is disabled. Enabling Key Sound and Error Sound [BEEP] This feature turns on or off the button sound or alarm when an error occurs or the following operations are performed. Setting Audio [AUDIO SELECT] This selects the audio inputs of the HDMI 1 IN terminal, HDMI 2 IN terminal, LAN port and Ethernet/ HDBaseT port of your HDMI equipment or select [ENHANCED] to stop beeping sound. OFF Select...

User Manual English
Page 101
... remote control or the projector cabinet to always use the POWER button on automatically and the image is selected - OFF AUTO HDMI1 HDMI2 COMPUTER The AUTO POWER ON function will power on the projector. When a signal is detected, the projector's power turns on the remote control or projector cabinet. 4. cally for the selected input terminal. This eliminates the need to power on the projector and simultaneously project the image. The projector's power turns on automatically when the power cord...
... remote control or the projector cabinet to always use the POWER button on automatically and the image is selected - OFF AUTO HDMI1 HDMI2 COMPUTER The AUTO POWER ON function will power on the projector. When a signal is detected, the projector's power turns on the remote control or projector cabinet. 4. cally for the selected input terminal. This eliminates the need to power on the projector and simultaneously project the image. The projector's power turns on automatically when the power cord...

User Manual English
Page 161
... a LAN cable. About the ASCII Control Command This device supports the common ASCII Control Command for this device Input command Input terminal HDMI1 HDMI2 COMPUTER HDBaseT USB-A LAN Response hdmi1 hdmi2 computer hdbaset usb-a lan Parameter hdmi1 or hdmi hdmi2 One among computer, computer1, vga, vga1, rgb, and rgb1 hdbaset or hdbaset1 usb-a or usb-a1 lan or lan1 140 Connection thru the serial port. Connection via network Communication Protocol (Connection via network (LAN) Connects the projector to connect the projector...
... a LAN cable. About the ASCII Control Command This device supports the common ASCII Control Command for this device Input command Input terminal HDMI1 HDMI2 COMPUTER HDBaseT USB-A LAN Response hdmi1 hdmi2 computer hdbaset usb-a lan Parameter hdmi1 or hdmi hdmi2 One among computer, computer1, vga, vga1, rgb, and rgb1 hdbaset or hdbaset1 usb-a or usb-a1 lan or lan1 140 Connection thru the serial port. Connection via network Communication Protocol (Connection via network (LAN) Connects the projector to connect the projector...
User Manual English
Page 163
... the power again. • Set [FAN MODE] to the user guide accompanied with your computer or graphics card, or contact the support center for any trouble and failure caused by this happens, wait a couple minutes and turn on the projector. (→ page 77) If you are not liable for your remote control, it 's hard to see if the projector has overheated. Troubleshooting This section helps you resolve problems...
... the power again. • Set [FAN MODE] to the user guide accompanied with your computer or graphics card, or contact the support center for any trouble and failure caused by this happens, wait a couple minutes and turn on the projector. (→ page 77) If you are not liable for your remote control, it 's hard to see if the projector has overheated. Troubleshooting This section helps you resolve problems...

User Manual English
Page 165
..., select [View] → [Arrange] from a notebook PC is not an industry standard, the projected image may display nothing. Should this means there is no picture, or the picture is not turned on the Mac screen Folders or icons may not be seen on a MacBook * When using the projector with the projector, set to a displayable mode and then restart the Mac again. For setting display modes other than those supported by Apple...
..., select [View] → [Arrange] from a notebook PC is not an industry standard, the projected image may display nothing. Should this means there is no picture, or the picture is not turned on the Mac screen Folders or icons may not be seen on a MacBook * When using the projector with the projector, set to a displayable mode and then restart the Mac again. For setting display modes other than those supported by Apple...

User Manual English
Page 172
... . □ Image is displayed from [HIGH ALTITUDE] to [AUTO]. □ Image appears blurry or out of focus. □ Still unchanged even though you checked the signal's resolution on PC and changed it to projector's native resolution. □ Still unchanged even though you adjusted the focus. □ No sound. □ Audio cable is connected to your audio equipment (only models with the AUDIO OUT terminal). □ Buttons on the projector cabinet do not work . □...
... . □ Image is displayed from [HIGH ALTITUDE] to [AUTO]. □ Image appears blurry or out of focus. □ Still unchanged even though you checked the signal's resolution on PC and changed it to projector's native resolution. □ Still unchanged even though you adjusted the focus. □ No sound. □ Audio cable is connected to your audio equipment (only models with the AUDIO OUT terminal). □ Buttons on the projector cabinet do not work . □...

Quick Guide
Page 1
... capuchon de l'objectif. 4. P605UL/P525UL/P525WL Quick Setup Guide 1 Step Connect your computer to the projector using the supplied computer cable (VGA). ❷ Connect the supplied power cord. ❸ Remove the lens cap. ❹ Turn on the projector. or NOTE: The color of the POWER indicator BLUE ORANGE [Power On] [Standby] In the state, [STANDBY MODE] is [NORMAL]. 6 Step Adjust an image size and position. [LENS SHIFT] 1. 2. Drücken Sie entweder die (POWER)-Taste oder die STANDBY -Taste erneut. 3. ASTUCE: Appuyez...
... capuchon de l'objectif. 4. P605UL/P525UL/P525WL Quick Setup Guide 1 Step Connect your computer to the projector using the supplied computer cable (VGA). ❷ Connect the supplied power cord. ❸ Remove the lens cap. ❹ Turn on the projector. or NOTE: The color of the POWER indicator BLUE ORANGE [Power On] [Standby] In the state, [STANDBY MODE] is [NORMAL]. 6 Step Adjust an image size and position. [LENS SHIFT] 1. 2. Drücken Sie entweder die (POWER)-Taste oder die STANDBY -Taste erneut. 3. ASTUCE: Appuyez...

Installation Guide
Page 1
... sources using NEC developed scaling technology. Notes For screen sizes not indicated on the tables do not match the results of formulas, use the formulas below. www.necdisplay.com P525WL/P525UL/P605UL Page 1 of America, Inc. P525WL/P525UL/P605UL Installation Guide Desktop and Ceiling Mount Rev 1.1 Contents Product Description, Lens Specs, Screen/Aspect Ratio Notes Distance Charts and Formulas Ceiling Mount/Desktop Installation Lens Shift Adjustable Range Cabinet Dimensions Ventilation Requirements, Input Panel...
... sources using NEC developed scaling technology. Notes For screen sizes not indicated on the tables do not match the results of formulas, use the formulas below. www.necdisplay.com P525WL/P525UL/P605UL Page 1 of America, Inc. P525WL/P525UL/P605UL Installation Guide Desktop and Ceiling Mount Rev 1.1 Contents Product Description, Lens Specs, Screen/Aspect Ratio Notes Distance Charts and Formulas Ceiling Mount/Desktop Installation Lens Shift Adjustable Range Cabinet Dimensions Ventilation Requirements, Input Panel...


