

RS232 codes- Projectors
Page 2
... of Response Error Codes 1. Connection Method The following 3 kinds of the projector via connection with a USB cable. * Note that control the functions of connection methods are available for [STANDBY MODE]. USB connection using the supplied USB cable is not supported for [STANDBY MODE]. LAN connection 3-1. The projector cannot use of control commands that a connection method using the USB port on the projector A LAN cable is required. 2. Setting method: Under projector [Projector Options] --> [Setup], enter a check for [Idle Mode] on the projector A serial cable is required...
... of Response Error Codes 1. Connection Method The following 3 kinds of the projector via connection with a USB cable. * Note that control the functions of connection methods are available for [STANDBY MODE]. USB connection using the supplied USB cable is not supported for [STANDBY MODE]. LAN connection 3-1. The projector cannot use of control commands that a connection method using the USB port on the projector A LAN cable is required. 2. Setting method: Under projector [Projector Options] --> [Setup], enter a check for [Idle Mode] on the projector A serial cable is required...

RS232 codes- Projectors
Page 35
... (*1) (*2) (*4) (*3) 6. Table of projector. Power Off inhibited. 050. Specified terminal is unavailable or cannot be selected. Command: 02H 0FH 00H 00H 02H DATA01 DATA02 CKS (*3) Data Portion Contents Setting not possible. This returns ACK with adding data to the data portion for the command that does not request data. REMOTE KEY CODE Function: This command sends remote control key codes of Response Error Codes DATA01 DATA2 Error Error Types description...
... (*1) (*2) (*4) (*3) 6. Table of projector. Power Off inhibited. 050. Specified terminal is unavailable or cannot be selected. Command: 02H 0FH 00H 00H 02H DATA01 DATA02 CKS (*3) Data Portion Contents Setting not possible. This returns ACK with adding data to the data portion for the command that does not request data. REMOTE KEY CODE Function: This command sends remote control key codes of Response Error Codes DATA01 DATA2 Error Error Types description...

NaViSetAdmin2 Press Release
Page 1
... have to gain better control of projector lamps, filters, and fan cleaning, in order to create their support costs by remotely diagnosing and correcting technology issues. NaViSet™ Administrator 2 controls the majority of the NEC product portfolio of commercial LCD display and projector solutions, announced today a new remote management and monitoring software solution that helps organizations reduce technical support costs, improve display and projector control, and remotely administer installed NEC products. May 29, 2013...
... have to gain better control of projector lamps, filters, and fan cleaning, in order to create their support costs by remotely diagnosing and correcting technology issues. NaViSet™ Administrator 2 controls the majority of the NEC product portfolio of commercial LCD display and projector solutions, announced today a new remote management and monitoring software solution that helps organizations reduce technical support costs, improve display and projector control, and remotely administer installed NEC products. May 29, 2013...

Specification Brochure
Page 4
...-RF-X11 NECEW2-I ADVEXON1-I ADVEXON2-I DNSL Suspended ceiling plate Ceiling mount Wireless LAN Module Replacement remote control Power cable RGB cable Safety Cover for source selection Remote diagnostics enable the user to monitor and make adjustments to change. ©2015 NEC Display Solutions of their respective holders. HDMI, the HDMI Logo and High-Definition Multimedia Interface are trademarks or registered trademarks of America, Inc. SHIPS WITH Remote control, batteries, power cord, user's manual on G 100 - 240V AC, 50/60Hz...
...-RF-X11 NECEW2-I ADVEXON1-I ADVEXON2-I DNSL Suspended ceiling plate Ceiling mount Wireless LAN Module Replacement remote control Power cable RGB cable Safety Cover for source selection Remote diagnostics enable the user to monitor and make adjustments to change. ©2015 NEC Display Solutions of their respective holders. HDMI, the HDMI Logo and High-Definition Multimedia Interface are trademarks or registered trademarks of America, Inc. SHIPS WITH Remote control, batteries, power cord, user's manual on G 100 - 240V AC, 50/60Hz...

APP User Manual
Page 29
... detection setting from the projector: THE COOLING FAN HAS STOPPED. [INFORMATION] PROJECTOR NAME : PJ-XXXXXXXX LIGHT HOURS USED : XXXX[H] SENDER'S ADDRESS Enter sender's address. Sample of a message to a network compatible with the NetLinx control system of this device to be reflected immediately. Free: Set the free mode. PJLink setting Set the login password for more information on the Alert Mail feature. De- RECIPIENT'S ADDRESS Enter your computer of lamp replace time or error messages via...
... detection setting from the projector: THE COOLING FAN HAS STOPPED. [INFORMATION] PROJECTOR NAME : PJ-XXXXXXXX LIGHT HOURS USED : XXXX[H] SENDER'S ADDRESS Enter sender's address. Sample of a message to a network compatible with the NetLinx control system of this device to be reflected immediately. Free: Set the free mode. PJLink setting Set the login password for more information on the Alert Mail feature. De- RECIPIENT'S ADDRESS Enter your computer of lamp replace time or error messages via...

Users Manual
Page 5
... your hands burned from the heat that your power supply fits this requirement before attempting to use the projector with it will have the projector serviced by a qualified service personnel. • Do not place any objects, which are easily affected by heat, in a malfunction, however, portrait installation* is turned off with the POWER button. Visual impairment could lead to get rid...
... your hands burned from the heat that your power supply fits this requirement before attempting to use the projector with it will have the projector serviced by a qualified service personnel. • Do not place any objects, which are easily affected by heat, in a malfunction, however, portrait installation* is turned off with the POWER button. Visual impairment could lead to get rid...

Users Manual
Page 10
...; Avoid viewing 3D images for [STANDBY MODE]. To find the appropriate model to automatically turn off in the user's manual included with your LCD shutter eyeglasses or your area, please visit the company website: URL: http://www.nec-display.com/global/support/index.html viii STANDBY MODE (Factory preset: NORMAL) To control the projector from an external device, select [OFF] for [AUTO POWER OFF]. AUTO POWER OFF (Factory preset: 1 hour) To control the projector from...
...; Avoid viewing 3D images for [STANDBY MODE]. To find the appropriate model to automatically turn off in the user's manual included with your LCD shutter eyeglasses or your area, please visit the company website: URL: http://www.nec-display.com/global/support/index.html viii STANDBY MODE (Factory preset: NORMAL) To control the projector from an external device, select [OFF] for [AUTO POWER OFF]. AUTO POWER OFF (Factory preset: 1 hour) To control the projector from...
Users Manual
Page 11
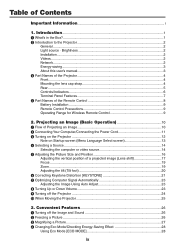
... Sound 26 ❷ Freezing a Picture...26 ❸ Magnifying a Picture...27 ❹ Changing Eco Mode/Checking Energy-Saving Effect 28 Using Eco Mode [ECO MODE 28 ix Projecting an Image (Basic Operation 10 ❶ Flow of Projecting an Image 10 ❷ Connecting Your Computer/Connecting the Power Cord 11 ❸ Turning on the Projector 12 Note on Startup screen (Menu Language Select screen 13 ❹ Selecting a Source...14 Selecting the computer or video source 14 ❺ Adjusting the Picture Size...
... Sound 26 ❷ Freezing a Picture...26 ❸ Magnifying a Picture...27 ❹ Changing Eco Mode/Checking Energy-Saving Effect 28 Using Eco Mode [ECO MODE 28 ix Projecting an Image (Basic Operation 10 ❶ Flow of Projecting an Image 10 ❷ Connecting Your Computer/Connecting the Power Cord 11 ❸ Turning on the Projector 12 Note on Startup screen (Menu Language Select screen 13 ❹ Selecting a Source...14 Selecting the computer or video source 14 ❺ Adjusting the Picture Size...
Users Manual
Page 13
... ❶ Troubleshooting...115 Indicator Messages 115 Common Problems & Solutions 117 If there is no picture, or the picture is not displayed correctly 118 ❷ Specifications...119 ❸ Cabinet Dimensions...121 ❹ Attaching the Optional Cable Cover (NP08CV 122 Attaching the cable cover 122 Removing the cable cover 123 ❺ Pin assignments and signal names of Contents Connecting HDMI Input 78 Connecting your document camera 79 Connecting to a Wired LAN 80 Connecting to a Wireless LAN (Optional...
... ❶ Troubleshooting...115 Indicator Messages 115 Common Problems & Solutions 117 If there is no picture, or the picture is not displayed correctly 118 ❷ Specifications...119 ❸ Cabinet Dimensions...121 ❹ Attaching the Optional Cable Cover (NP08CV 122 Attaching the cable cover 122 Removing the cable cover 123 ❺ Pin assignments and signal names of Contents Connecting HDMI Input 78 Connecting your document camera 79 Connecting to a Wired LAN 80 Connecting to a Wireless LAN (Optional...

Users Manual
Page 24
... Turn two thumb screws of the supplied power cord in the wall outlet. Connect the supplied power cord to a computer. This section will apply for both the AC IN and the wall outlet. Installation and Connections" on page 73. Connect the computer cable (VGA) between the projector's COMPUTER IN terminal and the computer's port (mini D-Sub 15 Pin). The projector's power indicator will flash for [STANDBY MODE]. Projecting an Image (Basic Operation) ❷ Connecting Your Computer/Connecting...
... Turn two thumb screws of the supplied power cord in the wall outlet. Connect the supplied power cord to a computer. This section will apply for both the AC IN and the wall outlet. Installation and Connections" on page 73. Connect the computer cable (VGA) between the projector's COMPUTER IN terminal and the computer's port (mini D-Sub 15 Pin). The projector's power indicator will flash for [STANDBY MODE]. Projecting an Image (Basic Operation) ❷ Connecting Your Computer/Connecting...

Users Manual
Page 46
... to display the image. 4. Take a break of 15 minutes or longer after every hour of viewing. • If you get sick such as DVDs, video games, computer's video files and the like. For the operating procedure to turn on the 3D mode, refer to "On-screen menu for 3D images" on the following : • Do not use the projector to the user's manual accompanied with your LCD...
... to display the image. 4. Take a break of 15 minutes or longer after every hour of viewing. • If you get sick such as DVDs, video games, computer's video files and the like. For the operating procedure to turn on the 3D mode, refer to "On-screen menu for 3D images" on the following : • Do not use the projector to the user's manual accompanied with your LCD...

Users Manual
Page 73
... When [NETWORK STANDBY] is selected, [AUTO POWER OFF] will turn in the SLEEP mode is done from PC Control command, AUTO POWER ON, Operation by the [STANDBY MODE]. When [NETWORK SERVICE] → [AMX SETTINGS] → [ENABLE] is selected - matically for [DISABLE] and mounting the wireless LAN unit to always use the POWER button on in [STANDBY MODE] The projector has two standby modes: [NORMAL] and [NETWORK STANDBY]. The Status indicator turns on the remote control or projector cabinet. 60 Using On-Screen Menu Selecting Power-saving in Green. When [NETWORK SERVICE...
... When [NETWORK STANDBY] is selected, [AUTO POWER OFF] will turn in the SLEEP mode is done from PC Control command, AUTO POWER ON, Operation by the [STANDBY MODE]. When [NETWORK SERVICE] → [AMX SETTINGS] → [ENABLE] is selected - matically for [DISABLE] and mounting the wireless LAN unit to always use the POWER button on in [STANDBY MODE] The projector has two standby modes: [NORMAL] and [NETWORK STANDBY]. The Status indicator turns on the remote control or projector cabinet. 60 Using On-Screen Menu Selecting Power-saving in Green. When [NETWORK SERVICE...

Users Manual
Page 88
... work only in the sleep mode. In this projector is for projecting image on a monitor the computer analog image you to use the MONITOR OUT (COMP.) terminal and the AUDIO OUT mini jack. COMPUTER IN terminal converted signal will put the projector in the condition of the standby modes. AUDIO OUT MONITOR OUT (COMP.) Stereo mini-plug audio cable (not supplied) Stereo mini-plug audio cable (not supplied) Computer cable (VGA...
... work only in the sleep mode. In this projector is for projecting image on a monitor the computer analog image you to use the MONITOR OUT (COMP.) terminal and the AUDIO OUT mini jack. COMPUTER IN terminal converted signal will put the projector in the condition of the standby modes. AUDIO OUT MONITOR OUT (COMP.) Stereo mini-plug audio cable (not supplied) Stereo mini-plug audio cable (not supplied) Computer cable (VGA...

Users Manual
Page 105
...; page 93) • This software program can lock the logo to prevent it from your computer by Mac. After registering it is also used to control the power ON/OFF and source selection of images projected on the projector. (→ page 112) * Wireless Image Utility is not supported by using the supplied computer cable (VGA) and others. (→ page 106) Only via serial connection it , you to transfer photos...
...; page 93) • This software program can lock the logo to prevent it from your computer by Mac. After registering it is also used to control the power ON/OFF and source selection of images projected on the projector. (→ page 112) * Wireless Image Utility is not supported by using the supplied computer cable (VGA) and others. (→ page 106) Only via serial connection it , you to transfer photos...

Users Manual
Page 120
... install Virtual Remote Tool, the Windows user account must have "Administrator" privilege. • Exit all running , the installation may cause failure in signal communication. Click "OK". The menu window will be sent to use Virtual Remote Tool. Download and install it as your computer screen. • Use the supplied computer cable (VGA) to register it on the supplied NEC Projector CD-ROM. For Windows 7 1. Image size (resolution): P502HL: Horizontal 1920 × vertical 1080 dots or less P502WL...
... install Virtual Remote Tool, the Windows user account must have "Administrator" privilege. • Exit all running , the installation may cause failure in signal communication. Click "OK". The menu window will be sent to use Virtual Remote Tool. Download and install it as your computer screen. • Use the supplied computer cable (VGA) to register it on the supplied NEC Projector CD-ROM. For Windows 7 1. Image size (resolution): P502HL: Horizontal 1920 × vertical 1080 dots or less P502WL...

Users Manual
Page 122
... AC Input Power cord (supplied) Supplied computer cable (VGA) → To wall outlet TIP: • When Virtual Remote Tool starts for the first time, "Easy Setup" window will be displayed to navigate your connections. 109 The projector is displayed, click "Continue". Follow the instructions on the screens to the AC IN of the projector and the wall outlet. To uninstall Virtual Remote Tool, the Windows user account must have "Administrator" privilege (Windows 8.1, Windows 8, Windows 7 and Windows...
... AC Input Power cord (supplied) Supplied computer cable (VGA) → To wall outlet TIP: • When Virtual Remote Tool starts for the first time, "Easy Setup" window will be displayed to navigate your connections. 109 The projector is displayed, click "Continue". Follow the instructions on the screens to the AC IN of the projector and the wall outlet. To uninstall Virtual Remote Tool, the Windows user account must have "Administrator" privilege (Windows 8.1, Windows 8, Windows 7 and Windows...

Users Manual
Page 128
... Standby Blinking Red 2 cycle (0.5 sec Temperature error light On, 0.5 sec Off) 3 cycle (0.5 sec Power error On, 0.5 sec Off) 4 cycle (0.5 sec Fan error On, 0.5 sec Off) 6 cycle (0.5 sec Light source error On, 0.5 sec Off) Orange 1 cycle (0.5 sec Network conflict On, 2.5 sec Off) Steady Green light Orange Sleep mode* CONTROL PANEL LOCK is turned on. - Power unit is getting ready to [OFF]. - [ECO MODE] is enabled. - Ask your dealer. Off Timer is set to turn on . Fans will not work correctly. LIGHT Indicator Indicator...
... Standby Blinking Red 2 cycle (0.5 sec Temperature error light On, 0.5 sec Off) 3 cycle (0.5 sec Power error On, 0.5 sec Off) 4 cycle (0.5 sec Fan error On, 0.5 sec Off) 6 cycle (0.5 sec Light source error On, 0.5 sec Off) Orange 1 cycle (0.5 sec Network conflict On, 2.5 sec Off) Steady Green light Orange Sleep mode* CONTROL PANEL LOCK is turned on. - Power unit is getting ready to [OFF]. - [ECO MODE] is enabled. - Ask your dealer. Off Timer is set to turn on . Fans will not work correctly. LIGHT Indicator Indicator...
Users Manual
Page 130
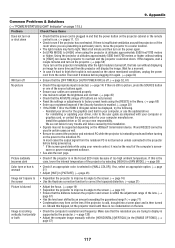
... some time and then the projector will display the image. Picture suddenly becomes dark • Check if the projector is in standby mode and before turning on the power to factory preset levels using the [RESET] in again. (→ page 24) Will turn on or shut down . If this installation. • Signals may be supported depending on . (→ pages 11, 12) • Check to [HIGH] when using your remote control, it 's hard to the user guide...
... some time and then the projector will display the image. Picture suddenly becomes dark • Check if the projector is in standby mode and before turning on the power to factory preset levels using the [RESET] in again. (→ page 24) Will turn on or shut down . If this installation. • Signals may be supported depending on . (→ pages 11, 12) • Check to [HIGH] when using your remote control, it 's hard to the user guide...

Users Manual
Page 131
... your MacBook. 9. Displaying an image on the projector cabinet or the remote control. (→ page 23) • Adjust the computer image manually with the projector) according to the projector. button on the notebook PC's screen does not necessarily mean it reads "0kHz", this happen, set the DIPswitch of the Mac adapter (not supplied with [CLOCK]/[PHASE] in [IMAGE OPTIONS] in the projector's menu under Information. If it outputs a signal to your Mac...
... your MacBook. 9. Displaying an image on the projector cabinet or the remote control. (→ page 23) • Adjust the computer image manually with the projector) according to the projector. button on the notebook PC's screen does not necessarily mean it reads "0kHz", this happen, set the DIPswitch of the Mac adapter (not supplied with [CLOCK]/[PHASE] in [IMAGE OPTIONS] in the projector's menu under Information. If it outputs a signal to your Mac...

Users Manual
Page 143
... "Troubleshooting" section in your check. The source connected to the projector is displayed from [HIGH] to [AUTO]. □ Image appears blurry or out of focus. □ Still unchanged even though you checked the signal's resolution on PC and changed it to projector's native resolution. □ Still unchanged even though you adjusted the focus. □ No sound. □ Audio cable is pressed to the ON position. □ No power even though you connect the projector...
... "Troubleshooting" section in your check. The source connected to the projector is displayed from [HIGH] to [AUTO]. □ Image appears blurry or out of focus. □ Still unchanged even though you checked the signal's resolution on PC and changed it to projector's native resolution. □ Still unchanged even though you adjusted the focus. □ No sound. □ Audio cable is pressed to the ON position. □ No power even though you connect the projector...

