
MT1065 spec sheet
Page 2
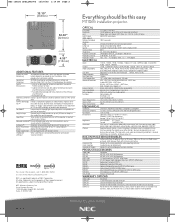
...Sync on G Built-in Speakers 5Wx2 with location control Chalkboard/ When a USB mouse is connected the presenter can be this easy MT1065 installation projector. Improves white Plus™ level, color accuracy, dynamic range, and display of varying levels of black in Presentation Download your ...Timer Timer can make on USB input screen annotations For more information, call 1.800.NEC.INFO or visit www.necvisualsystems.com NEC is a registered trademark of NEC Corporation. OPTICAL LCD Panel Resolution Lens Light Output (ANSI, typical) Optional Extended life lamp Lamp Lamp Life...
...Sync on G Built-in Speakers 5Wx2 with location control Chalkboard/ When a USB mouse is connected the presenter can be this easy MT1065 installation projector. Improves white Plus™ level, color accuracy, dynamic range, and display of varying levels of black in Presentation Download your ...Timer Timer can make on USB input screen annotations For more information, call 1.800.NEC.INFO or visit www.necvisualsystems.com NEC is a registered trademark of NEC Corporation. OPTICAL LCD Panel Resolution Lens Light Output (ANSI, typical) Optional Extended life lamp Lamp Lamp Life...

MT1075/MT1065 UM
Page 1
LCD Projector MT1075/MT1065 User's Manual
LCD Projector MT1075/MT1065 User's Manual
MT1075/MT1065 UM
Page 6
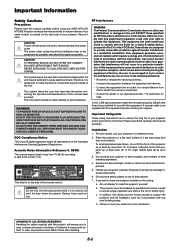
...the ceiling: a. Do not place heavy objects on the right side of your projector. REFER SERVICING TO QUALIFIED NEC SERVICE PERSONNEL. c. Acoustic Noise Information Ordinance-3. Tilting the front of the projector up or down from dust and moisture. This equipment has been tested and ...harmful interference in direct sunlight, near to radio communications. Important Information Safety Cautions Precautions Please read this manual carefully before using your NEC MT1075/ MT1065 Projector and keep the manual handy for future reference.Your serial number is located on top of the...
...the ceiling: a. Do not place heavy objects on the right side of your projector. REFER SERVICING TO QUALIFIED NEC SERVICE PERSONNEL. c. Acoustic Noise Information Ordinance-3. Tilting the front of the projector up or down from dust and moisture. This equipment has been tested and ...harmful interference in direct sunlight, near to radio communications. Important Information Safety Cautions Precautions Please read this manual carefully before using your NEC MT1075/ MT1065 Projector and keep the manual handy for future reference.Your serial number is located on top of the...

MT1075/MT1065 UM
Page 9
...audio out control via projector • The built-in applications where the display is one of the manual you can be strong enough to review the user's manual. This includes NTSC,... the very best projectors available today. E-5 Password prevents unauthorized individuals from behind a screen, and the projector can even be installed on the ceiling. • NEC's exclusive Advanced AccuBlend... MT1075/MT1065 Projector and describes the features and controls. offers a crisp image with UXGA (1600ן1200) resolution*3. • Supports most IBM VGA, SVGA, XGA, SXGA...
...audio out control via projector • The built-in applications where the display is one of the manual you can be strong enough to review the user's manual. This includes NTSC,... the very best projectors available today. E-5 Password prevents unauthorized individuals from behind a screen, and the projector can even be installed on the ceiling. • NEC's exclusive Advanced AccuBlend... MT1075/MT1065 Projector and describes the features and controls. offers a crisp image with UXGA (1600ן1200) resolution*3. • Supports most IBM VGA, SVGA, XGA, SXGA...

MT1075/MT1065 UM
Page 20
... OUT LR Component Y Cb Cr Audio Equipment AUDIO IN LR Audio cable (not supplied) You can connect your projector to your DVD player's owner's manual for more information about your DVD player's video output requirements, E-16 Turn on the projector. NOTE: Refer to a DVD player with component output or Video output. If your...
... OUT LR Component Y Cb Cr Audio Equipment AUDIO IN LR Audio cable (not supplied) You can connect your projector to your DVD player's owner's manual for more information about your DVD player's video output requirements, E-16 Turn on the projector. NOTE: Refer to a DVD player with component output or Video output. If your...

MT1075/MT1065 UM
Page 21
...supplied power cable in fast-forward or fast-rewind via a scan converter. Be careful to keep your projector. To make these connections, simply: 1. NOTE: An image may not be displayed correctly when a ... AC IN of the projector, and then connect the other plug of your VCR or laser disc player, connect the other end to your VCR or laser disc player owner's manual for stereo sound. ...3. Turn on your VCR or laser disc player has this capability). Turn off the power to the projector. NOTE: Refer to the Video input on the projector and the ...
...supplied power cable in fast-forward or fast-rewind via a scan converter. Be careful to keep your projector. To make these connections, simply: 1. NOTE: An image may not be displayed correctly when a ... AC IN of the projector, and then connect the other plug of your VCR or laser disc player, connect the other end to your VCR or laser disc player owner's manual for stereo sound. ...3. Turn on your VCR or laser disc player has this capability). Turn off the power to the projector. NOTE: Refer to the Video input on the projector and the ...

MT1075/MT1065 UM
Page 26
... Up or Down Volume Sound level from the speaker and the AUDIO OUT jack (RCA) on the projector can place on . • Do not point the laser beam at the above maximum angle when ...range. This function also adjusts the clock phase to reduce video noise, dot interference or cross talk. (This is XGA Higher resolution than XGA limits 3D Reform in Wide (Zoom) • Resolution is evident when part of your audience's attention to activate the... Screen setting can use the laser to draw your image appears to adjust Clock and Phase manually. A combination of the Auto Adjust feature.
... Up or Down Volume Sound level from the speaker and the AUDIO OUT jack (RCA) on the projector can place on . • Do not point the laser beam at the above maximum angle when ...range. This function also adjusts the clock phase to reduce video noise, dot interference or cross talk. (This is XGA Higher resolution than XGA limits 3D Reform in Wide (Zoom) • Resolution is evident when part of your audience's attention to activate the... Screen setting can use the laser to draw your image appears to adjust Clock and Phase manually. A combination of the Auto Adjust feature.

MT1075/MT1065 UM
Page 29
...4. Highlight [Start] and press the ENTER button. Should this purpose. Executing the Auto 3D Reform feature Screen's outer frame 1. See the user's manual or the quick connect guide for a minimum of 2 seconds. Press and hold the AUTO ADJUST button for projecting an image. 2. NOTE: * ...The 3D Reform (Cornerstone) screen is displayed. * The AUTO ADJ. Projected area 3. button on the front of the projector can fail to make correction. (The projector can be recognized. • The Auto 3D Reform feature does not support reflective screens. A guide pattern that the outline ...
...4. Highlight [Start] and press the ENTER button. Should this purpose. Executing the Auto 3D Reform feature Screen's outer frame 1. See the user's manual or the quick connect guide for a minimum of 2 seconds. Press and hold the AUTO ADJUST button for projecting an image. 2. NOTE: * ...The 3D Reform (Cornerstone) screen is displayed. * The AUTO ADJ. Projected area 3. button on the front of the projector can fail to make correction. (The projector can be recognized. • The Auto 3D Reform feature does not support reflective screens. A guide pattern that the outline ...

MT1075/MT1065 UM
Page 34
...for Inserting the PC Card The PC card has a top and bottom and must be inserted into each slot at meetings and in this manual) on -line manual of the Dynamic Image Utility 2.0. • Selecting Viewer sets the audio input for DVI input. PC Card Type The PC Card slot ...; 24-bit full color playback • Viewing of digital camera images Simple utility software (for computer) • Dynamic Image Utility 2.0 operable on the supplied NEC Projector User Supportware CD-ROM. Refer to the PC card's operating instructions for the proper direction of the PC card and pull it out. First remove...
...for Inserting the PC Card The PC card has a top and bottom and must be inserted into each slot at meetings and in this manual) on -line manual of the Dynamic Image Utility 2.0. • Selecting Viewer sets the audio input for DVI input. PC Card Type The PC Card slot ...; 24-bit full color playback • Viewing of digital camera images Simple utility software (for computer) • Dynamic Image Utility 2.0 operable on the supplied NEC Projector User Supportware CD-ROM. Refer to the PC card's operating instructions for the proper direction of the PC card and pull it out. First remove...
MT1075/MT1065 UM
Page 35
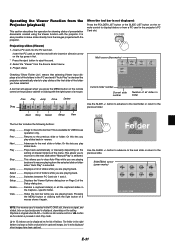
...Insert a PC card into the PC card slot. Checking "Show Folder List", means that the end with the projector. Play Plays back automatically or manually depending on the setting on Viewer Options of all the captured slides in the Capture - This allows you are ... the SLIDE +/- E-31 Select .......... Drive Switches between PC Card slot 1 and 2. specific folder. Operating the Viewer Function from the Projector (playback) This section describes the operation for showing slides of presentation documents created using the Viewer function with the insertion direction arrow on ...
...Insert a PC card into the PC card slot. Checking "Show Folder List", means that the end with the projector. Play Plays back automatically or manually depending on the setting on Viewer Options of all the captured slides in the Capture - This allows you are ... the SLIDE +/- E-31 Select .......... Drive Switches between PC Card slot 1 and 2. specific folder. Operating the Viewer Function from the Projector (playback) This section describes the operation for showing slides of presentation documents created using the Viewer function with the insertion direction arrow on ...

MT1075/MT1065 UM
Page 40
... Text1-4 Page 2 Viewer Options Show Folder List Auto Play, Manual Play, Interval Capture Options High Quality, Normal, High Compression Mouse Button Right Hand, Left Hand Sensitivity Fast, Medium, Slow Operation Mode Select Auto, Projector Page 3 Signal Select RGB1 RGB/Component, RGB, Component, Scart...231;ais, Italiano, Español, Svenska Menu Mode Basic Menu, Custom Menu, Advanced Menu Custom Menu Edit Projector Pointer Pointer 1-9 Mouse Pointer Pointer 1-9 Menu Display Time Manual, Auto 5sec, Auto 15sec, Auto 45sec Page 2 Source Display Message Menu Color Select On, Off On, ...
... Text1-4 Page 2 Viewer Options Show Folder List Auto Play, Manual Play, Interval Capture Options High Quality, Normal, High Compression Mouse Button Right Hand, Left Hand Sensitivity Fast, Medium, Slow Operation Mode Select Auto, Projector Page 3 Signal Select RGB1 RGB/Component, RGB, Component, Scart...231;ais, Italiano, Español, Svenska Menu Mode Basic Menu, Custom Menu, Advanced Menu Custom Menu Edit Projector Pointer Pointer 1-9 Mouse Pointer Pointer 1-9 Menu Display Time Manual, Auto 5sec, Auto 15sec, Auto 45sec Page 2 Source Display Message Menu Color Select On, Off On, ...

MT1075/MT1065 UM
Page 41
Advanced Menu Source Select Picture Volume Image Options Picture Management Projector Options Tools Help Factory Default 3D Reform Wall Color Correction Menu Setup Lamp Setting Screen Auto Functions LAN Mode Password Security Sleep Timer Capture PC ... Color Correction 3D Reform Adjustment Sensitivity On, Off On, Off On, Off Inside, Outside Lower, Medium, Higher LAN Mode IP Address Automatic Manual IP Address, Subnet Mask,Gateway Projector Name DNS Configuration Domain Name Network Type Mode SSID Channel TX rate Infrastructure, 802.11 Ad Hoc, Ad Hoc Easy Connection 1-14 Automatic...
Advanced Menu Source Select Picture Volume Image Options Picture Management Projector Options Tools Help Factory Default 3D Reform Wall Color Correction Menu Setup Lamp Setting Screen Auto Functions LAN Mode Password Security Sleep Timer Capture PC ... Color Correction 3D Reform Adjustment Sensitivity On, Off On, Off On, Off Inside, Outside Lower, Medium, Higher LAN Mode IP Address Automatic Manual IP Address, Subnet Mask,Gateway Projector Name DNS Configuration Domain Name Network Type Mode SSID Channel TX rate Infrastructure, 802.11 Ad Hoc, Ad Hoc Easy Connection 1-14 Automatic...
MT1075/MT1065 UM
Page 43
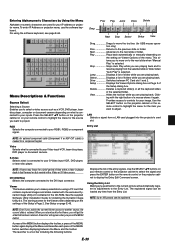
...the Dynamic Image Utility 2.0.The starting screen for USB mouse operation only) Prev Returns to your remote control to the next slide when "Manual Play" is played back in the selected folder. See Setup on the settings of the Setup's Page 2. Press the SELECT ̆̄...signal can be loaded any ajustments to the current picture will appear when you want to highlight the menu for your IP address or projector name. A launcher will automatically register its adjustments to project. Entering Alphanumeric Characters by Using the Menu Alphabet or numeric characters are used...
...the Dynamic Image Utility 2.0.The starting screen for USB mouse operation only) Prev Returns to your remote control to the next slide when "Manual Play" is played back in the selected folder. See Setup on the settings of the Setup's Page 2. Press the SELECT ̆̄...signal can be loaded any ajustments to the current picture will appear when you want to highlight the menu for your IP address or projector name. A launcher will automatically register its adjustments to project. Entering Alphanumeric Characters by Using the Menu Alphabet or numeric characters are used...

MT1075/MT1065 UM
Page 45
...3D Reform", "Aspect Ratio", "Screen" and "Overscan" are displaying an image with the SELECT ̇ or ̈ button. The projector automatically reduces or enlarges the current image to mask any vertical banding that eliminate the horizontal banding in its true resolution. Presentation .. This is...are 5 factory presets optimized for various types of the screen image. Masking Unwanted Area (Blanking) This feature allows you to manually adjust the image horizontally and vertically, and adjust Clock and Phase. This adjustment is made automatically when the Auto Adjust is turned...
...3D Reform", "Aspect Ratio", "Screen" and "Overscan" are displaying an image with the SELECT ̇ or ̈ button. The projector automatically reduces or enlarges the current image to mask any vertical banding that eliminate the horizontal banding in its true resolution. Presentation .. This is...are 5 factory presets optimized for various types of the screen image. Masking Unwanted Area (Blanking) This feature allows you to manually adjust the image horizontally and vertically, and adjust Clock and Phase. This adjustment is made automatically when the Auto Adjust is turned...

MT1075/MT1065 UM
Page 47
... or AUTO ADJ button for a minimum of the projected images on textured walls using the image sensor on the projector. If you have set for color correction: Automatic and Manual. This message means that are two ways for User 1 - 4 setting. Highlight "Setting" and press the .... The Auto Wall Color Correction will be displayed. Choose a selection from User 1 - 4. Displays "Automatic" or "Manual". NOTE: Correction may not be possible depending on the projector, or the image sensor may be saved. The correction mode select screen is glossy or with certain patterns, or walls...
... or AUTO ADJ button for a minimum of the projected images on textured walls using the image sensor on the projector. If you have set for color correction: Automatic and Manual. This message means that are two ways for User 1 - 4 setting. Highlight "Setting" and press the .... The Auto Wall Color Correction will be displayed. Choose a selection from User 1 - 4. Displays "Automatic" or "Manual". NOTE: Correction may not be possible depending on the projector, or the image sensor may be saved. The correction mode select screen is glossy or with certain patterns, or walls...

MT1075/MT1065 UM
Page 48
...screen is displayed. Press the ENTER button. Use the SELECT ̇ or ̈ button to move the yellow box to the working area in the Manual Wall Color Correction (Red) screen. Repeat steps 4 to finely adjust. 11. Highlight the Correction Level bar and then use the SELECT ̇ or &#...7. Yellow box Palette Actual color of the projected image on the wall Color of the selected portion in the palette. * To move the Manual Wall Color Correction (Red) screen, highlight "Move" and then press the ENTER button. * The "Slide Bar" button adjusts Hue, Saturation and Brightness...
...screen is displayed. Press the ENTER button. Use the SELECT ̇ or ̈ button to move the yellow box to the working area in the Manual Wall Color Correction (Red) screen. Repeat steps 4 to finely adjust. 11. Highlight the Correction Level bar and then use the SELECT ̇ or &#...7. Yellow box Palette Actual color of the projected image on the wall Color of the selected portion in the palette. * To move the Manual Wall Color Correction (Red) screen, highlight "Move" and then press the ENTER button. * The "Slide Bar" button adjusts Hue, Saturation and Brightness...

MT1075/MT1065 UM
Page 49
...Selecting Menu Display Time: This option allows you to select 3 menu modes: Advanced Menu, Custom Menu and Basic Menu. Selecting Projecting Pointer Icon [Projector Pointer]: This enables you to select from nine different Pointer icons for the "Pointer" button on or off the menu. Turning On / Off Source... can be cases where the Pointer function is the basic menu that you to customize the Menu. The menu will automatically be turned off manually. Advanced Menu This is the factory preset. Turning On / Off Message [Message]: This option turns on -screen instructions. Menu Allows you...
...Selecting Menu Display Time: This option allows you to select 3 menu modes: Advanced Menu, Custom Menu and Basic Menu. Selecting Projecting Pointer Icon [Projector Pointer]: This enables you to select from nine different Pointer icons for the "Pointer" button on or off the menu. Turning On / Off Source... can be cases where the Pointer function is the basic menu that you to customize the Menu. The menu will automatically be turned off manually. Advanced Menu This is the factory preset. Turning On / Off Message [Message]: This option turns on -screen instructions. Menu Allows you...

MT1075/MT1065 UM
Page 50
...is checked, when the Viewer source is selected on your USB mouse settings. Manual Play: Views a slide manually when the Viewer source is "Blue".You can change your PC, the USB mouse is selected on the projector, the folder lists will be output to display a blue/ black screen or.... Setting Closed Caption: This option sets several closed caption mode. The options are used as a PC mouse. * When not connecting the projector to your image for JPEG compression quality: High quality, Normal and High Compression. Text is available for the Capture function that allows text to...
...is checked, when the Viewer source is selected on your USB mouse settings. Manual Play: Views a slide manually when the Viewer source is "Blue".You can change your PC, the USB mouse is selected on the projector, the folder lists will be output to display a blue/ black screen or.... Setting Closed Caption: This option sets several closed caption mode. The options are used as a PC mouse. * When not connecting the projector to your image for JPEG compression quality: High quality, Normal and High Compression. Text is available for the Capture function that allows text to...

MT1075/MT1065 UM
Page 51
...Speed Fan Mode [High Speed Fan Mode]: This option allows you to put the projector in the Idle mode. * The HTTP server functions are saved when you to save your PC using NEC's Advanced AccuBlend Intelligent Pixel Blending Technology. Selecting Built-in Speakers [Built-in speakers....This feature enables you to mute the built-in Speaker]: This option allows you to select composite video standards manually. The projector is set to "On", the projector automatically determines the best resolution for consecutive days. E-47 The changes are not available during the Standby or Idle...
...Speed Fan Mode [High Speed Fan Mode]: This option allows you to put the projector in the Idle mode. * The HTTP server functions are saved when you to save your PC using NEC's Advanced AccuBlend Intelligent Pixel Blending Technology. Selecting Built-in Speakers [Built-in speakers....This feature enables you to mute the built-in Speaker]: This option allows you to select composite video standards manually. The projector is set to "On", the projector automatically determines the best resolution for consecutive days. E-47 The changes are not available during the Standby or Idle...

MT1075/MT1065 UM
Page 54
...communicating on your wireless LAN. Subnet Mask .. Projector Name Specify a unique projector name. Try another transmission speed when the connection fails. E-50 NEC's optional wireless LAN card is available. Infrastructure ...Select this option when using wireless LAN. When data is sent from your network administrator about these settings. however, when the transfer location has not been found as Automatic. Normally leave it manually...
...communicating on your wireless LAN. Subnet Mask .. Projector Name Specify a unique projector name. Try another transmission speed when the connection fails. E-50 NEC's optional wireless LAN card is available. Infrastructure ...Select this option when using wireless LAN. When data is sent from your network administrator about these settings. however, when the transfer location has not been found as Automatic. Normally leave it manually...


