
MT850/MT1050/MT1055
Page 5
...remote control. RF Interference WARNING The Federal Communications Commission does not allow any part inside of the FCC Rules. In UK, a BS approved power cable with this unit has been provided.The information should be read this manual carefully before using your NEC MultiSync MT1055/MT1050/MT850 Projector... generates, uses, and can be determined by NEC Technologies in this manual. If a power cable is not supplied with the instructions, may cause harmful interference to operate this equipment please contact your MultiSync MT1055/MT1050/MT850. Record it is encouraged to try to...
...remote control. RF Interference WARNING The Federal Communications Commission does not allow any part inside of the FCC Rules. In UK, a BS approved power cable with this unit has been provided.The information should be read this manual carefully before using your NEC MultiSync MT1055/MT1050/MT850 Projector... generates, uses, and can be determined by NEC Technologies in this manual. If a power cable is not supplied with the instructions, may cause harmful interference to operate this equipment please contact your MultiSync MT1055/MT1050/MT850. Record it is encouraged to try to...

MT850/MT1050/MT1055
Page 7
... E-7 Top Features E-8 Terminal Panel Features E-9 Remote Control Features E-10 Remote Control Battery Installation E-12 Operating Range E-12 Remote Control Precautions E-12 Switching Operation mode between mouse and projector ..... INSTALLATION Setting Up Your Projector E-14 Selecting a Location E-14 Using a Tabletop... E-18 Connecting Your PC E-19 Connecting Your Macintosh Computer E-20 Connecting Your Computer to the MultiSync MT1055/MT1050/MT850 Projector .......... INTRODUCTION Introduction to the Mouse Output Port ......... E-13 2. E-21 Connecting an External Monitor...
... E-7 Top Features E-8 Terminal Panel Features E-9 Remote Control Features E-10 Remote Control Battery Installation E-12 Operating Range E-12 Remote Control Precautions E-12 Switching Operation mode between mouse and projector ..... INSTALLATION Setting Up Your Projector E-14 Selecting a Location E-14 Using a Tabletop... E-18 Connecting Your PC E-19 Connecting Your Macintosh Computer E-20 Connecting Your Computer to the MultiSync MT1055/MT1050/MT850 Projector .......... INTRODUCTION Introduction to the Mouse Output Port ......... E-13 2. E-21 Connecting an External Monitor...

MT850/MT1050/MT1055
Page 8
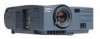
... • A high-performance 200 watt NSH lamp. • The supplied wireless remote control that operates the projector from your new MultiSync MT1055 and MT1050 (XGA)/ MT850 (SVGA) Projector and describes the features and controls. Features you to project precise images up and ...your dealer for NTSC playback on the ceiling. • NEC Technologies' exclusive Advanced AccuBlend intelligent pixel blending technology - Congratulations on Your Purchase of The MultiSync MT1055/MT1050/MT850 Projector The MultiSync MT1055/MT1050/MT850 is included on your time and do everything right...
... • A high-performance 200 watt NSH lamp. • The supplied wireless remote control that operates the projector from your new MultiSync MT1055 and MT1050 (XGA)/ MT850 (SVGA) Projector and describes the features and controls. Features you to project precise images up and ...your dealer for NTSC playback on the ceiling. • NEC Technologies' exclusive Advanced AccuBlend intelligent pixel blending technology - Congratulations on Your Purchase of The MultiSync MT1055/MT1050/MT850 Projector The MultiSync MT1055/MT1050/MT850 is included on your time and do everything right...

MT850/MT1050/MT1055
Page 9
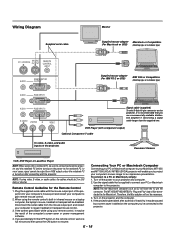
...AUDIO RGOBUTMPOUNTITOR AUDIO RGB INPUT 1 S-VIDEO RGB INPUT 2 L /MONO R VIDEO AC IN NEC MultiSync MT1055, MT1050 or MT850 projector Lens cap String and rivet Batteries (AAן2) Power cable Serial cable RGB ...signal cable (15-Pin Mini D-Sub To 15-Pin Mini D-Sub connector) Mouse adapter (For IBM PS/2) CD-ROM Mouse adapter (For Macintosh) Mouse adapter (USB) GCuoidneQnuecictk MaUnusaelr's E - 6 Remote cable - PJ LASER + Remote...
...AUDIO RGOBUTMPOUNTITOR AUDIO RGB INPUT 1 S-VIDEO RGB INPUT 2 L /MONO R VIDEO AC IN NEC MultiSync MT1055, MT1050 or MT850 projector Lens cap String and rivet Batteries (AAן2) Power cable Serial cable RGB ...signal cable (15-Pin Mini D-Sub To 15-Pin Mini D-Sub connector) Mouse adapter (For IBM PS/2) CD-ROM Mouse adapter (For Macintosh) Mouse adapter (USB) GCuoidneQnuecictk MaUnusaelr's E - 6 Remote cable - PJ LASER + Remote...
MT850/MT1050/MT1055
Page 10
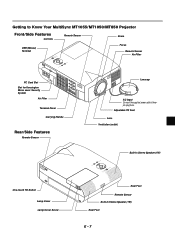
...CANCEL ON/STAND BY Built-In Stereo Speaker (1W) Rear Foot Remote Sensor Built-In Stereo Speaker (1W) Rear Foot E - 7 Getting to Know Your MultiSync MT1055/MT1050/MT850 Projector Front/Side Features Controls USB (Mouse) Terminal Remote Sensor Zoom Focus Remote Sensor Air-Filter STATPUOSWER ENTER ON/STAND BY SELECT CANCEL SOURCE ... System Air Filter AUDIO AUDIO RGOBUTMPOUNTITOR AUDIO RGB INPUT 1 S-VIDEO RGB INPUT 2 L /MONO R VIDEO Terminal Panel Carrying Handle Rear/Side Features Remote Sensor Lenscap AC IN AC Input Connect the supplied power cable's threepin plug here.
...CANCEL ON/STAND BY Built-In Stereo Speaker (1W) Rear Foot Remote Sensor Built-In Stereo Speaker (1W) Rear Foot E - 7 Getting to Know Your MultiSync MT1055/MT1050/MT850 Projector Front/Side Features Controls USB (Mouse) Terminal Remote Sensor Zoom Focus Remote Sensor Air-Filter STATPUOSWER ENTER ON/STAND BY SELECT CANCEL SOURCE ... System Air Filter AUDIO AUDIO RGOBUTMPOUNTITOR AUDIO RGB INPUT 1 S-VIDEO RGB INPUT 2 L /MONO R VIDEO Terminal Panel Carrying Handle Rear/Side Features Remote Sensor Lenscap AC IN AC Input Connect the supplied power cable's threepin plug here.

MT850/MT1050/MT1055
Page 12
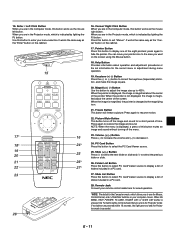
... Mouse Output Port (Mini DIN 8 Pin) Use this terminal is required to project video. 14. Remote Control Input Jack Connect your own program, typical PC control codes are on your projector via this port to connect your computer, Video or S- RGB Monitor Output Connector (Mini D-Sub 15...CONTROL OMUOTUPSUET CROIENNMPTOUR PC-CARD 4. USB Terminal Connect a commercially available mouse that the projector does not support. 11 12 13 USB MENU AUTO ADJUST 2 PC Card Slot Insert a PC card here. 3. The NEC optional serial cable is not used with the USB mouse via a serial cable. ...
... Mouse Output Port (Mini DIN 8 Pin) Use this terminal is required to project video. 14. Remote Control Input Jack Connect your own program, typical PC control codes are on your projector via this port to connect your computer, Video or S- RGB Monitor Output Connector (Mini D-Sub 15...CONTROL OMUOTUPSUET CROIENNMPTOUR PC-CARD 4. USB Terminal Connect a commercially available mouse that the projector does not support. 11 12 13 USB MENU AUTO ADJUST 2 PC Card Slot Insert a PC card here. 3. The NEC optional serial cable is not used with the USB mouse via a serial cable. ...

MT850/MT1050/MT1055
Page 13
... 10 11* 9 12 R-CLICK /CANCEL HELP POINTER PC CARD KEYSTONE MAGNIFY SLIDE FREEZE VOL. RGB 2 Button Press this button to your projector off the projector, press and hold this button to activate the mouse. PJ Button Press this button to select a video source from computer or component equipment ...mode, these buttons work as a computer mouse. When the pointer is pressed. 1 2 3 5 6 8 7 13* 14 OFF ON VIDEO S-VIDEO AUTO ADJ. Remote Control Features NOTE: If you are vertical stripes on the picture or if the picture is flickering. 11. Video Button Press this button to your...
... 10 11* 9 12 R-CLICK /CANCEL HELP POINTER PC CARD KEYSTONE MAGNIFY SLIDE FREEZE VOL. RGB 2 Button Press this button to your projector off the projector, press and hold this button to activate the mouse. PJ Button Press this button to select a video source from computer or component equipment ...mode, these buttons work as a computer mouse. When the pointer is pressed. 1 2 3 5 6 8 7 13* 14 OFF ON VIDEO S-VIDEO AUTO ADJ. Remote Control Features NOTE: If you are vertical stripes on the picture or if the picture is flickering. 11. Video Button Press this button to your...
MT850/MT1050/MT1055
Page 14
... or the set information for the current menu or adjustment during menu operation. 19. Enter / Left Click Button When you are in the Projector mode, which is indicated by lighting the PJ button: Use this button to select the PC Card Viewer source. 25. Cancel/ Right Click...Button Press (+) to select the next folder or slide and (-) to restore the image and sound. Remote Jack Connect your computer mouse. When you are pressed within 10 seconds, the light goes out and the Projector mode is magnified about the center of time. Volume (+) (-) Button Press (+) to increase the volume...
... or the set information for the current menu or adjustment during menu operation. 19. Enter / Left Click Button When you are in the Projector mode, which is indicated by lighting the PJ button: Use this button to select the PC Card Viewer source. 25. Cancel/ Right Click...Button Press (+) to select the next folder or slide and (-) to restore the image and sound. Remote Jack Connect your computer mouse. When you are pressed within 10 seconds, the light goes out and the Projector mode is magnified about the center of time. Volume (+) (-) Button Press (+) to increase the volume...

MT850/MT1050/MT1055
Page 15
... old batteries. Operating Range 7m 2. Remove both old batteries and install new ones (AA). Ensure that you will not be using the remote control for a long time, remove the batteries. • Do not place the batteries upside down. • Do not look into ...have the batteries' polarity (+/-) aligned correctly. 3. E - 12 Press firmly and slide the battery cover off. Remote Control Battery Installation 1. Remote Control Precautions • Handle the remote control carefully. • If the remote control gets wet, wipe it is on. • Do not point the laser beam at a person.
... old batteries. Operating Range 7m 2. Remove both old batteries and install new ones (AA). Ensure that you will not be using the remote control for a long time, remove the batteries. • Do not place the batteries upside down. • Do not look into ...have the batteries' polarity (+/-) aligned correctly. 3. E - 12 Press firmly and slide the battery cover off. Remote Control Battery Installation 1. Remote Control Precautions • Handle the remote control carefully. • If the remote control gets wet, wipe it is on. • Do not point the laser beam at a person.

MT850/MT1050/MT1055
Page 19
... harm the screen image. • Ensure that you to reflect your projector's image enables you have adequate ventilation around your remote control to the ground, you need a mirror. Contact your projector on the ceiling must be done by a qualified technician. Contact your NEC dealer for ceiling installation) Ceiling Installation Screen top D 2.9" (79.5mm) Lens...
... harm the screen image. • Ensure that you to reflect your projector's image enables you have adequate ventilation around your remote control to the ground, you need a mirror. Contact your projector on the ceiling must be done by a qualified technician. Contact your NEC dealer for ceiling installation) Ceiling Installation Screen top D 2.9" (79.5mm) Lens...
MT850/MT1050/MT1055
Page 21
... cable longer than the supplied one full minute and then press the ON button to your computer's screen image for the Remote Control 1. If you to a PC or Macintosh, simply: 1. To connect to project your MultiSync MT1055 and MT1050 (XGA) / MT850 (SVGA) projector will have the 15 pin HD connector. It is turned on the...
... cable longer than the supplied one full minute and then press the ON button to your computer's screen image for the Remote Control 1. If you to a PC or Macintosh, simply: 1. To connect to project your MultiSync MT1055 and MT1050 (XGA) / MT850 (SVGA) projector will have the 15 pin HD connector. It is turned on the...

MT850/MT1050/MT1055
Page 24
...Signal cable (suppried) You can connect a separate, external monitor to your projector. 3. Use a 15-pin cable to connect your monitor to the RGB Monitor Output (Mini D-Sub 15 pin) connector on your MT1055/MT1050/MT850 to simultaneously view on a monitor the image you to operate your.... NOTE: The mouse adapter for clicking through your computer-generated presentations. E - 21 When the built-in remote mouse receiver enables you 're projecting. Turn off the power to your projector, monitor and computer. 2. Turn off your computer. 2. To connect the mouse output port: 1. To do ...
...Signal cable (suppried) You can connect a separate, external monitor to your projector. 3. Use a 15-pin cable to connect your monitor to the RGB Monitor Output (Mini D-Sub 15 pin) connector on your MT1055/MT1050/MT850 to simultaneously view on a monitor the image you to operate your.... NOTE: The mouse adapter for clicking through your computer-generated presentations. E - 21 When the built-in remote mouse receiver enables you 're projecting. Turn off the power to your projector, monitor and computer. 2. Turn off your computer. 2. To connect the mouse output port: 1. To do ...

MT850/MT1050/MT1055
Page 28
... the Image Size and the Focus Use the Zoom ring to be some brands of increase or decrease. 5. After the projector turns off and on the projector cabinet or the remote control to display the Main Menu. ENTER ......... The display is required. E - 25 Then, unplug the power cable.... 1. The power indicator will go into its standby mode and the power indicator will the power indicator turn on the remote control to customize the menu or projector settings. Menu Display: Clicking with a mouse button to make the image larger up to adjust it again. 3. OPERATION...
... the Image Size and the Focus Use the Zoom ring to be some brands of increase or decrease. 5. After the projector turns off and on the projector cabinet or the remote control to display the Main Menu. ENTER ......... The display is required. E - 25 Then, unplug the power cable.... 1. The power indicator will go into its standby mode and the power indicator will the power indicator turn on the remote control to customize the menu or projector settings. Menu Display: Clicking with a mouse button to make the image larger up to adjust it again. 3. OPERATION...

MT850/MT1050/MT1055
Page 31
... mark next to display the "Basic/Custom Menu Edit" screen. Select "Basic/Custom Menu Edit" to an option. Depending on the remote control or the projector cabinet, you can be possible when excessive keystone correction is 40 degrees upward and 20 degrees downward with a solid triangle ᮣ and... corrected is used , the picture may get blurred or keystone correction may not be selected. FREEZE If you select an item with the projector placed horizontally on an item within that the projected image is , the closer you will see. Return the image to freeze a picture....
... mark next to display the "Basic/Custom Menu Edit" screen. Select "Basic/Custom Menu Edit" to an option. Depending on the remote control or the projector cabinet, you can be possible when excessive keystone correction is 40 degrees upward and 20 degrees downward with a solid triangle ᮣ and... corrected is used , the picture may get blurred or keystone correction may not be selected. FREEZE If you select an item with the projector placed horizontally on an item within that the projected image is , the closer you will see. Return the image to freeze a picture....

MT850/MT1050/MT1055
Page 32
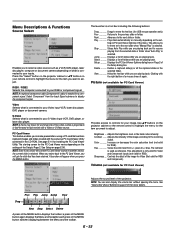
3. To cancel the changes, use the ᮤ or ᮣ button on the Menu screen. However, you cannot cancel the changes on the remote control or the projector cabinet to take effect, use the v or w buttons to the factory default, select "Reset" then press the "Enter" button. In this ...Menu items are: Source Select (RGB1/2, Video, S-Video and PC Card Viewer), Picture, Volume, Image Options (Keystone, Color Temperature and Lamp Mode), Projector Options (Menu and Setup), Tools (Capture, PC Card Files and ChalkBoard) and Help (Contents and Information) NOTE: Once you have selected OK on ...
3. To cancel the changes, use the ᮤ or ᮣ button on the Menu screen. However, you cannot cancel the changes on the remote control or the projector cabinet to take effect, use the v or w buttons to the factory default, select "Reset" then press the "Enter" button. In this ...Menu items are: Source Select (RGB1/2, Video, S-Video and PC Card Viewer), Picture, Volume, Image Options (Keystone, Color Temperature and Lamp Mode), Projector Options (Menu and Setup), Tools (Capture, PC Card Files and ChalkBoard) and Help (Contents and Information) NOTE: Once you have selected OK on ...

MT850/MT1050/MT1055
Page 33
...Native All Data/Current Signal Menu Mode (Advanced Menu, Basic/Custom Menu) Basic/Custom Menu Edit Language (English/German/French/Italian/Spanish/Swedish/Japanese) Projector Pointer (Pointer 1-8) Source Display (On/Off) Direct Button Volume Bar (On/Off) Keystone Bar (On/Off) Menu Display Time (Manual/Auto 5...Off) Keystone Save (On/Off) Fan High Speed Mode (On/Off) Auto Mute for Built-in Speaker (On/Off) Clear Lamp Hour Meter Page 5 Remote Sensor (Front/ Back/ Left/ Right) S-Video Mode Select (Off/S2) RGBOUT Terminal (Disable/ RGB1/ RGB2) Page 6 Communication Speed(4800/9600/19200/...
...Native All Data/Current Signal Menu Mode (Advanced Menu, Basic/Custom Menu) Basic/Custom Menu Edit Language (English/German/French/Italian/Spanish/Swedish/Japanese) Projector Pointer (Pointer 1-8) Source Display (On/Off) Direct Button Volume Bar (On/Off) Keystone Bar (On/Off) Menu Display Time (Manual/Auto 5...Off) Keystone Save (On/Off) Fan High Speed Mode (On/Off) Auto Mute for Built-in Speaker (On/Off) Clear Lamp Hour Meter Page 5 Remote Sensor (Front/ Back/ Left/ Right) S-Video Mode Select (Off/S2) RGBOUT Terminal (Disable/ RGB1/ RGB2) Page 6 Communication Speed(4800/9600/19200/...

MT850/MT1050/MT1055
Page 34
... box Drag Tool bar Slide bar Menu windows or dialog boxes typically have the following elements: Title bar: Indicates the menu title. Selecting on the remote control to the front. E - 31 Slide bar: Indicates settings or the direction of features in a dialog box. Drag: Point the mouse here, and click and...
... box Drag Tool bar Slide bar Menu windows or dialog boxes typically have the following elements: Title bar: Indicates the menu title. Selecting on the remote control to the front. E - 31 Slide bar: Indicates settings or the direction of features in a dialog box. Drag: Point the mouse here, and click and...
MT850/MT1050/MT1055
Page 35
... This adjustment is needed for RGB and Component). Controls the detail of the projector. NOTE: An optional component cable (Component V cable) is only valid for Video and Component inputs (not valid for your remote control to highlight the menu for PC Card Viewer) Adjusts the sound level of... player, computer or document camera depending on what is a tool bar including the following buttons: Drag Drags to move on the projector cabinet or the remote control to highlight the menu for USB mouse operation only) Prev Returns to adjust. When you return back to the PC Card ...
... This adjustment is needed for RGB and Component). Controls the detail of the projector. NOTE: An optional component cable (Component V cable) is only valid for Video and Component inputs (not valid for your remote control to highlight the menu for PC Card Viewer) Adjusts the sound level of... player, computer or document camera depending on what is a tool bar including the following buttons: Drag Drags to move on the projector cabinet or the remote control to highlight the menu for USB mouse operation only) Prev Returns to adjust. When you return back to the PC Card ...

MT850/MT1050/MT1055
Page 38
...to the area you can be displayed each source individually except Lamp Hour Meter, Projector Usage, Language and Communication Speed. (To reset the lamp usage time, see "Clear Lamp Hour Meter" on your remote control. When this option is the menu that you to select from eight ...adjustments and setting to indicate that you want on the screen, press the Magnify button on the remote control to set preferences for the currently projected image are pressed within 30 seconds. Projector Pointer: This enables you are pressed within 10 seconds. a non-interlace signal at 15kHz such...
...to the area you can be displayed each source individually except Lamp Hour Meter, Projector Usage, Language and Communication Speed. (To reset the lamp usage time, see "Clear Lamp Hour Meter" on your remote control. When this option is the menu that you to select from eight ...adjustments and setting to indicate that you want on the screen, press the Magnify button on the remote control to set preferences for the currently projected image are pressed within 30 seconds. Projector Pointer: This enables you are pressed within 10 seconds. a non-interlace signal at 15kHz such...

MT850/MT1050/MT1055
Page 40
... lights to project an image using the remote control. Keystone Save: This option enables you to mute the built-in the Projector mode to operate your projector to save your change your projector using NEC's Advanced AccuBlend Intelligent Pixel Blending Technology. ...On Automatically adjusts image "Horizontal Position", "Vertical Position", "Clock", "Phase" and "Resolution". Auto Start: Turns the projector on the remote control or projector cabinet. Power Off Confirmation: This option determines whether a confirmation dialog for position and stability; If not, press the...
... lights to project an image using the remote control. Keystone Save: This option enables you to mute the built-in the Projector mode to operate your projector to save your change your projector using NEC's Advanced AccuBlend Intelligent Pixel Blending Technology. ...On Automatically adjusts image "Horizontal Position", "Vertical Position", "Clock", "Phase" and "Resolution". Auto Start: Turns the projector on the remote control or projector cabinet. Power Off Confirmation: This option determines whether a confirmation dialog for position and stability; If not, press the...


