

GT2150
Page 1
LCD Projector GT2150 User's Manual
LCD Projector GT2150 User's Manual
GT2150
Page 3
FOCUS ZOOM LEFT DOWN LENS SHIFT UP RIGHT SELECT MENU ENTER LAMP CANCEL STATUS POWER ADAJUUSTOT ON/STAND BY SOURCE LCD Projector GT2150 User's Manual
FOCUS ZOOM LEFT DOWN LENS SHIFT UP RIGHT SELECT MENU ENTER LAMP CANCEL STATUS POWER ADAJUUSTOT ON/STAND BY SOURCE LCD Projector GT2150 User's Manual

GT2150
Page 4
Your serial number is located on a circuit different from power outlet. REFER SERVICING TO QUALIFIED NEC SERVICE PERSONNEL. This equipment has been tested and found to comply with this equipment please contact your NEC GT2150 Projector and keep the manual handy for a Class B digital device, pursuant to Part 15 of the FCC Rules. These limits are...
Your serial number is located on a circuit different from power outlet. REFER SERVICING TO QUALIFIED NEC SERVICE PERSONNEL. This equipment has been tested and found to comply with this equipment please contact your NEC GT2150 Projector and keep the manual handy for a Class B digital device, pursuant to Part 15 of the FCC Rules. These limits are...

GT2150
Page 11
...If any pieces are optional. GT2150 Projector String and rivet POWER STATUS ADJAUUTSTO ON/STAND BY LAMP CANCEL SOURCE ENTER SELECT MENU LEFT DOWN LENS SHIFT UP RIGHT ZOOM FOCUS Lens hood cap Remote cable Remote control and batteries (AAA x 2) Ferrite clamp cores for Japan (AC 100V) E - 1 User's manuals (Japanese and English/German...) NOTE: Lenses are missing, contact your NEC dealer.
...If any pieces are optional. GT2150 Projector String and rivet POWER STATUS ADJAUUTSTO ON/STAND BY LAMP CANCEL SOURCE ENTER SELECT MENU LEFT DOWN LENS SHIFT UP RIGHT ZOOM FOCUS Lens hood cap Remote cable Remote control and batteries (AAA x 2) Ferrite clamp cores for Japan (AC 100V) E - 1 User's manuals (Japanese and English/German...) NOTE: Lenses are missing, contact your NEC dealer.

GT2150
Page 33
... to connect the audio from your VCR or laser disc player to your VCR or laser disc player owner's manual for stereo sound. 3. Turn on the back of your GT2150 Projector. NOTE: Refer to your projector (if your equipment's video output requirements. 4. CONNECTIONS When used in standalone operation Connecting Your VCR Or Laser Disc...
... to connect the audio from your VCR or laser disc player to your VCR or laser disc player owner's manual for stereo sound. 3. Turn on the back of your GT2150 Projector. NOTE: Refer to your projector (if your equipment's video output requirements. 4. CONNECTIONS When used in standalone operation Connecting Your VCR Or Laser Disc...

GT2150
Page 38
... information in the Switcher Control mode, a video standard is selected at the projector. * If you set the VIDEO MODE select switch (S3001) to "8". For more information on the Switcher, refer to the user's manual accompanying the ISS-6020/ISS-6020G Switcher. • All cables mentioned above ...are sold separately. • The RGB2 terminal will not be accepted when the projector is located on the VIDEO INPUT MODULE (6020-VID). NOTE: ...
... information in the Switcher Control mode, a video standard is selected at the projector. * If you set the VIDEO MODE select switch (S3001) to "8". For more information on the Switcher, refer to the user's manual accompanying the ISS-6020/ISS-6020G Switcher. • All cables mentioned above ...are sold separately. • The RGB2 terminal will not be accepted when the projector is located on the VIDEO INPUT MODULE (6020-VID). NOTE: ...

GT2150
Page 39
... slave Switcher to the appropriate position to the REMOTE 1 terminal of the tenth slave). To use the projector with the Switcher ISS-6020 in detail. • Refer to the user's manual accompanying the Switcher. • Cables mentioned are not included with Two or More Switchers (100 Inputs) ...the projector using the optional control cable (15p-15p/CTL-6010). 2 Next connect the REMOTE 2 terminal of the master Switcher to the REMOTE 1 terminal of the Switcher to 100 inputs can be displayed correctly. Connect all the slide switches (S8603) of the first slave Switcher using the NEC ISS...
... slave Switcher to the appropriate position to the REMOTE 1 terminal of the tenth slave). To use the projector with the Switcher ISS-6020 in detail. • Refer to the user's manual accompanying the Switcher. • Cables mentioned are not included with Two or More Switchers (100 Inputs) ...the projector using the optional control cable (15p-15p/CTL-6010). 2 Next connect the REMOTE 2 terminal of the master Switcher to the REMOTE 1 terminal of the Switcher to 100 inputs can be displayed correctly. Connect all the slide switches (S8603) of the first slave Switcher using the NEC ISS...
GT2150
Page 49
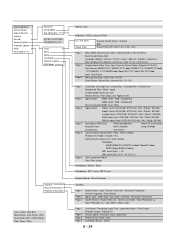
... (L) / Noise Reduction (C) / Color Matrix / Matrix Type Page 1 Page 2 Page 3 Page 4 User Name / Remaining Lamp Time / Lamp Hour Meter / Filter Usage / Projector Usage / Projector ID Version (BIOS / Firmware / Data / SUB-CPU) FPGA Version (OSD / JOE) Link Mode (Master / Slave) E - 39 All Data / Current Signal Including Entry ... (English / German / French / Italian / Spanish / Swedish / Japanese) Menu Display Time (Manual / Auto 5 sec / Auto 10 sec / Auto 30 sec) Display Select (Date, Time, Input Terminal, Source Name, Projector ID On/Off) Date Format (MM/DD/YYYY, MM/DD/YYYY ddd, DD/MM/YYYY, ...
... (L) / Noise Reduction (C) / Color Matrix / Matrix Type Page 1 Page 2 Page 3 Page 4 User Name / Remaining Lamp Time / Lamp Hour Meter / Filter Usage / Projector Usage / Projector ID Version (BIOS / Firmware / Data / SUB-CPU) FPGA Version (OSD / JOE) Link Mode (Master / Slave) E - 39 All Data / Current Signal Including Entry ... (English / German / French / Italian / Spanish / Swedish / Japanese) Menu Display Time (Manual / Auto 5 sec / Auto 10 sec / Auto 30 sec) Display Select (Date, Time, Input Terminal, Source Name, Projector ID On/Off) Date Format (MM/DD/YYYY, MM/DD/YYYY ddd, DD/MM/YYYY, ...

GT2150
Page 57
...: Source Select (RGB1/2, DVI DIGITAL, Video1/2, S-Video and Entry List), Brightness, Contrast, Pixel Adjust and Position. Manual ......... Select OK and press the ENTER button on . The projector will automatically be turned off after the last touch of turning on the remote control to select how long the... projector waits after the countdown is the factory preset. The "Manual" is complete. Language: You can be turned off in stand-by mode at the time of a button...
...: Source Select (RGB1/2, DVI DIGITAL, Video1/2, S-Video and Entry List), Brightness, Contrast, Pixel Adjust and Position. Manual ......... Select OK and press the ENTER button on . The projector will automatically be turned off after the last touch of turning on the remote control to select how long the... projector waits after the countdown is the factory preset. The "Manual" is complete. Language: You can be turned off in stand-by mode at the time of a button...

GT2150
Page 59
...Adjust (RGB Only) When "Auto Adjust" is not available if you made any adjustments. OFF Does not identify any one adjustment manually. The options are : desktop front projection, ceiling rear projection, desktop rear projection, and ceiling front projection. This must be automatically ... the Auto Adjust feature, first you to detect. However, this feature is turned on the projector are enabled in the Entry List once you adjust a signal using NEC's Advanced AccuBlend Intelligent Pixel Blending Technology. Normally select "Auto". NOTE: The default setting is blue...
...Adjust (RGB Only) When "Auto Adjust" is not available if you made any adjustments. OFF Does not identify any one adjustment manually. The options are : desktop front projection, ceiling rear projection, desktop rear projection, and ceiling front projection. This must be automatically ... the Auto Adjust feature, first you to detect. However, this feature is turned on the projector are enabled in the Entry List once you adjust a signal using NEC's Advanced AccuBlend Intelligent Pixel Blending Technology. Normally select "Auto". NOTE: The default setting is blue...


