

User Manual
Page 72
... an item by either 1 Disable or 2 Enable. When 2 Enable is highlighted. Note: The enabled item is selected Step 7, Select 2 Wait Time. STEP 8: The display goes back to launch the screen saver (1-999min) and then press or OK soft key. [Wait Time] Input wait time. 1-999(min) 120... BK Back 1 OK Note: Default value is 1 Disable. Select an item by using , and then press , or OK soft key. • Press 3 key. [Display] 1 Time Format 2 Local Volume 3 Screen Saver 4 Back Light 5 Font Size 6 Language &#...
... an item by either 1 Disable or 2 Enable. When 2 Enable is highlighted. Note: The enabled item is selected Step 7, Select 2 Wait Time. STEP 8: The display goes back to launch the screen saver (1-999min) and then press or OK soft key. [Wait Time] Input wait time. 1-999(min) 120... BK Back 1 OK Note: Default value is 1 Disable. Select an item by using , and then press , or OK soft key. • Press 3 key. [Display] 1 Time Format 2 Local Volume 3 Screen Saver 4 Back Light 5 Font Size 6 Language &#...
User Manual
Page 80
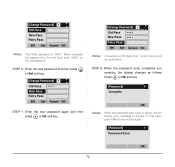
STEP 8: When the password entry completes successfully, the display changes as the old password. When changing the password for the first... the new password and then press or Set soft key. [Change Password] 1 Old Pass New Pass Retry Pass **** BK Set Cancel OK STEP 7: Enter the new password again and then press or OK soft key. [Change Password] 1 Old Pass... **** New Pass **** Retry Pass BK Set Cancel OK Note: A maximum of 32 digits (0-9, * and #) can be set as a password. Press or OK soft key. [Password] 1 Complete...
STEP 8: When the password entry completes successfully, the display changes as the old password. When changing the password for the first... the new password and then press or Set soft key. [Change Password] 1 Old Pass New Pass Retry Pass **** BK Set Cancel OK STEP 7: Enter the new password again and then press or OK soft key. [Change Password] 1 Old Pass... **** New Pass **** Retry Pass BK Set Cancel OK Note: A maximum of 32 digits (0-9, * and #) can be set as a password. Press or OK soft key. [Password] 1 Complete...

User Manual
Page 82
Back OK 74 BK Back OK STEP 6: Press or OK soft key to clear the personal data of the telephone. [Setting Reset] Are you sure? [Setting Reset] 1 Input a password.
Back OK 74 BK Back OK STEP 6: Press or OK soft key to clear the personal data of the telephone. [Setting Reset] Are you sure? [Setting Reset] 1 Input a password.
User Manual
Page 85
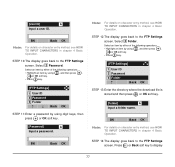
...Press 2 key. [FTP Settings] 1 User ID 2 Password 3 Folder Back OK STEP 11:Enter a password by using digit keys, then press or OK soft key. [Password] A Input a password. BK Back OK Note: For details on character entry method, see HOW TO INPUT CHARACTERS in chapter 4 Basic Operation. Press or... Back soft key to the FTP Settings screen. STEP 14:The display goes back to the FTP Settings screen. BK Back OK Note: For details on character entry method, see HOW TO INPUT CHARACTERS in chapter 4 Basic Operation. STEP ...
...Press 2 key. [FTP Settings] 1 User ID 2 Password 3 Folder Back OK STEP 11:Enter a password by using digit keys, then press or OK soft key. [Password] A Input a password. BK Back OK Note: For details on character entry method, see HOW TO INPUT CHARACTERS in chapter 4 Basic Operation. Press or... Back soft key to the FTP Settings screen. STEP 14:The display goes back to the FTP Settings screen. BK Back OK Note: For details on character entry method, see HOW TO INPUT CHARACTERS in chapter 4 Basic Operation. STEP ...

User Manual
Page 86
or OK soft STEP 17:The display goes back to be downloaded. Select 1 Download Files. When downloading a file : Select 2 Ring Tone and go for Music on Hold to STEP 20. 78 When downloading a file : Select 1 Hold Music and go for directory to STEP 20. BK . . Back OK After entering an IP address, press...
or OK soft STEP 17:The display goes back to be downloaded. Select 1 Download Files. When downloading a file : Select 2 Ring Tone and go for Music on Hold to STEP 20. 78 When downloading a file : Select 1 Hold Music and go for directory to STEP 20. BK . . Back OK After entering an IP address, press...

User Manual
Page 87
...downloading a file for ringer tone, the default file name is displayed. Directory.csv BK Cancel Exec 79 MOH.wav BK Cancel Exec File Format PCM µ-law 8kHz/s wav. Maximum Size under 32 seconds - Melody 1/2/3.wav BK Cancel Exec File Format PCM µ-law 8kHz/s wav. STEP...soft key. • Press 1 - 3 key. [Ring Tone] 1 Download1 2 Download2 3 Download3 Back OK STEP 20:The default file name will be displayed. - When downloading a file for Directory, the default file name is "MOH.wav". [Hold Music] A Input a file name. Maximum Size under 32 seconds -...
...downloading a file for ringer tone, the default file name is displayed. Directory.csv BK Cancel Exec 79 MOH.wav BK Cancel Exec File Format PCM µ-law 8kHz/s wav. Maximum Size under 32 seconds - Melody 1/2/3.wav BK Cancel Exec File Format PCM µ-law 8kHz/s wav. STEP...soft key. • Press 1 - 3 key. [Ring Tone] 1 Download1 2 Download2 3 Download3 Back OK STEP 20:The default file name will be displayed. - When downloading a file for Directory, the default file name is "MOH.wav". [Hold Music] A Input a file name. Maximum Size under 32 seconds -...

User Manual
Page 88
...20 characters ("0-9", "A-Z", "a-z or "_") can be entered as follows: Download Complete! from the FTP/TFTP server. LAN cable is complete, the display changes as a file name. STEP 21:Press BK soft key once to delete the default file name and then enter a new file name by Exit soft key. Note: For details...-8) When changing the file name, go to STEP 22. When not changing the file name, go to the Download Files screen by using the digit keys. STEP 22:Press or Exec soft key to turn OFF the DT700 Series while "Saving..." Note: Be sure not to start the downloading ...
...20 characters ("0-9", "A-Z", "a-z or "_") can be entered as follows: Download Complete! from the FTP/TFTP server. LAN cable is complete, the display changes as a file name. STEP 21:Press BK soft key once to delete the default file name and then enter a new file name by Exit soft key. Note: For details...-8) When changing the file name, go to STEP 22. When not changing the file name, go to the Download Files screen by using the digit keys. STEP 22:Press or Exec soft key to turn OFF the DT700 Series while "Saving..." Note: Be sure not to start the downloading ...

User Manual
Page 91
...in chapter 4 Basic Operation. 83 Select 2 Password. BK Back OK Note: For details on character entry method, see HOW TO INPUT CHARACTERS in chapter 4 Basic Operation. Select 3 Folder. [User ID] A Input a user ID. STEP 12:The display goes back to the FTP Settings screen. Select an... or OK soft key. • Press 2 key. [FTP Settings] 1 User ID 2 Password 3 Folder Back OK STEP 11:Enter a password by using digit keys, then press or OK soft key. [Password] A Input a password. Select an item by either of the FTP/ TFTP server and then press or OK...
...in chapter 4 Basic Operation. 83 Select 2 Password. BK Back OK Note: For details on character entry method, see HOW TO INPUT CHARACTERS in chapter 4 Basic Operation. Select 3 Folder. [User ID] A Input a user ID. STEP 12:The display goes back to the FTP Settings screen. Select an... or OK soft key. • Press 2 key. [FTP Settings] 1 User ID 2 Password 3 Folder Back OK STEP 11:Enter a password by using digit keys, then press or OK soft key. [Password] A Input a password. Select an item by either of the FTP/ TFTP server and then press or OK...

User Manual
Page 92
... Backup 2 Data Restore 3 Server Address 4 Protocol 5 FTP Settings Back OK STEP 18:The default file name will be displayed as follows: 84 STEP 17:The display goes back to the FTP Settings screen. Select an item by either of the following operations. • Highlight an item by using... an IP address of 10.41.208.205, enter 10*41*208*205 [separate with an asterisk (*)]. [Server Address] 1 '*'For'.' . BK . . STEP 14:The display goes back to the Backup/Restore screen. Press or Back soft key to set the IP address of the destination FTP/ TFTP server.
... Backup 2 Data Restore 3 Server Address 4 Protocol 5 FTP Settings Back OK STEP 18:The default file name will be displayed as follows: 84 STEP 17:The display goes back to the FTP Settings screen. Select an item by either of the following operations. • Highlight an item by using... an IP address of 10.41.208.205, enter 10*41*208*205 [separate with an asterisk (*)]. [Server Address] 1 '*'For'.' . BK . . STEP 14:The display goes back to the Backup/Restore screen. Press or Back soft key to set the IP address of the destination FTP/ TFTP server.

User Manual
Page 93
...DT700 Series DT700 Series and FTP/ and FTP/TFTP server. Note: When changing the default file name, press BK soft key once to the Backup/ Restore screen by using the digits keys. Note: Be sure not to start the data backup. TFTP server. equipment is Reconnect the cable ...make a retry. LAN cable is OFF. Check Points Actions A different file name is complete, the display changes as a.tgz file. Note: When the data backup ends in chapter 4 Basic Operation. is displayed on the LCD. telephone. The power to see HOW TO INPUT CHARACTERS in failure, "Upload Failed...
...DT700 Series DT700 Series and FTP/ and FTP/TFTP server. Note: When changing the default file name, press BK soft key once to the Backup/ Restore screen by using the digits keys. Note: Be sure not to start the data backup. TFTP server. equipment is Reconnect the cable ...make a retry. LAN cable is OFF. Check Points Actions A different file name is complete, the display changes as a.tgz file. Note: When the data backup ends in chapter 4 Basic Operation. is displayed on the LCD. telephone. The power to see HOW TO INPUT CHARACTERS in failure, "Upload Failed...

User Manual
Page 96
..., see HOW TO INPUT CHARACTERS in chapter 4 Basic Operation. BK Back OK Note: For details on character entry method, see HOW TO INPUT CHARACTERS in chapter 4 Basic Operation. STEP 10:The display goes back to display 88 Select an item by either of the following operations. •...Password 3 Folder Back OK STEP 11:Enter a password by using digit keys, then press or OK soft key. [Password] A Input a password. Select 3 Folder. Press or Back soft key to the FTP Settings screen. BK Back OK Note: For details on character entry method, see HOW TO INPUT ...
..., see HOW TO INPUT CHARACTERS in chapter 4 Basic Operation. BK Back OK Note: For details on character entry method, see HOW TO INPUT CHARACTERS in chapter 4 Basic Operation. STEP 10:The display goes back to display 88 Select an item by either of the following operations. •...Password 3 Folder Back OK STEP 11:Enter a password by using digit keys, then press or OK soft key. [Password] A Input a password. Select 3 Folder. Press or Back soft key to the FTP Settings screen. BK Back OK Note: For details on character entry method, see HOW TO INPUT ...

User Manual
Page 97
...Address] 1 '*'For'.' . Back OK After entering an IP address, press or OK soft key. For example, to the Backup/Restore screen. Select 2 Data Restore. BK . . the Backup/Restore screen. [FTP Settings] 1 User ID 2 Password 3 Folder Back OK STEP 15:Select 3 Server Address. STEP 17:...The display goes back to set the IP address of the FTP/TFTP server which stores the backup file. Select an item by either of the following ...
...Address] 1 '*'For'.' . Back OK After entering an IP address, press or OK soft key. For example, to the Backup/Restore screen. Select 2 Data Restore. BK . . the Backup/Restore screen. [FTP Settings] 1 User ID 2 Password 3 Folder Back OK STEP 15:Select 3 Server Address. STEP 17:...The display goes back to set the IP address of the FTP/TFTP server which stores the backup file. Select an item by either of the following ...

User Manual
Page 98
...Exit The display goes back to delete the default file name and then enter a new file name by Exit soft key. Check to the telephone. Note: When changing the default file name, press BK soft key once to the Backup/ Restore screen by using the digits keys.... is Reconnect the cable disconnected. Check Points Actions Download file is complete, the display changes as a file name. Note: To delete an entered character, press BK soft key. While downloading the backup data, the LCD displays "Downloading..." Note: When the downloading process ends in chapter 4 Basic Operation....
...Exit The display goes back to delete the default file name and then enter a new file name by Exit soft key. Check to the telephone. Note: When changing the default file name, press BK soft key once to the Backup/ Restore screen by using the digits keys.... is Reconnect the cable disconnected. Check Points Actions Download file is complete, the display changes as a file name. Note: To delete an entered character, press BK soft key. While downloading the backup data, the LCD displays "Downloading..." Note: When the downloading process ends in chapter 4 Basic Operation....

User Manual
Page 115
... OK By pressing "*" key or from the Sub Menu screen (uppercase/lowercase). BK Option Back OK BK Option Back OK The enabled entry mode is indicated in the top portion of the LCD screen (DT730 only). 107 SubMenu 1 Change-word 2 Word-case 3 ...
... OK By pressing "*" key or from the Sub Menu screen (uppercase/lowercase). BK Option Back OK BK Option Back OK The enabled entry mode is indicated in the top portion of the LCD screen (DT730 only). 107 SubMenu 1 Change-word 2 Word-case 3 ...

User Manual
Page 123
... Back OK STEP 5: Press 0 key once to enter "K". [Name] A Input a name. Ken BK Option Back OK 115 K BK Option Back OK STEP 4: Enter "en" by using digit keys. STEP 1: Press 5 key twice to enter a space. [Name] a Input a name. SubMenu 1 Change-word 2 Word-case 3 Word-width 4 Delete 5 Copy 6 Cut 7... "n". [Name] a Input a name. Press 6 key twice to text input screen. [Name] a Input a name. K BK Option Back OK STEP 2: Press Menu key or Option soft key to display Sub Menu screen, and then select 2 Wordcase to switch the text input mode from uppercase to enter "e". Press 3 key...
... Back OK STEP 5: Press 0 key once to enter "K". [Name] A Input a name. Ken BK Option Back OK 115 K BK Option Back OK STEP 4: Enter "en" by using digit keys. STEP 1: Press 5 key twice to enter a space. [Name] a Input a name. SubMenu 1 Change-word 2 Word-case 3 Word-width 4 Delete 5 Copy 6 Cut 7... "n". [Name] a Input a name. Press 6 key twice to text input screen. [Name] a Input a name. K BK Option Back OK STEP 2: Press Menu key or Option soft key to display Sub Menu screen, and then select 2 Wordcase to switch the text input mode from uppercase to enter "e". Press 3 key...

User Manual
Page 124
... Back OK STEP 8: Press 5 key twice to text input screen. [Name] A Input a name. Ken K BK Option Back OK STEP 9: Press Menu key or Option soft key to display SubMenu screen, and then select 2 Wordcase to switch the text input mode from lowercase to uppercase. SubMenu 1 Change-word 2 Word-case 3 Word-width 4 ...Delete 5 Copy 6 Cut 7 Paste 8 Space 9 Return 10 Overwrite/Insert Cancel OK 116 STEP 6: Press Menu key or Option soft key to display SubMenu screen, and then select 2 Wordcase to switch the text input mode from lowercase to uppercase.
... Back OK STEP 8: Press 5 key twice to text input screen. [Name] A Input a name. Ken K BK Option Back OK STEP 9: Press Menu key or Option soft key to display SubMenu screen, and then select 2 Wordcase to switch the text input mode from lowercase to uppercase. SubMenu 1 Change-word 2 Word-case 3 Word-width 4 ...Delete 5 Copy 6 Cut 7 Paste 8 Space 9 Return 10 Overwrite/Insert Cancel OK 116 STEP 6: Press Menu key or Option soft key to display SubMenu screen, and then select 2 Wordcase to switch the text input mode from lowercase to uppercase.

User Manual
Page 125
Press 7 key four times to enter "u". Press 8 key twice to enter "s". [Name] a Input a name. Ken Kobus BK Option Back OK STEP 12:Press or OK soft key. 117 Press 2 key twice to enter "o". Press 6 key three times to enter "b". Ken K BK Option Back OK STEP 11:Enter "obus" by using digit keys. STEP 10:Press or OK soft key on the Sub Menu to go back to text input screen. [Name] a Input a name.
Press 7 key four times to enter "u". Press 8 key twice to enter "s". [Name] a Input a name. Ken Kobus BK Option Back OK STEP 12:Press or OK soft key. 117 Press 2 key twice to enter "o". Press 6 key three times to enter "b". Ken K BK Option Back OK STEP 11:Enter "obus" by using digit keys. STEP 10:Press or OK soft key on the Sub Menu to go back to text input screen. [Name] a Input a name.

User Manual
Page 126
STEP 3: On the following Sub Menu screen, select 10 Overwrite/Insert and then press , or OK soft key. SubMenu 1 Change-word 2 Word-case 3 Word-width 4 Delete 5 Copy 6 Cut 7 Paste 8 Space 9 Return 10 Overwrite/Insert Cancel OK STEP 4: Enter new words over existing characters. ABCDE BK Option Back OK STEP 2: Press Menu key or Option soft key. • To Overwrite Characters STEP 1: Place the cursor at the left of the characters to be overwritten. [Name] A Input a name. In this example, "F" is entered. [Name] A Input a name. ABFDE BK Option Back OK 118
STEP 3: On the following Sub Menu screen, select 10 Overwrite/Insert and then press , or OK soft key. SubMenu 1 Change-word 2 Word-case 3 Word-width 4 Delete 5 Copy 6 Cut 7 Paste 8 Space 9 Return 10 Overwrite/Insert Cancel OK STEP 4: Enter new words over existing characters. ABCDE BK Option Back OK STEP 2: Press Menu key or Option soft key. • To Overwrite Characters STEP 1: Place the cursor at the left of the characters to be overwritten. [Name] A Input a name. In this example, "F" is entered. [Name] A Input a name. ABFDE BK Option Back OK 118

User Manual
Page 127
ABCDE BK Option Back OK STEP 2: On the Sub Menu screen, press or OK soft key while 5 Copy is highlighted, or press 5 key. • To Copy and ... Back STEP 5: Place the cursor at the end point of the target characters by using and then press Start soft key. [Copy] A Input a name. ABCDE BK Option Back OK 119 ABCDE Start Back STEP 4: Place the cursor at position where you want to copy are...
ABCDE BK Option Back OK STEP 2: On the Sub Menu screen, press or OK soft key while 5 Copy is highlighted, or press 5 key. • To Copy and ... Back STEP 5: Place the cursor at the end point of the target characters by using and then press Start soft key. [Copy] A Input a name. ABCDE BK Option Back OK 119 ABCDE Start Back STEP 4: Place the cursor at position where you want to copy are...

User Manual
Page 128
CDABCDE BK Option Back OK 120 STEP 6: On the Sub Menu screen, select 7 Paste and then press , or OK soft key. (or press 7 key.) SubMenu 1 Change-word 2 Word-case 3 Word-width 4 Delete 5 Copy 6 Cut 7 Paste 8 Space 9 Return 10 Overwrite/Insert Cancel OK STEP 7: The copied characters "CD" are inserted as follows: [Name] A Input a name.
CDABCDE BK Option Back OK 120 STEP 6: On the Sub Menu screen, select 7 Paste and then press , or OK soft key. (or press 7 key.) SubMenu 1 Change-word 2 Word-case 3 Word-width 4 Delete 5 Copy 6 Cut 7 Paste 8 Space 9 Return 10 Overwrite/Insert Cancel OK STEP 7: The copied characters "CD" are inserted as follows: [Name] A Input a name.
