User Manual
Page 16
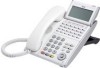
... a message has been left. (3) LCD LCD (Liquid Crystal Display) provides DT Series activity information plus date, time and Soft Key Operation. (4) Exit To exit Menu or Help mode and go back to the terminal. Telephone num- 8 KEYS AND PARTS • KEYS AND PARTS ON ITL-24D-1 This subsection explains keys and parts of DT Series taking ITL-24D-1 as Flexible Line key/Programmable Feature Key by simple operation. (2) Call Indicator Lamp Lamp at the top corner of DT Series Display flashes when a call terminates...
... a message has been left. (3) LCD LCD (Liquid Crystal Display) provides DT Series activity information plus date, time and Soft Key Operation. (4) Exit To exit Menu or Help mode and go back to the terminal. Telephone num- 8 KEYS AND PARTS • KEYS AND PARTS ON ITL-24D-1 This subsection explains keys and parts of DT Series taking ITL-24D-1 as Flexible Line key/Programmable Feature Key by simple operation. (2) Call Indicator Lamp Lamp at the top corner of DT Series Display flashes when a call terminates...
User Manual
Page 17
...) Used to adjust LCD contrast, speaker/receiver volume, and ringer volume. • LCD Contrast: Press ( ) or ( ) key while idle. • Speaker/Receiver Volume: Press ( ) or ( ) key during conversation. • Ringer Volume: Press ( ) or ( ) key during speakerphone operation. (12) Menu To access the local menu of "One-Touch Speed Dial key", you can access to various features with simple operation. Details on this key, DT Series user can switch the side by PAGE key (Soft key). (8) Recall Press key to finish the call . (11) Mic Press key...
...) Used to adjust LCD contrast, speaker/receiver volume, and ringer volume. • LCD Contrast: Press ( ) or ( ) key while idle. • Speaker/Receiver Volume: Press ( ) or ( ) key during conversation. • Ringer Volume: Press ( ) or ( ) key during speakerphone operation. (12) Menu To access the local menu of "One-Touch Speed Dial key", you can access to various features with simple operation. Details on this key, DT Series user can switch the side by PAGE key (Soft key). (8) Recall Press key to finish the call . (11) Mic Press key...
User Manual
Page 27
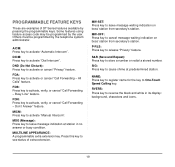
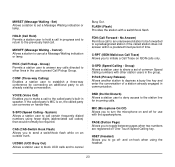
PROGRAMMABLE FEATURE KEYS These are examples of extra extension. Some features using feature access code may be programmed by the telephone system administrator. DND (Do Not Disturb): Press key to activate, verify, or cancel "Call Forwarding - FDB: Press key to activate or cancel "Privacy" feature. Don't Answer" feature. MULTILINE APPEARANCE: A programmable extra extension key. 1. MSG (Message): Press key to cancel message waiting indication on boss' station from secretary's station. MW-OFF: Press key to leave message indication at predetermined station...
PROGRAMMABLE FEATURE KEYS These are examples of extra extension. Some features using feature access code may be programmed by the telephone system administrator. DND (Do Not Disturb): Press key to activate, verify, or cancel "Call Forwarding - FDB: Press key to activate or cancel "Privacy" feature. Don't Answer" feature. MULTILINE APPEARANCE: A programmable extra extension key. 1. MSG (Message): Press key to cancel message waiting indication on boss' station from secretary's station. MW-OFF: Press key to leave message indication at predetermined station...
User Manual
Page 31
... calls directed to turn the microphone on an outside trunk. Group) Allows a station user to the called party's built-in communication. If the called party's MIC is on hands-free. System) Allows a station user to call certain frequently dialed numbers using the headset. 23 MIC (Microphone On/Off) Allows you to make a call codes) than would normally be forwarded to depress a busy line key and enter the conversation of time. MWSET (Message Waiting - VOICE (Voice Call...
... calls directed to turn the microphone on an outside trunk. Group) Allows a station user to the called party's built-in communication. If the called party's MIC is on hands-free. System) Allows a station user to call certain frequently dialed numbers using the headset. 23 MIC (Microphone On/Off) Allows you to make a call codes) than would normally be forwarded to depress a busy line key and enter the conversation of time. MWSET (Message Waiting - VOICE (Voice Call...

User Manual
Page 50
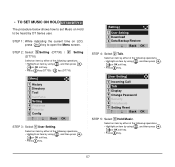
... key. • Press 5 key (DT730) / 2 key (DT710) [Menu] 1 History 2 Directory 3 Tool 4 Call Func. 5 Setting 6 Presence # Favorite 0 Config Back OK STEP 3: Select 1 User Setting. STEP 1: While indicating the current time on LCD, press Menu key to enable/disable Offhook ringing. STEP 2: Select 5 Setting (DT730) / 2 Setting (DT710) Select an item by either of the following operations. • Highlight an item by using , and then press , or OK soft key. • Press 1 key. [Setting] 1 User Setting 2 Download 3 Data...
... key. • Press 5 key (DT730) / 2 key (DT710) [Menu] 1 History 2 Directory 3 Tool 4 Call Func. 5 Setting 6 Presence # Favorite 0 Config Back OK STEP 3: Select 1 User Setting. STEP 1: While indicating the current time on LCD, press Menu key to enable/disable Offhook ringing. STEP 2: Select 5 Setting (DT730) / 2 Setting (DT710) Select an item by either of the following operations. • Highlight an item by using , and then press , or OK soft key. • Press 1 key. [Setting] 1 User Setting 2 Download 3 Data...

User Manual
Page 52
• TO SET RINGING OF HEADSET DT730 The procedure below shows how to open the Menu screen. Select an item by using , and then press , or OK soft key. • Press 1 key. [Setting] 1 User Setting 2 Download 3 Data Backup/Restore Back OK STEP 4: Select 1 Incoming Call. STEP 1: While indicating the current time on LCD, press Menu key to enable/disable the ringing of the following operations. • Highlight an item by either...
• TO SET RINGING OF HEADSET DT730 The procedure below shows how to open the Menu screen. Select an item by using , and then press , or OK soft key. • Press 1 key. [Setting] 1 User Setting 2 Download 3 Data Backup/Restore Back OK STEP 4: Select 1 Incoming Call. STEP 1: While indicating the current time on LCD, press Menu key to enable/disable the ringing of the following operations. • Highlight an item by either...

User Manual
Page 54
... 1 User Setting. Select an item by either of the following operations. • Highlight an item by using , and then press , or OK soft key. • Press 1 key. [Setting] 1 User Setting 2 Download 3 Data Backup/Restore Back OK STEP 4: Select 1 Incoming Call. • TO SET RINGER TONE DT730/DT710 The procedure below shows how to open the Menu screen. STEP 1: While indicating the current time on LCD, press Menu key to change the ringer tone...
... 1 User Setting. Select an item by either of the following operations. • Highlight an item by using , and then press , or OK soft key. • Press 1 key. [Setting] 1 User Setting 2 Download 3 Data Backup/Restore Back OK STEP 4: Select 1 Incoming Call. • TO SET RINGER TONE DT730/DT710 The procedure below shows how to open the Menu screen. STEP 1: While indicating the current time on LCD, press Menu key to change the ringer tone...

User Manual
Page 57
... operations. • Highlight an item by either of the following operations. • Highlight an item by using , and then press , or OK soft key. • Press 1 key. [User Setting] 1 Incoming Call 2 Talk 3 Display 4 Change Password 5 Security 6 Peripherals 0 Setting Reset Back OK STEP 5: Select 5 Illumination. Select an item by using , and then press , or OK soft key. • Press 1 key. [Setting] 1 User Setting 2 Download 3 Data Backup/Restore Back OK STEP 4: Select 1 Incoming Call...
... operations. • Highlight an item by either of the following operations. • Highlight an item by using , and then press , or OK soft key. • Press 1 key. [User Setting] 1 Incoming Call 2 Talk 3 Display 4 Change Password 5 Security 6 Peripherals 0 Setting Reset Back OK STEP 5: Select 5 Illumination. Select an item by using , and then press , or OK soft key. • Press 1 key. [Setting] 1 User Setting 2 Download 3 Data Backup/Restore Back OK STEP 4: Select 1 Incoming Call...

User Manual
Page 61
... key. • Press 5 key (DT730) / 2 (DT710) [Menu] 1 History 2 Directory 3 Tool 4 Call Func. 5 Setting 6 Presence # Favorite 0 Config Back OK STEP 3: Select 1 User Setting. Select an item by either of the following operations. • Highlight an item by using , and then press , or OK soft key. • Press 2 key. [User Setting] 1 Incoming Call 2 Talk 3 Display 4 Change Password 5 Security 6 Peripherals 0 Setting Reset Back OK STEP 5: Select 2 DTMF Tone. • TO ENABLE/DISABLE...
... key. • Press 5 key (DT730) / 2 (DT710) [Menu] 1 History 2 Directory 3 Tool 4 Call Func. 5 Setting 6 Presence # Favorite 0 Config Back OK STEP 3: Select 1 User Setting. Select an item by either of the following operations. • Highlight an item by using , and then press , or OK soft key. • Press 2 key. [User Setting] 1 Incoming Call 2 Talk 3 Display 4 Change Password 5 Security 6 Peripherals 0 Setting Reset Back OK STEP 5: Select 2 DTMF Tone. • TO ENABLE/DISABLE...

User Manual
Page 63
... key. • Press 1 key. [Setting] 1 User Setting 2 Download 3 Data Backup/Restore Back OK STEP 4: Select 2 Talk. STEP 1: While indicating the current time on LCD, press Menu key to set Key Touch Tone. Select an item by either of the following operations. • Highlight an item by using , and then press , or OK soft key. • Press 3 key. 55 Key Touch Tone is a tone generated when the digit keys are pressed while DT Series...
... key. • Press 1 key. [Setting] 1 User Setting 2 Download 3 Data Backup/Restore Back OK STEP 4: Select 2 Talk. STEP 1: While indicating the current time on LCD, press Menu key to set Key Touch Tone. Select an item by either of the following operations. • Highlight an item by using , and then press , or OK soft key. • Press 3 key. 55 Key Touch Tone is a tone generated when the digit keys are pressed while DT Series...
User Manual
Page 65
... Menu screen. Select an item by either of the following operations. • Highlight an item by using , and then press , or OK soft key. • Press 2 key. [User Setting] 1 Incoming Call 2 Talk 3 Display 4 Change Password 5 Security 6 Peripherals 0 Setting Reset Back OK STEP 5: Select 4 Hold Music. Select an item by either of the following operations. • Highlight an item by using , and then press , or OK soft key. • Press 1 key. [Setting] 1 User Setting 2 Download 3 Data...
... Menu screen. Select an item by either of the following operations. • Highlight an item by using , and then press , or OK soft key. • Press 2 key. [User Setting] 1 Incoming Call 2 Talk 3 Display 4 Change Password 5 Security 6 Peripherals 0 Setting Reset Back OK STEP 5: Select 4 Hold Music. Select an item by either of the following operations. • Highlight an item by using , and then press , or OK soft key. • Press 1 key. [Setting] 1 User Setting 2 Download 3 Data...

User Manual
Page 71
... 1: While indicating the current time on the XML service, contact the Sys- Select an item by either of the following operations. • Highlight an item by using , and then press , or OK soft key. • Press 3 key. [User Setting] 1 Incoming Call 2 Talk 3 Display 4 Change Password 5 Security 6 Peripherals 0 Setting Reset Back OK 63 Select an item by either of time. STEP 2: Select 5 Setting (DT730) / 2 Setting (DT710) on the Menu screen.
... 1: While indicating the current time on the XML service, contact the Sys- Select an item by either of the following operations. • Highlight an item by using , and then press , or OK soft key. • Press 3 key. [User Setting] 1 Incoming Call 2 Talk 3 Display 4 Change Password 5 Security 6 Peripherals 0 Setting Reset Back OK 63 Select an item by either of time. STEP 2: Select 5 Setting (DT730) / 2 Setting (DT710) on the Menu screen.

User Manual
Page 73
... , or OK soft key. • Press 3 key. [User Setting] 1 Incoming Call 2 Talk 3 Display 4 Change Password 5 Security 6 Peripherals 0 Setting Reset Back OK STEP 5: Select 4 Back Light. The backlights illuminate (for approximately 10 seconds) when you press any key or lifts the handset. STEP 2: Select 5 Setting. Select an item by either of LCD and digit keys. STEP 1: While indicating the current time on LCD, press Menu key to enable/disable the backlights of the...
... , or OK soft key. • Press 3 key. [User Setting] 1 Incoming Call 2 Talk 3 Display 4 Change Password 5 Security 6 Peripherals 0 Setting Reset Back OK STEP 5: Select 4 Back Light. The backlights illuminate (for approximately 10 seconds) when you press any key or lifts the handset. STEP 2: Select 5 Setting. Select an item by either of LCD and digit keys. STEP 1: While indicating the current time on LCD, press Menu key to enable/disable the backlights of the...

User Manual
Page 79
... OK soft key. • Press 4 key. [User Setting] 1 Incoming Call 2 Talk 3 Display 4 Change Password 5 Security 6 Peripherals 0 Setting Reset Back OK STEP 5: The Change Password screen is used for the following operations. • Highlight an item by using , and then press , or OK soft key. • Press 1 key. [Setting] 1 User Setting 2 Download 3 Data Backup/Restore Back OK STEP 4: Select 4 Change Password. This password is displayed. STEP 1: While indicating the current time on LCD, press Menu key to open the Menu screen. Select an...
... OK soft key. • Press 4 key. [User Setting] 1 Incoming Call 2 Talk 3 Display 4 Change Password 5 Security 6 Peripherals 0 Setting Reset Back OK STEP 5: The Change Password screen is used for the following operations. • Highlight an item by using , and then press , or OK soft key. • Press 1 key. [Setting] 1 User Setting 2 Download 3 Data Backup/Restore Back OK STEP 4: Select 4 Change Password. This password is displayed. STEP 1: While indicating the current time on LCD, press Menu key to open the Menu screen. Select an...
User Manual
Page 80
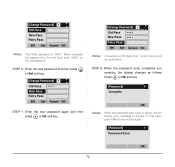
... key. [Password] 1 Complete OK Note: When the password entry ends in failure, the following error message is "0000". When changing the password for the first time, enter "0000" as follows. STEP 8: When the password entry completes successfully, the display changes as the old password. STEP 6: Enter the new password and then press or Set soft key. [Change Password] 1 Old Pass New Pass Retry Pass **** BK Set Cancel OK STEP 7: Enter the new password...
... key. [Password] 1 Complete OK Note: When the password entry ends in failure, the following error message is "0000". When changing the password for the first time, enter "0000" as follows. STEP 8: When the password entry completes successfully, the display changes as the old password. STEP 6: Enter the new password and then press or Set soft key. [Change Password] 1 Old Pass New Pass Retry Pass **** BK Set Cancel OK STEP 7: Enter the new password...

User Manual
Page 81
... key. • Press 1 key. [Setting] 1 User Setting 2 Download 3 Data Backup/Restore Back OK STEP 4: Select 0 Setting Reset. Select an item by either of the following explains how to open the Menu screen. STEP 2: Select 5 Setting (DT730) / 2 Setting (DT710) Select an item by either of the following operations. • Highlight an item by using , and then press , or OK soft key. • Press 0 key. [User Setting] 1 Incoming Call 2 Talk 3 Display 4 Change Password 5 Security 6 Peripherals 0 Setting Reset...
... key. • Press 1 key. [Setting] 1 User Setting 2 Download 3 Data Backup/Restore Back OK STEP 4: Select 0 Setting Reset. Select an item by either of the following explains how to open the Menu screen. STEP 2: Select 5 Setting (DT730) / 2 Setting (DT710) Select an item by either of the following operations. • Highlight an item by using , and then press , or OK soft key. • Press 0 key. [User Setting] 1 Incoming Call 2 Talk 3 Display 4 Change Password 5 Security 6 Peripherals 0 Setting Reset...

User Manual
Page 131
... telephone number needs to be made with Security key. The LCD turns to time display. (Security mode is activated). For the setting of the emergency number, contact the system administrator. When telephone numbers other than the predetermined emergency number are dialed, the following message appears (after a few seconds, the display goes back to "Dial Emergency Number Only" screen). When pressing Unlock soft key, the telephone prompts for the Security mode cancellation password. Note: You can make a call...
... telephone number needs to be made with Security key. The LCD turns to time display. (Security mode is activated). For the setting of the emergency number, contact the system administrator. When telephone numbers other than the predetermined emergency number are dialed, the following message appears (after a few seconds, the display goes back to "Dial Emergency Number Only" screen). When pressing Unlock soft key, the telephone prompts for the Security mode cancellation password. Note: You can make a call...

User Manual
Page 145
... 2010 STEP 6: Dial busy station. appears on LCD. STEP 4: Dial "Call Waiting" feature access code. displays on LCD. Or - To Activate Call Waiting - STEP 5: By repeating these steps, it is sent to alternate between calls. STEP 5: Dial "Call Waiting" access code, receive dial tone. STEP 4: Lift handset or press Speaker key. Trunk type Trunk number CAMP ON DDD 3 1:25 PM MON 12 JUL 2010 STEP 2: Press CALL WAITING. Note: To program a hook switch for transfer or feature activation, press Recall as first digit.
... 2010 STEP 6: Dial busy station. appears on LCD. STEP 4: Dial "Call Waiting" feature access code. displays on LCD. Or - To Activate Call Waiting - STEP 5: By repeating these steps, it is sent to alternate between calls. STEP 5: Dial "Call Waiting" access code, receive dial tone. STEP 4: Lift handset or press Speaker key. Trunk type Trunk number CAMP ON DDD 3 1:25 PM MON 12 JUL 2010 STEP 2: Press CALL WAITING. Note: To program a hook switch for transfer or feature activation, press Recall as first digit.
User Manual
Page 239
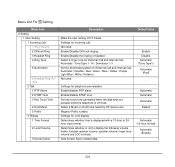
...Prefix number. Automatic Automatic Automatic Default - Settings for incoming call. Enable/disable RTP alarm. Select a Music on Hold to display the following volume levels: handset receiver volume, speaker volume, ringer tone volume and LCD contrast. Automatic / Tone Type 1~14 / Download 1~3 Set the illumination pattern for External Call and Internal Call. Menu List For 5 Setting Menu Item 5 Setting 1 User Setting 1 Incoming Call 1 Ring Volume 2 Offhook Ring 3 Headset Ring 4 Ring Tone 5 Illumination 6 Headset Ring Volume 2 Talk 1 RTP Alarm 2 DTMF Tone 3 Key Touch Tone 4 Hold Music 5 Prefix...
...Prefix number. Automatic Automatic Automatic Default - Settings for incoming call. Enable/disable RTP alarm. Select a Music on Hold to display the following volume levels: handset receiver volume, speaker volume, ringer tone volume and LCD contrast. Automatic / Tone Type 1~14 / Download 1~3 Set the illumination pattern for External Call and Internal Call. Menu List For 5 Setting Menu Item 5 Setting 1 User Setting 1 Incoming Call 1 Ring Volume 2 Offhook Ring 3 Headset Ring 4 Ring Tone 5 Illumination 6 Headset Ring Volume 2 Talk 1 RTP Alarm 2 DTMF Tone 3 Key Touch Tone 4 Hold Music 5 Prefix...

User Manual
Page 243
... digit keys are pressed while the telephone is displayed with a 12-hour or 24hour clock format. Determines whether or not to lock/unlock the telephone. Select a Music on Hold to be heard by DT Series user. Set the Wait Time to launch Screen Saver Select a language to be displayed on LCD. Enable/disable DTMF tone. Change the password to display the following volume levels: handset receiver volume, speaker volume, ringer tone volume and LCD contrast. Automatic / Tone Type 1~14 Not used. Sets Screen Saver related data. Reset...
... digit keys are pressed while the telephone is displayed with a 12-hour or 24hour clock format. Determines whether or not to lock/unlock the telephone. Select a Music on Hold to be heard by DT Series user. Set the Wait Time to launch Screen Saver Select a language to be displayed on LCD. Enable/disable DTMF tone. Change the password to display the following volume levels: handset receiver volume, speaker volume, ringer tone volume and LCD contrast. Automatic / Tone Type 1~14 Not used. Sets Screen Saver related data. Reset...


