
User Manual
Page 11
...8226; Wallpaper • Text Size • Theme • Home Icons • Backlight • Timer • Java Timer • PTT Backlight • Slide Close • Continue Task • End Task • Clock • Display • Time Format • Date Format • Year • Menu View... • Language Phone Calls • Set Line • Any Key Ans • Auto Redial • Call Waiting • Auto Ans • Slide Activation • Minute Beep • Call Duration • TTY • Hearing Aid • Notifications • DTMF Dialing • Call Forward •...
...8226; Wallpaper • Text Size • Theme • Home Icons • Backlight • Timer • Java Timer • PTT Backlight • Slide Close • Continue Task • End Task • Clock • Display • Time Format • Date Format • Year • Menu View... • Language Phone Calls • Set Line • Any Key Ans • Auto Redial • Call Waiting • Auto Ans • Slide Activation • Minute Beep • Call Duration • TTY • Hearing Aid • Notifications • DTMF Dialing • Call Forward •...
User Manual
Page 15
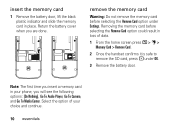
... SD card, press - Return the battery cover when you are done. insert the memory card 1 Remove the battery door, lift the black plastic indicator and slide the memory card in your choice and continue. 10 essentials Removing the memory card before selecting the Remove Card option under OK. 3 Remove the battery...
... SD card, press - Return the battery cover when you are done. insert the memory card 1 Remove the battery door, lift the black plastic indicator and slide the memory card in your choice and continue. 10 essentials Removing the memory card before selecting the Remove Card option under OK. 3 Remove the battery...
User Manual
Page 16
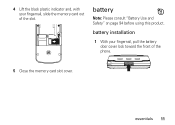
4 Lift the black plastic indicator and, with your fingernail, pull the battery door cover lock toward the front of the slot. essentials 11 battery installation 1 With your fingernail, slide the memory card out of the phone. 5 Close the memory card slot cover. battery Note: Please consult "Battery Use and Safety" on page 94 before using this product.
4 Lift the black plastic indicator and, with your fingernail, pull the battery door cover lock toward the front of the slot. essentials 11 battery installation 1 With your fingernail, slide the memory card out of the phone. 5 Close the memory card slot cover. battery Note: Please consult "Battery Use and Safety" on page 94 before using this product.
User Manual
Page 17
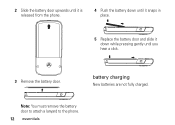
Note: You must remove the battery door to attach a lanyard to the phone. 12 essentials 2 Slide the battery door upwards until it is released from the phone. 4 Push the battery down until it snaps in place. 5 Replace the battery door and slide it down while pressing gently until you hear a click. 3 Remove the battery door. battery charging New batteries are not fully charged.
Note: You must remove the battery door to attach a lanyard to the phone. 12 essentials 2 Slide the battery door upwards until it is released from the phone. 4 Push the battery down until it snaps in place. 5 Replace the battery door and slide it down while pressing gently until you hear a click. 3 Remove the battery door. battery charging New batteries are not fully charged.

User Manual
Page 48
... rotate the handset as well for the hearing impaired using your phone with cochlear implants: optimize your handset position and orientation While in a phone call slide your phone up and down, then left and right until best microphone coupling is telecoil equipped or needs an auxiliary magnet, please refer to adjust...
... rotate the handset as well for the hearing impaired using your phone with cochlear implants: optimize your handset position and orientation While in a phone call slide your phone up and down, then left and right until best microphone coupling is telecoil equipped or needs an auxiliary magnet, please refer to adjust...
User Manual
Page 50
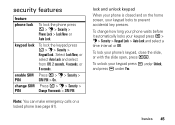
... a locked phone (see page 81). To lock your keypad press K under Unlock, and press K under Yes. To unlock your phone's keypad, close the slide, or with the slide open, press /*. basics 45 security features feature phone lock keypad lock enable SIM PIN change how long your phone waits before it automatically locks...
... a locked phone (see page 81). To lock your keypad press K under Unlock, and press K under Yes. To unlock your phone's keypad, close the slide, or with the slide open, press /*. basics 45 security features feature phone lock keypad lock enable SIM PIN change how long your phone waits before it automatically locks...
User Manual
Page 51
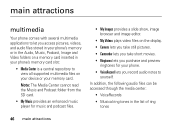
... Music and Podcast folder from the SD card. • My Music provides an enhanced music player for music and podcast files. • My Images provides a slide show, image browser and image editor. • My Videos plays video files on the display. • Camera lets you take still pictures. • Camcorder lets...
... Music and Podcast folder from the SD card. • My Music provides an enhanced music player for music and podcast files. • My Images provides a slide show, image browser and image editor. • My Videos plays video files on the display. • Camera lets you take still pictures. • Camcorder lets...
User Manual
Page 63
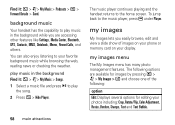
... main attractions Find it : / > j> My Music > Songs. 1 Select a music file and press y to play music in the background while you easily browse, edit and view a slide show of the following options are accessing other features like Settings, Media Center, Bluetooth, GPS, Contacts, MMS, Datebook, Memo, Recent Calls, and others.
... main attractions Find it : / > j> My Music > Songs. 1 Select a music file and press y to play music in the background while you easily browse, edit and view a slide show of the following options are accessing other features like Settings, Media Center, Bluetooth, GPS, Contacts, MMS, Datebook, Memo, Recent Calls, and others.

User Manual
Page 64
... highlighted image. The # or * keys can also be used to delete at one time. Find it : / > j > My Images. 1 Press / > Slideshow to a Contact. option Slideshow: Starts a slide show of all images in the current folder. 2 Press ; Rename: Lets you chose multiple images to scroll the images.
... highlighted image. The # or * keys can also be used to delete at one time. Find it : / > j > My Images. 1 Press / > Slideshow to a Contact. option Slideshow: Starts a slide show of all images in the current folder. 2 Press ; Rename: Lets you chose multiple images to scroll the images.

User Manual
Page 65
... On and Off. Reverbs: Lets you take pictures aim the camera lens and press K under Discard. Note: The Camera function is available only when the slide is open. To discard the picture without saving it : / > j > My Videos > / > Setup The My Videos Setup Menu allows you to landscape mode press / > Full Screen...
... On and Off. Reverbs: Lets you take pictures aim the camera lens and press K under Discard. Note: The Camera function is available only when the slide is open. To discard the picture without saving it : / > j > My Videos > / > Setup The My Videos Setup Menu allows you to landscape mode press / > Full Screen...

User Manual
Page 68
.... Remove Card: To safely remove the memory card from the viewfinder by pressing left and right. Note: The Camcorder function is available only when the slide is open. main attractions 63 Zoom: To set picture size from the phone. Find it: / > j > Camcorder record video 1 Press K under Record, or press r. 2 To stop...
.... Remove Card: To safely remove the memory card from the viewfinder by pressing left and right. Note: The Camcorder function is available only when the slide is open. main attractions 63 Zoom: To set picture size from the phone. Find it: / > j > Camcorder record video 1 Press K under Record, or press r. 2 To stop...

User Manual
Page 86
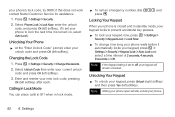
...open sky and your phone's GPS Enabled feature can help emergency service personnel find you, if you are on the screen. If the slide is locked, or if your local emergency number to be placed due to reveal the keypad. Your phone's preprogrammed emergency number(s) may... limitations of this feature, always provide your location, to an emergency response center. Dial 911 or your phone is closed, push up the slide to network, environmental, or interference issues. If you make an emergency call . international calls If your phone service includes international dialing, press ...
...open sky and your phone's GPS Enabled feature can help emergency service personnel find you, if you are on the screen. If the slide is locked, or if your local emergency number to be placed due to reveal the keypad. Your phone's preprogrammed emergency number(s) may... limitations of this feature, always provide your location, to an emergency response center. Dial 911 or your phone is closed, push up the slide to network, environmental, or interference issues. If you make an emergency call . international calls If your phone service includes international dialing, press ...

User Guide
Page 13
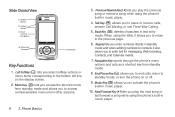
Left Softkey 2. Menu Key 3. Back Key 12. Next/ Forward Key 9. End/ Power Key 7. Phone Basics 5 Phone Basics 2. OK/Play Key 10. Phone Basics ࡗ Your Phone (page 5) ࡗ Getting Started With Your Phone (page 7) ࡗ Navigating Through Menus and Options (page 13) ࡗ Displaying Your Numbers (page 15) ࡗ Entering Text (page 15) ࡗ Accessories (page 19) Your Phone Slide Open View 1. Navigation Key 6. Keypad 2. Previous / Rewind Key 4. Talk Key 5. Right Softkey 11. Music Key 8.
Left Softkey 2. Menu Key 3. Back Key 12. Next/ Forward Key 9. End/ Power Key 7. Phone Basics 5 Phone Basics 2. OK/Play Key 10. Phone Basics ࡗ Your Phone (page 5) ࡗ Getting Started With Your Phone (page 7) ࡗ Navigating Through Menus and Options (page 13) ࡗ Displaying Your Numbers (page 15) ࡗ Entering Text (page 15) ࡗ Accessories (page 19) Your Phone Slide Open View 1. Navigation Key 6. Keypad 2. Previous / Rewind Key 4. Talk Key 5. Right Softkey 11. Music Key 8.
User Guide
Page 14
... from standby mode and allows you to standby mode, or turn the phone on the display screen. 2. Music Key ([) allows you to the previous page. 6. Slide Closed View 13. Speaker Button 14. Direct Connect (DC) Button 16. End/Power Key (.) allows you to return to access context-sensitive menus from standby...
... from standby mode and allows you to standby mode, or turn the phone on the display screen. 2. Music Key ([) allows you to the previous page. 6. Slide Closed View 13. Speaker Button 14. Direct Connect (DC) Button 16. End/Power Key (.) allows you to return to access context-sensitive menus from standby...
User Guide
Page 16
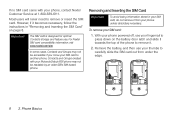
... and Inserting the SIM Card Important To avoid losing information stored in "Removing and Inserting the SIM Card" on the battery door latch and slide it towards the top of the phone to remove or insert the SIM card. However, if it becomes necessary, follow the instructions in your... SIM card, do not remove it . 2. Phone Basics If no SIM card came with your Motorola Debut i856 phone may not be readable by an older iDEN SIM-based phone. Contacts and Groups created with your phone unless absolutely necessary.
... and Inserting the SIM Card Important To avoid losing information stored in "Removing and Inserting the SIM Card" on the battery door latch and slide it towards the top of the phone to remove or insert the SIM card. However, if it becomes necessary, follow the instructions in your... SIM card, do not remove it . 2. Phone Basics If no SIM card came with your Motorola Debut i856 phone may not be readable by an older iDEN SIM-based phone. Contacts and Groups created with your phone unless absolutely necessary.

User Guide
Page 17
... Phone Basics 9 Battery and Charger WARNING Use only Nextel-approved or Motorolaapproved batteries and chargers with your SIM card. The failure to carefully slide the SIM card into your phone until it lies flat in serious bodily injury, death, or property damage. Important Do not touch the ...gold-colored areas of its capacity, your SIM card: 1. Nextel-approved and Motorola-approved batteries and accessories can be found at www.nextel.com or by calling 1-866-866-7509. Remove the battery, and then use your ...
... Phone Basics 9 Battery and Charger WARNING Use only Nextel-approved or Motorolaapproved batteries and chargers with your SIM card. The failure to carefully slide the SIM card into your phone until it lies flat in serious bodily injury, death, or property damage. Important Do not touch the ...gold-colored areas of its capacity, your SIM card: 1. Nextel-approved and Motorola-approved batteries and accessories can be found at www.nextel.com or by calling 1-866-866-7509. Remove the battery, and then use your ...

User Guide
Page 18
... may reduce the battery's talk and standby times. Phone Basics Replace the battery cover and gently press and slide it down to remove it clicks into the opening, making sure the connectors align. Gently slide the battery cover forward to secure the battery. 4. Note Long backlight settings, searching for service, vibrate mode...
... may reduce the battery's talk and standby times. Phone Basics Replace the battery cover and gently press and slide it down to remove it clicks into the opening, making sure the connectors align. Gently slide the battery cover forward to secure the battery. 4. Note Long backlight settings, searching for service, vibrate mode...

User Guide
Page 29
... settings, you can also place calls from your phone by using your Recent Call list (page 26). Making and Answering Calls 21 To set Slide to Ans and Slide to End to erase the numbers.) 3. when you of ringing or vibrating, the indicator light flashing, the backlight illuminating, or the screen displaying... your phone is on page 85 more information. Your phone notifies you are finished. Phone Calls Making Calls Placing a traditional wireless phone call from your Motorola Debut i856 is as easy as making a call from any number key.
... settings, you can also place calls from your phone by using your Recent Call list (page 26). Making and Answering Calls 21 To set Slide to Ans and Slide to End to erase the numbers.) 3. when you of ringing or vibrating, the indicator light flashing, the backlight illuminating, or the screen displaying... your phone is on page 85 more information. Your phone notifies you are finished. Phone Calls Making Calls Placing a traditional wireless phone call from your Motorola Debut i856 is as easy as making a call from any number key.
User Guide
Page 94
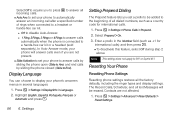
... The Prepend feature lets you set a prefix to be erased, Contacts are not present. Ⅲ Slide Activation to set your phone to answer calls by sliding the phone open (Slide to Ans) and end calls by sliding the phone closed (Slide to End). Select Prepend > On. 3. The Recent Calls, Scheduler, and all text Messages will...
... The Prepend feature lets you set a prefix to be erased, Contacts are not present. Ⅲ Slide Activation to set your phone to answer calls by sliding the phone open (Slide to Ans) and end calls by sliding the phone closed (Slide to End). Select Prepend > On. 3. The Recent Calls, Scheduler, and all text Messages will...
User Guide
Page 100
Changing the Lock Code 1. Enter and reenter your keypad, press Unlock (right softkey) and then press Yes (left softkey). Note Sliding your keypad, press / > Settings > Security > Keypad Lock > Auto Lock and select a time interval of 2 seconds, 4 seconds, 8 seconds or Off. Unlocking Your Keypad ᮣ To unlock ...
Changing the Lock Code 1. Enter and reenter your keypad, press Unlock (right softkey) and then press Yes (left softkey). Note Sliding your keypad, press / > Settings > Security > Keypad Lock > Auto Lock and select a time interval of 2 seconds, 4 seconds, 8 seconds or Off. Unlocking Your Keypad ᮣ To unlock ...


