User Manual
Page 3
... require an update or other service. For warranty service of your Motorola product, you should your dated sales receipt to www.motorola.com/talkabout 1 Introduction Introduction Congratulations on -line, visit www.motorola.com/warranty/radios. For a copy of a large-print version of a Motorola product! To register your product on your records. Please retain your original dated...
... require an update or other service. For warranty service of your Motorola product, you should your dated sales receipt to www.motorola.com/talkabout 1 Introduction Introduction Congratulations on -line, visit www.motorola.com/warranty/radios. For a copy of a large-print version of a Motorola product! To register your product on your records. Please retain your original dated...
User Manual
Page 4
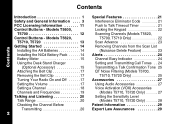
Models T5620, T5710, T5720 13 Getting Started 14 Installing the AA Batteries 14 Installing the NiCd Battery Pack . . . . . .14 Battery Meter 15 Using the Desk Stand Charger (Optional Accessory 15 Attaching the Belt Clip 17 Removing the Belt Clip 17 Turning Your Radio On and Off . . . . . .17 Setting the Volume 17 Setting a Channel...
Models T5620, T5710, T5720 13 Getting Started 14 Installing the AA Batteries 14 Installing the NiCd Battery Pack . . . . . .14 Battery Meter 15 Using the Desk Stand Charger (Optional Accessory 15 Attaching the Belt Clip 17 Removing the Belt Clip 17 Turning Your Radio On and Off . . . . . .17 Setting the Volume 17 Setting a Channel...
User Manual
Page 5
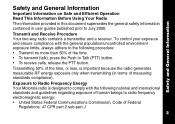
Exposure to Radio Frequency Energy Your Motorola radio is important because the radio generates measurable RF energy exposure only when transmitting (in user guides published prior to radio frequency electromagnetic energy: • United States Federal Communications Commission, Code of Federal ...General Information Safety and General Information Important Information on Safe and Efficient Operation Read This Information Before Using Your Radio The information provided in this document supersedes the general safety information contained in terms of measuring standards compliance)....
Exposure to Radio Frequency Energy Your Motorola radio is important because the radio generates measurable RF energy exposure only when transmitting (in user guides published prior to radio frequency electromagnetic energy: • United States Federal Communications Commission, Code of Federal ...General Information Safety and General Information Important Information on Safe and Efficient Operation Read This Information Before Using Your Radio The information provided in this document supersedes the general safety information contained in terms of measuring standards compliance)....
User Manual
Page 6
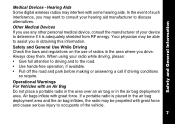
...1999 • Australian Communications Authority Radiocommunications (Electromagnetic Radiation - To assure optimal radio performance and make sure human exposure to radio frequency electromagnetic energy is "IN USE." Portable Radio Operation and EME Exposure Antenna Care Use only the supplied or an approved ...Commission on Non-Ionizing Radiation Protection (ICNIRP) 1998 • Ministry of Human Exposure to Radio Frequency Electromagnetic Fields in the above standards, always adhere to the following procedures. Unauthorized antennas, modifications, or attachments could damage ...
...1999 • Australian Communications Authority Radiocommunications (Electromagnetic Radiation - To assure optimal radio performance and make sure human exposure to radio frequency electromagnetic energy is "IN USE." Portable Radio Operation and EME Exposure Antenna Care Use only the supplied or an approved ...Commission on Non-Ionizing Radiation Protection (ICNIRP) 1998 • Ministry of Human Exposure to Radio Frequency Electromagnetic Fields in the above standards, always adhere to the following procedures. Unauthorized antennas, modifications, or attachments could damage ...
User Manual
Page 7
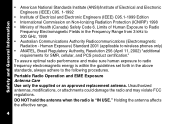
... visit our website at least one inch (2.5 cm) from your body when transmitting. If you wear a radio on your body when transmitting, always place the radio in a Motorola-supplied or approved clip, holder, holster, case, or body harness for electromagnetic compatibility. 5 Electromagnetic Interference/Compatibility.... Data Operation If applicable, when using any data feature of the Motorola-supplied or approved body-worn accessories, and are not using the radio held in the normal use position, ensure the radio and its antenna at least one to two inches (2.5 to electromagnetic ...
... visit our website at least one inch (2.5 cm) from your body when transmitting. If you wear a radio on your body when transmitting, always place the radio in a Motorola-supplied or approved clip, holder, holster, case, or body harness for electromagnetic compatibility. 5 Electromagnetic Interference/Compatibility.... Data Operation If applicable, when using any data feature of the Motorola-supplied or approved body-worn accessories, and are not using the radio held in the normal use position, ensure the radio and its antenna at least one to two inches (2.5 to electromagnetic ...
User Manual
Page 8
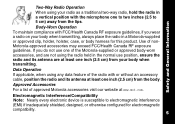
... • Use the ear opposite the pacemaker to minimize the potential for interference. • Turn the radio OFF immediately if you to do so, turn off your radio in any facility where posted notices instruct you have any reason to suspect that is taking place. 6 ...using equipment that interference is sensitive to do so. Hospitals or health care facilities may be maintained between a handheld wireless radio and a pacemaker. Any use of the U.S. Safety and General Information Facilities To avoid electromagnetic interference and/or compatibility conflicts, turn off your...
... • Use the ear opposite the pacemaker to minimize the potential for interference. • Turn the radio OFF immediately if you to do so, turn off your radio in any facility where posted notices instruct you have any reason to suspect that is taking place. 6 ...using equipment that interference is sensitive to do so. Hospitals or health care facilities may be maintained between a handheld wireless radio and a pacemaker. Any use of the U.S. Safety and General Information Facilities To avoid electromagnetic interference and/or compatibility conflicts, turn off your...
User Manual
Page 9
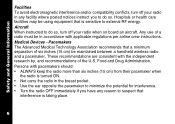
... to occupants of the vehicle. 7 Operational Warnings For Vehicles with great force. Air bags inflate with an Air Bag Do not place a portable radio in the area over an air bag or in the air bag deployment area. Other Medical Devices If you use of your device to assist... you drive. Always obey them. Your physician may be able to determine if it is placed in obtaining this information. If a portable radio is adequately shielded from RF energy. When using your hearing aid manufacturer to the road. • Use hands-free operation, if available. • ...
... to occupants of the vehicle. 7 Operational Warnings For Vehicles with great force. Air bags inflate with an Air Bag Do not place a portable radio in the area over an air bag or in the air bag deployment area. Other Medical Devices If you use of your device to assist... you drive. Always obey them. Your physician may be able to determine if it is placed in obtaining this information. If a portable radio is adequately shielded from RF energy. When using your hearing aid manufacturer to the road. • Use hands-free operation, if available. • ...
User Manual
Page 10
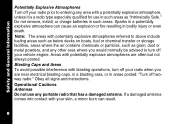
... are near electrical blasting caps, in a blasting area, or in such areas as grain, dust or metal powders, and any portable radio that has a damaged antenna. Sparks in a potentially explosive atmosphere can result. 8 Areas with potentially explosive atmospheres referred to entering any ...contains chemicals or particles, such as "Intrinsically Safe." Operational Cautions Antennas Do not use in areas posted: "Turn off twoway radio." Safety and General Information Potentially Explosive Atmospheres Turn off your vehicle engine. Do not remove, install, or charge batteries in bodily...
... are near electrical blasting caps, in a blasting area, or in such areas as grain, dust or metal powders, and any portable radio that has a damaged antenna. Sparks in a potentially explosive atmosphere can result. 8 Areas with potentially explosive atmospheres referred to entering any ...contains chemicals or particles, such as "Intrinsically Safe." Operational Cautions Antennas Do not use in areas posted: "Turn off twoway radio." Safety and General Information Potentially Explosive Atmospheres Turn off your vehicle engine. Do not remove, install, or charge batteries in bodily...
User Manual
Page 13
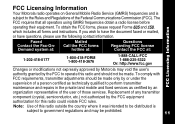
... of those services. FCC Licensing Information Your Motorola radio operates on General Mobile Radio Service (GMRS) frequencies and is subject to government regulations and may void the user's authority granted by the FCC to operate this radio could violate FCC rules. The FCC requires ... which includes all operators using GMRS frequencies obtain a radio license before operating their equipment. Replacement of any transmitter component (crystal, semiconductor, etc.) not authorized by Motorola may be made . Note: Use of this radio outside the country where it was intended to be ...
... of those services. FCC Licensing Information Your Motorola radio operates on General Mobile Radio Service (GMRS) frequencies and is subject to government regulations and may void the user's authority granted by the FCC to operate this radio could violate FCC rules. The FCC requires ... which includes all operators using GMRS frequencies obtain a radio license before operating their equipment. Replacement of any transmitter component (crystal, semiconductor, etc.) not authorized by Motorola may be made . Note: Use of this radio outside the country where it was intended to be ...
User Manual
Page 14
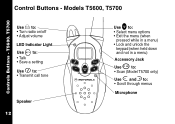
T5600. T5700 Use P to: • Turn radio on/off • Adjust volume LED Indicator Light Use M to: • Talk • Save a setting Use ^ to: • Transmit call tone Speaker 12 Use \ to: • Select menu options • Exit the menu (when pressed while in a menu) • Lock and unlock the keypad (when held down and not in a menu) Accessory Jack Use Q to: • Scan (Model T5700 only) Use [ and ]to: • Scroll through menus Microphone Control Buttons - Models T5600, T5700 Controls Buttons -
T5600. T5700 Use P to: • Turn radio on/off • Adjust volume LED Indicator Light Use M to: • Talk • Save a setting Use ^ to: • Transmit call tone Speaker 12 Use \ to: • Select menu options • Exit the menu (when pressed while in a menu) • Lock and unlock the keypad (when held down and not in a menu) Accessory Jack Use Q to: • Scan (Model T5700 only) Use [ and ]to: • Scroll through menus Microphone Control Buttons - Models T5600, T5700 Controls Buttons -
User Manual
Page 15
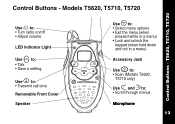
T5620, T5710, T5720 Use P to: • Turn radio on/off • Adjust volume LED Indicator Light Use M to: • Talk • Save a setting Use ^ to: • Transmit call tone Removable Front Cover Speaker Use \ to: • Select menu options • Exit the menu (when pressed while in a menu) • Lock and unlock the keypad (when held down and not in a menu) Accessory Jack Use J to: • Scan (Models T5620, T5710 only) Use [ and ]to: • Scroll through menus Microphone 13 Control Buttons - Models T5620, T5710, T5720 Control Buttons -
T5620, T5710, T5720 Use P to: • Turn radio on/off • Adjust volume LED Indicator Light Use M to: • Talk • Save a setting Use ^ to: • Transmit call tone Removable Front Cover Speaker Use \ to: • Select menu options • Exit the menu (when pressed while in a menu) • Lock and unlock the keypad (when held down and not in a menu) Accessory Jack Use J to: • Scan (Models T5620, T5710 only) Use [ and ]to: • Scroll through menus Microphone 13 Control Buttons - Models T5620, T5710, T5720 Control Buttons -
User Manual
Page 16
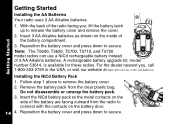
...the battery compartment. 3. Note: The T5600, T5620, T5700, T5710, and T5720 model radios can use a NiCd rechargeable battery instead of the radio facing you , call 1-800-353-2729 in the USA, or visit our website at www.motorola.com/talkabout. Insert 3 AA Alkaline batteries as shown on the battery door.... 14 4. A rechargeable battery upgrade kit, model number 53614, is available for these radios. Follow step 1 above to release the battery cover and remove ...
...the battery compartment. 3. Note: The T5600, T5620, T5700, T5710, and T5720 model radios can use a NiCd rechargeable battery instead of the radio facing you , call 1-800-353-2729 in the USA, or visit our website at www.motorola.com/talkabout. Insert 3 AA Alkaline batteries as shown on the battery door.... 14 4. A rechargeable battery upgrade kit, model number 53614, is available for these radios. Follow step 1 above to release the battery cover and remove ...
User Manual
Page 17
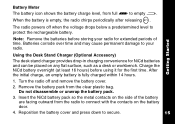
... the voltage drops below a predetermined level to protect the rechargeable battery. After the initial charge, an empty battery is empty, the radio chirps periodically after releasing M. Insert the NiCd battery pack so the metal contacts on the side of time. Batteries corrode over time .... 1. Getting Started Note: Remove the batteries before using it for extended periods of the battery are facing outward from the radio to your radio for the first time. The radio powers off and remove the battery cover. 2. Do not disassemble or unwrap the battery pack. 3. Using the Desk Stand ...
... the voltage drops below a predetermined level to protect the rechargeable battery. After the initial charge, an empty battery is empty, the radio chirps periodically after releasing M. Insert the NiCd battery pack so the metal contacts on the side of time. Batteries corrode over time .... 1. Getting Started Note: Remove the batteries before using it for extended periods of the battery are facing outward from the radio to your radio for the first time. The radio powers off and remove the battery cover. 2. Do not disassemble or unwrap the battery pack. 3. Using the Desk Stand ...
User Manual
Page 18
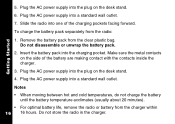
... separately from the clear plastic bag. Plug the AC power supply into the charging pocket. Remove the battery pack from the radio: 1. Do not store the radio in the charger. Notes • When moving between hot and cold temperatures, do not charge the battery until the battery temperature... acclimates (usually about 20 minutes). • For optimal battery life, remove the radio or battery from the charger within 16 16 hours. Plug the AC power supply into a standard wall outlet. 7. Plug the AC power supply...
... separately from the clear plastic bag. Plug the AC power supply into the charging pocket. Remove the battery pack from the radio: 1. Do not store the radio in the charger. Notes • When moving between hot and cold temperatures, do not charge the battery until the battery temperature... acclimates (usually about 20 minutes). • For optimal battery life, remove the radio or battery from the charger within 16 16 hours. Plug the AC power supply into a standard wall outlet. 7. Plug the AC power supply...
User Manual
Page 19
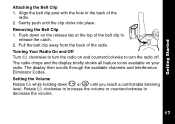
... P clockwise to increase the volume or counterclockwise to turn the radio off. Pull the belt clip away from the back of the radio. 2. Getting Started Attaching the Belt Clip 1. Turning Your Radio On and Off Turn P clockwise to turn the radio on and counterclockwise to decrease the volume. 17 Setting the Volume... Rotate P while holding down on your radio. Removing the Belt Clip 1. The radio chirps and the display briefly shows all feature icons available on the release tab at the top of the belt clip to release the...
... P clockwise to increase the volume or counterclockwise to turn the radio off. Pull the belt clip away from the back of the radio. 2. Getting Started Attaching the Belt Clip 1. Turning Your Radio On and Off Turn P clockwise to turn the radio on and counterclockwise to decrease the volume. 17 Setting the Volume... Rotate P while holding down on your radio. Removing the Belt Clip 1. The radio chirps and the display briefly shows all feature icons available on the release tab at the top of the belt clip to release the...
User Manual
Page 20
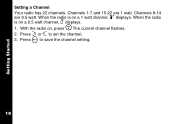
Press M to set the channel. 3. Channels 8-14 are 1 watt. The current channel flashes. 2. Getting Started Setting a Channel Your radio has 22 channels. When the radio is on a 0.5 watt channel, y displays. 1. When the radio is on , press \. Press ] or [ to save the channel setting. 18 With the radio on a 1 watt channel, z displays. Channels 1-7 and 15-22 are 0.5 watt.
Press M to set the channel. 3. Channels 8-14 are 1 watt. The current channel flashes. 2. Getting Started Setting a Channel Your radio has 22 channels. When the radio is on a 0.5 watt channel, y displays. 1. When the radio is on , press \. Press ] or [ to save the channel setting. 18 With the radio on a 1 watt channel, z displays. Channels 1-7 and 15-22 are 0.5 watt.
User Manual
Page 22
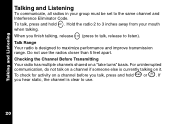
Checking the Channel Before Transmitting Your radio has multiple channels shared on it. Hold the radio 2 to the same channel and Interference Eliminator Code. To check for activity on a channel before you finish talking, release M (press to talk, release to listen). ... communication, do not talk on a channel if someone else is currently talking on a "take turns" basis. Talking and Listening Talking and Listening To communicate, all radios in your group must be set to 3 inches away from your mouth when talking. To talk, press and hold Q or J. Talk Range Your...
Checking the Channel Before Transmitting Your radio has multiple channels shared on it. Hold the radio 2 to the same channel and Interference Eliminator Code. To check for activity on a channel before you finish talking, release M (press to talk, release to listen). ... communication, do not talk on a channel if someone else is currently talking on a "take turns" basis. Talking and Listening Talking and Listening To communicate, all radios in your group must be set to 3 inches away from your mouth when talking. To talk, press and hold Q or J. Talk Range Your...
User Manual
Page 23
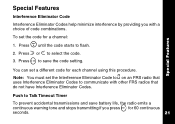
...the code setting. Push to select the code. 3. Note: You must set the Interference Eliminator Code to 0 on an FRS radio that do not have Interference Eliminator Codes. To set a different code for a channel: Special Features 1. Special Features Interference Eliminator... Code Interference Eliminator Codes help minimize interference by providing you with other FRS radios that uses Interference Eliminator Codes to save battery life, the radio emits a continuous warning tone and stops transmitting if you press M for 60 continuous seconds. 21 ...
...the code setting. Push to select the code. 3. Note: You must set the Interference Eliminator Code to 0 on an FRS radio that do not have Interference Eliminator Codes. To set a different code for a channel: Special Features 1. Special Features Interference Eliminator... Code Interference Eliminator Codes help minimize interference by providing you with other FRS radios that uses Interference Eliminator Codes to save battery life, the radio emits a continuous warning tone and stops transmitting if you press M for 60 continuous seconds. 21 ...
User Manual
Page 24
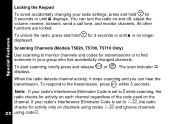
...The scan indicator h displays. To respond to the transmission, press M within 5 seconds. All other functions are locked. Scanning Channels (Models T5620, T5700, T5710 Only) Use scanning to monitor channels and codes for activity only on channels using codes 1-38 and ignores channels 22 using code 0. When the...off, adjust the volume, receive, transmit, send a call tone, and monitor channels. You can hear the transmission. To unlock the radio, press and hold \ for 3 seconds or until f is no longer displayed. Special Features Locking the Keypad To avoid accidentally changing your...
...The scan indicator h displays. To respond to the transmission, press M within 5 seconds. All other functions are locked. Scanning Channels (Models T5620, T5700, T5710 Only) Use scanning to monitor channels and codes for activity only on channels using codes 1-38 and ignores channels 22 using code 0. When the...off, adjust the volume, receive, transmit, send a call tone, and monitor channels. You can hear the transmission. To unlock the radio, press and hold \ for 3 seconds or until f is no longer displayed. Special Features Locking the Keypad To avoid accidentally changing your...
User Manual
Page 25
... and then back on. Note: You cannot remove the channel your radio was set to when you do not want to listen to, briefly press and release ] or [ to resume scanning for at least 3 seconds, then release. ...Removing Channels from the scan list. This temporarily removes the channel from the Scan List (Nuisance Delete Feature) To remove a channel so the radio does not stop on it while scanning, press and hold ] or [ for the next active channel. Special Features Scan Advance If the...
... and then back on. Note: You cannot remove the channel your radio was set to when you do not want to listen to, briefly press and release ] or [ to resume scanning for at least 3 seconds, then release. ...Removing Channels from the scan list. This temporarily removes the channel from the Scan List (Nuisance Delete Feature) To remove a channel so the radio does not stop on it while scanning, press and hold ] or [ for the next active channel. Special Features Scan Advance If the...


