User's Manual
Page 7
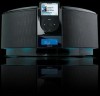
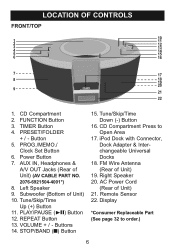
...*) 8. PLAY/PAUSE (®p) Button 12. Buttons 14. Power Button 7. AUX IN, Headphones & A/V OUT Jacks (Rear of Unit) 10. VOLUME + / - Tune/Skip/Time Down (-) Button 16. Remote Sensor 22. LOCATION OF CONTROLS FRONT/TOP 10 1 11 2 12 3 13 4 14 5 15 6 16 7 17 8 18 19 20 9 21 22 1. PROG./MEMO./ Clock Set Button...
...*) 8. PLAY/PAUSE (®p) Button 12. Buttons 14. Power Button 7. AUX IN, Headphones & A/V OUT Jacks (Rear of Unit) 10. VOLUME + / - Tune/Skip/Time Down (-) Button 16. Remote Sensor 22. LOCATION OF CONTROLS FRONT/TOP 10 1 11 2 12 3 13 4 14 5 15 6 16 7 17 8 18 19 20 9 21 22 1. PROG./MEMO./ Clock Set Button...
User's Manual
Page 8
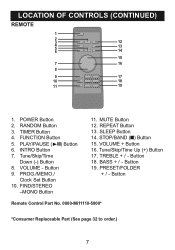
... (-) Button 8. VOLUME + Button 16. TIMER Button 4. FIND/STEREO -MONO Button 11. Button 19. PRESET/FOLDER + / - Tune/Skip/Time Up (+) Button 17. LOCATION OF CONTROLS (CONTINUED) REMOTE 1 2 3 12 4 13 5 6 14 15 7 16 8 9 17 10 18 11 19 1. POWER Button 2. RANDOM Button 3. STOP/BAND (I) Button 15. MUTE Button 12. FUNCTION Button 5. SLEEP Button...
... (-) Button 8. VOLUME + Button 16. TIMER Button 4. FIND/STEREO -MONO Button 11. Button 19. PRESET/FOLDER + / - Tune/Skip/Time Up (+) Button 17. LOCATION OF CONTROLS (CONTINUED) REMOTE 1 2 3 12 4 13 5 6 14 15 7 16 8 9 17 10 18 11 19 1. POWER Button 2. RANDOM Button 3. STOP/BAND (I) Button 15. MUTE Button 12. FUNCTION Button 5. SLEEP Button...
User's Manual
Page 9
...of time, remove the battery to prevent damage or injury from possible battery leakage. 5. Warning - Use only the size and type of the remote control) by filing the wider blade to be saved. A reversed battery may have been saved. This is connected again, the clock time will... continue running and the radio presets will be recharged; Danger of electric shock. REMOTE BATTERY INSTALLATION 1. Replace only with a polarized AC plug which has one blade wider than the AC Outlet other. Please note that you...
...of time, remove the battery to prevent damage or injury from possible battery leakage. 5. Warning - Use only the size and type of the remote control) by filing the wider blade to be saved. A reversed battery may have been saved. This is connected again, the clock time will... continue running and the radio presets will be recharged; Danger of electric shock. REMOTE BATTERY INSTALLATION 1. Replace only with a polarized AC plug which has one blade wider than the AC Outlet other. Please note that you...
User's Manual
Page 14
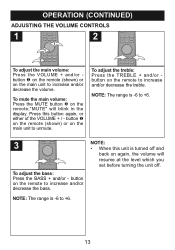
Press this unit is turned off . 13 button 1 on the remote (shown) or on again, the volume will blink in the display. NOTE: The range is -6 to +6. 3 To adjust the bass...8226; When this button again, or either of the VOLUME + / - To mute the main volume: Press the MUTE button 2 on the remote to increase and/or decrease the treble. To adjust the treble: Press the TREBLE + and/or button on the... remote;"MUTE" will resume at the level which you set before turning the unit off and back on the main...
Press this unit is turned off . 13 button 1 on the remote (shown) or on again, the volume will blink in the display. NOTE: The range is -6 to +6. 3 To adjust the bass...8226; When this button again, or either of the VOLUME + / - To mute the main volume: Press the MUTE button 2 on the remote to increase and/or decrease the treble. To adjust the treble: Press the TREBLE + and/or button on the... remote;"MUTE" will resume at the level which you set before turning the unit off and back on the main...
User's Manual
Page 15
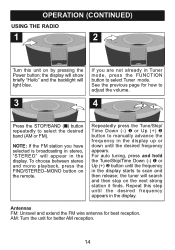
... show briefly "Hello" and the backlight will light blue. 3 1 If you have selected is broadcasting in stereo, "STEREO" will search and then stop on the remote. To choose between stereo and mono playback, press the FIND/STEREO-MONO button on the next strong station it finds. OPERATION (CONTINUED) USING THE RADIO...
... show briefly "Hello" and the backlight will light blue. 3 1 If you have selected is broadcasting in stereo, "STEREO" will search and then stop on the remote. To choose between stereo and mono playback, press the FIND/STEREO-MONO button on the next strong station it finds. OPERATION (CONTINUED) USING THE RADIO...
User's Manual
Page 20
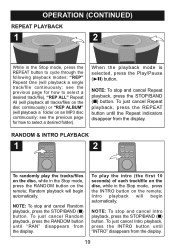
... REPEAT (will playback a single (®p) button. To play the tracks/files on the disc, while in the Stop mode, press the INTRO button on the remote; see the previous page for how to select a desired folder). button until "INTRO" disappears from the display. RANDOM & INTRO PLAYBACK 1 2 To randomly play the intro... (the first 10 seconds) of each track/file on the disc, while in the Stop mode, press the RANDOM button on the remote; To just cancel Random playback, press the RANDOM button until "RAN" disappears from the display. 19
... REPEAT (will playback a single (®p) button. To play the tracks/files on the disc, while in the Stop mode, press the INTRO button on the remote; see the previous page for how to select a desired folder). button until "INTRO" disappears from the display. RANDOM & INTRO PLAYBACK 1 2 To randomly play the intro... (the first 10 seconds) of each track/file on the disc, while in the Stop mode, press the RANDOM button on the remote; To just cancel Random playback, press the RANDOM button until "RAN" disappears from the display. 19
User's Manual
Page 24
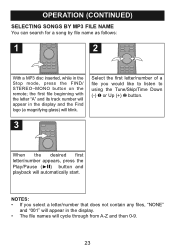
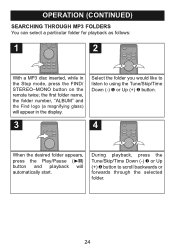
.... the first file beginning with the letter "A" and its track number will appear in the Stop mode, press the FIND/ STEREO-MONO button on the remote;
.... the first file beginning with the letter "A" and its track number will appear in the Stop mode, press the FIND/ STEREO-MONO button on the remote;
User's Manual
Page 25
... desired folder appears, press the Play/Pause (®p) button and playback will appear in the Stop mode, press the FIND/ STEREO-MONO button on the remote twice; the first folder name, the folder number, "ALBUM" and the Find logo (a magnifying glass) will automatically start.
... desired folder appears, press the Play/Pause (®p) button and playback will appear in the Stop mode, press the FIND/ STEREO-MONO button on the remote twice; the first folder name, the folder number, "ALBUM" and the Find logo (a magnifying glass) will automatically start.
User's Manual
Page 28
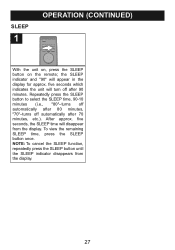
....). five seconds, the SLEEP time will appear in the display for approx. SLEEP 1 OPERATION (CONTINUED) With the unit on, press the SLEEP button on the remote;
....). five seconds, the SLEEP time will appear in the display for approx. SLEEP 1 OPERATION (CONTINUED) With the unit on, press the SLEEP button on the remote;
User's Manual
Page 33
... MATERIAL FOR AT LEAST 90 DAYS IN CASE YOU NEED TO RETURN THIS PRODUCT TO YOUR PLACE OF PURCHASE OR MEMOREX. SPECIFICATIONS GENERAL Power Source (Main Unit AC 120V, 60Hz Power Source (Remote Control) . . . . DC 3V, CR2025, Lithium Battery Speaker 4 ohm x 2 + 4 ohm (subwoofer) Output Power 5W x 2 +15W (subwoofer) RADIO SECTION Frequency Range...
... MATERIAL FOR AT LEAST 90 DAYS IN CASE YOU NEED TO RETURN THIS PRODUCT TO YOUR PLACE OF PURCHASE OR MEMOREX. SPECIFICATIONS GENERAL Power Source (Main Unit AC 120V, 60Hz Power Source (Remote Control) . . . . DC 3V, CR2025, Lithium Battery Speaker 4 ohm x 2 + 4 ohm (subwoofer) Output Power 5W x 2 +15W (subwoofer) RADIO SECTION Frequency Range...

