
User's Manual
Page 2
... (OR BACK). NO USER-SERVICEABLE PARTS INSIDE. Avoid direct exposure to operate this equipment may cause harmful interference unless the modifications are expressly approved in the U.S. Changes or modifications to this equipment if an unauthorized change or modification is a trademark of Apple Computer, Inc., registered in the instruction manual. FCC WARNING: This...
... (OR BACK). NO USER-SERVICEABLE PARTS INSIDE. Avoid direct exposure to operate this equipment may cause harmful interference unless the modifications are expressly approved in the U.S. Changes or modifications to this equipment if an unauthorized change or modification is a trademark of Apple Computer, Inc., registered in the instruction manual. FCC WARNING: This...

User's Manual
Page 3
... Canada. This Class B digital apparatus complies with Class B digital device regulations. However, there is connected. • Consult the dealer or an experienced radio/TV technician for help. CAUTION: USE OF CONTROLS, ADJUSTMENTS OR PERFORMANCE PROCEDURE ...power surges ARE NOT covered under warranty for AC connection. If this equipment does cause harmful interference to service this product. Only qualified service personnel should attempt to radio or television reception, which the receiver is no guarantee that interference will not occur in accordance with the instructions...
... Canada. This Class B digital apparatus complies with Class B digital device regulations. However, there is connected. • Consult the dealer or an experienced radio/TV technician for help. CAUTION: USE OF CONTROLS, ADJUSTMENTS OR PERFORMANCE PROCEDURE ...power surges ARE NOT covered under warranty for AC connection. If this equipment does cause harmful interference to service this product. Only qualified service personnel should attempt to radio or television reception, which the receiver is no guarantee that interference will not occur in accordance with the instructions...

User's Manual
Page 4
...time, unplug it from overheating. Use only with a cart, stand, tripod, bracket or table recommended by placing the product on a bed, sofa, rug or other electric light or power circuits, or 3 This product should be located in installation such as they exit from the appliance. 13. READ INSTRUCTIONS...Quick stops, excessive force and uneven surfaces may fall, causing serious injury and serious damage to . 4. For products intended to the operating instructions. 11. POWER-CORD PROTECTION Power-supply cords should be placed in a built-in the vicinity of overhead power lines...
...time, unplug it from overheating. Use only with a cart, stand, tripod, bracket or table recommended by placing the product on a bed, sofa, rug or other electric light or power circuits, or 3 This product should be located in installation such as they exit from the appliance. 13. READ INSTRUCTIONS...Quick stops, excessive force and uneven surfaces may fall, causing serious injury and serious damage to . 4. For products intended to the operating instructions. 11. POWER-CORD PROTECTION Power-supply cords should be placed in a built-in the vicinity of overhead power lines...

User's Manual
Page 5
.... When the power-supply cord or plug is grounded so as close to rain or water. If the product has been exposed to the point of cable entry as an adjustment of other controls may touch dangerous voltage points or short out parts that provides guidelines for service. 23. NOTE TO CATV SYSTEM INSTALLER This reminder is connected to the product...
.... When the power-supply cord or plug is grounded so as close to rain or water. If the product has been exposed to the point of cable entry as an adjustment of other controls may touch dangerous voltage points or short out parts that provides guidelines for service. 23. NOTE TO CATV SYSTEM INSTALLER This reminder is connected to the product...

User's Manual
Page 6
... cleaner, hair dryer, noisy restaurant Average city traffic, garbage disposals, alarm clock at a safe level BEFORE your equipment offers. Dear Customer: Selecting fine audio equipment such as the unit you avoid prolonged exposure to excessive noise....time your sensitive hearing. Once you can hear it at a low setting. • Slowly increase the sound until it there. Now it's time to prevent hearing damage or loss in front of speakers, thunderclap 140 Gunshot blast, jet engine 180 Rocket launching pad Information courtesy of your equipment by setting your volume control...
... cleaner, hair dryer, noisy restaurant Average city traffic, garbage disposals, alarm clock at a safe level BEFORE your equipment offers. Dear Customer: Selecting fine audio equipment such as the unit you avoid prolonged exposure to excessive noise....time your sensitive hearing. Once you can hear it at a low setting. • Slowly increase the sound until it there. Now it's time to prevent hearing damage or loss in front of speakers, thunderclap 140 Gunshot blast, jet engine 180 Rocket launching pad Information courtesy of your equipment by setting your volume control...
User's Manual
Page 7
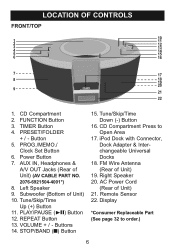
..../ Clock Set Button 6. Power Button 7. Subwoofer (Bottom of Unit) 19. STOP/BAND (I) Button 15. FM Wire Antenna (Rear of Unit) 10. Display *Consumer Replaceable Part (See page 32 to Open Area 17. Left Speaker 9. PLAY/PAUSE (®p) Button 12. Buttons 14. iPod Dock with Connector, Dock Adapter & Interchangeable Universal Docks 18. Remote Sensor 22. Button 5. Right Speaker 20. AUX IN, Headphones & A/V OUT Jacks (Rear of Unit) 21. AC Power Cord (Rear of Unit) (AV CABLE PART...
..../ Clock Set Button 6. Power Button 7. Subwoofer (Bottom of Unit) 19. STOP/BAND (I) Button 15. FM Wire Antenna (Rear of Unit) 10. Display *Consumer Replaceable Part (See page 32 to Open Area 17. Left Speaker 9. PLAY/PAUSE (®p) Button 12. Buttons 14. iPod Dock with Connector, Dock Adapter & Interchangeable Universal Docks 18. Remote Sensor 22. Button 5. Right Speaker 20. AUX IN, Headphones & A/V OUT Jacks (Rear of Unit) 21. AC Power Cord (Rear of Unit) (AV CABLE PART...
User's Manual
Page 8
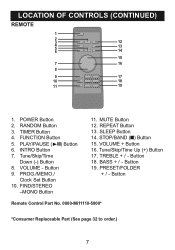
.... TREBLE + / - PRESET/FOLDER + / - Button 19. PLAY/PAUSE (®p) Button 6. Tune/Skip/Time Down (-) Button 8. REPEAT Button 13. FUNCTION Button 5. Button 18. STOP/BAND (I) Button 15. LOCATION OF CONTROLS (CONTINUED) REMOTE 1 2 3 12 4 13 5 6 14 15 7 16 8 9 17 10 18 11 19 1. POWER Button 2. RANDOM Button 3. TIMER Button 4. VOLUME - PROG./MEMO./ Clock Set Button 10. FIND/STEREO -MONO Button 11. SLEEP Button 14. Tune/Skip/Time Up (+) Button 17. BASS + / - Button Remote Control Part No. 0000-Mi11110-5800* *Consumer Replaceable Part (See page 32...
.... TREBLE + / - PRESET/FOLDER + / - Button 19. PLAY/PAUSE (®p) Button 6. Tune/Skip/Time Down (-) Button 8. REPEAT Button 13. FUNCTION Button 5. Button 18. STOP/BAND (I) Button 15. LOCATION OF CONTROLS (CONTINUED) REMOTE 1 2 3 12 4 13 5 6 14 15 7 16 8 9 17 10 18 11 19 1. POWER Button 2. RANDOM Button 3. TIMER Button 4. VOLUME - PROG./MEMO./ Clock Set Button 10. FIND/STEREO -MONO Button 11. SLEEP Button 14. Tune/Skip/Time Up (+) Button 17. BASS + / - Button Remote Control Part No. 0000-Mi11110-5800* *Consumer Replaceable Part (See page 32...
User's Manual
Page 9
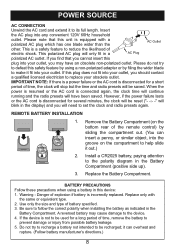
... AC plug into your outlet. REMOTE BATTERY INSTALLATION 1. Do not try to its full length. If you find that this device: 1. IMPORTANT NOTE: If there is a power failure or the AC cord is connected again, the clock time will continue running and the radio presets will be used for a long period of time, remove the battery to replace your outlet, you will blink...
... AC plug into your outlet. REMOTE BATTERY INSTALLATION 1. Do not try to its full length. If you find that this device: 1. IMPORTANT NOTE: If there is a power failure or the AC cord is connected again, the clock time will continue running and the radio presets will be used for a long period of time, remove the battery to replace your outlet, you will blink...

User's Manual
Page 10
... as this manual. • When connecting this unit. The external audio unit's output sound will then be able to view the photos (in the jack. 9 To listen to the external audio unit, turn both units are automatically disconnected when the headphone plug is suggested that you unplug the audio cable when you are using an iPod with the included audio/video cable. OPTIONAL CONNECTIONS A/V (Audio/Video) OUT...
... as this manual. • When connecting this unit. The external audio unit's output sound will then be able to view the photos (in the jack. 9 To listen to the external audio unit, turn both units are automatically disconnected when the headphone plug is suggested that you unplug the audio cable when you are using an iPod with the included audio/video cable. OPTIONAL CONNECTIONS A/V (Audio/Video) OUT...

User's Manual
Page 12
... unit. If the unit is turned on pages 2829. Then, if you connect the iPod, it will start charging the battery until it was previously in. INSERTING AN iPod 1 Tabs facing front (A) 2 (A) (B) Locate the correct iPod Universal Dock to use as shown on and in any other mode, once the iPod is connected, this unit will change to iPod mode automatically.
... unit. If the unit is turned on pages 2829. Then, if you connect the iPod, it will start charging the battery until it was previously in. INSERTING AN iPod 1 Tabs facing front (A) 2 (A) (B) Locate the correct iPod Universal Dock to use as shown on and in any other mode, once the iPod is connected, this unit will change to iPod mode automatically.

User's Manual
Page 13
... operate the iPod using its own controls, as per its owner's manual, and the sound will be heard through this unit on by pressing the Power button; NOTES: • Once you are not already in Pause mode. • See the next page for how to select iPod mode. To completely stop the iPod: Press the Play/Pause (®p) button 1 to the beginning...
... operate the iPod using its own controls, as per its owner's manual, and the sound will be heard through this unit on by pressing the Power button; NOTES: • Once you are not already in Pause mode. • See the next page for how to select iPod mode. To completely stop the iPod: Press the Play/Pause (®p) button 1 to the beginning...
User's Manual
Page 15
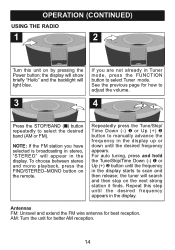
... button to select the desired band (AM or FM). OPERATION (CONTINUED) USING THE RADIO 1 2 Turn this step until the desired frequency 2 appears. NOTE: If the FM station you are not already in stereo, "STEREO" will search and then stop on the remote. See the previous page for how to adjust the volume. 4 21 Press the STOP/BAND (I) button repeatedly to select Tuner mode...
... button to select the desired band (AM or FM). OPERATION (CONTINUED) USING THE RADIO 1 2 Turn this step until the desired frequency 2 appears. NOTE: If the FM station you are not already in stereo, "STEREO" will search and then stop on the remote. See the previous page for how to adjust the volume. 4 21 Press the STOP/BAND (I) button repeatedly to select Tuner mode...

User's Manual
Page 17
... and elapsed playing time (file name, title, artist and album will appear and scroll through playing, it is through the display, if using an MP3 disc) will light blue. OPERATION (CONTINUED) USING A CD WITH THIS UNIT 12 2 1 Turn this unit. 3 4 Press the Play/Pause (®p) button to begin ...mode, total number of tracks will gently press a CD onto the center show briefly "Hello" and the spindle with this unit on by pressing the Press the "Press to Open" area and Power button 1; the display will appear in the display. Press the STOP/BAND (I) button to adjust the volume...
... and elapsed playing time (file name, title, artist and album will appear and scroll through playing, it is through the display, if using an MP3 disc) will light blue. OPERATION (CONTINUED) USING A CD WITH THIS UNIT 12 2 1 Turn this unit. 3 4 Press the Play/Pause (®p) button to begin ...mode, total number of tracks will gently press a CD onto the center show briefly "Hello" and the spindle with this unit on by pressing the Press the "Press to Open" area and Power button 1; the display will appear in the display. Press the STOP/BAND (I) button to adjust the volume...

User's Manual
Page 21
... TO 64 TRACKS) Programming is inserted, you will be programmed using the Tune/Skip/Time Down (-) 1 or Up (+) 2 button. SEE NEXT PAGE FOR MORE NOTES ON PROGRAMMING THE MEMORY. 20 "MEM", the track number and "P-01" (the program number) will appear in the Stop mode, press the PROG./MEMO./Clock Set button. If using a MP3 disc.) 3 Select a track to be played. 1 2 21 While in...
... TO 64 TRACKS) Programming is inserted, you will be programmed using the Tune/Skip/Time Down (-) 1 or Up (+) 2 button. SEE NEXT PAGE FOR MORE NOTES ON PROGRAMMING THE MEMORY. 20 "MEM", the track number and "P-01" (the program number) will appear in the Stop mode, press the PROG./MEMO./Clock Set button. If using a MP3 disc.) 3 Select a track to be played. 1 2 21 While in...

User's Manual
Page 22
... be stored in the program memory as many times as desired (up to 64 files). • You can review the program by pressing the PROG./MEMO./Clock Set button repeatedly while in the Stop mode. • To add a track to the program memory, while in the Stop mode, simply press the PROG./MEMO./Clock Set button repeatedly until the first empty Program number appears in the...
... be stored in the program memory as many times as desired (up to 64 files). • You can review the program by pressing the PROG./MEMO./Clock Set button repeatedly while in the Stop mode. • To add a track to the program memory, while in the Stop mode, simply press the PROG./MEMO./Clock Set button repeatedly until the first empty Program number appears in the...

User's Manual
Page 23
...-Frequently Asked Questions Please read regular music CDs? You can . Can the unit read before playing a MP3 disc. What appears on the same CD. Does the unit support packet write CD-RW? If you.... Yes, but this unit will play only the MP3 files. Does the unit support subdirectories (subfolders)? Yes, the unit can . The album, title and artist (if set when MP3 was recorded). 22 Yes...unit support multi-session CDRs? It appears like a PC hard drive. Can I use the MP3 extension for non-audio data files? However, you can not mix MP3s and WAV files on the display when playing ...
...-Frequently Asked Questions Please read regular music CDs? You can . Can the unit read before playing a MP3 disc. What appears on the same CD. Does the unit support packet write CD-RW? If you.... Yes, but this unit will play only the MP3 files. Does the unit support subdirectories (subfolders)? Yes, the unit can . The album, title and artist (if set when MP3 was recorded). 22 Yes...unit support multi-session CDRs? It appears like a PC hard drive. Can I use the MP3 extension for non-audio data files? However, you can not mix MP3s and WAV files on the display when playing ...
User's Manual
Page 24
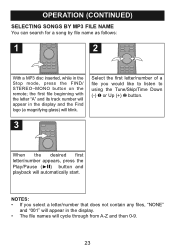
.... • The file names will automatically start. NOTES: • If you would like to listen to using the Tune/Skip/Time Down (-) 1 or Up (+) 2 button. 3 When the desired first letter/number appears, press the Play/Pause (®p) button and playback will cycle through from A-Z and then 0-9. 23 OPERATION (CONTINUED) SELECTING SONGS BY MP3 FILE NAME... the display and the Find logo (a magnifying glass) will blink. the first file beginning with the letter "A" and its track number will appear in the Stop mode, press the FIND/ STEREO-MONO button on the remote;
.... • The file names will automatically start. NOTES: • If you would like to listen to using the Tune/Skip/Time Down (-) 1 or Up (+) 2 button. 3 When the desired first letter/number appears, press the Play/Pause (®p) button and playback will cycle through from A-Z and then 0-9. 23 OPERATION (CONTINUED) SELECTING SONGS BY MP3 FILE NAME... the display and the Find logo (a magnifying glass) will blink. the first file beginning with the letter "A" and its track number will appear in the Stop mode, press the FIND/ STEREO-MONO button on the remote;

User's Manual
Page 27
... entry (i.e., set the TIMER ON time and TIMER OFF time to the exact same time. • Press the Power button to turn off. • "ERROR" will appear in the display. Then press the TIMER button 3 again to confirm. Repeat to set the desired mode (iPod, CD, Tuner). "TIMER" will turn on ; After the volume is set, the TIMER ON time, TIMER OFF time, mode and volume level you make sure an AM/FM station is...
... entry (i.e., set the TIMER ON time and TIMER OFF time to the exact same time. • Press the Power button to turn off. • "ERROR" will appear in the display. Then press the TIMER button 3 again to confirm. Repeat to set the desired mode (iPod, CD, Tuner). "TIMER" will turn on ; After the volume is set, the TIMER ON time, TIMER OFF time, mode and volume level you make sure an AM/FM station is...

User's Manual
Page 31
... AM or FM properly. Press the FUNCTION button to minimum. TROUBLESHOOTING GUIDE If you experience a problem with soft cloth. Not in iPod mode. FM: Wire broadcast station. Clean or replace disc. CAUSE Volume is not pos- AM: Unit is SOLUTION Increase volume. iPod mode, no or Not in CD mode. Press the FUNCTION poor sound. set to select iPod. Disc inserted incorrectly. AM...
... AM or FM properly. Press the FUNCTION button to minimum. TROUBLESHOOTING GUIDE If you experience a problem with soft cloth. Not in iPod mode. FM: Wire broadcast station. Clean or replace disc. CAUSE Volume is not pos- AM: Unit is SOLUTION Increase volume. iPod mode, no or Not in CD mode. Press the FUNCTION poor sound. set to select iPod. Disc inserted incorrectly. AM...
User's Manual
Page 33
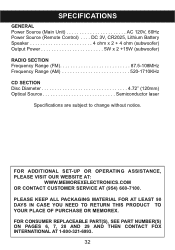
... DC 3V, CR2025, Lithium Battery Speaker 4 ohm x 2 + 4 ohm (subwoofer) Output Power 5W x 2 +15W (subwoofer) RADIO SECTION Frequency Range (FM 87.5-108MHz Frequency Range (AM 520-1710KHz CD SECTION Disc Diameter 4.72" (120mm) Optical Source Semiconductor laser Specifications are subject to change without notice. SPECIFICATIONS GENERAL Power Source (Main Unit AC 120V, 60Hz Power Source (Remote Control) . . . . FOR ADDITIONAL SET-UP OR OPERATING ASSISTANCE...
... DC 3V, CR2025, Lithium Battery Speaker 4 ohm x 2 + 4 ohm (subwoofer) Output Power 5W x 2 +15W (subwoofer) RADIO SECTION Frequency Range (FM 87.5-108MHz Frequency Range (AM 520-1710KHz CD SECTION Disc Diameter 4.72" (120mm) Optical Source Semiconductor laser Specifications are subject to change without notice. SPECIFICATIONS GENERAL Power Source (Main Unit AC 120V, 60Hz Power Source (Remote Control) . . . . FOR ADDITIONAL SET-UP OR OPERATING ASSISTANCE...


