
User Guide
Page 2
... Stop/Play Modes ........31 • Pause/Step 31 • Display 32 • Audio 32 • Tracking 32 • Recording from the External A/V Input 33 • To Stop Recording Temporarily 34 To Stop Recording 34 • One-Touch Recording (OTR 34 • Recording From DVD to this Player (Using the Front A/V Jacks 14 About Discs 15 DVD Setup Menu 17 • General Setup Menu 18 • Speaker Setup Menu 19 • Dolby Digital Setup Menu...
... Stop/Play Modes ........31 • Pause/Step 31 • Display 32 • Audio 32 • Tracking 32 • Recording from the External A/V Input 33 • To Stop Recording Temporarily 34 To Stop Recording 34 • One-Touch Recording (OTR 34 • Recording From DVD to this Player (Using the Front A/V Jacks 14 About Discs 15 DVD Setup Menu 17 • General Setup Menu 18 • Speaker Setup Menu 19 • Dolby Digital Setup Menu...
User Guide
Page 3
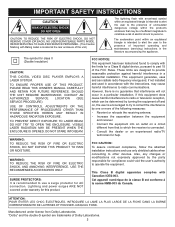
... important operating and maintenance (servicing) instructions in a residential installation. Manufactured under warranty for class II (Double Insulation) CAUTION: THIS DIGITAL VIDEO DISC PLAYER EMPLOYS A LASER SYSTEM. USE OF CONTROLS, ADJUSTMENTS OR THE PERFORMANCE OF PROCEDURES OTHER THAN THOSE SPECIFIED HEREIN MAY RESULT IN HAZARDOUS RADIATION EXPOSURE. Also, any changes or modifications not expressly approved by turning the equipment off and on, the user is connected...
... important operating and maintenance (servicing) instructions in a residential installation. Manufactured under warranty for class II (Double Insulation) CAUTION: THIS DIGITAL VIDEO DISC PLAYER EMPLOYS A LASER SYSTEM. USE OF CONTROLS, ADJUSTMENTS OR THE PERFORMANCE OF PROCEDURES OTHER THAN THOSE SPECIFIED HEREIN MAY RESULT IN HAZARDOUS RADIATION EXPOSURE. Also, any changes or modifications not expressly approved by turning the equipment off and on, the user is connected...

User Guide
Page 4
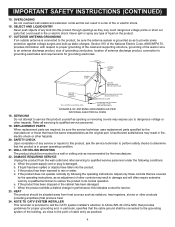
... by placing the product on the product and in the back or bottom are unable to ensure reliable operation of the polarized plug. 12. Use a dry cloth for long periods of overhead power lines or other similar surface. VENTILATION Slots and openings in the cabinet and in the operating instructions should be placed near a swimming pool. 8. When installing an outside...
... by placing the product on the product and in the back or bottom are unable to ensure reliable operation of the polarized plug. 12. Use a dry cloth for long periods of overhead power lines or other similar surface. VENTILATION Slots and openings in the cabinet and in the operating instructions should be placed near a swimming pool. 8. When installing an outside...
User Guide
Page 5
.... WALL OR CEILING MOUNTING The product should be sure the service technician uses replacement parts specified by the manufacturer or those controls that could result in damage and will often require extensive work by the operating instructions, as an adjustment of cable entry as radiators, heat registers, stoves or other hazards. 20. b. d. Adjust only those that the product is grounded so as opening or removing covers...
.... WALL OR CEILING MOUNTING The product should be sure the service technician uses replacement parts specified by the manufacturer or those controls that could result in damage and will often require extensive work by the operating instructions, as an adjustment of cable entry as radiators, heat registers, stoves or other hazards. 20. b. d. Adjust only those that the product is grounded so as opening or removing covers...
User Guide
Page 6
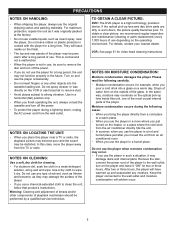
... leave rubber or plastic products in the future. Do not spray cleaner or wax directly on the outside of water form on the VCR or use , be performed by a qualified service technician. TO OBTAIN A CLEAR PICTURE: DVD: The DVD player is not in use forced air to remove dust. • Avoid places subject to remove the disc and turn off the power. • To protect...
... leave rubber or plastic products in the future. Do not spray cleaner or wax directly on the outside of water form on the VCR or use , be performed by a qualified service technician. TO OBTAIN A CLEAR PICTURE: DVD: The DVD player is not in use forced air to remove dust. • Avoid places subject to remove the disc and turn off the power. • To protect...
User Guide
Page 8
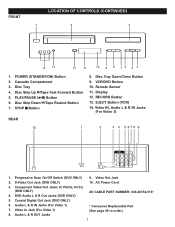
... 12. AC Power Cord 3. Component Video Out Jacks (Y, Pb/Cb, Pr/Cr) (DVD ONLY) 4. Coaxial Digital Out Jack (DVD ONLY) 6. Video In Jack (For Video 1) 8. Disc Tray 4. STOP s Button REAR 8. RECORD Button 13. Video Out Jack 2. POWER (STANDBY/ON) Button 2. Disc Skip Up n/Tape Fast Forward Button 5. FRONT LOCATION OF CONTROLS (CONTINUED) 1. EJECT Button (VCR) 14. Video IN, Audio L & R IN Jacks (For Video 2) 1. S-Video Out Jack (DVD ONLY) 10. Disc Tray Open/Close Button 9. VCR/DVD Button 10. DVD Audio L & R Out Jacks (DVD ONLY) AV CABLE PART NUMBER: 043-26152...
... 12. AC Power Cord 3. Component Video Out Jacks (Y, Pb/Cb, Pr/Cr) (DVD ONLY) 4. Coaxial Digital Out Jack (DVD ONLY) 6. Video In Jack (For Video 1) 8. Disc Tray 4. STOP s Button REAR 8. RECORD Button 13. Video Out Jack 2. POWER (STANDBY/ON) Button 2. Disc Skip Up n/Tape Fast Forward Button 5. FRONT LOCATION OF CONTROLS (CONTINUED) 1. EJECT Button (VCR) 14. Video IN, Audio L & R IN Jacks (For Video 2) 1. S-Video Out Jack (DVD ONLY) 10. Disc Tray Open/Close Button 9. VCR/DVD Button 10. DVD Audio L & R Out Jacks (DVD ONLY) AV CABLE PART NUMBER: 043-26152...
User Guide
Page 9
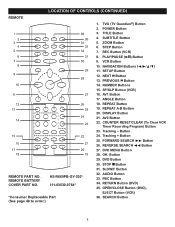
...27. OPEN/CLOSE Button (DVD), EJECT Button (VCR) 36. STEP Button 7. REC Button (VCR) 8. NUMBER Buttons 15. SP/SLP Button (VCR) 16. COUNTER RESET/CLEAR (To Clear VCR Timer Recording Program) Button 23. FORWARD SEARCH ®® Button 26. PBC Button 34. POWER Button 3. AV2 Button 22. SUBTITLE Button 5. VCR Button 10. ANGLE Button 18. Tracking + Button 25. DVD Button 30. STOP s Button 31. SLOW/F Button 32. HS-R669PB-GY-320* 111-03530-0784* *Consumer Replaceable Part (See page 49 to order.) 1. ZOOM Button 6. Button 24. AUDIO Button 33. RETURN Button (DVD...
...27. OPEN/CLOSE Button (DVD), EJECT Button (VCR) 36. STEP Button 7. REC Button (VCR) 8. NUMBER Buttons 15. SP/SLP Button (VCR) 16. COUNTER RESET/CLEAR (To Clear VCR Timer Recording Program) Button 23. FORWARD SEARCH ®® Button 26. PBC Button 34. POWER Button 3. AV2 Button 22. SUBTITLE Button 5. VCR Button 10. ANGLE Button 18. Tracking + Button 25. DVD Button 30. STOP s Button 31. SLOW/F Button 32. HS-R669PB-GY-320* 111-03530-0784* *Consumer Replaceable Part (See page 49 to order.) 1. ZOOM Button 6. Button 24. AUDIO Button 33. RETURN Button (DVD...
User Guide
Page 11
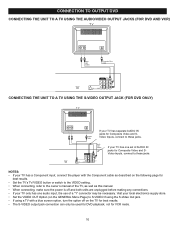
...'s TV/VIDEO button or switch to the VIDEO setting. • When connecting, refer to the owner's manual of a "Y" connector may be used for DVD playback, not for Composite Video and SVideo Inputs, connect to these jacks. NOTES: • If your TV has a Component input, connect the player with a blue screen option, turn the option off and both units are unplugged before making any connections. • If your TV only has one audio input, the use of...
...'s TV/VIDEO button or switch to the VIDEO setting. • When connecting, refer to the owner's manual of a "Y" connector may be used for DVD playback, not for Composite Video and SVideo Inputs, connect to these jacks. NOTES: • If your TV has a Component input, connect the player with a blue screen option, turn the option off and both units are unplugged before making any connections. • If your TV only has one audio input, the use of...
User Guide
Page 12
... Video and Y, Pb/Cb, Pr/Cr Inputs, connect to these jacks. NOTES: • If you turn on a Progressive-Scan compatible TV. IN CASE OF 525 PROGRESSIVE SCAN PICTURE PROBLEMS, IT IS RECOMMENDED THAT THE USER SET THE PROGRESSIVE SCAN SWITCH TO OFF. • To turn off the Progressive Scan function, turn off , on the screen. The Progressive Scan function will appear on the TV for VCR mode. • If using a TV with a blue screen option, turn...
... Video and Y, Pb/Cb, Pr/Cr Inputs, connect to these jacks. NOTES: • If you turn on a Progressive-Scan compatible TV. IN CASE OF 525 PROGRESSIVE SCAN PICTURE PROBLEMS, IT IS RECOMMENDED THAT THE USER SET THE PROGRESSIVE SCAN SWITCH TO OFF. • To turn off the Progressive Scan function, turn off , on the screen. The Progressive Scan function will appear on the TV for VCR mode. • If using a TV with a blue screen option, turn...
User Guide
Page 13
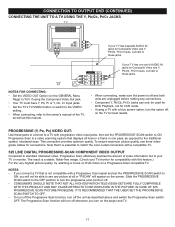
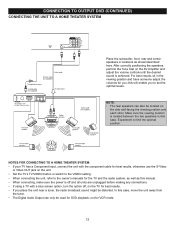
... VCR mode. 12 For best results, sit in the viewing position and have someone adjust the volumes for you; CONNECTION TO OUTPUT DVD (CONTINUED) CONNECTING THE UNIT TO A HOME THEATER SYSTEM Place the subwoofer, front, rear and center speakers in locations as this manual. • When connecting, make sure the power is off and all units are unplugged before making any connections. • If using a TV with a blue screen option, turn...
... VCR mode. 12 For best results, sit in the viewing position and have someone adjust the volumes for you; CONNECTION TO OUTPUT DVD (CONTINUED) CONNECTING THE UNIT TO A HOME THEATER SYSTEM Place the subwoofer, front, rear and center speakers in locations as this manual. • When connecting, make sure the power is off and all units are unplugged before making any connections. • If using a TV with a blue screen option, turn...
User Guide
Page 14
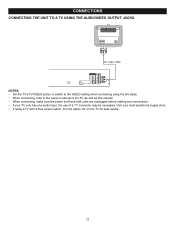
... one audio input, the use of a "Y" connector may be necessary. CONNECTIONS CONNECTING THE UNIT TO A TV USING THE AUDIO/VIDEO OUTPUT JACKS NOTES: • Set the TV's TV/VIDEO button or switch to the VIDEO setting when connecting using a TV with a blue screen option, turn the option off and both units are unplugged before making any connections. • If your local electronics supply store. • If using the A/V jacks. • When connecting, refer to the owner's manual...
... one audio input, the use of a "Y" connector may be necessary. CONNECTIONS CONNECTING THE UNIT TO A TV USING THE AUDIO/VIDEO OUTPUT JACKS NOTES: • Set the TV's TV/VIDEO button or switch to the VIDEO setting when connecting using a TV with a blue screen option, turn the option off and both units are unplugged before making any connections. • If your local electronics supply store. • If using the A/V jacks. • When connecting, refer to the owner's manual...
User Guide
Page 16
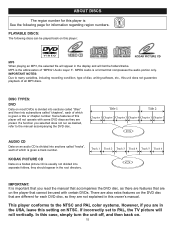
... file will appear in the display and will roll vertically. In this setting on a Kodak picture CD is important that you read the manual that accompanies the DVD disc, as there are features that cannot be played back on this player will not operate with certain DVDs. KODAK PICTURE CD Data on NTSC. This player conforms to PAL, the TV picture will list the folders/tracks. DISC TYPES: DVD Data...
... file will appear in the display and will roll vertically. In this setting on a Kodak picture CD is important that you read the manual that accompanies the DVD disc, as there are features that cannot be played back on this player will not operate with certain DVDs. KODAK PICTURE CD Data on NTSC. This player conforms to PAL, the TV picture will list the folders/tracks. DISC TYPES: DVD Data...
User Guide
Page 19
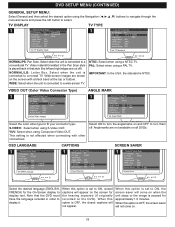
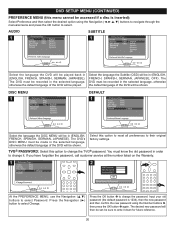
... image is set to turn them off ). DVD SETUP MENU (CONTINUED) GENERAL SETUP MENU: Select General and then select the desired option using the Navigation buttons to navigate through the menus/screens and press the OK button to display text. Video material formatted in the Pan Scan style is connected to display it. WIDE: Select when the unit is played back in that the DVD must have the language included...
... image is set to turn them off ). DVD SETUP MENU (CONTINUED) GENERAL SETUP MENU: Select General and then select the desired option using the Navigation buttons to navigate through the menus/screens and press the OK button to display text. Video material formatted in the Pan Scan style is connected to display it. WIDE: Select when the unit is played back in that the DVD must have the language included...
User Guide
Page 21
... their original factory settings. TVG® PASSWORD: Select this option to reset all preferences to change the password. Press the OK button 1 to change it down for future reference. 1 20 Select the language the Subtitle (OSD) will be in order to change the TVG® password. DISC MENU 1 DEFAULT 1 Select the language the DISC MENU will be played. If you have forgotten the password, call customer service at the number listed on...
... their original factory settings. TVG® PASSWORD: Select this option to reset all preferences to change the password. Press the OK button 1 to change it down for future reference. 1 20 Select the language the Subtitle (OSD) will be in order to change the TVG® password. DISC MENU 1 DEFAULT 1 Select the language the DISC MENU will be played. If you have forgotten the password, call customer service at the number listed on...
User Guide
Page 22
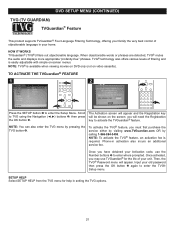
...;s oFnEDAVTDUoRnlEy (not on -screen menus. Press the Navigation > button to enter where prompted. Then the TVGUARDIAN SETUP menu will appear. Then, the TVG® Password menu will appear. the parental icon using Select TVGUARDIAN 2 Mode using the number buttonscoanllinthge1r-e8m66o-8te84c-o3n4t5ro8.l. NOTE: To activate the TVG® feature, an activation fee is easily adjustable with simple on video cassette). Damn and Hell Filters...
...;s oFnEDAVTDUoRnlEy (not on -screen menus. Press the Navigation > button to enter where prompted. Then the TVGUARDIAN SETUP menu will appear. Then, the TVG® Password menu will appear. the parental icon using Select TVGUARDIAN 2 Mode using the number buttonscoanllinthge1r-e8m66o-8te84c-o3n4t5ro8.l. NOTE: To activate the TVG® feature, an activation fee is easily adjustable with simple on video cassette). Damn and Hell Filters...
User Guide
Page 23
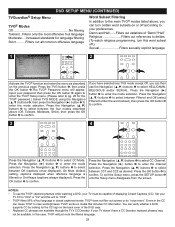
... CC1 and CC2 as described on media that includes CC information. To exit the Setup menu, press the SETUP button 3 until the Setup menu disappears from the screen. Set your preferences. You can verify whether a DVD supports CC by looking for the TVG® password.) Select TVG MODE using the Navigation (π,†) buttons 3, then press the Navigation (®) button 3 to "CC2". • TVG® filters...
... CC1 and CC2 as described on media that includes CC information. To exit the Setup menu, press the SETUP button 3 until the Setup menu disappears from the screen. Set your preferences. You can verify whether a DVD supports CC by looking for the TVG® password.) Select TVG MODE using the Navigation (π,†) buttons 3, then press the Navigation (®) button 3 to "CC2". • TVG® filters...
User Guide
Page 33
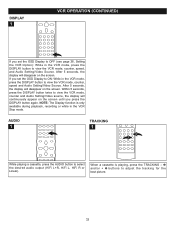
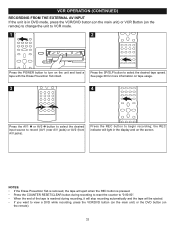
... mode. Within 5 seconds, press the DISPLAY button twice to view the VCR mode, counter and Audio Setting/Video source, the display will continuously appear on the screen until you set the OSD Display to ON: While in the VCR mode, press the DISPLAY button to adjust the tracking for the best picture. 32 After 5 seconds, the display will disappear on the screen. DISPLAY 1 VCR OPERATION (CONTINUED) If you press the DISPLAY button again. NOTE: The Display function is playing...
... mode. Within 5 seconds, press the DISPLAY button twice to view the VCR mode, counter and Audio Setting/Video source, the display will continuously appear on the screen until you set the OSD Display to ON: While in the VCR mode, press the DISPLAY button to adjust the tracking for the best picture. 32 After 5 seconds, the display will disappear on the screen. DISPLAY 1 VCR OPERATION (CONTINUED) If you press the DISPLAY button again. NOTE: The Display function is playing...
User Guide
Page 34
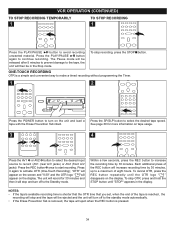
... is removed, the tape will eject when the REC button is pressed. • Press the COUNTER RESET/CLEAR button during recording to reset the counter to "0:00:00". • When the end of the tape is in DVD mode, press the VCR/DVD button (on the main unit) or VCR Button (on the remote) to change the unit to VCR mode. 1 2 Press the POWER button to turn on the unit and load a tape with...
... is removed, the tape will eject when the REC button is pressed. • Press the COUNTER RESET/CLEAR button during recording to reset the counter to "0:00:00". • When the end of the tape is in DVD mode, press the VCR/DVD button (on the main unit) or VCR Button (on the remote) to change the unit to VCR mode. 1 2 Press the POWER button to turn on the unit and load a tape with...
User Guide
Page 35
..., press the REC button to increase the recording time by 30 minutes, up to a maximum of the tape is reached, the recording will eject when the REC button is removed, the tape will stop and turn off to the tape, the unit will record for more information on the display. The Pause mode will be ejected and the unit will turn off to record (AV1 (rear A/V jacks) or...
..., press the REC button to increase the recording time by 30 minutes, up to a maximum of the tape is reached, the recording will eject when the REC button is removed, the tape will stop and turn off to the tape, the unit will record for more information on the display. The Pause mode will be ejected and the unit will turn off to record (AV1 (rear A/V jacks) or...
User Guide
Page 48
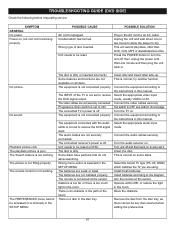
... disc inserted. There is not connected properly. Power on some discs. The equipment is a disc in the SETUP MENU. The remote is not set to the instructions in this manual. Connect the equipment according to receive the DVD signal input. Unit needs to be reset to receive the DVD signal output. The connected TV's power is not set to NTSC. The audio cables are using. try another function. Connect the equipment according to an AC outlet. Aim the remote at the sensor. Operate...
... disc inserted. There is not connected properly. Power on some discs. The equipment is a disc in the SETUP MENU. The remote is not set to the instructions in this manual. Connect the equipment according to receive the DVD signal input. Unit needs to be reset to receive the DVD signal output. The connected TV's power is not set to NTSC. The audio cables are using. try another function. Connect the equipment according to an AC outlet. Aim the remote at the sensor. Operate...


