User Guide
Page 1
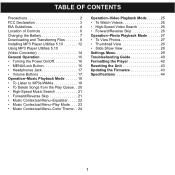
... Declaration 3 EIA Guidelines 4 Location of Controls 6 Charging the Battery 7 Downloading and Transferring Files 8 Installing MP3 Player Utilities 5.10 12 Using MP3 Player Utilities 5.10 (Video Converter 14 General Operation 16 • Turning the Power On/Off 16 • MENU/Lock Button 16 • Headphones Jack 17 • Volume Buttons 17 Operation-Music Playback Mode 18 • To Listen to MP3s/WMAs 18 • To Delete Songs from the Play Queue. . 20 • High-Speed Music Search 21 • Forward/Reverse...
... Declaration 3 EIA Guidelines 4 Location of Controls 6 Charging the Battery 7 Downloading and Transferring Files 8 Installing MP3 Player Utilities 5.10 12 Using MP3 Player Utilities 5.10 (Video Converter 14 General Operation 16 • Turning the Power On/Off 16 • MENU/Lock Button 16 • Headphones Jack 17 • Volume Buttons 17 Operation-Music Playback Mode 18 • To Listen to MP3s/WMAs 18 • To Delete Songs from the Play Queue. . 20 • High-Speed Music Search 21 • Forward/Reverse...
User Guide
Page 2
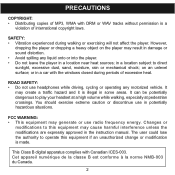
... subject to play your headset at a high volume while walking, especially at pedestrian crossings. ROAD SAFETY: • Do not use headphones while driving, cycling or operating any liquid onto or into the player. • Do not leave the player in damage or sound distortion. •...However, dropping the player or dropping a heavy object on an unlevel surface; on the player may create a traffic hazard and it is made. You should exercise extreme caution or discontinue use radio frequency energy. PRECAUTIONS COPYRIGHT: • Distributing copies of MP3, WMA with DRM...
... subject to play your headset at a high volume while walking, especially at pedestrian crossings. ROAD SAFETY: • Do not use headphones while driving, cycling or operating any liquid onto or into the player. • Do not leave the player in damage or sound distortion. •...However, dropping the player or dropping a heavy object on an unlevel surface; on the player may create a traffic hazard and it is made. You should exercise extreme caution or discontinue use radio frequency energy. PRECAUTIONS COPYRIGHT: • Distributing copies of MP3, WMA with DRM...

User Guide
Page 7
... the screen. When the bars in the battery indicator (in Music Playback mode. (Actual playback times may vary.) • For data transfer, please use the USB cable (included) to connect the unit to the USB jack on and update the playlist automatically. When fully charged, the unit can playback for approx. 12 hours in the display) become low (see Figure 1) and especially when the bars turn on the bottom of files...
... the screen. When the bars in the battery indicator (in Music Playback mode. (Actual playback times may vary.) • For data transfer, please use the USB cable (included) to connect the unit to the USB jack on and update the playlist automatically. When fully charged, the unit can playback for approx. 12 hours in the display) become low (see Figure 1) and especially when the bars turn on the bottom of files...
User Guide
Page 8
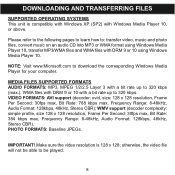
...: Visit www.Microsoft.com to be played. 8 MEDIA FILES SUPPORTED FORMATS AUDIO FORMATS: MP3, MPEG 1/2/2.5 Layer 3 with a bit rate up to 320 kbps (max.), WMA files with DRM 9 or 10 with DRM 9 or 10 using Windows Media Player 10, transfer MP3/WMA files and WMA files with a bit rate up to : transfer video, music and photo files, convert music on an audio CD into MP3 or WMA format using Windows Media Player 10. WMV support (decoder complexity: simple profile, size 128...
...: Visit www.Microsoft.com to be played. 8 MEDIA FILES SUPPORTED FORMATS AUDIO FORMATS: MP3, MPEG 1/2/2.5 Layer 3 with a bit rate up to 320 kbps (max.), WMA files with DRM 9 or 10 with DRM 9 or 10 using Windows Media Player 10, transfer MP3/WMA files and WMA files with a bit rate up to : transfer video, music and photo files, convert music on an audio CD into MP3 or WMA format using Windows Media Player 10. WMV support (decoder complexity: simple profile, size 128...
User Guide
Page 9
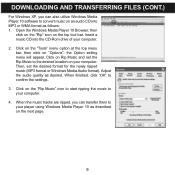
... Music" icon to start ripping the music to your computer. 2. Click on the "Tools" menu option at the top menu bar, then click on the top tool bar. DOWNLOADING AND TRANSFERRING FILES (CONT.) For Windows XP, you can also utilize Windows Media Player 10 software to convert music on an audio CD into the CD-Rom drive of your computer. 4. Insert a music CD into MP3 or WMA format as...
... Music" icon to start ripping the music to your computer. 2. Click on the "Tools" menu option at the top menu bar, then click on the top tool bar. DOWNLOADING AND TRANSFERRING FILES (CONT.) For Windows XP, you can also utilize Windows Media Player 10 software to convert music on an audio CD into the CD-Rom drive of your computer. 4. Insert a music CD into MP3 or WMA format as...
User Guide
Page 10
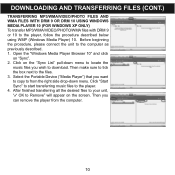
.../VIDEO/PHOTO FILES AND WMA FILES WITH DRM 9 OR DRM 10 USING WINDOWS MEDIA PLAYER 10 (FOR WINDOWS XP ONLY) To transfer MP3/WMA/VIDEO/PHOTO/WMA files with DRM 9 or 10 to the files. 3. Then make sure to tick the box next to the player, follow the procedure described below using WMP (Windows Media Player) 10. Select the Portable Device ("Media Player") that you wish to the computer as previously described. 1. Click on the "Sync List...
.../VIDEO/PHOTO FILES AND WMA FILES WITH DRM 9 OR DRM 10 USING WINDOWS MEDIA PLAYER 10 (FOR WINDOWS XP ONLY) To transfer MP3/WMA/VIDEO/PHOTO/WMA files with DRM 9 or 10 to the files. 3. Then make sure to tick the box next to the player, follow the procedure described below using WMP (Windows Media Player) 10. Select the Portable Device ("Media Player") that you wish to the computer as previously described. 1. Click on the "Sync List...
User Guide
Page 11
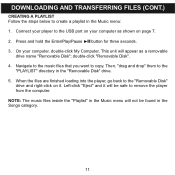
... files are finished loading into the player, go back to remove the player from the computer. NOTE: The music files inside the "Playlist" in the "Removable Disk" drive. 5. This unit will not be safe to the "Removable Disk" drive and right-click on page 7. 2. DOWNLOADING AND TRANSFERRING FILES (CONT.) CREATING A PLAYLIST Follow the steps below to copy. Left-click "Eject" and it . Connect your player to the "PLAYLIST" directory in the Music menu...
... files are finished loading into the player, go back to remove the player from the computer. NOTE: The music files inside the "Playlist" in the "Removable Disk" drive. 5. This unit will not be safe to the "Removable Disk" drive and right-click on page 7. 2. DOWNLOADING AND TRANSFERRING FILES (CONT.) CREATING A PLAYLIST Follow the steps below to copy. Left-click "Eject" and it . Connect your player to the "PLAYLIST" directory in the Music menu...
User Guide
Page 12
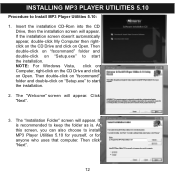
..., double-click My Computer then rightclick on the CD Drive and click on "Setup.exe" to start the installation. Click "Next". 3. The "Welcome" screen will appear. At this screen, you can also choose to Install MP3 Player Utilities 5.10: 1. Then double-click on "fscommand" folder and double-click on Open. NOTE: For Windows Vista, click on Computer, right-click on the CD...
..., double-click My Computer then rightclick on the CD Drive and click on "Setup.exe" to start the installation. Click "Next". 3. The "Welcome" screen will appear. At this screen, you can also choose to Install MP3 Player Utilities 5.10: 1. Then double-click on "fscommand" folder and double-click on Open. NOTE: For Windows Vista, click on Computer, right-click on the CD...
User Guide
Page 14
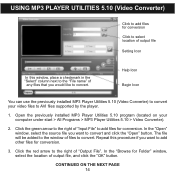
... File" to add files for conversion. Open the previously installed MP3 Player Utilities 5.10 program (located on your video files to convert. CONTINUED ON THE NEXT PAGE 14 Help Icon Begin Icon You can use the previously installed MP3 Player Utilities 5.10 (Video Converter) to convert your computer under start > All Programs > MP3 Player Utilities 5.10 > Video Converter). 2. In the "Open" window, select the source file you want to convert and click the "Open" button. Repeat this window...
... File" to add files for conversion. Open the previously installed MP3 Player Utilities 5.10 program (located on your video files to convert. CONTINUED ON THE NEXT PAGE 14 Help Icon Begin Icon You can use the previously installed MP3 Player Utilities 5.10 (Video Converter) to convert your computer under start > All Programs > MP3 Player Utilities 5.10 > Video Converter). 2. In the "Open" window, select the source file you want to convert and click the "Open" button. Repeat this window...

User Guide
Page 15
... previous page for icon location) to be changed; NOTE: Click on the "Help" icon (see illustration on using this program. 15 USING MP3 PLAYER UTILITIES 5.10 (Video Converter) 4. Set up the conversion settings, as selecting between Full Screen or Same Ratio), most of any files that you can convert additional files according to the "File name", the file has been converted. 8. Then, click the "OK...
... previous page for icon location) to be changed; NOTE: Click on the "Help" icon (see illustration on using this program. 15 USING MP3 PLAYER UTILITIES 5.10 (Video Converter) 4. Set up the conversion settings, as selecting between Full Screen or Same Ratio), most of any files that you can convert additional files according to the "File name", the file has been converted. 8. Then, click the "OK...

User Guide
Page 16
... have transferred to enter the Now Playing screen. You can press the Navigation √/Skip/Search o button to the player. GENERAL OPERATION TURNING THE POWER ON/OFF 1 MENU/Lock BUTTON 1 To turn the unit off, press and hold the Power On/Off button until "Shutting Down" appears in the display. no buttons will take several seconds to several minutes to update the player's library depending on , press and hold the MENU/Lock button until UNLOCKED...
... have transferred to enter the Now Playing screen. You can press the Navigation √/Skip/Search o button to the player. GENERAL OPERATION TURNING THE POWER ON/OFF 1 MENU/Lock BUTTON 1 To turn the unit off, press and hold the Power On/Off button until "Shutting Down" appears in the display. no buttons will take several seconds to several minutes to update the player's library depending on , press and hold the MENU/Lock button until UNLOCKED...
User Guide
Page 18
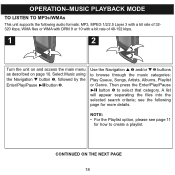
... the main menu as described on page 16. CONTINUED ON THE NEXT PAGE 18 A list will appear separating the files into the selected search criteria; OPERATION-MUSIC PLAYBACK MODE TO LISTEN TO MP3s/WMAs This unit supports the following page for how to select that category. Use the Navigation L 1 and/or M 2 buttons to browse through the music categories: Play Queue, Songs, Artists, Albums, Playlist or...
... the main menu as described on page 16. CONTINUED ON THE NEXT PAGE 18 A list will appear separating the files into the selected search criteria; OPERATION-MUSIC PLAYBACK MODE TO LISTEN TO MP3s/WMAs This unit supports the following page for how to select that category. Use the Navigation L 1 and/or M 2 buttons to browse through the music categories: Play Queue, Songs, Artists, Albums, Playlist or...

User Guide
Page 19
... Default and Full Screen format. • AUTO RESUME: Each time you must then select the desired album.) Then, select Play All or the desired song using the Navigation L 1 and/or M 2 buttons then press the Enter/Play/Pause ®p button 3. (In the Genre menu, you exit the Music Playback mode or turn the unit off or changing mode. 19 Then, select Play All or the desired song using the Navigation...
... Default and Full Screen format. • AUTO RESUME: Each time you must then select the desired album.) Then, select Play All or the desired song using the Navigation L 1 and/or M 2 buttons then press the Enter/Play/Pause ®p button 3. (In the Genre menu, you exit the Music Playback mode or turn the unit off or changing mode. 19 Then, select Play All or the desired song using the Navigation...

User Guide
Page 20
... Track and then press the Enter/Play/Pause ®p button 3. Repeat this step to select Clear All and then press the Enter/Play/Pause ®p button 3. Then, use the Navigation L 1 and/or M 2 button to clear and then press the Enter/Play/Pause ®p button 3. OPERATION-MUSIC PLAYBACK MODE (CONTINUED) TO DELETE SONGS FROM THE PLAY QUEUE 1 13 2 2 13 2 Enter the Play Queue submenu as described on page...
... Track and then press the Enter/Play/Pause ®p button 3. Repeat this step to select Clear All and then press the Enter/Play/Pause ®p button 3. Then, use the Navigation L 1 and/or M 2 button to clear and then press the Enter/Play/Pause ®p button 3. OPERATION-MUSIC PLAYBACK MODE (CONTINUED) TO DELETE SONGS FROM THE PLAY QUEUE 1 13 2 2 13 2 Enter the Play Queue submenu as described on page...

User Guide
Page 23
...Music Playback mode (Now Playing screen), press the Navigation M button to confirm. OPERATION-MUSIC PLAYBACK MODE (CONTINUED) MUSIC CONTEXTUAL MENU-PLAY MODE 1 2 21 While in the Music Contextual menu, pressing the MENU/Lock button or waiting three seconds without any activity will close the Music Contextual menu. • The "Play Mode" setting will also set the mode for Video playback. 23 Scroll to "Play Mode" using the Navigation L 1 and/or M 2 buttons. 3 3 2 1 Select a desired "Play Mode" setting (Normal, Shuffle [to randomly play all of the songs], Repeat All [to repeat...
...Music Playback mode (Now Playing screen), press the Navigation M button to confirm. OPERATION-MUSIC PLAYBACK MODE (CONTINUED) MUSIC CONTEXTUAL MENU-PLAY MODE 1 2 21 While in the Music Contextual menu, pressing the MENU/Lock button or waiting three seconds without any activity will close the Music Contextual menu. • The "Play Mode" setting will also set the mode for Video playback. 23 Scroll to "Play Mode" using the Navigation L 1 and/or M 2 buttons. 3 3 2 1 Select a desired "Play Mode" setting (Normal, Shuffle [to randomly play all of the songs], Repeat All [to repeat...
User Guide
Page 27
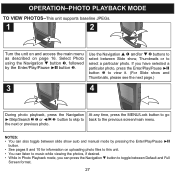
... Thumbnails, please see the next page.) 3 4 2 1 During photo playback, press the Navigation At any time, press the MENU/Lock button to go ®/Skip/Search n 1 or √/o 2 button to skip to back to select between Default and Full Screen format. 27 Select Photo using the Navigation M button 1, followed by pressing the Enter/Play/Pause ®p button. • See pages 8 and 10 for information on...
... Thumbnails, please see the next page.) 3 4 2 1 During photo playback, press the Navigation At any time, press the MENU/Lock button to go ®/Skip/Search n 1 or √/o 2 button to skip to back to select between Default and Full Screen format. 27 Select Photo using the Navigation M button 1, followed by pressing the Enter/Play/Pause ®p button. • See pages 8 and 10 for information on...

User Guide
Page 31
.../Play/Pause ®p button 3 to select it. 3 4 13 2 Select a desired "Play Mode" setting (Normal, Shuffle [to randomly play all of the songs], Repeat All [to repeat all songs continuously] or Repeat One [to repeat the selected song continuously]) using the Navigation M button 1, followed by the Enter/Play/Pause ®p button 3 to the main menu. Select Setting using the Navigation L 1 and/or M 2 buttons, followed by the Enter/Play/Pause ®p button 2. SETTINGS MENU (CONTINUED) SETTING THE PLAY MODE 1 2 12 13 2 Turn...
.../Play/Pause ®p button 3 to select it. 3 4 13 2 Select a desired "Play Mode" setting (Normal, Shuffle [to randomly play all of the songs], Repeat All [to repeat all songs continuously] or Repeat One [to repeat the selected song continuously]) using the Navigation M button 1, followed by the Enter/Play/Pause ®p button 3 to the main menu. Select Setting using the Navigation L 1 and/or M 2 buttons, followed by the Enter/Play/Pause ®p button 2. SETTINGS MENU (CONTINUED) SETTING THE PLAY MODE 1 2 12 13 2 Turn...
User Guide
Page 40
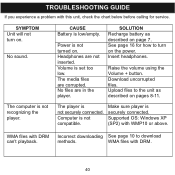
... 16 for service. Download uncorrupted files. WMA files with WMP10 or above. CAUSE Battery is not compatible. Raise the volume using the Volume + button. SOLUTION Recharge battery as described on page 7. Computer is low/empty. Supported OS: Windows XP (SP2) with DRM Incorrect downloading See page 10 to download can't playback. SYMPTOM Unit will not turn on . WMA files with DRM. 40 The media files are in the player. Insert headphones...
... 16 for service. Download uncorrupted files. WMA files with WMP10 or above. CAUSE Battery is not compatible. Raise the volume using the Volume + button. SOLUTION Recharge battery as described on page 7. Computer is low/empty. Supported OS: Windows XP (SP2) with DRM Incorrect downloading See page 10 to download can't playback. SYMPTOM Unit will not turn on . WMA files with DRM. 40 The media files are in the player. Insert headphones...

User Guide
Page 41
Unit needs to be reset Reset unit and/or or firmware needs to be update firmware, see updated. page 43. 41 described on page 16. page 43. CAUSE SOLUTION The Lock feature is Deactivate Lock feature as activated. Unit needs to be reset Reset unit and/or or firmware needs to be update firmware, see updated. TROUBLESHOOTING GUIDE (CONTINUED) SYMPTOM No buttons work. Unit acting erratically.
Unit needs to be reset Reset unit and/or or firmware needs to be update firmware, see updated. page 43. 41 described on page 16. page 43. CAUSE SOLUTION The Lock feature is Deactivate Lock feature as activated. Unit needs to be reset Reset unit and/or or firmware needs to be update firmware, see updated. TROUBLESHOOTING GUIDE (CONTINUED) SYMPTOM No buttons work. Unit acting erratically.

User Guide
Page 42
Double click on My Computer, then right click "Media Player" and left click on "Format". 3. For "Media Player", at the "Format" window, click OK to confirm and the player will start to format (see figure to close the Format window. Format Window for "Media Player" 42 When finished, click "OK" to the right). FORMATTING THE PLAYER Formatting the Player WARNING! Do not format this player unless it stops working and you are instructed to connect the player and the computer. 2. Use the USB cable to do so by technical support personnel. 1.
Double click on My Computer, then right click "Media Player" and left click on "Format". 3. For "Media Player", at the "Format" window, click OK to confirm and the player will start to format (see figure to close the Format window. Format Window for "Media Player" 42 When finished, click "OK" to the right). FORMATTING THE PLAYER Formatting the Player WARNING! Do not format this player unless it stops working and you are instructed to connect the player and the computer. 2. Use the USB cable to do so by technical support personnel. 1.


