User Guide
Page 9
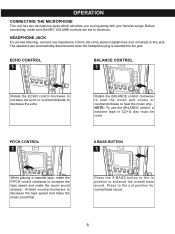
... connect low impedance 3.5mm (32 ohm) stereo headphones (not included) to sing along with your favorite songs. OPERATION CONNECTING THE MICROPHONE This unit has two microphone jacks which will allow you to this jack. Press to hear the music only. ECHO CONTROL 1 BALANCE CONTROL 1 Rotate the ECHO...clockwise to hear the music and vocals or counterclockwise to the out position for normal bass sound. 1 8 NOTE: To use the BALANCE control, a karaoke tape or CD+G disc must be used. 1 X BASS BUTTON 1 When playing a cassette tape, rotate the PITCH control clockwise to increase the tape...
... connect low impedance 3.5mm (32 ohm) stereo headphones (not included) to sing along with your favorite songs. OPERATION CONNECTING THE MICROPHONE This unit has two microphone jacks which will allow you to this jack. Press to hear the music only. ECHO CONTROL 1 BALANCE CONTROL 1 Rotate the ECHO...clockwise to hear the music and vocals or counterclockwise to the out position for normal bass sound. 1 8 NOTE: To use the BALANCE control, a karaoke tape or CD+G disc must be used. 1 X BASS BUTTON 1 When playing a cassette tape, rotate the PITCH control clockwise to increase the tape...
User Guide
Page 10
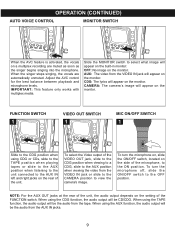
... CAMERA position to the ON position. When the singer stops singing, the vocals are muted as soon as the singer begins singing into the microphone. To turn the microphone off, slide the ON/OFF switch to select what image will be the audio from the AUX IN jacks. 9 When using the CDG... function, the audio output will appear on the built-in monitor: OFF: No image on the monitor. To turn the microphone on, slide the ON/OFF switch, located on the monitor. Slide the MONITOR switch to the OFF position. CDG: The lyrics will be CD/CDG...
... CAMERA position to the ON position. When the singer stops singing, the vocals are muted as soon as the singer begins singing into the microphone. To turn the microphone off, slide the ON/OFF switch to select what image will be the audio from the AUX IN jacks. 9 When using the CDG... function, the audio output will appear on the built-in monitor: OFF: No image on the monitor. To turn the microphone on, slide the ON/OFF switch, located on the monitor. Slide the MONITOR switch to the OFF position. CDG: The lyrics will be CD/CDG...

User Guide
Page 16
... to a CD+G Karaoke disc. the POWER indicator will not light. 15 Rotate the AUTO VOICE control clockwise to your voice. Adjust the ECHO control ƒ to add an echo effect to suppress the vocal tracks on the CD being played when singing into the microphone. Press the POWER ... set to have the vocal tracks on this control will hear both the vocal and music tracks with a standard CD. • During playback of the microphone. Rotate the AUTO VOICE control counterclockwise to the center position so that displays the song lyrics on the CD play at normal volume. 6 7 1 1 1...
... to a CD+G Karaoke disc. the POWER indicator will not light. 15 Rotate the AUTO VOICE control clockwise to your voice. Adjust the ECHO control ƒ to add an echo effect to suppress the vocal tracks on the CD being played when singing into the microphone. Press the POWER ... set to have the vocal tracks on this control will hear both the vocal and music tracks with a standard CD. • During playback of the microphone. Rotate the AUTO VOICE control counterclockwise to the center position so that displays the song lyrics on the CD play at normal volume. 6 7 1 1 1...
User Guide
Page 17
... you can hear both the vocal and music tracks at the proper tempo, even if you do not know the song. To avoid microphone feedback, keep the microphone(s) as far away from the speaker(s) as when you are designed specifically for playback in time with music on the left channel and...: CD+G Karaoke discs are changing a disc or adjusting one through four may have the music only without vocals, and tracks five through eight might have the same four songs recorded with the music to help you sing along at an equal level. MICROPHONE FEEDBACK: "Feedback" is a howling or screeching sound that ...
... you can hear both the vocal and music tracks at the proper tempo, even if you do not know the song. To avoid microphone feedback, keep the microphone(s) as far away from the speaker(s) as when you are designed specifically for playback in time with music on the left channel and...: CD+G Karaoke discs are changing a disc or adjusting one through four may have the music only without vocals, and tracks five through eight might have the same four songs recorded with the music to help you sing along at an equal level. MICROPHONE FEEDBACK: "Feedback" is a howling or screeching sound that ...
User Guide
Page 18
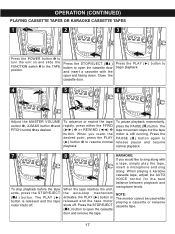
...;√) ƒ button. To pause playback momentarily, press the PAUSE ( ) button. When playing a karaoke cassette tape, adjust the AUTO VOICE control for the best balance between playback and microphone levels. Press the PLAY (®) button to release pause and resume normal playback. 3 7 8 To ... ( ) button to open the cassette door and insert a cassette with a tape, simply play the tape, insert a microphone and sing along. OPERATION (CONTINUED) PLAYING CASSETTE TAPES OR KARAOKE CASSETTE TAPES 1 1 2 3 2 Press the POWER button 1 to turn the unit on and slide the FUNCTION switch ...
...;√) ƒ button. To pause playback momentarily, press the PAUSE ( ) button. When playing a karaoke cassette tape, adjust the AUTO VOICE control for the best balance between playback and microphone levels. Press the PLAY (®) button to release pause and resume normal playback. 3 7 8 To ... ( ) button to open the cassette door and insert a cassette with a tape, simply play the tape, insert a microphone and sing along. OPERATION (CONTINUED) PLAYING CASSETTE TAPES OR KARAOKE CASSETTE TAPES 1 1 2 3 2 Press the POWER button 1 to turn the unit on and slide the FUNCTION switch ...
User Guide
Page 19
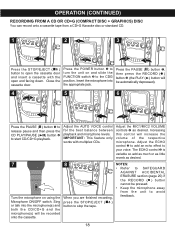
...18 NOTES: • Refer to SAFEGUARD AGAINST ACCIDENTAL ERASURE section (page 20) if the RECORD ( ) button cannot be pressed. • Keep the microphone away from a CD+G Karaoke disc or standard CD. 1 2 1 3 2 2 1 Press the STOP/EJECT ( ) button to open end facing down. Press the POWER button... button 2 to turn the unit on using the Microphone ON/OFF switch. Increasing this control will increase the volume of the respective microphone. Insert the microphone into the microphone(s) and both the CD/CD+G and the microphone(s) will be recorded onto the cassette. Close the ...
...18 NOTES: • Refer to SAFEGUARD AGAINST ACCIDENTAL ERASURE section (page 20) if the RECORD ( ) button cannot be pressed. • Keep the microphone away from a CD+G Karaoke disc or standard CD. 1 2 1 3 2 2 1 Press the STOP/EJECT ( ) button to open end facing down. Press the POWER button... button 2 to turn the unit on using the Microphone ON/OFF switch. Increasing this control will increase the volume of the respective microphone. Insert the microphone into the microphone(s) and both the CD/CD+G and the microphone(s) will be recorded onto the cassette. Close the ...
User Guide
Page 23
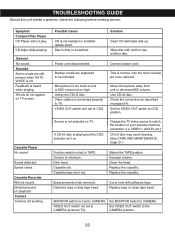
...adhesive tape. Connect power cord. Microphone is too close to TV. Video cable not connected properly to unit or MIC volume is not selected on playback. VIDEO OUT switch isn't set to TAPE. Set the VIDEO OUT switch to match the location of your karaoke machine connection. (i.e. Sound distorted...22 22 VIDEO OUT switch not set to be included. Set VIDEO OUT switch to CAMERA. Words do not appear on pages 5-6. Move microphone away from unit or decrease MIC volume. Speed varies. Feedback is not installed or installed upside-down. Replace the cassette. Possible Cause Solution ...
...adhesive tape. Connect power cord. Microphone is too close to TV. Video cable not connected properly to unit or MIC volume is not selected on playback. VIDEO OUT switch isn't set to TAPE. Set the VIDEO OUT switch to match the location of your karaoke machine connection. (i.e. Sound distorted...22 22 VIDEO OUT switch not set to be included. Set VIDEO OUT switch to CAMERA. Words do not appear on pages 5-6. Move microphone away from unit or decrease MIC volume. Speed varies. Feedback is not installed or installed upside-down. Replace the cassette. Possible Cause Solution ...


