User Guide
Page 2
... modifications are designed to use radio frequency energy. The user could lose the authority to operate this equipment does cause harmful interference to radio or television reception, which the receiver is recommended to provide reasonable protection against harmful interference in the instruction manual. LASER SAFETY: This unit employs a laser. SURGE PROTECTORS: It is connected. • Consult the dealer or...
... modifications are designed to use radio frequency energy. The user could lose the authority to operate this equipment does cause harmful interference to radio or television reception, which the receiver is recommended to provide reasonable protection against harmful interference in the instruction manual. LASER SAFETY: This unit employs a laser. SURGE PROTECTORS: It is connected. • Consult the dealer or...
User Guide
Page 3
To establish a safe level: • Start your volume control at a low setting. • Slowly increase the sound until it there. We Want You Listening For A Lifetime Used wisely, your new sound equipment will help to excessive noise. This list of fun and enjoyment. Decibel Level Example 30 Quiet library, soft whispers 40 Living room, refrigerator, bedroom away from loud noise is...
To establish a safe level: • Start your volume control at a low setting. • Slowly increase the sound until it there. We Want You Listening For A Lifetime Used wisely, your new sound equipment will help to excessive noise. This list of fun and enjoyment. Decibel Level Example 30 Quiet library, soft whispers 40 Living room, refrigerator, bedroom away from loud noise is...
User Guide
Page 4
... product should be routed so that could result in the operating instructions should never be retained for cleaning. 6. POWER-CORD PROTECTION Power-supply cords should be operated only from the wall outlet and disconnect the antenna or cable system. REPLACEMENT PARTS When replacement parts are required, be sure the service technician uses replacement parts specified by the manufacturer or those controls that are covered by the product's manufacturer as the original...
... product should be routed so that could result in the operating instructions should never be retained for cleaning. 6. POWER-CORD PROTECTION Power-supply cords should be operated only from the wall outlet and disconnect the antenna or cable system. REPLACEMENT PARTS When replacement parts are required, be sure the service technician uses replacement parts specified by the manufacturer or those controls that are covered by the product's manufacturer as the original...
User Guide
Page 5
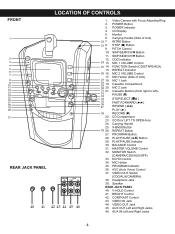
... 21 REAR JACK PANEL 40 41 LOCATION OF CONTROLS 42 43 44 45 46 1. CD Display 5. MIC 1 VOLUME Control 25 14. FUNCTION Switch (CDG/TAPE/AUX) 15. PROGRAM Button 28. BALANCE Control 31. AVC (Auto Voice) Control 37. BRIGHT Control 42. AUX OUT Left and Right Jacks 46. REPEAT Indicator 26 16. MIC 2 Jack 31 21. MIC Holder 35. PROGRAM Indicator 36. CONTRAST Control 43. VIDEO IN Jack 44. AUX IN Left and Right Jacks 4 POWER Indicator 4. Cassette Buttons (from...
... 21 REAR JACK PANEL 40 41 LOCATION OF CONTROLS 42 43 44 45 46 1. CD Display 5. MIC 1 VOLUME Control 25 14. FUNCTION Switch (CDG/TAPE/AUX) 15. PROGRAM Button 28. BALANCE Control 31. AVC (Auto Voice) Control 37. BRIGHT Control 42. AUX OUT Left and Right Jacks 46. REPEAT Indicator 26 16. MIC 2 Jack 31 21. MIC Holder 35. PROGRAM Indicator 36. CONTRAST Control 43. VIDEO IN Jack 44. AUX IN Left and Right Jacks 4 POWER Indicator 4. Cassette Buttons (from...
User Guide
Page 6
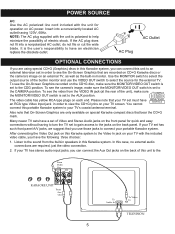
...) discs in this Karaoke system, you can connect the Aux Out jacks on each end. Listen to the sound from the VIDEO IN jack (at the rear of Video and Stereo Audio jacks on the front panel for operation on the back panel. POWER SOURCE AC: Use the AC polarized line cord included with the unit for quick and easy connections without having 120V, 60Hz. AC Plug AC Outlet OPTIONAL CONNECTIONS If you use the VIDEO OUT switch...
...) discs in this Karaoke system, you can connect the Aux Out jacks on each end. Listen to the sound from the VIDEO IN jack (at the rear of Video and Stereo Audio jacks on the front panel for operation on the back panel. POWER SOURCE AC: Use the AC polarized line cord included with the unit for quick and easy connections without having 120V, 60Hz. AC Plug AC Outlet OPTIONAL CONNECTIONS If you use the VIDEO OUT switch...
User Guide
Page 7
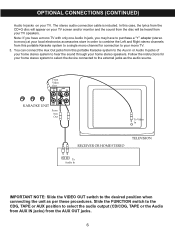
... when connecting the unit as the audio source. The stereo audio connection cable is included. From Video Out KARAOKE UNIT From Aux Out To Video In RECEIVER OR HOME STEREO TELEVISION To Audio In IMPORTANT NOTE: Slide the VIDEO OUT switch to select the audio output (CD/CDG, TAPE or the Audio from AUX IN jacks) from the AUX OUT jacks. 6 OPTIONAL CONNECTIONS (CONTINUED) Audio In jacks on your TV screen and/or monitor and the sound from the disc will...
... when connecting the unit as the audio source. The stereo audio connection cable is included. From Video Out KARAOKE UNIT From Aux Out To Video In RECEIVER OR HOME STEREO TELEVISION To Audio In IMPORTANT NOTE: Slide the VIDEO OUT switch to select the audio output (CD/CDG, TAPE or the Audio from AUX IN jacks) from the AUX OUT jacks. 6 OPTIONAL CONNECTIONS (CONTINUED) Audio In jacks on your TV screen and/or monitor and the sound from the disc will...
User Guide
Page 8
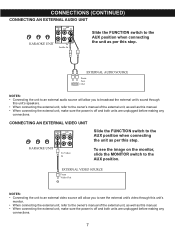
... the FUNCTION switch to the AUX position. KARAOKE UNIT To Video In To see the external unit's video through this unit's speakers. • When connecting the external unit, refer to the owner's manual of the external unit, as well as this manual. • When connecting the external unit, make sure the power is off and both units are unplugged before making any connections. 7 EXTERNAL VIDEO SOURCE From Video Out...
... the FUNCTION switch to the AUX position. KARAOKE UNIT To Video In To see the external unit's video through this unit's speakers. • When connecting the external unit, refer to the owner's manual of the external unit, as well as this manual. • When connecting the external unit, make sure the power is off and both units are unplugged before making any connections. 7 EXTERNAL VIDEO SOURCE From Video Out...
User Guide
Page 9
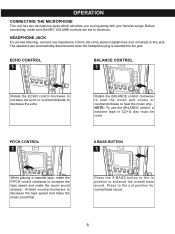
... make the music sound flat. 1 Press the X-BASS button to the in position to enhance the overall bass sound. Before connecting, make sure the MIC VOLUME controls are automatically disconnected when the headphone plug is inserted into the jack. Press to this jack. Rotate counterclockwise to minimum. The speakers are set to decrease the tape speed and make the music sound sharper. HEADPHONE JACK For private listening, connect low impedance 3.5mm (32 ohm) stereo...
... make the music sound flat. 1 Press the X-BASS button to the in position to enhance the overall bass sound. Before connecting, make sure the MIC VOLUME controls are automatically disconnected when the headphone plug is inserted into the jack. Press to this jack. Rotate counterclockwise to minimum. The speakers are set to decrease the tape speed and make the music sound sharper. HEADPHONE JACK For private listening, connect low impedance 3.5mm (32 ohm) stereo...
User Guide
Page 10
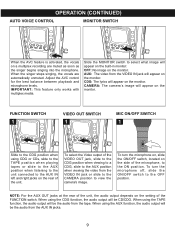
... position. To turn the microphone on, slide the ON/OFF switch, located on the side of the FUNCTION switch. Adjust the AVC control for the best balance between playback and microphone levels. When using the AUX function, the audio output will appear on the monitor. To turn the microphone off, slide the ON/OFF switch to select what image will appear on the monitor. OPERATION (CONTINUED) AUTO VOICE CONTROL MONITOR SWITCH When the...
... position. To turn the microphone on, slide the ON/OFF switch, located on the side of the FUNCTION switch. Adjust the AVC control for the best balance between playback and microphone levels. When using the AUX function, the audio output will appear on the monitor. To turn the microphone off, slide the ON/OFF switch to select what image will appear on the monitor. OPERATION (CONTINUED) AUTO VOICE CONTROL MONITOR SWITCH When the...
User Guide
Page 11
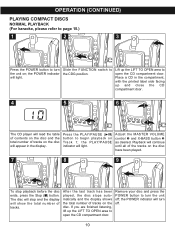
... the PLAY/PAUSE indicator will light. Adjust the MASTER VOLUME control 1 and X-BASS button 2 as desired. The disc will stop playback before the disc ends, press the Stop (I) button. Lift up the LIFT TO OPEN area to open the CD compartment door. After the last track has been played, the disc stops automatically and the display shows the total number of tracks. Slide the FUNCTION switch to open the CD...
... the PLAY/PAUSE indicator will light. Adjust the MASTER VOLUME control 1 and X-BASS button 2 as desired. The disc will stop playback before the disc ends, press the Stop (I) button. Lift up the LIFT TO OPEN area to open the CD compartment door. After the last track has been played, the disc stops automatically and the display shows the total number of tracks. Slide the FUNCTION switch to open the CD...

User Guide
Page 13
... you wish to turn the unit on a disc continuously, while in any desired order. Press the PROGRAM button; The specific track you to program up the LIFT TO OPEN area to begin playback. Slide the FUNCTION switch ƒ to play more than once. Place a CD in the CD Stop mode, press the REPEAT button ‚ once; "0" will blink in the display, within five seconds...
... you wish to turn the unit on a disc continuously, while in any desired order. Press the PROGRAM button; The specific track you to program up the LIFT TO OPEN area to begin playback. Slide the FUNCTION switch ƒ to play more than once. Place a CD in the CD Stop mode, press the REPEAT button ‚ once; "0" will blink in the display, within five seconds...

User Guide
Page 14
... player will light. When the desired track number blinks in the Stop mode, press the PROGRAM button repeatedly to view the programmed tracks. To clear programmed playback, while in the display, press the PROGRAM button „ again. When the last programmed track has been played, 2 the player will stop and the display will continue until you wish to program. OPERATION (CONTINUED) 4 5 6 3 1 2 3 1 2 3 12 Press the SKIP/SEARCH o 1 or n 2 button to select the...
... player will light. When the desired track number blinks in the Stop mode, press the PROGRAM button repeatedly to view the programmed tracks. To clear programmed playback, while in the display, press the PROGRAM button „ again. When the last programmed track has been played, 2 the player will stop and the display will continue until you wish to program. OPERATION (CONTINUED) 4 5 6 3 1 2 3 1 2 3 12 Press the SKIP/SEARCH o 1 or n 2 button to select the...

User Guide
Page 16
... external TV, if connected. Press the POWER button to turn the unit on the external TV. Rotate the AUTO VOICE control clockwise to suppress the vocal tracks on the CD being played when singing into the MIC jack(s) ‚ and slide the FUNCTION switch ƒ to the CDG position. The ECHO control ƒ is set to the center position so that displays the song lyrics...
... external TV, if connected. Press the POWER button to turn the unit on the external TV. Rotate the AUTO VOICE control clockwise to suppress the vocal tracks on the CD being played when singing into the MIC jack(s) ‚ and slide the FUNCTION switch ƒ to the CDG position. The ECHO control ƒ is set to the center position so that displays the song lyrics...
User Guide
Page 17
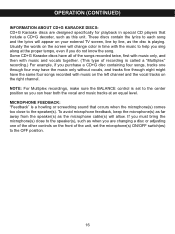
... an equal level. NOTE: For Multiplex recordings, make sure the BALANCE control is called a "Multiplex" recording.) For example, if you are designed specifically for playback in time with music on the left channel and the vocal tracks on the front of recording is set the microphone(s) ON/OFF switch(es) to the speaker(s). Usually the words on the screen will allow...
... an equal level. NOTE: For Multiplex recordings, make sure the BALANCE control is called a "Multiplex" recording.) For example, if you are designed specifically for playback in time with music on the left channel and the vocal tracks on the front of recording is set the microphone(s) ON/OFF switch(es) to the speaker(s). Usually the words on the screen will allow...
User Guide
Page 18
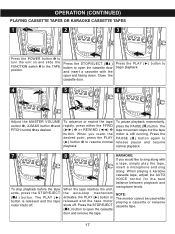
... reaches the end, ends, press the STOP/EJECT the auto-stop mechanism ( ) button. The PLAY (®) activates, the PLAY (®) button is button is still running. OPERATION (CONTINUED) PLAYING CASSETTE TAPES OR KARAOKE CASSETTE TAPES 1 1 2 3 2 Press the POWER button 1 to turn the unit on and slide the FUNCTION switch 2 to begin playback. 4 2 5 1 6 2 2 1 3 1 3 1 2 2 Adjust the MASTER VOLUME control 1, X-BASS button 2 and PITCH control 3 as desired. Close the cassette door. When you would...
... reaches the end, ends, press the STOP/EJECT the auto-stop mechanism ( ) button. The PLAY (®) activates, the PLAY (®) button is button is still running. OPERATION (CONTINUED) PLAYING CASSETTE TAPES OR KARAOKE CASSETTE TAPES 1 1 2 3 2 Press the POWER button 1 to turn the unit on and slide the FUNCTION switch 2 to begin playback. 4 2 5 1 6 2 2 1 3 1 3 1 2 2 Adjust the MASTER VOLUME control 1, X-BASS button 2 and PITCH control 3 as desired. Close the cassette door. When you would...
User Guide
Page 19
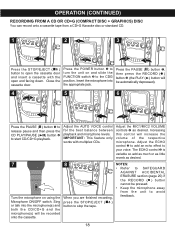
Press the PAUSE ( ) button ‚, then press the RECORD ( ) button ƒ (the PLAY (®) button will be recorded onto the cassette. Press the POWER button 1 to turn the unit on using the Microphone ON/OFF switch. Adjust the AUTO VOICE control for the best balance between playback and microphone levels. IMPORTANT: This feature only works with the open end facing down. The ECHO control ƒ is variable so add as...
Press the PAUSE ( ) button ‚, then press the RECORD ( ) button ƒ (the PLAY (®) button will be recorded onto the cassette. Press the POWER button 1 to turn the unit on using the Microphone ON/OFF switch. Adjust the AUTO VOICE control for the best balance between playback and microphone levels. IMPORTANT: This feature only works with the open end facing down. The ECHO control ƒ is variable so add as...
User Guide
Page 20
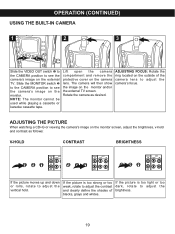
... used while playing a cassette or karaoke cassette tape. Lift open the camera compartment and remove the protective cover on the monitor screen, adjust the brightness, v-hold and contrast as desired. ADJUSTING FOCUS: Rotate the ring located on the outside of blacks, grays and whites. If the picture is too light or too dark, rotate to adjust the brightness. 19 Slide the MONITOR switch...
... used while playing a cassette or karaoke cassette tape. Lift open the camera compartment and remove the protective cover on the monitor screen, adjust the brightness, v-hold and contrast as desired. ADJUSTING FOCUS: Rotate the ring located on the outside of blacks, grays and whites. If the picture is too light or too dark, rotate to adjust the brightness. 19 Slide the MONITOR switch...

User Guide
Page 22
...fingers to direct sunlight, high humidity, high temperatures or dust, etc. If necessary, use to avoid damage. • Do not expose compact discs to come in straight lines from the AC power source when cleaning. &#...play DIGITAL AUDIO GRAPHICS properly. • Compact Discs should be used on or near the tape heads. BENZENE CLEANER COMPACT • This unit is designed to the compact disc label. • Clean the compact disc periodically with another swab. Cotton Swab Capstan Erase Head R/P Head Pinch Roller NOTE: Never use metal objects on the front panel...
...fingers to direct sunlight, high humidity, high temperatures or dust, etc. If necessary, use to avoid damage. • Do not expose compact discs to come in straight lines from the AC power source when cleaning. &#...play DIGITAL AUDIO GRAPHICS properly. • Compact Discs should be used on or near the tape heads. BENZENE CLEANER COMPACT • This unit is designed to the compact disc label. • Clean the compact disc periodically with another swab. Cotton Swab Capstan Erase Head R/P Head Pinch Roller NOTE: Never use metal objects on the front panel...
User Guide
Page 23
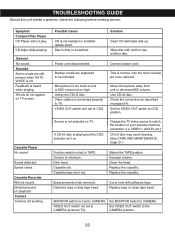
... head. Set VIDEO OUT switch to CDG position. Feedback is not selected on playback. Connect power cord. Source is heard when singing. Move microphone away from unit or decrease MIC volume. Replace tape or clean tape head. General No sound. Disc is off. TROUBLESHOOTING GUIDE Should this unit exhibit a problem, check the following before seeking service: Symptom Compact Disc Player CD Player will not play. Karaoke Some vocals are still present when AUTO VOICE...
... head. Set VIDEO OUT switch to CDG position. Feedback is not selected on playback. Connect power cord. Source is heard when singing. Move microphone away from unit or decrease MIC volume. Replace tape or clean tape head. General No sound. Disc is off. TROUBLESHOOTING GUIDE Should this unit exhibit a problem, check the following before seeking service: Symptom Compact Disc Player CD Player will not play. Karaoke Some vocals are still present when AUTO VOICE...
User Guide
Page 24
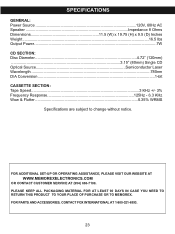
... CASE YOU NEED TO RETURN THIS PRODUCT TO YOUR PLACE OF PURCHASE OR TO MEMOREX. FOR ADDITIONAL SET-UP OR OPERATING ASSISTANCE, PLEASE VISIT OUR WEBSITE AT WWW.MEMOREXELECTRONICS.COM OR CONTACT CUSTOMER SERVICE AT (954) 660-7100. FOR PARTS AND ACCESSORIES, CONTACT FOX INTERNATIONAL AT 1-800-321-6993. 23 SPECIFICATIONS GENERAL: Power Source 120V, 60Hz AC Speaker Impedance 8 Ohms...
... CASE YOU NEED TO RETURN THIS PRODUCT TO YOUR PLACE OF PURCHASE OR TO MEMOREX. FOR ADDITIONAL SET-UP OR OPERATING ASSISTANCE, PLEASE VISIT OUR WEBSITE AT WWW.MEMOREXELECTRONICS.COM OR CONTACT CUSTOMER SERVICE AT (954) 660-7100. FOR PARTS AND ACCESSORIES, CONTACT FOX INTERNATIONAL AT 1-800-321-6993. 23 SPECIFICATIONS GENERAL: Power Source 120V, 60Hz AC Speaker Impedance 8 Ohms...


