User Guide
Page 1
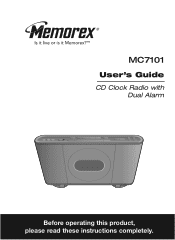
MC7101 User's Guide CD Clock Radio with Dual Alarm Before operating this product, please read these instructions completely.
MC7101 User's Guide CD Clock Radio with Dual Alarm Before operating this product, please read these instructions completely.
User Guide
Page 2
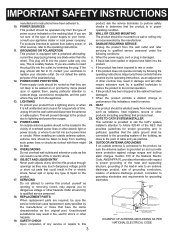
... REMOVE COVER (OR BACK). CAUTION: USE OF CONTROLS, ADJUSTMENTS OR PERFORMANCE PROCEDURE HEREIN MAY RESULT IN HAZARDOUS RADIATION EXPOSURE. Invisible and hazardous laser radiation when open and interlock failed or defeated. Avoid direct exposure to constitute a risk of important operating and maintenance (servicing) instructions in the instruction manual. The user could lose the authority to operate this device due to possible...
... REMOVE COVER (OR BACK). CAUTION: USE OF CONTROLS, ADJUSTMENTS OR PERFORMANCE PROCEDURE HEREIN MAY RESULT IN HAZARDOUS RADIATION EXPOSURE. Invisible and hazardous laser radiation when open and interlock failed or defeated. Avoid direct exposure to constitute a risk of important operating and maintenance (servicing) instructions in the instruction manual. The user could lose the authority to operate this device due to possible...
User Guide
Page 3
... and found to comply with the limits for a Class B digital device, pursuant to provide reasonable protection against harmful interference in a residential installation. This equipment generates, uses and can be sure to which the receiver is connected. • Consult the dealer or an experienced radio/TV technician for help. FOLLOW INSTRUCTIONS All operating and use liquid cleaners or aerosol cleaners.
... and found to comply with the limits for a Class B digital device, pursuant to provide reasonable protection against harmful interference in a residential installation. This equipment generates, uses and can be sure to which the receiver is connected. • Consult the dealer or an experienced radio/TV technician for help. FOLLOW INSTRUCTIONS All operating and use liquid cleaners or aerosol cleaners.
User Guide
Page 4
... the polarized plug. NOTE TO CATV SYSTEM INSTALLER 14. When installing an outside antenna system, connected to the grounding system of power supply to keep from the appliance. Section 810 of time, The product should not be routed so that produce heat. CLAMP 18. NATIONAL ELECTRICAL CODE S2898A POWER SERVICE GROUNDING ELECTRODE SYSTEM (NEC ART 250, PART H) hazards. 19. Unplug the product from battery power, or 21...
... the polarized plug. NOTE TO CATV SYSTEM INSTALLER 14. When installing an outside antenna system, connected to the grounding system of power supply to keep from the appliance. Section 810 of time, The product should not be routed so that produce heat. CLAMP 18. NATIONAL ELECTRICAL CODE S2898A POWER SERVICE GROUNDING ELECTRODE SYSTEM (NEC ART 250, PART H) hazards. 19. Unplug the product from battery power, or 21...
User Guide
Page 5
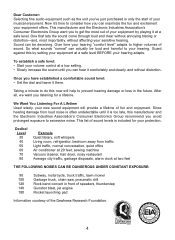
... traffic Light traffic, normal conversation, quiet office Air conditioner at 20 feet, sewing machine Vacuum cleaner, hair dryer, noisy restaurant Average city traffic, garbage disposals, alarm clock at a safe level BEFORE your protection. Now it comfortably and clearly, and without affecting your new sound equipment will help to prevent hearing damage or loss in front of speakers...
... traffic Light traffic, normal conversation, quiet office Air conditioner at 20 feet, sewing machine Vacuum cleaner, hair dryer, noisy restaurant Average city traffic, garbage disposals, alarm clock at a safe level BEFORE your protection. Now it comfortably and clearly, and without affecting your new sound equipment will help to prevent hearing damage or loss in front of speakers...
User Guide
Page 6
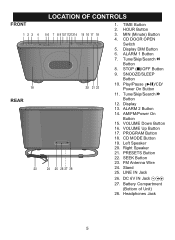
...8. SNOOZE/SLEEP Button 10. CD MODE Button 19. LINE IN Jack 26. CD DOOR OPEN Switch 5. ALARM 1 Button 7. STOP (s)/OFF Button 9. Tune/Skip/Search l Button 12. VOLUME Up Button 17. PROGRAM Button 18. Right Speaker 21. SEEK Button 23. FM Antenna Wire 24. PRESETS Button 22. MIN (Minute) Button 4. VOLUME Down Button 16. Stand 25. Headphones Jack 5 FRONT REAR LOCATION OF CONTROLS 1. HOUR Button 3. Display DIM Button 6. Battery Compartment (Bottom of Unit) 28. ALARM 2 Button 14. DC 6V IN Jack Z 27. Display 13. Left Speaker 20. TIME Button 2. Play/Pause...
...8. SNOOZE/SLEEP Button 10. CD MODE Button 19. LINE IN Jack 26. CD DOOR OPEN Switch 5. ALARM 1 Button 7. STOP (s)/OFF Button 9. Tune/Skip/Search l Button 12. VOLUME Up Button 17. PROGRAM Button 18. Right Speaker 21. SEEK Button 23. FM Antenna Wire 24. PRESETS Button 22. MIN (Minute) Button 4. VOLUME Down Button 16. Stand 25. Headphones Jack 5 FRONT REAR LOCATION OF CONTROLS 1. HOUR Button 3. Display DIM Button 6. Battery Compartment (Bottom of Unit) 28. ALARM 2 Button 14. DC 6V IN Jack Z 27. Display 13. Left Speaker 20. TIME Button 2. Play/Pause...
User Guide
Page 7
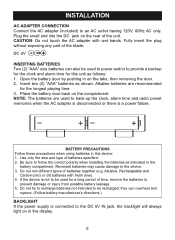
... clock, alarm time and radio preset memories when the AC adapter is disconnected or there is not to prevent damage or injury from possible battery leakage. 5. Do not try to recharge batteries not intended to the device. 3. Z DC 6V INSERTING BATTERIES Two (2) "AAA" size batteries can overheat and rupture. (Follow battery manufacturer's directions.) BACKLIGHT If the power supply is connected to the DC 6V IN jack, the backlight...
... clock, alarm time and radio preset memories when the AC adapter is disconnected or there is not to prevent damage or injury from possible battery leakage. 5. Do not try to recharge batteries not intended to the device. 3. Z DC 6V INSERTING BATTERIES Two (2) "AAA" size batteries can overheat and rupture. (Follow battery manufacturer's directions.) BACKLIGHT If the power supply is connected to the DC 6V IN jack, the backlight...
User Guide
Page 8
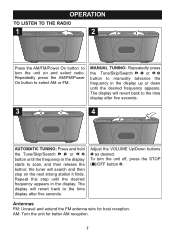
... display will search and then stop on and select radio. Repeat this step until the desired frequency appears in the display up or down until the frequency in the display starts to manually advance the frequency in the display. Adjust the VOLUME Up/Down buttons 1 as desired. AM: Turn the unit for best reception. Repeatedly press1the AM/FM/Power On button to the time display after five seconds. 3 2 1 4 2 1 AUTOMATIC...
... display will search and then stop on and select radio. Repeat this step until the desired frequency appears in the display up or down until the frequency in the display starts to manually advance the frequency in the display. Adjust the VOLUME Up/Down buttons 1 as desired. AM: Turn the unit for best reception. Repeatedly press1the AM/FM/Power On button to the time display after five seconds. 3 2 1 4 2 1 AUTOMATIC...
User Guide
Page 9
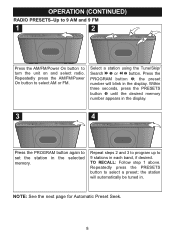
.... OPERATION (CONTINUED) RADIO PRESETS-Up to 9 AM and 9 FM 1 2 1 2 3 4 Press the AM/FM/Power On button to 9 stations in each band, if desired. NOTE: See the next page for Automatic Preset Seek. 8 Within three seconds, press the PRESETS button 4 until the desired memory number appears in the display. 3 4 Press the PROGRAM button again to set the station in the selected memory. 2 Repeat steps 2 and 3 to program up to turn the...
.... OPERATION (CONTINUED) RADIO PRESETS-Up to 9 AM and 9 FM 1 2 1 2 3 4 Press the AM/FM/Power On button to 9 stations in each band, if desired. NOTE: See the next page for Automatic Preset Seek. 8 Within three seconds, press the PRESETS button 4 until the desired memory number appears in the display. 3 4 Press the PROGRAM button again to set the station in the selected memory. 2 Repeat steps 2 and 3 to program up to turn the...

User Guide
Page 10
... stop on and select radio. OPERATION (CONTINUED) AUTOMATIC PRESET SEEK To have the unit automatically seek through all of the radio stations and program the first 9 strong stations. Press the SEEK button 1; INSERTING A CD 1 Slide the CD DOOR OPEN switch to play 3" singles? What is 74 minutes. 9 Close the CD door. 2 FAQS: Do I need an adapter to the right and the CD door will then seek through the radio stations...
... stop on and select radio. OPERATION (CONTINUED) AUTOMATIC PRESET SEEK To have the unit automatically seek through all of the radio stations and program the first 9 strong stations. Press the SEEK button 1; INSERTING A CD 1 Slide the CD DOOR OPEN switch to play 3" singles? What is 74 minutes. 9 Close the CD door. 2 FAQS: Do I need an adapter to the right and the CD door will then seek through the radio stations...
User Guide
Page 11
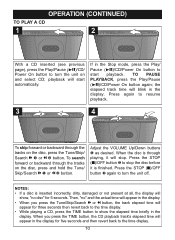
... time display. 10 TO PAUSE PLAYBACK, press the Play/Pause (®p)/CD/Power On button again; the elapsed track 2time will start automatically. 2 If in the display. To search forward or backward through playing, it is finished. Adjust the VOLUME Up/Down buttons 1 as desired. Press the STOP (s)/OFF button 2 again to turn the unit on and select CD; playback will blink in the Stop mode, press the Play...
... time display. 10 TO PAUSE PLAYBACK, press the Play/Pause (®p)/CD/Power On button again; the elapsed track 2time will start automatically. 2 If in the display. To search forward or backward through playing, it is finished. Adjust the VOLUME Up/Down buttons 1 as desired. Press the STOP (s)/OFF button 2 again to turn the unit on and select CD; playback will blink in the Stop mode, press the Play...
User Guide
Page 12
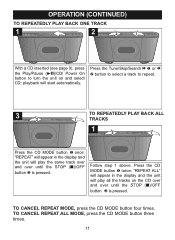
... turn the unit on the CD over and over until the STOP (s)/OFF button 2 is pressed. Press the CD MODE button 1 twice; OPERATION (CONTINUED) TO REPEATEDLY PLAY BACK ONE TRACK 1 2 2 1 With a CD inserted (see page 9), press the Play/Pause (®p)/CD/ Power On button to repeat. 3 2 TO REPEATEDLY PLAY BACK ALL 1 TRACKS 1 2 1 Press the CD MODE button 1 once; playback will play all the tracks on and select CD; TO CANCEL REPEAT MODE, press the CD MODE button four times...
... turn the unit on the CD over and over until the STOP (s)/OFF button 2 is pressed. Press the CD MODE button 1 twice; OPERATION (CONTINUED) TO REPEATEDLY PLAY BACK ONE TRACK 1 2 2 1 With a CD inserted (see page 9), press the Play/Pause (®p)/CD/ Power On button to repeat. 3 2 TO REPEATEDLY PLAY BACK ALL 1 TRACKS 1 2 1 Press the CD MODE button 1 once; playback will play all the tracks on and select CD; TO CANCEL REPEAT MODE, press the CD MODE button four times...
User Guide
Page 13
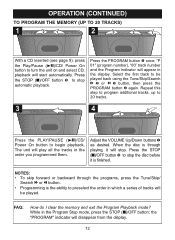
... Program Playback mode? Press the PROGRAM button 1 once; Press the STOP (s)/OFF button 2 to be played. Repeat this step to program additional tracks, up to 20 tracks. 3 4 2 1 Press the PLAY/PAUSE (®p)/CD/ Power On button to turn the unit on and select CD; Adjust the VOLUME Up/Down buttons 1 as desired. OPERATION (CONTINUED) TO PROGRAM THE MEMORY (UP TO 20 TRACKS) 1 2 1 2 3 2 1 With a CD inserted (see page 9), press the Play/Pause (®p)/CD/ Power...
... Program Playback mode? Press the PROGRAM button 1 once; Press the STOP (s)/OFF button 2 to be played. Repeat this step to program additional tracks, up to 20 tracks. 3 4 2 1 Press the PLAY/PAUSE (®p)/CD/ Power On button to turn the unit on and select CD; Adjust the VOLUME Up/Down buttons 1 as desired. OPERATION (CONTINUED) TO PROGRAM THE MEMORY (UP TO 20 TRACKS) 1 2 1 2 3 2 1 With a CD inserted (see page 9), press the Play/Pause (®p)/CD/ Power...
User Guide
Page 14
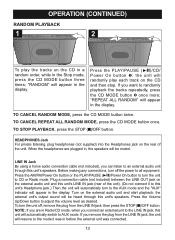
... the Stop mode, press the CD MODE button three times; HEADPHONES Jack For private listening, plug headphones (not supplied) into the Headphones jack on the rear of the unit). (Do not connect it was connected. 13 Turn on the external audio unit and start playback; the external unit's output sound will be muted. Press the PLAY/PAUSE (®p)/CD/ Power On button 1; Plug a connection cable (not included) between the LINE OUT jack on the external audio unit...
... the Stop mode, press the CD MODE button three times; HEADPHONES Jack For private listening, plug headphones (not supplied) into the Headphones jack on the rear of the unit). (Do not connect it was connected. 13 Turn on the external audio unit and start playback; the external unit's output sound will be muted. Press the PLAY/PAUSE (®p)/CD/ Power On button 1; Plug a connection cable (not included) between the LINE OUT jack on the external audio unit...
User Guide
Page 15
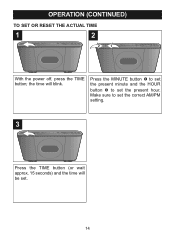
Make sure to set . 14 OPERATION (CONTINUED) TO SET OR RESET THE ACTUAL TIME 1 2 21 With the power off, press the TIME button; the time will be set the present hour. Press the MINUTE button 1 to set the present minute and the HOUR button 2 to set the correct AM/PM setting. 3 Press the TIME button (or wait approx. 15 seconds) and the time will blink.
Make sure to set . 14 OPERATION (CONTINUED) TO SET OR RESET THE ACTUAL TIME 1 2 21 With the power off, press the TIME button; the time will be set the present hour. Press the MINUTE button 1 to set the present minute and the HOUR button 2 to set the correct AM/PM setting. 3 Press the TIME button (or wait approx. 15 seconds) and the time will blink.
User Guide
Page 16
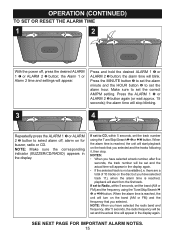
..., set the track number using the Tune/Skip/Search l 1 or m 2 button. NOTE: Make sure the corresponding indicator (BUZZER/CD/RADIO) appears in the display again. • If the selected track is reached, the unit will appear. If set to set the alarm hour. Press the MINUTE button 3 to set the alarm minute and the HOUR button 4 to set the correct AM/PM setting. When the alarm time is reached, playback will blink. NOTE...
..., set the track number using the Tune/Skip/Search l 1 or m 2 button. NOTE: Make sure the corresponding indicator (BUZZER/CD/RADIO) appears in the display again. • If the selected track is reached, the unit will appear. If set to set the alarm hour. Press the MINUTE button 3 to set the alarm minute and the HOUR button 4 to set the correct AM/PM setting. When the alarm time is reached, playback will blink. NOTE...
User Guide
Page 17
... not necessary to Radio or Buzzer, the unit will automatically turn on the next page. • While the alarm is reached. • When the actual time matches the selected preset alarm time(s), if set to set the volume level for the alarm. otherwise, there will only play the tracks on the CD and then shut off . • TO SHUT OFF THE ALARM, see TO SHUT THE ALARM OFF section on...
... not necessary to Radio or Buzzer, the unit will automatically turn on the next page. • While the alarm is reached. • When the actual time matches the selected preset alarm time(s), if set to set the volume level for the alarm. otherwise, there will only play the tracks on the CD and then shut off . • TO SHUT OFF THE ALARM, see TO SHUT THE ALARM OFF section on...
User Guide
Page 18
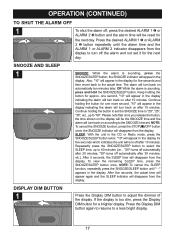
OPERATION (CONTINUED) TO SHUT THE ALARM OFF 1 1 To shut the alarm off, press the desired ALARM 1 1 or ALARM 2 2 button and the alarm time will be the SNOOZE time and the alarm will turn back on according to the SNOOZE time set. The alarm will turn back on the display will be reset for five seconds which indicates the unit will appear in the CD or Radio mode, press the SNOOZE/SLEEP button twice; Keep holding the button to "60". one...
OPERATION (CONTINUED) TO SHUT THE ALARM OFF 1 1 To shut the alarm off, press the desired ALARM 1 1 or ALARM 2 2 button and the alarm time will be the SNOOZE time and the alarm will turn back on according to the SNOOZE time set. The alarm will turn back on the display will be reset for five seconds which indicates the unit will appear in the CD or Radio mode, press the SNOOZE/SLEEP button twice; Keep holding the button to "60". one...
User Guide
Page 20
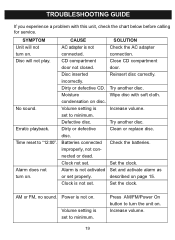
... turn on disc. Close CD compartment door. Volume setting is not activated or set to "12:00". Dirty or defective disc. Check the batteries. Reinsert disc correctly. Time reset to minimum. CAUSE AC adapter is set properly. Disc will not turn the unit on . Volume setting is not connected. Clock not set . Set the clock. SYMPTOM Unit will not play. Power is not set . Try another disc. Increase volume. Defective disc. No sound. Clock is not on . TROUBLESHOOTING GUIDE If you experience a problem...
... turn on disc. Close CD compartment door. Volume setting is not activated or set to "12:00". Dirty or defective disc. Check the batteries. Reinsert disc correctly. Time reset to minimum. CAUSE AC adapter is set properly. Disc will not turn the unit on . Volume setting is not connected. Clock not set . Set the clock. SYMPTOM Unit will not play. Power is not set . Try another disc. Increase volume. Defective disc. No sound. Clock is not on . TROUBLESHOOTING GUIDE If you experience a problem...
User Guide
Page 21
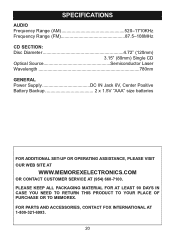
... OR TO MEMOREX. SPECIFICATIONS AUDIO Frequency Range (AM 520-1710KHz Frequency Range (FM 87.5-108MHz CD SECTION: Disc Diameter 4.72" (120mm) 3.15" (80mm) Single CD Optical Source Semiconductor Laser Wavelength 780nm GENERAL Power Supply DC IN Jack 6V, Center Positive Battery Backup 2 x 1.5V "AAA" size batteries FOR ADDITIONAL SET-UP OR OPERATING ASSISTANCE, PLEASE VISIT OUR WEB SITE AT WWW.MEMOREXELECTRONICS.COM OR CONTACT CUSTOMER SERVICE AT...
... OR TO MEMOREX. SPECIFICATIONS AUDIO Frequency Range (AM 520-1710KHz Frequency Range (FM 87.5-108MHz CD SECTION: Disc Diameter 4.72" (120mm) 3.15" (80mm) Single CD Optical Source Semiconductor Laser Wavelength 780nm GENERAL Power Supply DC IN Jack 6V, Center Positive Battery Backup 2 x 1.5V "AAA" size batteries FOR ADDITIONAL SET-UP OR OPERATING ASSISTANCE, PLEASE VISIT OUR WEB SITE AT WWW.MEMOREXELECTRONICS.COM OR CONTACT CUSTOMER SERVICE AT...


