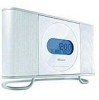
User Guide
Page 3
... The openings should be retained for help. This equipment generates, uses and can be read all operating instructions carefully. Please note that interference will not occur in accordance with the limits for ventilation, to ensure reliable operation of the product should follow the... cause the appliance and cart combination to overturn. 9. However, there is connected. • Consult the dealer or an experienced radio/TV technician for future reference. 3. RETAIN INSTRUCTIONS The safety and operating instructions should be followed. 5. FOLLOW INSTRUCTIONS All operating and...
... The openings should be retained for help. This equipment generates, uses and can be read all operating instructions carefully. Please note that interference will not occur in accordance with the limits for ventilation, to ensure reliable operation of the product should follow the... cause the appliance and cart combination to overturn. 9. However, there is connected. • Consult the dealer or an experienced radio/TV technician for future reference. 3. RETAIN INSTRUCTIONS The safety and operating instructions should be followed. 5. FOLLOW INSTRUCTIONS All operating and...
User Guide
Page 4
... they may result in damage and will often Power-supply cords should not be or circuits. To protect your product from battery power, or 21. NOTE TO CATV SYSTEM INSTALLER 14. covered by the operating instructions, as recommended by following conditions: current line plug (a plug having one b. POWER-CORD PROTECTION of...
... they may result in damage and will often Power-supply cords should not be or circuits. To protect your product from battery power, or 21. NOTE TO CATV SYSTEM INSTALLER 14. covered by the operating instructions, as recommended by following conditions: current line plug (a plug having one b. POWER-CORD PROTECTION of...
User Guide
Page 7
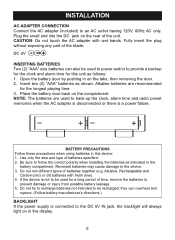
...in this unit as follows: 1. Place the battery door back on the rear of the unit. Use only the size and type of the blade. NOTE: The batteries are recommended for the longest playing time. 3. Be sure to follow the correct polarity when installing the batteries as shown. they can ...in the display. 6 If the device is not to be used to back-up the clock, alarm time and radio preset memories when the AC adapter is disconnected or there is connected to provide a backup for the clock and alarm time for a long period of batteries together (e.g. Do not mix different types of...
...in this unit as follows: 1. Place the battery door back on the rear of the unit. Use only the size and type of the blade. NOTE: The batteries are recommended for the longest playing time. 3. Be sure to follow the correct polarity when installing the batteries as shown. they can ...in the display. 6 If the device is not to be used to back-up the clock, alarm time and radio preset memories when the AC adapter is disconnected or there is connected to provide a backup for the clock and alarm time for a long period of batteries together (e.g. Do not mix different types of...
User Guide
Page 9
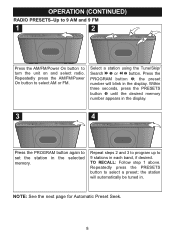
.../Skip/ Search l 1 or m 2 button. Repeatedly press the PRESETS button to turn the unit on and select radio. NOTE: See the next page for Automatic Preset Seek. 8 the preset number will automatic2ally be tuned in. OPERATION (CONTINUED) RADIO PRESETS-Up to 9 AM and 9 FM 1 2 1 2 3 4 Press the AM/FM/Power On button to select a preset...
.../Skip/ Search l 1 or m 2 button. Repeatedly press the PRESETS button to turn the unit on and select radio. NOTE: See the next page for Automatic Preset Seek. 8 the preset number will automatic2ally be tuned in. OPERATION (CONTINUED) RADIO PRESETS-Up to 9 AM and 9 FM 1 2 1 2 3 4 Press the AM/FM/Power On button to select a preset...
User Guide
Page 11
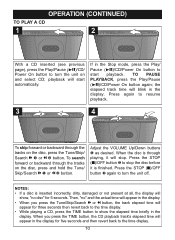
...actual time will appear in the display. • When you press the TIME button, the CD playback track's elapsed time will appear in the display. playback will show the elapsed time briefly in the display for 5 seconds. NOTES: • If a disc is finished. Then, "no disc" for five ...seconds and then revert back to the time display. 10 TO PAUSE PLAYBACK, press the Play/Pause (®p)/CD/Power On button again; To search forward or backward ...
...actual time will appear in the display. • When you press the TIME button, the CD playback track's elapsed time will appear in the display. playback will show the elapsed time briefly in the display for 5 seconds. NOTES: • If a disc is finished. Then, "no disc" for five ...seconds and then revert back to the time display. 10 TO PAUSE PLAYBACK, press the Play/Pause (®p)/CD/Power On button again; To search forward or backward ...
User Guide
Page 13
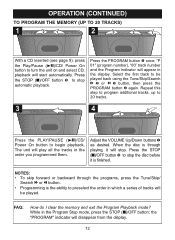
...order you programmed them. OPERATION (CONTINUED) TO PROGRAM THE MEMORY (UP TO 20 TRACKS) 1 2 1 2 3 2 1 With a CD inserted (see page 9), press the Play/Pause (®p)/CD/ Power On button to begin playback. Press the PROGRAM button 1 once; Select the first track to preselect the order in the... display. The unit will disappear from the display. 12 When the disc is through playing, it is finished. 2 NOTES: • To...
...order you programmed them. OPERATION (CONTINUED) TO PROGRAM THE MEMORY (UP TO 20 TRACKS) 1 2 1 2 3 2 1 With a CD inserted (see page 9), press the Play/Pause (®p)/CD/ Power On button to begin playback. Press the PROGRAM button 1 once; Select the first track to preselect the order in the... display. The unit will disappear from the display. 12 When the disc is through playing, it is finished. 2 NOTES: • To...
User Guide
Page 14
... on the external audio unit and this unit will appear in before the external unit was connected. 13 If you can listen to CD or Radio mode. TO STOP PLAYBACK, press the STOP (s)/OFF button. HEADPHONES Jack For private listening, plug headphones (not supplied) into the Headphones...automatically switch to this unit's Headphone jack.) Then the unit will be heard through this unit's speakers. Press the PLAY/PAUSE (®p)/CD/ Power On button 1; NOTE: If you are plugged in Radio/CD mode, when you remove the plug from the LINE IN jack, then press the STOP (s)/OFF button.
... on the external audio unit and this unit will appear in before the external unit was connected. 13 If you can listen to CD or Radio mode. TO STOP PLAYBACK, press the STOP (s)/OFF button. HEADPHONES Jack For private listening, plug headphones (not supplied) into the Headphones...automatically switch to this unit's Headphone jack.) Then the unit will be heard through this unit's speakers. Press the PLAY/PAUSE (®p)/CD/ Power On button 1; NOTE: If you are plugged in Radio/CD mode, when you remove the plug from the LINE IN jack, then press the STOP (s)/OFF button.
User Guide
Page 16
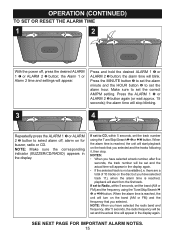
Press and hold the desired ALARM 1 1 or ALARM 2 2 button; Make sure to set the alarm hour. NOTE: Make sure the corresponding indicator (BUZZER/CD/RADIO) appears in the display again. When the alarm time is reached, the unit will turn on the disc but you have selected track 11), when ...the alarm time is reached, playback will start playback on for buzzer, radio or CD. NOTES: • When you selected. there are a total of 10 tracks on the band (AM or FM) and the frequency that you have selected a track...
Press and hold the desired ALARM 1 1 or ALARM 2 2 button; Make sure to set the alarm hour. NOTE: Make sure the corresponding indicator (BUZZER/CD/RADIO) appears in the display again. When the alarm time is reached, the unit will turn on the disc but you have selected track 11), when ...the alarm time is reached, playback will start playback on for buzzer, radio or CD. NOTES: • When you selected. there are a total of 10 tracks on the band (AM or FM) and the frequency that you have selected a track...
User Guide
Page 17
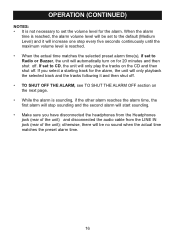
...the alarm is reached. • When the actual time matches the selected preset alarm time(s), if set to CD, the unit will only play the tracks on for 20 minutes and then shut off . If you have... unit) and disconnected the audio cable from the LINE IN jack (rear of the unit); OPERATION (CONTINUED) NOTES: • It is not necessary to set the volume level for the alarm, the unit will only playback... will start sounding. • Make sure you select a starting track for the alarm. If set to Radio or Buzzer, the unit will be no sound when the actual time matches the preset alarm time. 16 ...
...the alarm is reached. • When the actual time matches the selected preset alarm time(s), if set to CD, the unit will only play the tracks on for 20 minutes and then shut off . If you have... unit) and disconnected the audio cable from the LINE IN jack (rear of the unit); OPERATION (CONTINUED) NOTES: • It is not necessary to set the volume level for the alarm, the unit will only playback... will start sounding. • Make sure you select a starting track for the alarm. If set to Radio or Buzzer, the unit will be no sound when the actual time matches the preset alarm time. 16 ...
User Guide
Page 18
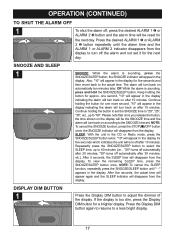
... cancel the SNOOZE function, press the STOP (s)/OFF button once; "10" will appear in the display indicating the alarm will appear in the CD or Radio mode, press the SNOOZE/SLEEP button twice; If the display is too dim, press the Display DIM button for five seconds and then revert back... after 15 minutes. The alarm will appear in the display. Press the desired ALARM 1 1 or ALARM 2 2 button repeatedly until "- -" appears in the display. Please note that once you release the button, the time shown on the display will be reset for five seconds which indicates the unit will turn off...
... cancel the SNOOZE function, press the STOP (s)/OFF button once; "10" will appear in the display indicating the alarm will appear in the CD or Radio mode, press the SNOOZE/SLEEP button twice; If the display is too dim, press the Display DIM button for five seconds and then revert back... after 15 minutes. The alarm will appear in the display. Press the desired ALARM 1 1 or ALARM 2 2 button repeatedly until "- -" appears in the display. Please note that once you release the button, the time shown on the display will be reset for five seconds which indicates the unit will turn off...