Manual
Page 1
MB2059B User's Guide 28 Hours Digital Voice Recorder Before operating this product, please read these instructions completely.
MB2059B User's Guide 28 Hours Digital Voice Recorder Before operating this product, please read these instructions completely.

Manual
Page 2
...NEED TO RETURN THIS PRODUCT TO YOUR PLACE OF PURCHASE OR IMATION ELECTRONICS PRODUCTS. This equipment generates, uses and can be determined by turning the equipment off and on the rear of the cabinet. We suggest that interference will not occur in a particular installation. Model Number: MB2059B Serial Number...there is ever needed at a future date. If this information is no guarantee that you for help. 1 The serial number of your unit can radiate radio frequency energy and, if not installed and used in accordance with the limits for a Class B digital device, pursuant to ...
...NEED TO RETURN THIS PRODUCT TO YOUR PLACE OF PURCHASE OR IMATION ELECTRONICS PRODUCTS. This equipment generates, uses and can be determined by turning the equipment off and on the rear of the cabinet. We suggest that interference will not occur in a particular installation. Model Number: MB2059B Serial Number...there is ever needed at a future date. If this information is no guarantee that you for help. 1 The serial number of your unit can radiate radio frequency energy and, if not installed and used in accordance with the limits for a Class B digital device, pursuant to ...

Manual
Page 3
Play Indicator B. REPEAT 1/ALL Indicators E. Minute/Second (Timer) Indicators I Y M DG AM PM H A. REMAIN Indicator J. Record Indicator F. Message File Folder Indicator 2 VOX Indicator L. Recording Quality Indicators C. Battery Indicator G. R (Record) DATE Indicator K. Date/Volume Indicators H. Message/Year Indicators D. LOCATION OF INDICATORS AB C A LP MP LB C HP REPEAT ALL D E D F K J R DATE REMAIN I .
Play Indicator B. REPEAT 1/ALL Indicators E. Minute/Second (Timer) Indicators I Y M DG AM PM H A. REMAIN Indicator J. Record Indicator F. Message File Folder Indicator 2 VOX Indicator L. Recording Quality Indicators C. Battery Indicator G. R (Record) DATE Indicator K. Date/Volume Indicators H. Message/Year Indicators D. LOCATION OF INDICATORS AB C A LP MP LB C HP REPEAT ALL D E D F K J R DATE REMAIN I .
Manual
Page 4
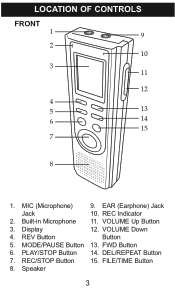
VOLUME Up Button 3. MODE/PAUSE Button 13. PLAY/STOP Button 14. Display 12. FILE/TIME Button 8. REC Indicator 2. VOLUME Down 4. REV Button Button 5. FWD Button 6. REC/STOP Button 15. LOCATION OF CONTROLS FRONT 1 9 2 10 3 11 12 4 5 13 6 14 15 7 8 1. DEL/REPEAT Button 7. Speaker 3 Built-in Microphone 11. MIC (Microphone) 9. EAR (Earphone) Jack Jack 10.
VOLUME Up Button 3. MODE/PAUSE Button 13. PLAY/STOP Button 14. Display 12. FILE/TIME Button 8. REC Indicator 2. VOLUME Down 4. REV Button Button 5. FWD Button 6. REC/STOP Button 15. LOCATION OF CONTROLS FRONT 1 9 2 10 3 11 12 4 5 13 6 14 15 7 8 1. DEL/REPEAT Button 7. Speaker 3 Built-in Microphone 11. MIC (Microphone) 9. EAR (Earphone) Jack Jack 10.
Manual
Page 8
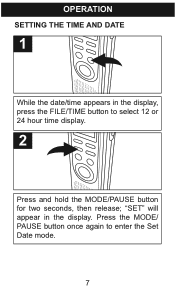
"SET" will appear in the display, press the FILE/TIME button to enter the Set Date mode. 7 Press the MODE/ PAUSE button once again to select 12 or 24 hour time display. 2 Press and hold the MODE/PAUSE button for two seconds, then release; OPERATION SETTING THE TIME AND DATE 1 While the date/time appears in the display.
"SET" will appear in the display, press the FILE/TIME button to enter the Set Date mode. 7 Press the MODE/ PAUSE button once again to select 12 or 24 hour time display. 2 Press and hold the MODE/PAUSE button for two seconds, then release; OPERATION SETTING THE TIME AND DATE 1 While the date/time appears in the display.
Manual
Page 12
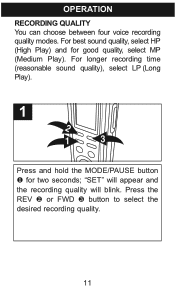
OPERATION RECORDING QUALITY You can choose between four voice recording quality modes. Press the REV 2 or FWD 3 button to select the desired recording quality. 11 For best sound quality, select HP (High Play) and for two seconds; For longer recording time (reasonable sound quality), select LP (Long Play). 1 2 1 3 Press and hold the MODE/PAUSE button 1 for good quality, select MP (Medium Play). "SET" will appear and the recording quality will blink.
OPERATION RECORDING QUALITY You can choose between four voice recording quality modes. Press the REV 2 or FWD 3 button to select the desired recording quality. 11 For best sound quality, select HP (High Play) and for two seconds; For longer recording time (reasonable sound quality), select LP (Long Play). 1 2 1 3 Press and hold the MODE/PAUSE button 1 for good quality, select MP (Medium Play). "SET" will appear and the recording quality will blink.
Manual
Page 14
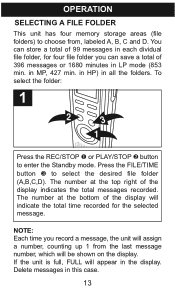
... number at the bottom of the display indicates the total messages recorded. To select the folder: 1 2 3 1 Press the REC/STOP 1 or PLAY/STOP 2 button to choose from the last message number, which will indicate the total time recorded for four file folder you record a message, the unit will appear in LP mode (853 min. in HP) in each dividual file folder, for the selected message. Press the FILE/TIME button 3 to select the desired file folder (A,B,C,D). The number...
... number at the bottom of the display indicates the total messages recorded. To select the folder: 1 2 3 1 Press the REC/STOP 1 or PLAY/STOP 2 button to choose from the last message number, which will indicate the total time recorded for four file folder you record a message, the unit will appear in LP mode (853 min. in HP) in each dividual file folder, for the selected message. Press the FILE/TIME button 3 to select the desired file folder (A,B,C,D). The number...
Manual
Page 16
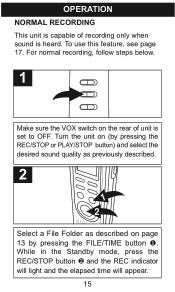
Turn the unit on (by pressing the REC/STOP or PLAY/STOP button) and select the desired sound quality as previously described. 2 1 2 Select a File Folder as described on the rear of recording only when sound is set to OFF. While in the Standby mode, press the REC/STOP button 2 and the REC indicator will light and the elapsed time will appear. 15 To use this feature, see page 17. For normal recording, follow steps below. 1 Make sure the VOX switch on page 13 by pressing the FILE/TIME button 1. OPERATION NORMAL RECORDING This unit is capable of unit is heard.
Turn the unit on (by pressing the REC/STOP or PLAY/STOP button) and select the desired sound quality as previously described. 2 1 2 Select a File Folder as described on the rear of recording only when sound is set to OFF. While in the Standby mode, press the REC/STOP button 2 and the REC indicator will light and the elapsed time will appear. 15 To use this feature, see page 17. For normal recording, follow steps below. 1 Make sure the VOX switch on page 13 by pressing the FILE/TIME button 1. OPERATION NORMAL RECORDING This unit is capable of unit is heard.
Manual
Page 17
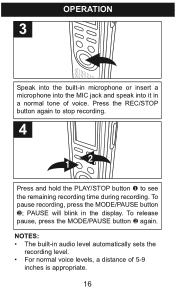
Press the REC/STOP button again to stop recording. 4 2 1 Press and hold the PLAY/STOP button 1 to see the remaining recording time during recording. To release pause, press the MODE/PAUSE button 2 again. OPERATION 3 Speak into the built-in microphone or insert a microphone into the MIC jack and speak into it in the display. PAUSE will blink in a normal tone of 5-9 inches is appropriate. 16 To pause recording, press the MODE/PAUSE button 2; NOTES: • The built-in audio level automatically sets the recording level. • For normal voice levels, a distance of voice.
Press the REC/STOP button again to stop recording. 4 2 1 Press and hold the PLAY/STOP button 1 to see the remaining recording time during recording. To release pause, press the MODE/PAUSE button 2 again. OPERATION 3 Speak into the built-in microphone or insert a microphone into the MIC jack and speak into it in the display. PAUSE will blink in a normal tone of 5-9 inches is appropriate. 16 To pause recording, press the MODE/PAUSE button 2; NOTES: • The built-in audio level automatically sets the recording level. • For normal voice levels, a distance of voice.

Manual
Page 18
OPERATION VOICE ACTIVATED (VOX) RECORDING Voice activated recording will temporarily stop recording until it will allow dictation only when you speak. Turn the unit on (by pressing the REC/STOP or PLAY/STOP button), and select the desired sound quality as described on the rear of the unit to the ON position. When the unit detects a pause of a few seconds, it detects sound again. 1 Slide the VOX switch on page 11. 2 Select a File Folder by pressing the FILE/TIME button (see page 13). 17
OPERATION VOICE ACTIVATED (VOX) RECORDING Voice activated recording will temporarily stop recording until it will allow dictation only when you speak. Turn the unit on (by pressing the REC/STOP or PLAY/STOP button), and select the desired sound quality as described on the rear of the unit to the ON position. When the unit detects a pause of a few seconds, it detects sound again. 1 Slide the VOX switch on page 11. 2 Select a File Folder by pressing the FILE/TIME button (see page 13). 17

Manual
Page 19
OPERATION 3 Press the REC/STOP button and the REC indicator will light and the elapsed time will blink in the display until sound is detected. When not recording, the REC indicator will blink and PAUSE will appear. Press the REC/STOP button again to stop recording. NOTES: • The first few sounds activate the recorder and may not be recorded. • A variation in microphone or insert a microphone into the built-in voice level during recording will...
OPERATION 3 Press the REC/STOP button and the REC indicator will light and the elapsed time will blink in the display until sound is detected. When not recording, the REC indicator will blink and PAUSE will appear. Press the REC/STOP button again to stop recording. NOTES: • The first few sounds activate the recorder and may not be recorded. • A variation in microphone or insert a microphone into the built-in voice level during recording will...
Manual
Page 20
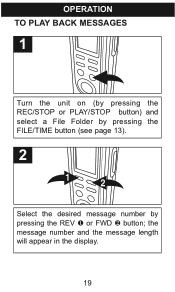
the message number and the message length will appear in the display. 19 OPERATION TO PLAY BACK MESSAGES 1 Turn the unit on (by pressing the REC/STOP or PLAY/STOP button) and select a File Folder by pressing the FILE/TIME button (see page 13). 2 1 2 Select the desired message number by pressing the REV 1 or FWD 2 button;
the message number and the message length will appear in the display. 19 OPERATION TO PLAY BACK MESSAGES 1 Turn the unit on (by pressing the REC/STOP or PLAY/STOP button) and select a File Folder by pressing the FILE/TIME button (see page 13). 2 1 2 Select the desired message number by pressing the REV 1 or FWD 2 button;
Manual
Page 21
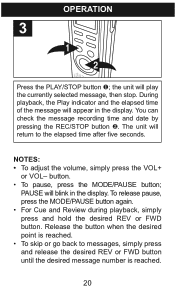
... seconds. You can check the message recording time and date by pressing the REC/STOP button 2. To release pause, press the MODE/PAUSE button again. • For Cue and Review during playback, simply press and hold the desired REV or FWD button. The unit will appear in the display. the unit will blink in the display. button. • To pause, press the MODE/PAUSE button; PAUSE will play the currently selected message, then stop. OPERATION 3 1 2 Press the PLAY/STOP button 1;
... seconds. You can check the message recording time and date by pressing the REC/STOP button 2. To release pause, press the MODE/PAUSE button again. • For Cue and Review during playback, simply press and hold the desired REV or FWD button. The unit will appear in the display. the unit will blink in the display. button. • To pause, press the MODE/PAUSE button; PAUSE will play the currently selected message, then stop. OPERATION 3 1 2 Press the PLAY/STOP button 1;
Manual
Page 22
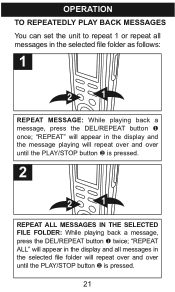
... file folder will repeat over and over until the PLAY/STOP button 2 is pressed. 2 2 1 REPEAT ALL MESSAGES IN THE SELECTED FILE FOLDER: While playing back a message, press the DEL/REPEAT button 1 twice; "REPEAT ALL" will appear in the display and all messages in the selected file folder as follows: 1 2 1 REPEAT MESSAGE: While playing back a message, press the DEL/REPEAT button 1 once; OPERATION TO REPEATEDLY PLAY BACK MESSAGES You can set the unit to repeat 1 or repeat all messages in the display and the message playing will repeat...
... file folder will repeat over and over until the PLAY/STOP button 2 is pressed. 2 2 1 REPEAT ALL MESSAGES IN THE SELECTED FILE FOLDER: While playing back a message, press the DEL/REPEAT button 1 twice; "REPEAT ALL" will appear in the display and all messages in the selected file folder as follows: 1 2 1 REPEAT MESSAGE: While playing back a message, press the DEL/REPEAT button 1 once; OPERATION TO REPEATEDLY PLAY BACK MESSAGES You can set the unit to repeat 1 or repeat all messages in the display and the message playing will repeat...

Manual
Page 24
... file folder (A,B,C,D) using the FILE/TIME button 1. Press and hold the PLAY/STOP button 2 for 2 seconds; SCAN will automatically stop Scan Playback, press the PLAY/STOP button twice. 23 To stop after all messages have been played. OPERATION SCAN PLAYBACK This unit can play back the first five seconds of each recorded message as follows: 1 2 1 While in the display. The unit will automatically scan and play back the message during scanning, press the PLAY/STOP button once to change to Playback mode...
... file folder (A,B,C,D) using the FILE/TIME button 1. Press and hold the PLAY/STOP button 2 for 2 seconds; SCAN will automatically stop Scan Playback, press the PLAY/STOP button twice. 23 To stop after all messages have been played. OPERATION SCAN PLAYBACK This unit can play back the first five seconds of each recorded message as follows: 1 2 1 While in the display. The unit will automatically scan and play back the message during scanning, press the PLAY/STOP button once to change to Playback mode...
Manual
Page 25
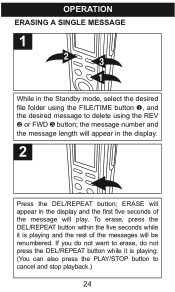
... and stop playback.) 24 ERASE will appear in the display and the first five seconds of the messages will be renumbered. the message number and the message length will play. To erase, press the DEL/REPEAT button within the five seconds while it is playing and the rest of the message will appear in the Standby mode, select the desired file folder using the REV 2 or FWD 3 button; OPERATION ERASING A SINGLE MESSAGE...
... and stop playback.) 24 ERASE will appear in the display and the first five seconds of the messages will be renumbered. the message number and the message length will play. To erase, press the DEL/REPEAT button within the five seconds while it is playing and the rest of the message will appear in the Standby mode, select the desired file folder using the REV 2 or FWD 3 button; OPERATION ERASING A SINGLE MESSAGE...

Manual
Page 26
... message(s) are deleted, they cannot be disabled. 25 If the DEL/REPEAT button is full, FULL will appear in the display when you press the REC/STOP button to start recording. ALL and ERASE will blink in the Standby mode, press and hold the DEL/REPEAT button 1 first, then press and hold the REC/STOP button 2 for two seconds; OPERATION ERASING ALL MESSAGES 1 1 2 While in the display. 2 To erase all the messages, press the DEL/REPEAT button...
... message(s) are deleted, they cannot be disabled. 25 If the DEL/REPEAT button is full, FULL will appear in the display when you press the REC/STOP button to start recording. ALL and ERASE will blink in the Standby mode, press and hold the DEL/REPEAT button 1 first, then press and hold the REC/STOP button 2 for two seconds; OPERATION ERASING ALL MESSAGES 1 1 2 While in the display. 2 To erase all the messages, press the DEL/REPEAT button...

Manual
Page 27
... static electrical charge, the unit may dim. TRAFFIC SAFETY • Do not use in many areas. • Even if your earphone is an open air type designed to their preset values, but if it does happen, remove the batteries and then reinstall. It may create a traffic hazard and is very rare, but the previous messages are saved. This...
... static electrical charge, the unit may dim. TRAFFIC SAFETY • Do not use in many areas. • Even if your earphone is an open air type designed to their preset values, but if it does happen, remove the batteries and then reinstall. It may create a traffic hazard and is very rare, but the previous messages are saved. This...

Manual
Page 29
SPECIFICATIONS Recording System...........Built-in Flash Memory Recording Time.........1680 minutes in LP mode Speaker 0.2W (8 Ohm) Output Power 80mW Power Source 3V, "AAA" size x 2 batteries (not Included) Battery Life Approx 15 hours at recording mode Approx 10 hours at play mode at medium volume level Dimensions...4.4 (H) x 1.4 (W) x 0.7 (D) inches Weight 46g (without batteries) Specifications are subject to change without notice. For customers calling within US, call 001-866-580-8316. F O R C O N S U M E R R E P L A C E A B L E PART(S), SEE PART NUMBER(S) ON...
SPECIFICATIONS Recording System...........Built-in Flash Memory Recording Time.........1680 minutes in LP mode Speaker 0.2W (8 Ohm) Output Power 80mW Power Source 3V, "AAA" size x 2 batteries (not Included) Battery Life Approx 15 hours at recording mode Approx 10 hours at play mode at medium volume level Dimensions...4.4 (H) x 1.4 (W) x 0.7 (D) inches Weight 46g (without batteries) Specifications are subject to change without notice. For customers calling within US, call 001-866-580-8316. F O R C O N S U M E R R E P L A C E A B L E PART(S), SEE PART NUMBER(S) ON...
Info Sheet
Page 1
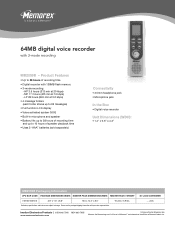
...; 4 message folders (each folder stores up to 99 messages) • Full function LCD display • Voice activated system (VOX) • Built-in microphone and speaker • Battery life: up to 28 hours of recording time and up to 28 hours of speaker playback time • Uses 2 "AAA" batteries (sold separately) Connectivity • 3.5mm headphone jack • Microphone jack In the Box • Digital voice recorder Unit Dimensions (WDH): • 1.4" x 0.6" x 4.3" MB2059B Packaging Information UPC BAR CODE PACKAGE...
...; 4 message folders (each folder stores up to 99 messages) • Full function LCD display • Voice activated system (VOX) • Built-in microphone and speaker • Battery life: up to 28 hours of recording time and up to 28 hours of speaker playback time • Uses 2 "AAA" batteries (sold separately) Connectivity • 3.5mm headphone jack • Microphone jack In the Box • Digital voice recorder Unit Dimensions (WDH): • 1.4" x 0.6" x 4.3" MB2059B Packaging Information UPC BAR CODE PACKAGE...


