Installation Instructions
Page 1
... INSTALLATION INSTRUCTIONS 30" (76.2 CM) FREESTANDING GAS RANGES Table of Contents RANGE SAFETY...2 INSTALLATION REQUIREMENTS 4 Tools and Parts...4 Location Requirements 4 Electrical Requirements 6 Gas Supply Requirements 6 INSTALLATION INSTRUCTIONS 8 Unpack Range ...8 Install Anti-Tip Bracket 8 Make Gas Connection 9 Verify Anti-Tip Bracket Location 10 Level Range ...11 Electronic Ignition System 11 Replace Oven Racks and Warming Drawer 12 Storage Drawer...13 Complete Installation 13 GAS CONVERSIONS 14 LP Gas...
... INSTALLATION INSTRUCTIONS 30" (76.2 CM) FREESTANDING GAS RANGES Table of Contents RANGE SAFETY...2 INSTALLATION REQUIREMENTS 4 Tools and Parts...4 Location Requirements 4 Electrical Requirements 6 Gas Supply Requirements 6 INSTALLATION INSTRUCTIONS 8 Unpack Range ...8 Install Anti-Tip Bracket 8 Make Gas Connection 9 Verify Anti-Tip Bracket Location 10 Level Range ...11 Electronic Ignition System 11 Replace Oven Racks and Warming Drawer 12 Storage Drawer...13 Complete Installation 13 GAS CONVERSIONS 14 LP Gas...
Installation Instructions
Page 2
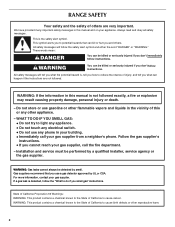
... be performed by a qualified installer, service agency or the gas supplier. WHAT TO DO IF YOU SMELL GAS: • Do not try to do if you don't follow instructions. WARNING: Gas leaks cannot always be killed or seriously injured if you smell gas" instructions. 2 These words mean: DANGER... kill or hurt you don't immediately follow instructions. All safety messages will tell you cannot reach your gas supplier from a neighbor's phone. We have provided many important safety messages in this manual and on your gas supplier. RANGE SAFETY Your safety and the safety of others...
... be performed by a qualified installer, service agency or the gas supplier. WHAT TO DO IF YOU SMELL GAS: • Do not try to do if you don't follow instructions. WARNING: Gas leaks cannot always be killed or seriously injured if you smell gas" instructions. 2 These words mean: DANGER... kill or hurt you don't immediately follow instructions. All safety messages will tell you cannot reach your gas supplier from a neighbor's phone. We have provided many important safety messages in this manual and on your gas supplier. RANGE SAFETY Your safety and the safety of others...
Installation Instructions
Page 3
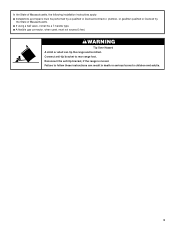
Failure to follow these instructions can tip the range and be a T-handle type. ■ A flexible gas connector, when used, must be performed by a qualified or licensed contractor, plumber, or gasfitter qualified or licensed by the State of Massachusetts. &#... Hazard A child or adult can result in death or serious burns to rear range foot. Connect anti-tip bracket to children and adults. 3 Reconnect the anti-tip bracket, if the range is moved. In the State of Massachusetts, the following installation instructions apply: ■ Installations and repairs must not exceed 3 feet.
Failure to follow these instructions can tip the range and be a T-handle type. ■ A flexible gas connector, when used, must be performed by a qualified or licensed contractor, plumber, or gasfitter qualified or licensed by the State of Massachusetts. &#... Hazard A child or adult can result in death or serious burns to rear range foot. Connect anti-tip bracket to children and adults. 3 Reconnect the anti-tip bracket, if the range is moved. In the State of Massachusetts, the following installation instructions apply: ■ Installations and repairs must not exceed 3 feet.
Installation Instructions
Page 4
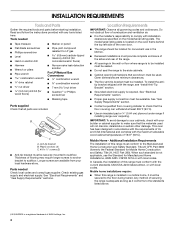
...;C). ■ Use an insulated pad or ¼" (0.64 cm) plywood under range if installing range over carpeting. See "Electrical Requirements" and "Gas Supply Requirements" sections. Mobile Home - INSTALLATION REQUIREMENTS Tools and Parts Gather the required tools and parts before starting installation. Read and follow the instructions provided with the maximum allowable wood cabinet temperatures of flooring may...
...;C). ■ Use an insulated pad or ¼" (0.64 cm) plywood under range if installing range over carpeting. See "Electrical Requirements" and "Gas Supply Requirements" sections. Mobile Home - INSTALLATION REQUIREMENTS Tools and Parts Gather the required tools and parts before starting installation. Read and follow the instructions provided with the maximum allowable wood cabinet temperatures of flooring may...
Installation Instructions
Page 5
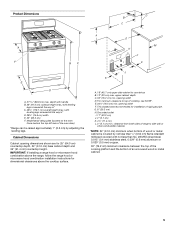
... width F. opening width D. A. 18" (45.7 cm) upper side cabinet to top of rigid gas pipe. This shaded area recommended for dimensional clearances above the range, follow the range hood or microwave hood combination installation instructions for installation of cooktop, see NOTE*. Grounded outlet I. 17" (43.2 cm) J. 2" (5.1 cm) K.... cabinet depth and 36" (91.4 cm) countertop height. upper cabinet depth C. 30" (76.2 cm) min. E. 30¹⁄₈" (76.5 cm) min. clearance from both sides of range to side wall or other combustible material. *NOTE: 24" (61.0 cm) minimum...
... width F. opening width D. A. 18" (45.7 cm) upper side cabinet to top of rigid gas pipe. This shaded area recommended for dimensional clearances above the range, follow the range hood or microwave hood combination installation instructions for installation of cooktop, see NOTE*. Grounded outlet I. 17" (43.2 cm) J. 2" (5.1 cm) K.... cabinet depth and 36" (91.4 cm) countertop height. upper cabinet depth C. 30" (76.2 cm) min. E. 30¹⁄₈" (76.5 cm) min. clearance from both sides of range to side wall or other combustible material. *NOTE: 24" (61.0 cm) minimum...
Installation Instructions
Page 6
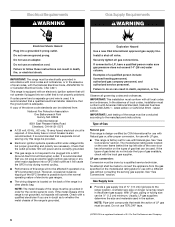
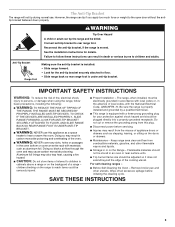
... 15-amp fused, electrical circuit is required. IMPORTANT: This installation must conform with Natural gas. See "Gas Conversions" section. Do not use with a qualified electrician if you not plug an electric spark ignition gas range or any other major appliance into a GFCI (Ground-Fault ...range must be conducted according to the range location. Do not use an extension cord. Securely tighten all governing codes and ordinances. In the absence of ¾" (1.9 cm) rigid pipe to the manufacturer's instructions. IMPORTANT: Leak testing of LP gas must be used . See "Gas...
... 15-amp fused, electrical circuit is required. IMPORTANT: This installation must conform with Natural gas. See "Gas Conversions" section. Do not use with a qualified electrician if you not plug an electric spark ignition gas range or any other major appliance into a GFCI (Ground-Fault ...range must be conducted according to the range location. Do not use an extension cord. Securely tighten all governing codes and ordinances. In the absence of ¾" (1.9 cm) rigid pipe to the manufacturer's instructions. IMPORTANT: Leak testing of LP gas must be used . See "Gas...
Installation Instructions
Page 8
... C If cabinet opening . A. Remove shipping materials, tape and film from outside the range. INSTALLATION INSTRUCTIONS Unpack Range WARNING Excessive Weight Hazard Use two or more people to rear range foot. Use a wrench or pliers to follow these instructions can result in death or serious burns to lower the front and rear leveling legs one -half turn...
... C If cabinet opening . A. Remove shipping materials, tape and film from outside the range. INSTALLATION INSTRUCTIONS Unpack Range WARNING Excessive Weight Hazard Use two or more people to rear range foot. Use a wrench or pliers to follow these instructions can result in death or serious burns to lower the front and rear leveling legs one -half turn...
Installation Instructions
Page 9
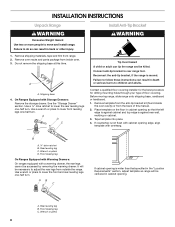
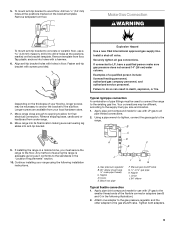
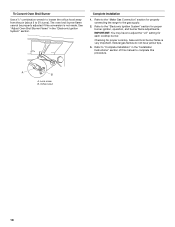
... connections may be different, according to the existing gas line. Nipple I H G F. Remove template from your local hardware store. 7. Gas pressure regulator B. 90° elbow (must be used to connect the range to the supply line type, size and location....the bracket template. If installing the range in floor. Union J. 90° elbow Typical flexible connection 1. Nipple D. Install a shut-off valve. Examples of the flexible connector adapters (see B and G in the following installation instructions. Continue installing your flooring, longer ...
... connections may be different, according to the existing gas line. Nipple I H G F. Remove template from your local hardware store. 7. Gas pressure regulator B. 90° elbow (must be used to connect the range to the supply line type, size and location....the bracket template. If installing the range in floor. Union J. 90° elbow Typical flexible connection 1. Nipple D. Install a shut-off valve. Examples of the flexible connector adapters (see B and G in the following installation instructions. Continue installing your flooring, longer ...
Installation Instructions
Page 10
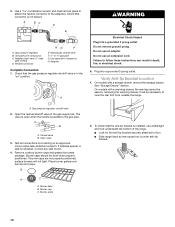
... bracket is installed, use a flashlight and look underneath the bottom of the range. ■ Look for the anti-tip bracket securely attached to the gas pipe. Check that the gas pressure regulator shutoff valve is parallel to floor. ■ Slide range back so rear range foot is ...a combination wrench and channel lock pliers to attach the flexible connector to follow these instructions can result in death, fire, or electrical shock. 5. Gas pressure regulator B. Manual gas shutoff valve F. ½" or ¾" gas pipe G. Do not use an adapter. The valve is open when the handle...
... bracket is installed, use a flashlight and look underneath the bottom of the range. ■ Look for the anti-tip bracket securely attached to the gas pipe. Check that the gas pressure regulator shutoff valve is parallel to floor. ■ Slide range back so rear range foot is ...a combination wrench and channel lock pliers to attach the flexible connector to follow these instructions can result in death, fire, or electrical shock. 5. Gas pressure regulator B. Manual gas shutoff valve F. ½" or ¾" gas pipe G. Do not use an adapter. The valve is open when the handle...
Installation Instructions
Page 13
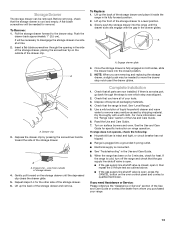
... now installed. See "Level Range." 5. Turn on for 5 minutes, check for removal. A A. Drawer clip - Complete Installation 1. If there is level. Check that you purchased your tools. 3. When the range has... the storage drawer into the closed , open it inside the range in the drawer glides. Repeat steps 2-4 for specific instruction on the oven control panel and contact a qualified technician. Once... ■ If the gas supply line shutoff valve is open . ■ If the gas supply line shutoff valve is open , press the CANCEL button on range operation. For more information...
... now installed. See "Level Range." 5. Turn on for 5 minutes, check for removal. A A. Drawer clip - Complete Installation 1. If there is level. Check that you purchased your tools. 3. When the range has... the storage drawer into the closed , open it inside the range in the drawer glides. Repeat steps 2-4 for specific instruction on the oven control panel and contact a qualified technician. Once... ■ If the gas supply line shutoff valve is open . ■ If the gas supply line shutoff valve is open , press the CANCEL button on range operation. For more information...
Installation Instructions
Page 14
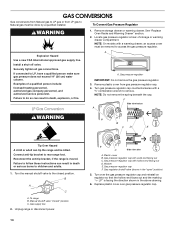
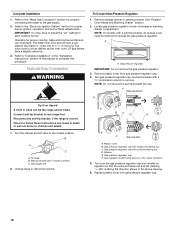
... Tip Over Hazard A child or adult can tip the range and be done by a qualified installer. Turn over the gas pressure regulator cap and reinstall on regulator so that the hollow end faces out and the marking " Securely tighten all gas connections. Failure to follow these instructions can result in death, explosion, or fire. Manual...
... Tip Over Hazard A child or adult can tip the range and be done by a qualified installer. Turn over the gas pressure regulator cap and reinstall on regulator so that the hollow end faces out and the marking " Securely tighten all gas connections. Failure to follow these instructions can result in death, explosion, or fire. Manual...
Installation Instructions
Page 16
... flame adjustments. Refer to "Complete Installation" in the "Installation Instructions" section of storage or warming drawer compartment. Locate gas pressure regulator at rear of this procedure. Gas pressure regulator IMPORTANT: Do not remove the gas pressure regulator. 3. Turn the manual shutoff valve to children and adults. 1. To range B. Refer to the gas supply. 2. LP gas flames have a very distinct...
... flame adjustments. Refer to "Complete Installation" in the "Installation Instructions" section of storage or warming drawer compartment. Locate gas pressure regulator at rear of this procedure. Gas pressure regulator IMPORTANT: Do not remove the gas pressure regulator. 3. Turn the manual shutoff valve to children and adults. 1. To range B. Refer to the gas supply. 2. LP gas flames have a very distinct...
Installation Instructions
Page 18
...range to "Complete Installation" in the "Electronic Ignition System" section. Lock screw B. Refer to the gas supply. 2. IMPORTANT: You may have yellow tips. 3. A B A. Refer to complete this conversion is very important. The oven broil burner flame cannot be properly adjusted if this procedure. See "Adjust Oven Broil Burner Flame" in the "Installation Instructions..." section of this manual to the "Make Gas Connection" section for proper cooktop, bake and broil burner flame is not...
...range to "Complete Installation" in the "Electronic Ignition System" section. Lock screw B. Refer to the gas supply. 2. IMPORTANT: You may have yellow tips. 3. A B A. Refer to complete this conversion is very important. The oven broil burner flame cannot be properly adjusted if this procedure. See "Adjust Oven Broil Burner Flame" in the "Installation Instructions..." section of this manual to the "Make Gas Connection" section for proper cooktop, bake and broil burner flame is not...
Owners Manual
Page 2
... liquids in this manual and on your gas supplier. RANGE SAFETY Your safety and the safety of this or any other appliance. - If a gas leak is the safety alert symbol. All safety messages will follow instructions. Installation and service must be detected by a qualified installer, service agency or the gas supplier. Gas suppliers recommend that can happen if...
... liquids in this manual and on your gas supplier. RANGE SAFETY Your safety and the safety of this or any other appliance. - If a gas leak is the safety alert symbol. All safety messages will follow instructions. Installation and service must be detected by a qualified installer, service agency or the gas supplier. Gas suppliers recommend that can happen if...
Owners Manual
Page 3
... such as a space heater to the open door without the antitip bracket fastened down properly. See the installation instructions for the anti-tip bracket securely attached to persons, or damage when using the range, follow these instructions can result in death or serious burns to children in the oven bottom or cover an entire...
... such as a space heater to the open door without the antitip bracket fastened down properly. See the installation instructions for the anti-tip bracket securely attached to persons, or damage when using the range, follow these instructions can result in death or serious burns to children in the oven bottom or cover an entire...
Owners Manual
Page 10
... heavy thickness. ■ Is the control knob set to the proper heat level? Gas range noises during Bake and Broil operations Noises that can be heard when the convection fan ... not extend more than ½" (1.3 cm) outside the cooking area. Level the range. See the Installation Instructions. Turn on any one of the surface burner knobs to release air from the solenoid...the proper size? Contact a service technician or see Installation Instructions. Oven burner flames are normal operational noises that may have been used ? www.maytag.com Nothing will not operate ■ Is the oven...
... heavy thickness. ■ Is the control knob set to the proper heat level? Gas range noises during Bake and Broil operations Noises that can be heard when the convection fan ... not extend more than ½" (1.3 cm) outside the cooking area. Level the range. See the Installation Instructions. Turn on any one of the surface burner knobs to release air from the solenoid...the proper size? Contact a service technician or see Installation Instructions. Oven burner flames are normal operational noises that may have been used ? www.maytag.com Nothing will not operate ■ Is the oven...
Owners Manual
Page 11
See cover for service. See the Installation Instructions. ■ Is the proper temperature set ? See "Oven Temperature...oven temperature calibration set ? There has been a power failure. Oven cooking results not what expected ■ Is the range level? Adjust cooking time. ■ Has the oven door been opened while cooking? Stainless Steel Cleaner and Polish ...(stainless steel models) Order Part Number 31462 All-Purpose Appliance Cleaner Order Part Number 31682 Gas Grate and Drip Pan Cleaner Order Part Number 31617 ACCESSORIES Split-Rack with Removable Insert Order Part ...
See cover for service. See the Installation Instructions. ■ Is the proper temperature set ? See "Oven Temperature...oven temperature calibration set ? There has been a power failure. Oven cooking results not what expected ■ Is the range level? Adjust cooking time. ■ Has the oven door been opened while cooking? Stainless Steel Cleaner and Polish ...(stainless steel models) Order Part Number 31462 All-Purpose Appliance Cleaner Order Part Number 31682 Gas Grate and Drip Pan Cleaner Order Part Number 31617 ACCESSORIES Split-Rack with Removable Insert Order Part ...
Owners Manual
Page 12
... in accordance with published installation instructions. 11. The removal and reinstallation of your major appliance if it is reported to repair or replace appliance light bulbs, air filters or water filters. DISCLAIMER OF IMPLIED WARRANTIES; MAYTAG SHALL NOT BE LIABLE FOR INCIDENTAL OR ...the storage drawer panel. Service calls to Maytag within 30 days from the date of your product or you can find your major appliance, to replace or repair house fuses, or to published user or operator instructions and/or installation instructions. 4. Cosmetic damage, including scratches, dents...
... in accordance with published installation instructions. 11. The removal and reinstallation of your major appliance if it is reported to repair or replace appliance light bulbs, air filters or water filters. DISCLAIMER OF IMPLIED WARRANTIES; MAYTAG SHALL NOT BE LIABLE FOR INCIDENTAL OR ...the storage drawer panel. Service calls to Maytag within 30 days from the date of your product or you can find your major appliance, to replace or repair house fuses, or to published user or operator instructions and/or installation instructions. 4. Cosmetic damage, including scratches, dents...


