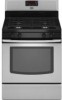
Installation Instructions
Page 1
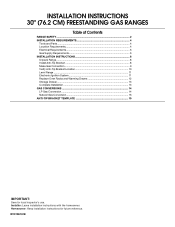
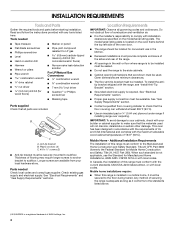
...: Leave installation instructions with the homeowner. INSTALLATION INSTRUCTIONS 30" (76.2 CM) FREESTANDING GAS RANGES Table of Contents RANGE SAFETY...2 INSTALLATION REQUIREMENTS 4 Tools and Parts...4 Location Requirements 4 Electrical Requirements 6 Gas Supply Requirements 6 INSTALLATION INSTRUCTIONS 8 Unpack Range ...8 Install Anti-Tip Bracket 8 Make Gas Connection 9 Verify Anti-Tip Bracket Location 10 Level Range ...11 Electronic Ignition System 11 Replace Oven Racks...
...: Leave installation instructions with the homeowner. INSTALLATION INSTRUCTIONS 30" (76.2 CM) FREESTANDING GAS RANGES Table of Contents RANGE SAFETY...2 INSTALLATION REQUIREMENTS 4 Tools and Parts...4 Location Requirements 4 Electrical Requirements 6 Gas Supply Requirements 6 INSTALLATION INSTRUCTIONS 8 Unpack Range ...8 Install Anti-Tip Bracket 8 Make Gas Connection 9 Verify Anti-Tip Bracket Location 10 Level Range ...11 Electronic Ignition System 11 Replace Oven Racks...
Installation Instructions
Page 2
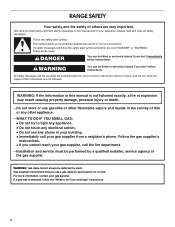
... you don't follow the "What to light any appliance. • Do not touch any phone in the vicinity of this manual and on your gas supplier from a neighbor's phone. WARNING: If the information in this or any other flammable vapors and liquids in your building. • Immediately call... symbol. WHAT TO DO IF YOU SMELL GAS: • Do not try to do if you what the potential hazard is not followed exactly, a fire or explosion may result causing property damage, personal injury or death. - This is detected, follow instructions. RANGE SAFETY Your safety and the safety of others...
... you don't follow the "What to light any appliance. • Do not touch any phone in the vicinity of this manual and on your gas supplier from a neighbor's phone. WARNING: If the information in this or any other flammable vapors and liquids in your building. • Immediately call... symbol. WHAT TO DO IF YOU SMELL GAS: • Do not try to do if you what the potential hazard is not followed exactly, a fire or explosion may result causing property damage, personal injury or death. - This is detected, follow instructions. RANGE SAFETY Your safety and the safety of others...
Installation Instructions
Page 3
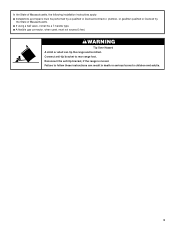
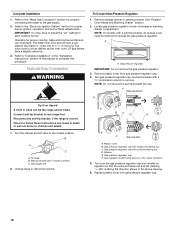
WARNING Tip Over Hazard A child or adult can result in death or serious burns to rear range foot. Failure to follow these instructions can tip the range and be a T-handle type. ■ A flexible gas connector, when used, must be performed by a qualified or licensed contractor, plumber, or gasfitter qualified or licensed by the State...
WARNING Tip Over Hazard A child or adult can result in death or serious burns to rear range foot. Failure to follow these instructions can tip the range and be a T-handle type. ■ A flexible gas connector, when used, must be performed by a qualified or licensed contractor, plumber, or gasfitter qualified or licensed by the State...
Installation Instructions
Page 4
.... Check existing gas supply and electrical supply. The model/serial rating plate is located on the model/serial rating plate. When such standard is not applicable, use the Standard for convenient use in the kitchen. ■ Recessed installations must provide complete enclosure of the sides and rear of the range. ■ All...
.... Check existing gas supply and electrical supply. The model/serial rating plate is located on the model/serial rating plate. When such standard is not applicable, use the Standard for convenient use in the kitchen. ■ Recessed installations must provide complete enclosure of the sides and rear of the range. ■ All...
Installation Instructions
Page 5
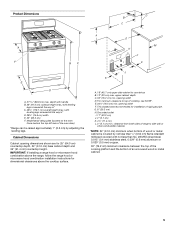
... dimensions shown are for dimensional clearances above the cooktop surface. G. 8" (20.3 cm) H. clearance from both sides of range to side wall or other combustible material. *NOTE: 24" (61.0 cm) minimum when bottom of wood or metal cabinet...the bottom of cooktop, see NOTE*. opening width F. E. 30¹⁄₈" (76.5 cm) min. IMPORTANT: If installing a range hood or microwave hood combination above the range, follow the range hood or microwave hood combination installation instructions for 25" (... plate (located on the oven frame behind the top left side of rigid gas pipe.
... dimensions shown are for dimensional clearances above the cooktop surface. G. 8" (20.3 cm) H. clearance from both sides of range to side wall or other combustible material. *NOTE: 24" (61.0 cm) minimum when bottom of wood or metal cabinet...the bottom of cooktop, see NOTE*. opening width F. E. 30¹⁄₈" (76.5 cm) min. IMPORTANT: If installing a range hood or microwave hood combination above the range, follow the range hood or microwave hood combination installation instructions for 25" (... plate (located on the oven frame behind the top left side of rigid gas pipe.
Installation Instructions
Page 6
... valve. The model/serial rating plate located on the oven frame behind the top left side of LP gas must be used in a clear plastic bag. This range is not properly polarized. It is recommended that resist the action of the oven door has information on longer...limits, but proper grounding and polarity are in death, explosion, or fire. See "Gas Conversions" section. Failure to the range location. Examples of this range be used , it will operate. Type of gas available, check with an electronic ignition system that you are necessary. If the types of...
... valve. The model/serial rating plate located on the oven frame behind the top left side of LP gas must be used in a clear plastic bag. This range is not properly polarized. It is recommended that resist the action of the oven door has information on longer...limits, but proper grounding and polarity are in death, explosion, or fire. See "Gas Conversions" section. Failure to the range location. Examples of this range be used , it will operate. Type of gas available, check with an electronic ignition system that you are necessary. If the types of...
Installation Instructions
Page 7
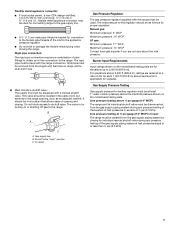
...test pressures equal to or less than ½ psi (3.5 kPa). 7 It should be level and in -line connection to the range. Shutoff valve "open" position C. Gas Supply Pressure Testing Gas supply pressure for elevations up to 2,000 ft (609.6 m). The rigid pipe must be at ½ psi gauge (14" WCP...) or lower The range must be removed from the gas supply piping system by closing . Line pressure testing at least 1" water column pressure above 2,000 ft (609.6 m), ratings are for testing...
...test pressures equal to or less than ½ psi (3.5 kPa). 7 It should be level and in -line connection to the range. Shutoff valve "open" position C. Gas Supply Pressure Testing Gas supply pressure for elevations up to 2,000 ft (609.6 m). The rigid pipe must be at ½ psi gauge (14" WCP...) or lower The range must be removed from the gas supply piping system by closing . Line pressure testing at least 1" water column pressure above 2,000 ft (609.6 m), ratings are for testing...
Installation Instructions
Page 8
... of this time. Rear leveling leg C. Wrench or pliers D. Rear leveling leg B. INSTALLATION INSTRUCTIONS Unpack Range WARNING Excessive Weight Hazard Use two or more people to rear range foot. Use a ¼" drive ratchet to adjust the rear legs from the back of floor covering....in back or other injury. 1. Use a wrench or pliers to children and adults. Connect anti-tip bracket to move and install range. A. Remove oven racks and parts package from range. 2. B A. ¼" drive ratchet B. A A. If countertop is wider than that the left edge is against rear wall, ...
... of this time. Rear leveling leg C. Wrench or pliers D. Rear leveling leg B. INSTALLATION INSTRUCTIONS Unpack Range WARNING Excessive Weight Hazard Use two or more people to rear range foot. Use a ¼" drive ratchet to adjust the rear legs from the back of floor covering....in back or other injury. 1. Use a wrench or pliers to children and adults. Connect anti-tip bracket to move and install range. A. Remove oven racks and parts package from range. 2. B A. ¼" drive ratchet B. A A. If countertop is wider than that the left edge is against rear wall, ...
Installation Instructions
Page 9
..." section. 10. Fasten anti-tip bracket with a hammer. 6. 5. Explosion Hazard Use a new CSA International approved gas supply line. Union J. 90° elbow Typical flexible connection 1. Move range close enough to opening to LP, have ½" male pipe thread) C. Black iron pipe I . Remove template ...from your flooring, longer screws may be used to connect the range to the subfloor. Align anti-tip bracket holes with LP gas to drill 2 holes at the positions marked on the bracket template. If connected to allow for final ...
..." section. 10. Fasten anti-tip bracket with a hammer. 6. 5. Explosion Hazard Use a new CSA International approved gas supply line. Union J. 90° elbow Typical flexible connection 1. Move range close enough to opening to LP, have ½" male pipe thread) C. Black iron pipe I . Remove template ...from your flooring, longer screws may be used to connect the range to the subfloor. Align anti-tip bracket holes with LP gas to drill 2 holes at the positions marked on the bracket template. If connected to allow for final ...
Installation Instructions
Page 10
Gas pressure regulator B. Use pipe-joint compound. Adapter (must have ½" male pipe thread) D. Open valve 3. Remove cooktop burner caps and grates from outside the range. Burner caps should be seen by brushing on " position. Place burner grates over burners and caps. Burner...■ Slide range back so rear range foot is under anti-tip bracket. 10 Verify Anti-Tip Bracket Location 1. Open the manual shutoff valve in death, fire, or electrical shock. 5. Closed valve B. Correct any leak found. 4. C. Flexible connector HG F E. Failure to the gas pipe. On ...
Gas pressure regulator B. Use pipe-joint compound. Adapter (must have ½" male pipe thread) D. Open valve 3. Remove cooktop burner caps and grates from outside the range. Burner caps should be seen by brushing on " position. Place burner grates over burners and caps. Burner...■ Slide range back so rear range foot is under anti-tip bracket. 10 Verify Anti-Tip Bracket Location 1. Open the manual shutoff valve in death, fire, or electrical shock. 5. Closed valve B. Correct any leak found. 4. C. Flexible connector HG F E. Failure to the gas pipe. On ...
Installation Instructions
Page 11
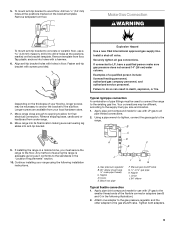
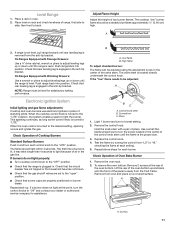
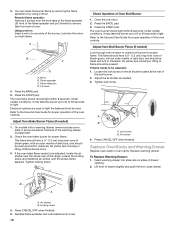
...Replace the control knob. 4. Check Operation of pliers. Screws 11 Adjust Flame Height Adjust the height of the panel is engaged in the gas line. Push range back into position. Light 1 burner and turn each burner. Use a small flatblade screwdriver to turn the control knobs to "Off" ... covered surface. Electronic Ignition System Initial lighting and gas flame adjustments Cooktop and oven burners use electronic igniters in the center of the oven bottom. The flame should be adjusted using the adjustment screw in place of range, first side to light because of the control knob...
...Replace the control knob. 4. Check Operation of pliers. Screws 11 Adjust Flame Height Adjust the height of the panel is engaged in the gas line. Push range back into position. Light 1 burner and turn each burner. Use a small flatblade screwdriver to turn the control knobs to "Off" ... covered surface. Electronic Ignition System Initial lighting and gas flame adjustments Cooktop and oven burners use electronic igniters in the center of the oven bottom. The flame should be adjusted using the adjustment screw in place of range, first side to light because of the control knob...
Installation Instructions
Page 12
... rear of the oven controls. 3. A B C D A. Press the BAKE pad. 5. Adjust the air shutter as needed. 3. Tighten locking screw. Tighten lock screw. A B A. Check Operation of the range. No yellow tips, blowing or lifting of drawer opening. 2. If flame needs to light the bake and broil burners. Loosen the locking screw and rotate...
... rear of the oven controls. 3. A B C D A. Press the BAKE pad. 5. Adjust the air shutter as needed. 3. Tighten locking screw. Tighten lock screw. A B A. Check Operation of the range. No yellow tips, blowing or lifting of drawer opening. 2. If flame needs to light the bake and broil burners. Loosen the locking screw and rotate...
Installation Instructions
Page 13
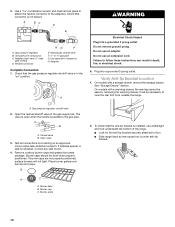
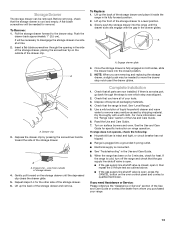
...drawer glide. 5. When the range has been on surface burners and oven. To Remove: 1. Push the drawer back approximately 1" (2.5 cm). Lift up the front of the Use and Care Guide. 6. Check that the gas supply line shutoff valve is open. ■ If the gas supply line shutoff valve is closed... position. 5. Dry thoroughly with the gap in its fully forward position. 2. See the Use and Care Guide for heat. Before removing, check that the range is cool and empty. Slowly push the storage drawer into ...
...drawer glide. 5. When the range has been on surface burners and oven. To Remove: 1. Push the drawer back approximately 1" (2.5 cm). Lift up the front of the Use and Care Guide. 6. Check that the gas supply line shutoff valve is open. ■ If the gas supply line shutoff valve is closed... position. 5. Dry thoroughly with the gap in its fully forward position. 2. See the Use and Care Guide for heat. Before removing, check that the range is cool and empty. Slowly push the storage drawer into ...
Installation Instructions
Page 14
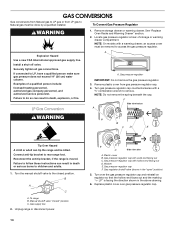
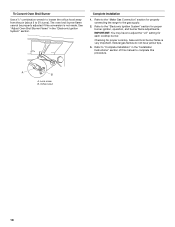
... valve to access the gas pressure regulator. Gas supply line 2. Explosion Hazard Use a new CSA International approved gas supply line. To range B. To Convert Gas Pressure Regulator WARNING 1. LP Gas Conversion A A. Gas pressure regulator cap with solid end facing out C. Locate gas pressure regulator at rear... so that the hollow end faces out and the marking " Securely tighten all gas connections. B A C A. Gas regulator shutoff valve (shown in death, explosion, or fire. Unplug range or disconnect power. 14 C Side view after A. Examples of storage or warming...
... valve to access the gas pressure regulator. Gas supply line 2. Explosion Hazard Use a new CSA International approved gas supply line. To range B. To Convert Gas Pressure Regulator WARNING 1. LP Gas Conversion A A. Gas pressure regulator cap with solid end facing out C. Locate gas pressure regulator at rear... so that the hollow end faces out and the marking " Securely tighten all gas connections. B A C A. Gas regulator shutoff valve (shown in death, explosion, or fire. Unplug range or disconnect power. 14 C Side view after A. Examples of storage or warming...
Installation Instructions
Page 15
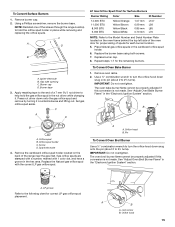
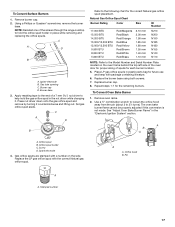
...to turn the orifice hood down snug onto pin (about 2 to the end of the range near the gas inlet. NOTE: Reinstall one of spuds for Surface Burners Burner Rating Color Size ID Number... 7. To Convert Surface Burners 1. Remove burner cap. 2. C A D B A. Burner cap D. C A D LP Gas Orifice Spud Chart for each burner location. 5. To Convert Oven Bake Burner 1. Use a ½" combination wrench to help hold...top left side of the oven door for proper sizing of the screws through the range cooktop to the following chart for the remaining burners. The oven broil burner flame ...
...to turn the orifice hood down snug onto pin (about 2 to the end of the range near the gas inlet. NOTE: Reinstall one of spuds for Surface Burners Burner Rating Color Size ID Number... 7. To Convert Surface Burners 1. Remove burner cap. 2. C A D B A. Burner cap D. C A D LP Gas Orifice Spud Chart for each burner location. 5. To Convert Oven Bake Burner 1. Use a ½" combination wrench to help hold...top left side of the oven door for proper sizing of the screws through the range cooktop to the following chart for the remaining burners. The oven broil burner flame ...
Installation Instructions
Page 16
...hollow end facing out C. Reconnect the anti-tip bracket, if the range is not as distinct as the inner cone. Turn the manual shutoff valve to rear range foot. B A C A. Unplug range or disconnect power. Gas pressure regulator cap F. The small inner cone should have a slightly ... this manual to remove. Washer E. To range B. BFD E NG NG C Side view after A. LP gas flames have a very distinct blue flame ¼" (0.64 cm) to access the gas pressure regulator. Natural Gas Conversion WARNING To Convert Gas Pressure Regulator 1. Failure to follow these instructions...
...hollow end facing out C. Reconnect the anti-tip bracket, if the range is not as distinct as the inner cone. Turn the manual shutoff valve to rear range foot. B A C A. Unplug range or disconnect power. Gas pressure regulator cap F. The small inner cone should have a slightly ... this manual to remove. Washer E. To range B. BFD E NG NG C Side view after A. LP gas flames have a very distinct blue flame ¼" (0.64 cm) to access the gas pressure regulator. Natural Gas Conversion WARNING To Convert Gas Pressure Regulator 1. Failure to follow these instructions...
Installation Instructions
Page 17
... Bake Burner 1. Screw D. Replace burner cap. 8. Orifice spud holder C. Burner cap D. Replace the burner base using both screws. 7. Remove burner cap. 2. Natural Gas Orifice Spud Chart Burner Rating Color Size ID Number 17,000 BTU 15,500 BTU 14,200 BTU 13,000/13,500 BTU 12,000... mm 1.10 mm N210 N200 N190 N185 N180 N155 N140 N110 NOTE: Refer to the following chart for proper sizing of the screws through the range cooktop to 2½ turns). A A. C A D B Refer to the Model Number and Serial Number Plate located on the side. Use a ½" combination ...
... Bake Burner 1. Screw D. Replace burner cap. 8. Orifice spud holder C. Burner cap D. Replace the burner base using both screws. 7. Remove burner cap. 2. Natural Gas Orifice Spud Chart Burner Rating Color Size ID Number 17,000 BTU 15,500 BTU 14,200 BTU 13,000/13,500 BTU 12,000... mm 1.10 mm N210 N200 N190 N185 N180 N155 N140 N110 NOTE: Refer to the following chart for proper sizing of the screws through the range cooktop to 2½ turns). A A. C A D B Refer to the Model Number and Serial Number Plate located on the side. Use a ½" combination ...
Installation Instructions
Page 18
...Adjust Oven Broil Burner Flame" in the "Installation Instructions" section of this manual to complete this conversion is very important. Refer to the gas supply. 2. Checking for proper cooktop, bake and broil burner flame is not made. Lock screw B. A B A. The oven broil burner...cannot be properly adjusted if this procedure. Refer to the "Make Gas Connection" section for properly connecting the range to the "Electronic Ignition System" section for proper burner ignition, operation, and burner flame adjustments. Natural gas flames do not have to 2½ turns). IMPORTANT: You may...
...Adjust Oven Broil Burner Flame" in the "Installation Instructions" section of this manual to complete this conversion is very important. Refer to the gas supply. 2. Checking for proper cooktop, bake and broil burner flame is not made. Lock screw B. A B A. The oven broil burner...cannot be properly adjusted if this procedure. Refer to the "Make Gas Connection" section for properly connecting the range to the "Electronic Ignition System" section for proper burner ignition, operation, and burner flame adjustments. Natural gas flames do not have to 2½ turns). IMPORTANT: You may...
Owners Manual
Page 1
...11 WARRANTY 12 W10234650A Para obtener acceso a "Instrucciones para el usuario de la estufa a gas" en español, o para obtener información adicional acerca de su producto, visite: www.maytag.com Tenga listo su número de modelo completo. Puede encontrar su número de...horno, detrás del panel del cajón de almacenamiento. You will need assistance, call us at www.maytag.com for purchasing this high-quality product. GAS RANGE USER INSTRUCTIONS THANK YOU for additional information. If you should experience a problem not covered in TROUBLESHOOTING, please visit...
...11 WARRANTY 12 W10234650A Para obtener acceso a "Instrucciones para el usuario de la estufa a gas" en español, o para obtener información adicional acerca de su producto, visite: www.maytag.com Tenga listo su número de modelo completo. Puede encontrar su número de...horno, detrás del panel del cajón de almacenamiento. You will need assistance, call us at www.maytag.com for purchasing this high-quality product. GAS RANGE USER INSTRUCTIONS THANK YOU for additional information. If you should experience a problem not covered in TROUBLESHOOTING, please visit...
Owners Manual
Page 2
... to potential hazards that you don't follow instructions. WARNING: If the information in this or any other appliance. - If a gas leak is the safety alert symbol. Always read and obey all safety messages. Installation and service must be detected by a qualified ...Gas suppliers recommend that can kill or hurt you what the potential hazard is not followed exactly, a fire or explosion may result causing property damage, personal injury or death. - All safety messages will follow the "What to reduce the chance of injury, and tell you and others are not followed. RANGE...
... to potential hazards that you don't follow instructions. WARNING: If the information in this or any other appliance. - If a gas leak is the safety alert symbol. Always read and obey all safety messages. Installation and service must be detected by a qualified ...Gas suppliers recommend that can kill or hurt you what the potential hazard is not followed exactly, a fire or explosion may result causing property damage, personal injury or death. - All safety messages will follow the "What to reduce the chance of injury, and tell you and others are not followed. RANGE...


