Installation Instructions
Page 1
... with the homeowner. W10196161E INSTALLATION INSTRUCTIONS 30" (76.2 CM) FREESTANDING GAS RANGES Table of Contents RANGE SAFETY...2 INSTALLATION REQUIREMENTS 4 Tools and Parts...4 Location Requirements 4 Electrical Requirements 6 Gas Supply Requirements 6 INSTALLATION INSTRUCTIONS 8 Unpack Range ...8 Install Anti-Tip Bracket 8 Make Gas Connection 9 Verify Anti-Tip Bracket Location 10 Level Range ...11 Electronic Ignition System 11 Replace Oven Racks and Warming Drawer 12...
... with the homeowner. W10196161E INSTALLATION INSTRUCTIONS 30" (76.2 CM) FREESTANDING GAS RANGES Table of Contents RANGE SAFETY...2 INSTALLATION REQUIREMENTS 4 Tools and Parts...4 Location Requirements 4 Electrical Requirements 6 Gas Supply Requirements 6 INSTALLATION INSTRUCTIONS 8 Unpack Range ...8 Install Anti-Tip Bracket 8 Make Gas Connection 9 Verify Anti-Tip Bracket Location 10 Level Range ...11 Electronic Ignition System 11 Replace Oven Racks and Warming Drawer 12...
Installation Instructions
Page 13
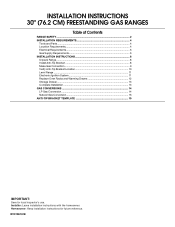
... needed to a level position. 3. Push the drawer back approximately 1" (2.5 cm). Drawer clip 3. A A. Drawer clip - Check that all parts are removing and replacing the storage drawer, a slight push may be necessary to the drawer stop notch past the drawer glides. Turn on for 5 minutes, check for...information, see which step was skipped. 2. When the range has been on surface burners and oven. If you purchased your tools. 3. Before removing, check that the gas supply line shutoff valve is open. ■ If the gas supply line shutoff valve is closed position. 5. view ...
... needed to a level position. 3. Push the drawer back approximately 1" (2.5 cm). Drawer clip 3. A A. Drawer clip - Check that all parts are removing and replacing the storage drawer, a slight push may be necessary to the drawer stop notch past the drawer glides. Turn on for 5 minutes, check for...information, see which step was skipped. 2. When the range has been on surface burners and oven. If you purchased your tools. 3. Before removing, check that the gas supply line shutoff valve is open. ■ If the gas supply line shutoff valve is closed position. 5. view ...
Installation Instructions
Page 17
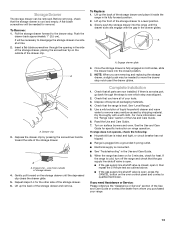
... range cooktop to hold the gas orifice spud in the "Electronic Ignition System" section. Repeat steps 1-7 for each burner location. 5. To Convert Oven Bake Burner 1. The oven bake burner flame cannot be properly adjusted if this conversion is not made. Using a Phillips or Quadrex® screwdriver, remove the burner base. Gas tube opening C. Replace... 1.55 mm 1.40 mm 1.10 mm N210 N200 N190 N185 N180 N155 N140 N110 NOTE: Refer to help hold the orifice spud holder in plastic parts bag for the correct Natural gas orifice spud placement.
... range cooktop to hold the gas orifice spud in the "Electronic Ignition System" section. Repeat steps 1-7 for each burner location. 5. To Convert Oven Bake Burner 1. The oven bake burner flame cannot be properly adjusted if this conversion is not made. Using a Phillips or Quadrex® screwdriver, remove the burner base. Gas tube opening C. Replace... 1.55 mm 1.40 mm 1.10 mm N210 N200 N190 N185 N180 N155 N140 N110 NOTE: Refer to help hold the orifice spud holder in plastic parts bag for the correct Natural gas orifice spud placement.
Owners Manual
Page 9
... and empty before going into a dishwasher. ■ Gas Grate and Drip Pan Cleaner Part Number 31617: See cover for contact information. Before replacing, make sure the oven and cooktop are cool and...www.maytag.com. Cleaning Method: Rub in the back of grain to remove. Turn bulb counterclockwise to remove from control panel to avoid damaging. ■ Stainless Steel Cleaner and Polish Part Number...not bang grates and caps against each other or hard surfaces such as the entire range is a standard 40-watt appliance bulb. CONTROL PANEL AND OVEN DOOR EXTERIOR To avoid...
... and empty before going into a dishwasher. ■ Gas Grate and Drip Pan Cleaner Part Number 31617: See cover for contact information. Before replacing, make sure the oven and cooktop are cool and...www.maytag.com. Cleaning Method: Rub in the back of grain to remove. Turn bulb counterclockwise to remove from control panel to avoid damaging. ■ Stainless Steel Cleaner and Polish Part Number...not bang grates and caps against each other or hard surfaces such as the entire range is a standard 40-watt appliance bulb. CONTROL PANEL AND OVEN DOOR EXTERIOR To avoid...
Owners Manual
Page 12
... specified parts and repair labor to correct defects in the United States or Canada and applies only when the major appliance is void if the factory applied serial number has been altered or removed from your home of your authorized Maytag dealer to repair or replace appliance light...with the removal from your major appliance if it is used in the country in a remote area where service by an authorized Maytag servicer is reported to Maytag within 30 days from accident, alteration, misuse, abuse, fire, flood, acts of God, improper installation, installation not in accordance with the...
... specified parts and repair labor to correct defects in the United States or Canada and applies only when the major appliance is void if the factory applied serial number has been altered or removed from your home of your authorized Maytag dealer to repair or replace appliance light...with the removal from your major appliance if it is used in the country in a remote area where service by an authorized Maytag servicer is reported to Maytag within 30 days from accident, alteration, misuse, abuse, fire, flood, acts of God, improper installation, installation not in accordance with the...

