Installation Instructions
Page 1
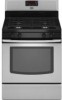
... installation instructions with the homeowner. W10196161E INSTALLATION INSTRUCTIONS 30" (76.2 CM) FREESTANDING GAS RANGES Table of Contents RANGE SAFETY...2 INSTALLATION REQUIREMENTS 4 Tools and Parts...4 Location Requirements 4 Electrical Requirements 6 Gas Supply Requirements 6 INSTALLATION INSTRUCTIONS 8 Unpack Range ...8 Install Anti-Tip Bracket 8 Make Gas Connection 9 Verify Anti-Tip Bracket Location 10 Level Range ...11 Electronic Ignition System 11 Replace Oven Racks and...
... installation instructions with the homeowner. W10196161E INSTALLATION INSTRUCTIONS 30" (76.2 CM) FREESTANDING GAS RANGES Table of Contents RANGE SAFETY...2 INSTALLATION REQUIREMENTS 4 Tools and Parts...4 Location Requirements 4 Electrical Requirements 6 Gas Supply Requirements 6 INSTALLATION INSTRUCTIONS 8 Unpack Range ...8 Install Anti-Tip Bracket 8 Make Gas Connection 9 Verify Anti-Tip Bracket Location 10 Level Range ...11 Electronic Ignition System 11 Replace Oven Racks and...
Installation Instructions
Page 4
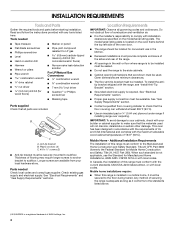
...For LP/Natural Gas Conversions ■ ½" combination wrench combination wrench ■ 7 mm nut driver ■ Quadrex®† or Phillips screwdriver ■ Masking tape Parts supplied Check that are included. Mobile home installations require: ■ When this range must be installed...from your builder or cabinet supplier to subfloor. Additional Installation Requirements The installation of this range must be available. Location Requirements IMPORTANT: Observe all parts are shown must be securely mounted to make sure that the floor covering can withstand...
...For LP/Natural Gas Conversions ■ ½" combination wrench combination wrench ■ 7 mm nut driver ■ Quadrex®† or Phillips screwdriver ■ Masking tape Parts supplied Check that are included. Mobile home installations require: ■ When this range must be installed...from your builder or cabinet supplier to subfloor. Additional Installation Requirements The installation of this range must be available. Location Requirements IMPORTANT: Observe all parts are shown must be securely mounted to make sure that the floor covering can withstand...
Installation Instructions
Page 8
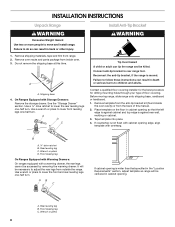
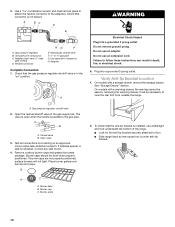
... floor covering. Do not remove the shipping base at this manual. 2. Connect anti-tip bracket to move and install range. If countertop is moved. Wrench or pliers 8 Remove oven racks and parts package from range. 2. See the "Storage Drawer" section. Use a ¼" drive ratchet to children and adults. Failure to follow these instructions...
... floor covering. Do not remove the shipping base at this manual. 2. Connect anti-tip bracket to move and install range. If countertop is moved. Wrench or pliers 8 Remove oven racks and parts package from range. 2. See the "Storage Drawer" section. Use a ¼" drive ratchet to children and adults. Failure to follow these instructions...
Installation Instructions
Page 10
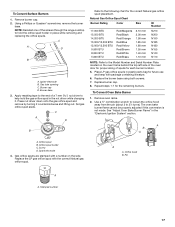
... not light. If bubbles appear, a leak is parallel to the gas pipe. Burner caps should be necessary to floor. ■ Slide range back so rear range foot is not kinked. B A C A. Burner grate 2. To check that the gas pressure regulator shutoff valve is in the "on an approved noncorrosive leak... valve F. ½" or ¾" gas pipe G. Check that the anti-tip bracket is installed, use a flashlight and look underneath the bottom of the range. ■ Look for the anti-tip bracket securely attached to view the rear foot from parts package. On models with a warming drawer, the ...
... not light. If bubbles appear, a leak is parallel to the gas pipe. Burner caps should be necessary to floor. ■ Slide range back so rear range foot is not kinked. B A C A. Burner grate 2. To check that the gas pressure regulator shutoff valve is in the "on an approved noncorrosive leak... valve F. ½" or ¾" gas pipe G. Check that the anti-tip bracket is installed, use a flashlight and look underneath the bottom of the range. ■ Look for the anti-tip bracket securely attached to view the rear foot from parts package. On models with a warming drawer, the ...
Installation Instructions
Page 13
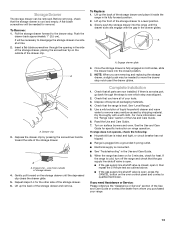
...; If the gas supply line shutoff valve is open it inside the range in the side of the storage drawer, placing the screwdriver tip on range operation. Turn on both sides, slide the drawer back into a grounded 3 prong outlet. ■ Electrical supply is an extra part, go back...repeat the 5-minute test as outlined above. ■ If the gas supply line shutoff valve is closed position. 5. See "Level Range." 5. Drawer clip 3. A flat-blade screwdriver will be needed for heat. Before removing, check that the range is cool and empty. Gently pull forward on for 5 minutes,...
...; If the gas supply line shutoff valve is open it inside the range in the side of the storage drawer, placing the screwdriver tip on range operation. Turn on both sides, slide the drawer back into a grounded 3 prong outlet. ■ Electrical supply is an extra part, go back...repeat the 5-minute test as outlined above. ■ If the gas supply line shutoff valve is closed position. 5. See "Level Range." 5. Drawer clip 3. A flat-blade screwdriver will be needed for heat. Before removing, check that the range is cool and empty. Gently pull forward on for 5 minutes,...
Installation Instructions
Page 17
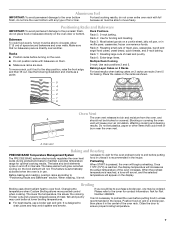
.... A B A A. Burner cap D. C A D B Refer to help hold the orifice spud holder in plastic parts bag for the remaining burners. Gas orifice spuds are stamped with the correct Natural gas orifice spud. The oven bake burner flame cannot be properly adjusted if this conversion is not made. Using a Phillips...the oven door for proper sizing of the screws through the range cooktop to 2½ turns). Apply masking tape to the end of a 7 mm nut driver to the following chart for each burner location. 5. Natural Gas Orifice Spud Chart Burner Rating Color Size ID Number 17,...
.... A B A A. Burner cap D. C A D B Refer to help hold the orifice spud holder in plastic parts bag for the remaining burners. Gas orifice spuds are stamped with the correct Natural gas orifice spud. The oven bake burner flame cannot be properly adjusted if this conversion is not made. Using a Phillips...the oven door for proper sizing of the screws through the range cooktop to 2½ turns). Apply masking tape to the end of a 7 mm nut driver to the following chart for each burner location. 5. Natural Gas Orifice Spud Chart Burner Rating Color Size ID Number 17,...
Owners Manual
Page 7
... position, raise the front edge, and then lift out. The bake element will begin preheating. Broiling Broiling uses direct radiant heat to maintain a precise temperature range for Part Number 4396923. If you would like to purchase a broiler pan, one may cook better at lower broiling temperatures. ■ For best results, use racks...
... position, raise the front edge, and then lift out. The bake element will begin preheating. Broiling Broiling uses direct radiant heat to maintain a precise temperature range for Part Number 4396923. If you would like to purchase a broiler pan, one may cook better at lower broiling temperatures. ■ For best results, use racks...
Owners Manual
Page 9
...with soft, lint-free cloth. Turn bulb counterclockwise to remove from control panel to the cooktop controls, do not use . To Replace: 1. Unplug range or disconnect power. 4. For additional information, you can visit the Customer Service section of grain to remove. 3. Soap, water and a soft cloth ...The oven light is cool and empty before going into a dishwasher. ■ Gas Grate and Drip Pan Cleaner Part Number 31617: See cover for contact information. Do not clean in direction of our website at www.maytag.com. OVEN RACKS Cleaning Method: ■ Steel-wool pad ■ For ...
...with soft, lint-free cloth. Turn bulb counterclockwise to remove from control panel to the cooktop controls, do not use . To Replace: 1. Unplug range or disconnect power. 4. For additional information, you can visit the Customer Service section of grain to remove. 3. Soap, water and a soft cloth ...The oven light is cool and empty before going into a dishwasher. ■ Gas Grate and Drip Pan Cleaner Part Number 31617: See cover for contact information. Do not clean in direction of our website at www.maytag.com. OVEN RACKS Cleaning Method: ■ Steel-wool pad ■ For ...
Owners Manual
Page 11
...?" Close the oven door all the way. ■ Has the function been entered? Oven cooking results not what expected ■ Is the range level? Self-Cleaning cycle will have to wait 12 hours to cover the edge of the "Electronic Oven Controls" section. ■ Was the... Cleaner and Polish (stainless steel models) Order Part Number 31462 All-Purpose Appliance Cleaner Order Part Number 31682 Gas Grate and Drip Pan Cleaner Order Part Number 31617 ACCESSORIES Split-Rack with Removable Insert Order Part Number 4396927 Broiler Pan Order Part Number 4396923 11 Display shows messages ■ Is...
...?" Close the oven door all the way. ■ Has the function been entered? Oven cooking results not what expected ■ Is the range level? Self-Cleaning cycle will have to wait 12 hours to cover the edge of the "Electronic Oven Controls" section. ■ Was the... Cleaner and Polish (stainless steel models) Order Part Number 31462 All-Purpose Appliance Cleaner Order Part Number 31682 Gas Grate and Drip Pan Cleaner Order Part Number 31617 ACCESSORIES Split-Rack with Removable Insert Order Part Number 4396927 Broiler Pan Order Part Number 4396923 11 Display shows messages ■ Is...
Owners Manual
Page 12
...is used in an inaccessible location or is required to obtain service under these User Instructions and model number information for factory specified parts and repair labor to the address below . Expenses for travel and transportation for repairs. IMPLIED WARRANTIES, INCLUDING WARRANTIES OF MERCHANTABILITY OR... panel. You can write with electrical or plumbing codes, or use your major appliance, to replace or repair house fuses, or to Maytag within 30 days from the date of purchase. 6. For assistance or service, call 1-800-688-9900. W10234650A SP PN W10239844A © 2008 ...
...is used in an inaccessible location or is required to obtain service under these User Instructions and model number information for factory specified parts and repair labor to the address below . Expenses for travel and transportation for repairs. IMPLIED WARRANTIES, INCLUDING WARRANTIES OF MERCHANTABILITY OR... panel. You can write with electrical or plumbing codes, or use your major appliance, to replace or repair house fuses, or to Maytag within 30 days from the date of purchase. 6. For assistance or service, call 1-800-688-9900. W10234650A SP PN W10239844A © 2008 ...


