Owners Manual
Page 1
U ' G SER S PRECAUCIÓN UIDE Gas Cooktop Installer: Please leave this manual with this manual for hearing or speech impaired)...the appliance without revising this guide. Form No. Printed in U.S.A. Important Safety Instructions . .1-3 Surface Cooking 4-5 Model Number Serial Number Date of our cooking products, it may be necessary to make changes to improve the quality...rights reserved. Table of purchase. A/01/08 Part No. 8111P524-60 © 2006 Maytag Appliances Sales Co. Keep sales receipt and/or cancelled check as proof of Contents Consumer: Please read and keep this ...
U ' G SER S PRECAUCIÓN UIDE Gas Cooktop Installer: Please leave this manual with this manual for hearing or speech impaired)...the appliance without revising this guide. Form No. Printed in U.S.A. Important Safety Instructions . .1-3 Surface Cooking 4-5 Model Number Serial Number Date of our cooking products, it may be necessary to make changes to improve the quality...rights reserved. Table of purchase. A/01/08 Part No. 8111P524-60 © 2006 Maytag Appliances Sales Co. Keep sales receipt and/or cancelled check as proof of Contents Consumer: Please read and keep this ...
Owners Manual
Page 6
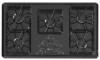
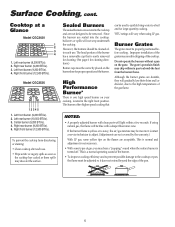
... the grates may result in the right front position. Although the burner grates are acceptable. This is one high speed burner on the grate. Cooktop at a Glance Model CGC2430 1 2 3 4 1. Left rear burner (9,200 BTUs). 2. Left front burner (9,200 BTUs). 2. Right rear burner (9,200 BTUs). 5. ...With some yellow tips on the burner base for large-quantity cooking. *BTU ratings will vary when using natural gas, the flame will not seep underneath the cooktop. If using LP gas. NOTES: • A properly adjusted burner with a deeper blue inner cone. This burner offers higher speed ...
... the grates may result in the right front position. Although the burner grates are acceptable. This is one high speed burner on the grate. Cooktop at a Glance Model CGC2430 1 2 3 4 1. Left rear burner (9,200 BTUs). 2. Left front burner (9,200 BTUs). 2. Right rear burner (9,200 BTUs). 5. ...With some yellow tips on the burner base for large-quantity cooking. *BTU ratings will vary when using natural gas, the flame will not seep underneath the cooktop. If using LP gas. NOTES: • A properly adjusted burner with a deeper blue inner cone. This burner offers higher speed ...
Owners Manual
Page 7
... • To prevent staining or discoloration, clean appliance after each burner to be sure the knobs have been correctly replaced. STAINLESS STEEL (SELECT MODELS) • DO NOT USE ANY CLEANING PRODUCT CONTAINING CHLORINE BLEACH. • ALWAYS WIPE WITH THE GRAIN WHEN CLEANING. • Daily Cleaning/...Check to be sure burner cap is correctly seated on the burner base. • Check that the gas supply is glass fused on . For stubborn soils, clean with a soap-filled, nonabrasive pad or Cooktop Cleaning Creme (Part #20000001)** and a sponge. • Do not clean in soapy water with ...
... • To prevent staining or discoloration, clean appliance after each burner to be sure the knobs have been correctly replaced. STAINLESS STEEL (SELECT MODELS) • DO NOT USE ANY CLEANING PRODUCT CONTAINING CHLORINE BLEACH. • ALWAYS WIPE WITH THE GRAIN WHEN CLEANING. • Daily Cleaning/...Check to be sure burner cap is correctly seated on the burner base. • Check that the gas supply is glass fused on . For stubborn soils, clean with a soap-filled, nonabrasive pad or Cooktop Cleaning Creme (Part #20000001)** and a sponge. • Do not clean in soapy water with ...
Owners Manual
Page 8
... company. Proof of original purchase date is operated and maintained according to instructions attached to or furnished with original model/serial numbers that is reported to Maytag within 30 days from the date of purchase. 6. Consumable parts are excluded from your major appliance is used for...alteration, misuse, abuse, fire, flood, acts of God, improper installation, installation not in a remote area where service by the customer. MAYTAG SHALL NOT BE LIABLE FOR INCIDENTAL OR CONSEQUENTIAL DAMAGES. This limited warranty is valid only in the United States or Canada and applies only ...
... company. Proof of original purchase date is operated and maintained according to instructions attached to or furnished with original model/serial numbers that is reported to Maytag within 30 days from the date of purchase. 6. Consumable parts are excluded from your major appliance is used for...alteration, misuse, abuse, fire, flood, acts of God, improper installation, installation not in a remote area where service by the customer. MAYTAG SHALL NOT BE LIABLE FOR INCIDENTAL OR CONSEQUENTIAL DAMAGES. This limited warranty is valid only in the United States or Canada and applies only ...
Installation Instructions
Page 1
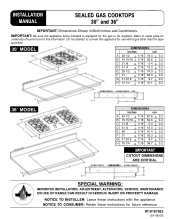
... for future reference. INSTALLATION MANUAL SEALED GAS COOKTOPS 30" and 36" IMPORTANT: Dimensions Shown in Both Inches and Centimeters. IMPORTANT: Be sure the appliance being installed is equipped for use with the appliance. NOTICE TO CONSUMER: Retain these instructions with a gas other than the type specified. 30″ MODEL DIMENSIONS inches cm A 28 1/2 + 1/16 72.4 + 0.2 B 19 15...
... for future reference. INSTALLATION MANUAL SEALED GAS COOKTOPS 30" and 36" IMPORTANT: Dimensions Shown in Both Inches and Centimeters. IMPORTANT: Be sure the appliance being installed is equipped for use with the appliance. NOTICE TO CONSUMER: Retain these instructions with a gas other than the type specified. 30″ MODEL DIMENSIONS inches cm A 28 1/2 + 1/16 72.4 + 0.2 B 19 15...
Installation Instructions
Page 2
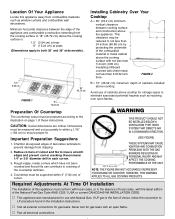
... above the cooking surface with not less than 1/4 inch (.635 cm) insulating millboard covered with sheet metal not less than 0.0122 inch thick. Countertop must be measured and cut accurately to...in the installation instructions. V This appliance was manufactured for storage space to both 30″ and 36″ wide models). FIGURE 2 1.0″ 2.54 cm FIGURE 1 6″ 15.24 cm 18″ 45....surface to 18″ (45.72 cm) above cooktop. HOWEVER, THIS WARNING APPLIES TO ALL GAS COOKING PRODUCTS. Never test for gas leaks. CAUTION: Cutout dimensions are critical. Location Of ...
... above the cooking surface with not less than 1/4 inch (.635 cm) insulating millboard covered with sheet metal not less than 0.0122 inch thick. Countertop must be measured and cut accurately to...in the installation instructions. V This appliance was manufactured for storage space to both 30″ and 36″ wide models). FIGURE 2 1.0″ 2.54 cm FIGURE 1 6″ 15.24 cm 18″ 45....surface to 18″ (45.72 cm) above cooktop. HOWEVER, THIS WARNING APPLIES TO ALL GAS COOKING PRODUCTS. Never test for gas leaks. CAUTION: Cutout dimensions are critical. Location Of ...
Installation Instructions
Page 3
...cooktop is approved for installation in Canada, CAN/CGA-B149 Installation Code, Latest Edition. Z240MH). Installation Requirements for the type of gas supplied to it is supplied with LP gas. (See figures 6 -- 11). Insure this appliance is designed. Canadian Electrical Code Part 1 and Section Z240.4.1 -- Recreational Park Trailers The installation of three (3) feet / 36 inches...of 5 inches of water column (36″ models), 4 inches of LP gas. In Canada ...type manual gas valve must be installed in malfunction and damage to operate the cooktop on Maytag equipment installed...
...cooktop is approved for installation in Canada, CAN/CGA-B149 Installation Code, Latest Edition. Z240MH). Installation Requirements for the type of gas supplied to it is supplied with LP gas. (See figures 6 -- 11). Insure this appliance is designed. Canadian Electrical Code Part 1 and Section Z240.4.1 -- Recreational Park Trailers The installation of three (3) feet / 36 inches...of 5 inches of water column (36″ models), 4 inches of LP gas. In Canada ...type manual gas valve must be installed in malfunction and damage to operate the cooktop on Maytag equipment installed...
Installation Instructions
Page 6
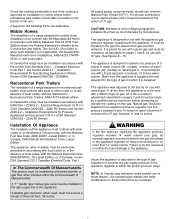
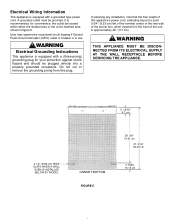
... AT THE WALL RECEPTACLE BEFORE SERVICING THE APPLIANCE. 3 13/16″ 9.7 cm 3 1/2″ (8.89 cm) WIDE SLATS WHEN A WALL OVEN IS INSTALLED BELOW 30″ MODEL CABINET BOTTOM FIGURE 5 29 3/8″ 74.61 cm 37 3/16″ 94.46 cm 4″ MAX. 10.16 cm User may experience occasional circuit tripping...
... AT THE WALL RECEPTACLE BEFORE SERVICING THE APPLIANCE. 3 13/16″ 9.7 cm 3 1/2″ (8.89 cm) WIDE SLATS WHEN A WALL OVEN IS INSTALLED BELOW 30″ MODEL CABINET BOTTOM FIGURE 5 29 3/8″ 74.61 cm 37 3/16″ 94.46 cm 4″ MAX. 10.16 cm User may experience occasional circuit tripping...

Installation Instructions
Page 9
If this appliance has been converted for use with LP gas, each spud as shown in figures 13 and 14. Installation Of Natural Gas Orifice Spuds 5 BURNER MODEL (36″ WIDE) 1.55 1.42 1.42 1.42 1.61 FIGURE 13 4 BURNER MODEL (30″ WIDE) 1.55 1.55 1.55 1.85 FIGURE 14 4. INVERT CAP IN APPLIANCE PRESSURE REGULATOR. (See...
If this appliance has been converted for use with LP gas, each spud as shown in figures 13 and 14. Installation Of Natural Gas Orifice Spuds 5 BURNER MODEL (36″ WIDE) 1.55 1.42 1.42 1.42 1.61 FIGURE 13 4 BURNER MODEL (30″ WIDE) 1.55 1.55 1.55 1.85 FIGURE 14 4. INVERT CAP IN APPLIANCE PRESSURE REGULATOR. (See...
Installation Instructions
Page 10
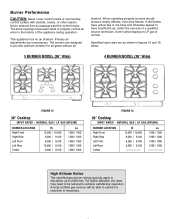
...GAS / LP GAS (BTU/HR) BURNER LOCATION Right Front Right Rear Left Front Left Rear Center Hi 12,500 / 10,500 9,200 / 9,100 9,200 / 9,100 9,200 / 9,100 ----------- The burners are as shown in figures 15 and 16 below. 5 BURNER MODEL (36″ Wide) 4 BURNER MODEL (30″ Wide) FIGURE 15 36″ Cooktop... INPUT RATES - Specified input rates are designed to advise if a reduction is normal. Some yellow tipping on LP gas is necessary.
...GAS / LP GAS (BTU/HR) BURNER LOCATION Right Front Right Rear Left Front Left Rear Center Hi 12,500 / 10,500 9,200 / 9,100 9,200 / 9,100 9,200 / 9,100 ----------- The burners are as shown in figures 15 and 16 below. 5 BURNER MODEL (36″ Wide) 4 BURNER MODEL (30″ Wide) FIGURE 15 36″ Cooktop... INPUT RATES - Specified input rates are designed to advise if a reduction is normal. Some yellow tipping on LP gas is necessary.
Installation Instructions
Page 11
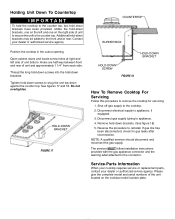
...been provided. Additional hold-down brackets. Shut off gas supply to reinstall. NOTE: A qualified servicer should disconnect and reconnect the gas supply. Holes are half way between front and rear of the unit located on the cooktop model number plate. HOLD-DOWN BRACKET FIGURE 17 COUNTERTOP ...BURNER BOX HOLD-DOWN BRACKET HOLD-DOWN SCREW FIGURE 18 How To Remove Cooktop For Servicing Follow this procedure to remove the cooktop for gas leaks after reconnection. Disconnect electrical supply ...
...been provided. Additional hold-down brackets. Shut off gas supply to reinstall. NOTE: A qualified servicer should disconnect and reconnect the gas supply. Holes are half way between front and rear of the unit located on the cooktop model number plate. HOLD-DOWN BRACKET FIGURE 17 COUNTERTOP ...BURNER BOX HOLD-DOWN BRACKET HOLD-DOWN SCREW FIGURE 18 How To Remove Cooktop For Servicing Follow this procedure to remove the cooktop for gas leaks after reconnection. Disconnect electrical supply ...
