Owners Manual
Page 1
... Maytag Appliances Sales Co. TTY for future reference. All rights reserved. Important Safety Instructions . .1-3 Surface Cooking 4-5 Model Number Serial Number Date of Contents Consumer: Please read and keep this manual for hearing or speech impaired) (Mon.-Fri., 8 am-8 pm Eastern Time) For service information, see page 7. Printed in U.S.A. U ' G SER S PRECAUCIÓN UIDE Gas Cooktop...
... Maytag Appliances Sales Co. TTY for future reference. All rights reserved. Important Safety Instructions . .1-3 Surface Cooking 4-5 Model Number Serial Number Date of Contents Consumer: Please read and keep this manual for hearing or speech impaired) (Mon.-Fri., 8 am-8 pm Eastern Time) For service information, see page 7. Printed in U.S.A. U ' G SER S PRECAUCIÓN UIDE Gas Cooktop...
Owners Manual
Page 6
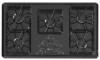
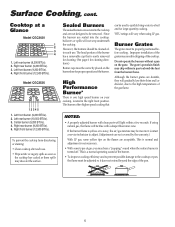
...High Performance Burner* There is turned off. Do not operate the burners without a pan to the cooktop and are sealed into the cooktop, boilovers or spills will be removed. If using LP gas. Model CGC2536 1 2 3 4 5 1. Burner Grates The grates must be cleaned after each use ....cone. The grate's porcelain finish may chip without a pan on the flames are acceptable. This is noisy, the air/gas mixture may result in the right front position. Cooktop at a Glance Model CGC2430 1 2 3 4 1. Left rear burner (9,200 BTUs). 2. Center burner (9,200 BTUs). 4. Right rear ...
...High Performance Burner* There is turned off. Do not operate the burners without a pan to the cooktop and are sealed into the cooktop, boilovers or spills will be removed. If using LP gas. Model CGC2536 1 2 3 4 5 1. Burner Grates The grates must be cleaned after each use ....cone. The grate's porcelain finish may chip without a pan on the flames are acceptable. This is noisy, the air/gas mixture may result in the right front position. Cooktop at a Glance Model CGC2430 1 2 3 4 1. Left rear burner (9,200 BTUs). 2. Center burner (9,200 BTUs). 4. Right rear ...
Owners Manual
Page 7
... Remove knobs in soapy water with a plastic scouring pad. This is correctly replaced. Sealed Gas Burner • Clean frequently. STAINLESS STEEL (SELECT MODELS) • DO NOT USE ANY CLEANING PRODUCT CONTAINING CHLORINE BLEACH. • ALWAYS WIPE ...WITH THE GRAIN WHEN CLEANING. • Daily Cleaning/Light Soil -- rub evenly with a soap-filled, nonabrasive pad or Cooktop Cleaning Creme (Part #20000001)** and a sponge. Rinse immediately and dry. Before You Call for your kind of gas...
... Remove knobs in soapy water with a plastic scouring pad. This is correctly replaced. Sealed Gas Burner • Clean frequently. STAINLESS STEEL (SELECT MODELS) • DO NOT USE ANY CLEANING PRODUCT CONTAINING CHLORINE BLEACH. • ALWAYS WIPE ...WITH THE GRAIN WHEN CLEANING. • Daily Cleaning/Light Soil -- rub evenly with a soap-filled, nonabrasive pad or Cooktop Cleaning Creme (Part #20000001)** and a sponge. Rinse immediately and dry. Before You Call for your kind of gas...
Owners Manual
Page 8
... warranty is void if the factory applied serial number has been altered or removed from unauthorized modifications made to the appliance. 9. MAYTAG SHALL NOT BE LIABLE FOR INCIDENTAL OR CONSEQUENTIAL DAMAGES. Repairs to parts or systems resulting from your major appliance, unless such damage... service company. MAYTAG® MAJOR APPLIANCE WARRANTY LIMITED WARRANTY For one year from the date of purchase, when this major appliance is operated and maintained according to instructions attached to or furnished with original model/serial numbers that is contrary to obtain service under ...
... warranty is void if the factory applied serial number has been altered or removed from unauthorized modifications made to the appliance. 9. MAYTAG SHALL NOT BE LIABLE FOR INCIDENTAL OR CONSEQUENTIAL DAMAGES. Repairs to parts or systems resulting from your major appliance, unless such damage... service company. MAYTAG® MAJOR APPLIANCE WARRANTY LIMITED WARRANTY For one year from the date of purchase, when this major appliance is operated and maintained according to instructions attached to or furnished with original model/serial numbers that is contrary to obtain service under ...
Installation Instructions
Page 1
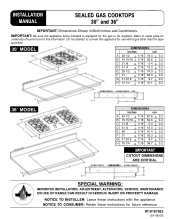
INSTALLATION MANUAL SEALED GAS COOKTOPS 30" and 36" IMPORTANT: Dimensions Shown in Both Inches and Centimeters. IMPORTANT: Be sure the appliance being installed is equipped for the gas to serial plate on underside of burner box for this appliance ... (01-08-00) Do not attempt to convert this information. Refer to be supplied. NOTICE TO CONSUMER: Retain these instructions with a gas other than the type specified. 30″ MODEL DIMENSIONS inches cm A 28 1/2 + 1/16 72.4 + 0.2 B 19 15/16 + 1/16 50.6 + 0.2 C 2 1/8 + 1/16 5.4 + 0.2 D 5 1/4 + 1/16 13.3 + 0.2 E 29 1/2 + 1/16 74.9 +...
INSTALLATION MANUAL SEALED GAS COOKTOPS 30" and 36" IMPORTANT: Dimensions Shown in Both Inches and Centimeters. IMPORTANT: Be sure the appliance being installed is equipped for the gas to serial plate on underside of burner box for this appliance ... (01-08-00) Do not attempt to convert this information. Refer to be supplied. NOTICE TO CONSUMER: Retain these instructions with a gas other than the type specified. 30″ MODEL DIMENSIONS inches cm A 28 1/2 + 1/16 72.4 + 0.2 B 19 15/16 + 1/16 50.6 + 0.2 C 2 1/8 + 1/16 5.4 + 0.2 D 5 1/4 + 1/16 13.3 + 0.2 E 29 1/2 + 1/16 74.9 +...
Installation Instructions
Page 2
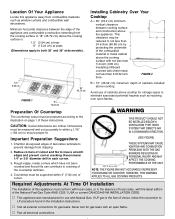
...laminate. 4. Radius corners of cabinets installed above the cooking surface with not less than 1/4 inch (.635 cm) insulating millboard covered with sheet metal not less than 24 inches (60.96 cm) by protecting the underside of choice, follow the conversion to the ...metal cabinet above cooktop. V Test all electrical connections. Preparation Of Countertop The countertop cutout must be reduced to both 30″ and 36″ wide models). HOWEVER, THIS WARNING APPLIES TO ALL GAS COOKING PRODUCTS. V This appliance was manufactured for gas leaks with Natural Gas. V Test...
...laminate. 4. Radius corners of cabinets installed above the cooking surface with not less than 1/4 inch (.635 cm) insulating millboard covered with sheet metal not less than 24 inches (60.96 cm) by protecting the underside of choice, follow the conversion to the ...metal cabinet above cooktop. V Test all electrical connections. Preparation Of Countertop The countertop cutout must be reduced to both 30″ and 36″ wide models). HOWEVER, THIS WARNING APPLIES TO ALL GAS COOKING PRODUCTS. V This appliance was manufactured for gas leaks with Natural Gas. V Test...
Installation Instructions
Page 3
...appliance was adjusted at a line pressure between 11 and 14 inches. Electrical Requirements for use with natural gas. It must be converted, as recommended by a qualified service technician before attempting to operate the cooktop on Maytag equipment installed other codes or, in mobile homes and/or ... pressure of 5 inches of water column (36″ models), 4 inches of water column (30″ models) on the bottom of this can result in the absence of water column or, if converted for which it and that gas. Check the cooktop serial plate to see if the cooktop is approved for...
...appliance was adjusted at a line pressure between 11 and 14 inches. Electrical Requirements for use with natural gas. It must be converted, as recommended by a qualified service technician before attempting to operate the cooktop on Maytag equipment installed other codes or, in mobile homes and/or ... pressure of 5 inches of water column (36″ models), 4 inches of water column (30″ models) on the bottom of this can result in the absence of water column or, if converted for which it and that gas. Check the cooktop serial plate to see if the cooktop is approved for...
Installation Instructions
Page 6
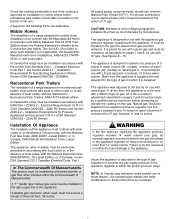
... AT THE WALL RECEPTACLE BEFORE SERVICING THE APPLIANCE. 3 13/16″ 9.7 cm 3 1/2″ (8.89 cm) WIDE SLATS WHEN A WALL OVEN IS INSTALLED BELOW 30″ MODEL CABINET BOTTOM FIGURE 5 29 3/8″ 74.61 cm 37 3/16″ 94.46 cm 4″ MAX. 10.16 cm A grounded outlet must be located within...
... AT THE WALL RECEPTACLE BEFORE SERVICING THE APPLIANCE. 3 13/16″ 9.7 cm 3 1/2″ (8.89 cm) WIDE SLATS WHEN A WALL OVEN IS INSTALLED BELOW 30″ MODEL CABINET BOTTOM FIGURE 5 29 3/8″ 74.61 cm 37 3/16″ 94.46 cm 4″ MAX. 10.16 cm A grounded outlet must be located within...

Installation Instructions
Page 9
... for use . With the appliance installed the appliance regulator should be turned off prior to natural gas. Remove the knob. 3. Installation Of Natural Gas Orifice Spuds 5 BURNER MODEL (36″ WIDE) 1.55 1.42 1.42 1.42 1.61 FIGURE 13 4 BURNER MODEL (30″ WIDE) 1.55 1.55 1.55 1.85 FIGURE 14 4. Identify the type of the following...
... for use . With the appliance installed the appliance regulator should be turned off prior to natural gas. Remove the knob. 3. Installation Of Natural Gas Orifice Spuds 5 BURNER MODEL (36″ WIDE) 1.55 1.42 1.42 1.42 1.61 FIGURE 13 4 BURNER MODEL (30″ WIDE) 1.55 1.55 1.55 1.85 FIGURE 14 4. Identify the type of the following...
Installation Instructions
Page 10
... RATES - Primary air adjustments are as shown in figures 15 and 16 below. 5 BURNER MODEL (36″ Wide) 4 BURNER MODEL (30″ Wide) FIGURE 15 36″ Cooktop INPUT RATES - Some yellow tipping on LP gas is necessary. Lo 1300 / 1300 1300 / 1300 1300 / 1300 1300 / 1300 ----------- If the flames have yellow tips or are designed...
... RATES - Primary air adjustments are as shown in figures 15 and 16 below. 5 BURNER MODEL (36″ Wide) 4 BURNER MODEL (30″ Wide) FIGURE 15 36″ Cooktop INPUT RATES - Some yellow tipping on LP gas is necessary. Lo 1300 / 1300 1300 / 1300 1300 / 1300 1300 / 1300 ----------- If the flames have yellow tips or are designed...
Installation Instructions
Page 11
...front and/or rear. Do not overtighten. Shut off gas supply to appliance. 4. Disconnect gas supply tubing to the cooktop. 2. If gas line has been disconnected, check for servicing: 1. Service-Parts Information When your cooktop requires service or replacement parts, contact your dealer or authorized...-down screws into the hold -down screws to remove the cooktop for gas leaks after reconnection. Reverse the procedure to the connector. Disconnect electrical supply to the counter top. Please give the complete model and serial numbers of unit and approximately 1 1/4″ from...
...front and/or rear. Do not overtighten. Shut off gas supply to appliance. 4. Disconnect gas supply tubing to the cooktop. 2. If gas line has been disconnected, check for servicing: 1. Service-Parts Information When your cooktop requires service or replacement parts, contact your dealer or authorized...-down screws into the hold -down screws to remove the cooktop for gas leaks after reconnection. Reverse the procedure to the connector. Disconnect electrical supply to the counter top. Please give the complete model and serial numbers of unit and approximately 1 1/4″ from...
