Installation Instructions
Page 8
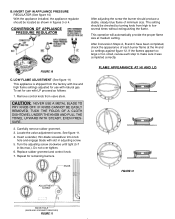
...without extinguishing the flame. See figure 11. 4. Remove control knob from high to make sure it was completed correctly. Repeat for use with natural gas. To set for use with LP proceed as shown in figures 3 or 4. IF KNOB CANNOT BE EASILY REMOVED, TUCK THE FOLDS OF A...screwdriver into knob hole and engage blade with slot in -lbs max.). B. FIGURE 10 C. If the flames appear too large or too small, review each burner flame at medium setting. Do not over tighten. 6. INVERT CAP IN APPLIANCE PRESSURE REGULATOR (See figure 10) With the appliance installed, ...
...without extinguishing the flame. See figure 11. 4. Remove control knob from high to make sure it was completed correctly. Repeat for use with natural gas. To set for use with LP proceed as shown in figures 3 or 4. IF KNOB CANNOT BE EASILY REMOVED, TUCK THE FOLDS OF A...screwdriver into knob hole and engage blade with slot in -lbs max.). B. FIGURE 10 C. If the flames appear too large or too small, review each burner flame at medium setting. Do not over tighten. 6. INVERT CAP IN APPLIANCE PRESSURE REGULATOR (See figure 10) With the appliance installed, ...