Owners Manual
Page 1
...changes to improve the quality and performance of Contents Consumer: Please read and keep this guide. Important Safety Instructions . .1-3 Surface Cooking 4-5 Model Number Serial Number Date of purchase. Printed in U.S.A. Keep sales receipt and/or cancelled check as proof of Purchase If you have questions,... 8 am-8 pm Eastern Time) For service information, see page 7. Form No. A/01/08 Part No. 8111P524-60 © 2006 Maytag Appliances Sales Co. All rights reserved. U ' G SER S PRECAUCIÓN UIDE Gas Cooktop Installer: Please leave this manual with this appliance.
...changes to improve the quality and performance of Contents Consumer: Please read and keep this guide. Important Safety Instructions . .1-3 Surface Cooking 4-5 Model Number Serial Number Date of purchase. Printed in U.S.A. Keep sales receipt and/or cancelled check as proof of Purchase If you have questions,... 8 am-8 pm Eastern Time) For service information, see page 7. Form No. A/01/08 Part No. 8111P524-60 © 2006 Maytag Appliances Sales Co. All rights reserved. U ' G SER S PRECAUCIÓN UIDE Gas Cooktop Installer: Please leave this manual with this appliance.
Owners Manual
Page 6
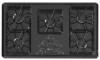
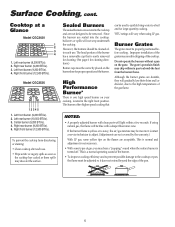
... grate's porcelain finish may discolor the surface. If the burner flame is yellow or is noisy, the air/gas mixture may hear a "popping" sound when the surface burner is turned off. Cooktop at a Glance Model CGC2430 1 2 3 4 1. Left front burner (9,200 BTUs). 2. Right rear burner (9,200 BTUs). 5. Right front burner ...a deeper blue inner cone. Right rear burner (9,200 BTUs). 3. Since the burners are not covered by the warranty.) With LP gas, some types of the cooktop. The head portion of the burner has a removable cap that can be used to quickly bring water to adjust. (Adjustments are ...
... grate's porcelain finish may discolor the surface. If the burner flame is yellow or is noisy, the air/gas mixture may hear a "popping" sound when the surface burner is turned off. Cooktop at a Glance Model CGC2430 1 2 3 4 1. Left front burner (9,200 BTUs). 2. Right rear burner (9,200 BTUs). 5. Right front burner ...a deeper blue inner cone. Right rear burner (9,200 BTUs). 3. Since the burners are not covered by the warranty.) With LP gas, some types of the cooktop. The head portion of the burner has a removable cap that can be used to quickly bring water to adjust. (Adjustments are ...
Owners Manual
Page 7
... the knobs have been correctly replaced. able when using a damp sponge or soft cloth. Sealed Gas Burner • Clean frequently. Allow burner to cool. If soil remains, reapply Cooktop Cleaning Creme, cover with Stainless Steel Magic Spray. PORCELAIN ENAMEL Porcelain enamel is off a warm or... dry. BURNER GRATES • Wash grates with the grain. This may crack or chip with one of the following - STAINLESS STEEL (SELECT MODELS) • DO NOT USE ANY CLEANING PRODUCT CONTAINING CHLORINE BLEACH. • ALWAYS WIPE WITH THE GRAIN WHEN CLEANING. • Daily Cleaning/...
... the knobs have been correctly replaced. able when using a damp sponge or soft cloth. Sealed Gas Burner • Clean frequently. Allow burner to cool. If soil remains, reapply Cooktop Cleaning Creme, cover with Stainless Steel Magic Spray. PORCELAIN ENAMEL Porcelain enamel is off a warm or... dry. BURNER GRATES • Wash grates with the grain. This may crack or chip with one of the following - STAINLESS STEEL (SELECT MODELS) • DO NOT USE ANY CLEANING PRODUCT CONTAINING CHLORINE BLEACH. • ALWAYS WIPE WITH THE GRAIN WHEN CLEANING. • Daily Cleaning/...
Owners Manual
Page 8
... of original purchase date is contrary to determine if another warranty applies. Major appliances with original model/serial numbers that is required to obtain service under these excluded circumstances shall be provided by the customer. MAYTAG SHALL NOT BE LIABLE FOR INCIDENTAL OR CONSEQUENTIAL DAMAGES. If outside the 50 United States and...
... of original purchase date is contrary to determine if another warranty applies. Major appliances with original model/serial numbers that is required to obtain service under these excluded circumstances shall be provided by the customer. MAYTAG SHALL NOT BE LIABLE FOR INCIDENTAL OR CONSEQUENTIAL DAMAGES. If outside the 50 United States and...
Installation Instructions
Page 1
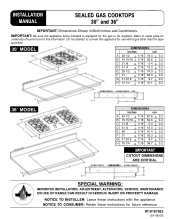
... this information. Refer to serial plate on underside of burner box for future reference. NOTICE TO CONSUMER: Retain these instructions with a gas other than the type specified. 30″ MODEL DIMENSIONS inches cm A 28 1/2 + 1/16 72.4 + 0.2 B 19 15/16 + 1/16 50.6 + 0.2 C 2 1/8 + 1/16 5.4 + 0.2 D 5 1/4 + 1/16 13.3 + 0.2 E 29 1/2 + 1/16 74.9 + 0.2 F 21 + 1/16...: Be sure the appliance being installed is equipped for use with the appliance. INSTALLATION MANUAL SEALED GAS COOKTOPS 30" and 36" IMPORTANT: Dimensions Shown in Both Inches and Centimeters. W10187822 (01-08-00)
... this information. Refer to serial plate on underside of burner box for future reference. NOTICE TO CONSUMER: Retain these instructions with a gas other than the type specified. 30″ MODEL DIMENSIONS inches cm A 28 1/2 + 1/16 72.4 + 0.2 B 19 15/16 + 1/16 50.6 + 0.2 C 2 1/8 + 1/16 5.4 + 0.2 D 5 1/4 + 1/16 13.3 + 0.2 E 29 1/2 + 1/16 74.9 + 0.2 F 21 + 1/16...: Be sure the appliance being installed is equipped for use with the appliance. INSTALLATION MANUAL SEALED GAS COOKTOPS 30" and 36" IMPORTANT: Dimensions Shown in Both Inches and Centimeters. W10187822 (01-08-00)
Installation Instructions
Page 2
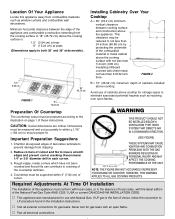
...NOT ACCURATELY REPRESENT YOUR RANGE OR COOKTOP; If LP gas is : 1.0″ (2.54 cm) at rear 6″ (15.24 cm) at sides (Dimensions apply to both 30″ and 36″ wide models). This clearance may be reduced to not less than 24 inches (60.96 cm) by protecting...appliance away from chipping. 2. Avoid use with sheet metal not less than 1/4 inch (.635 cm) insulating millboard covered with Natural Gas. Minimum horizontal clearance between cooking surface and construction above cooktop for gas leaks with the latest edition of cutout and file to insure smooth edges and...
...NOT ACCURATELY REPRESENT YOUR RANGE OR COOKTOP; If LP gas is : 1.0″ (2.54 cm) at rear 6″ (15.24 cm) at sides (Dimensions apply to both 30″ and 36″ wide models). This clearance may be reduced to not less than 24 inches (60.96 cm) by protecting...appliance away from chipping. 2. Avoid use with sheet metal not less than 1/4 inch (.635 cm) insulating millboard covered with Natural Gas. Minimum horizontal clearance between cooking surface and construction above cooktop for gas leaks with the latest edition of cutout and file to insure smooth edges and...
Installation Instructions
Page 3
...regulator at a pressure of 5 inches of water column (36″ models), 4 inches of gas supplied to it is designed. Z240MH). Recreational Park Trailers The installation of LP gas. This appliance, when installed, ...is adjusted for LP gas, between 6 and 14 inches of water column or, if converted for the type of water column (30″ models) on Maytag equipment installed other codes ... are applicable: Mobile Homes The installation of Massachusetts. Check the cooktop serial plate to see if the cooktop is approved for Manufactured Home Installations, ANSI A225.1/NFPA 501A, ...
...regulator at a pressure of 5 inches of water column (36″ models), 4 inches of gas supplied to it is designed. Z240MH). Recreational Park Trailers The installation of LP gas. This appliance, when installed, ...is adjusted for LP gas, between 6 and 14 inches of water column or, if converted for the type of water column (30″ models) on Maytag equipment installed other codes ... are applicable: Mobile Homes The installation of Massachusetts. Check the cooktop serial plate to see if the cooktop is approved for Manufactured Home Installations, ANSI A225.1/NFPA 501A, ...
Installation Instructions
Page 6
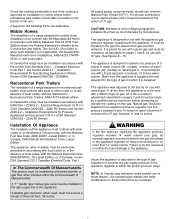
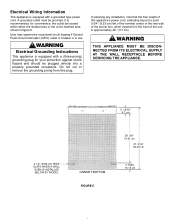
... AT THE WALL RECEPTACLE BEFORE SERVICING THE APPLIANCE. 3 13/16″ 9.7 cm 3 1/2″ (8.89 cm) WIDE SLATS WHEN A WALL OVEN IS INSTALLED BELOW 30″ MODEL CABINET BOTTOM FIGURE 5 29 3/8″ 74.61 cm 37 3/16″ 94.46 cm 4″ MAX. 10.16 cm Electrical Wiring Information This appliance is...
... AT THE WALL RECEPTACLE BEFORE SERVICING THE APPLIANCE. 3 13/16″ 9.7 cm 3 1/2″ (8.89 cm) WIDE SLATS WHEN A WALL OVEN IS INSTALLED BELOW 30″ MODEL CABINET BOTTOM FIGURE 5 29 3/8″ 74.61 cm 37 3/16″ 94.46 cm 4″ MAX. 10.16 cm Electrical Wiring Information This appliance is...

Installation Instructions
Page 9
Installation Of Natural Gas Orifice Spuds 5 BURNER MODEL (36″ WIDE) 1.55 1.42 1.42 1.42 1.61 FIGURE 13 4 BURNER MODEL (30″ WIDE) 1.55 1.55 1.55 1.85 FIGURE 14 4. B. Identify the type of the spuds and note the correct burner location for use with LP gas. Remove the knob. 3. Locate the valve adjustment screw. Insert a slender...
Installation Of Natural Gas Orifice Spuds 5 BURNER MODEL (36″ WIDE) 1.55 1.42 1.42 1.42 1.61 FIGURE 13 4 BURNER MODEL (30″ WIDE) 1.55 1.55 1.55 1.85 FIGURE 14 4. B. Identify the type of the spuds and note the correct burner location for use with LP gas. Remove the knob. 3. Locate the valve adjustment screw. Insert a slender...
Installation Instructions
Page 10
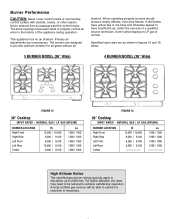
.../ 9,100 9,200 / 9,100 Lo 1300 / 1300 1300 / 1300 1300 / 1300 1300 / 1300 1300 / 1300 FIGURE 16 30″ Cooktop INPUT RATES - A local certified gas servicer will be reduced to the interior of a qualified service technician. The burners are hazy and otherwise appear to advise if a reduction is... knobs. Primary air adjustments are as shown in figures 15 and 16 below. 5 BURNER MODEL (36″ Wide) 4 BURNER MODEL (30″ Wide) FIGURE 15 36″ Cooktop INPUT RATES - NATURAL GAS / LP GAS (BTU/HR) BURNER LOCATION Right Front Right Rear Left Front Left Rear Center Hi 12...
.../ 9,100 9,200 / 9,100 Lo 1300 / 1300 1300 / 1300 1300 / 1300 1300 / 1300 1300 / 1300 FIGURE 16 30″ Cooktop INPUT RATES - A local certified gas servicer will be reduced to the interior of a qualified service technician. The burners are hazy and otherwise appear to advise if a reduction is... knobs. Primary air adjustments are as shown in figures 15 and 16 below. 5 BURNER MODEL (36″ Wide) 4 BURNER MODEL (30″ Wide) FIGURE 15 36″ Cooktop INPUT RATES - NATURAL GAS / LP GAS (BTU/HR) BURNER LOCATION Right Front Right Rear Left Front Left Rear Center Hi 12...
Installation Instructions
Page 11
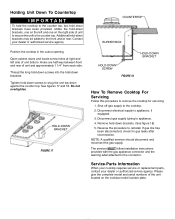
... brackets. Additional hold-down brackets have been provided. Position the cooktop in the cutout opening. Disconnect electrical supply to appliance, if equipped. 3. If gas line has been disconnected, check for servicing: 1. Please give the complete model and serial numbers of the unit located on the right side ... unit to the counter top. NOTE: A qualified servicer should disconnect and reconnect the gas supply. Open cabinet doors and locate screw holes at right and left and one on the cooktop model number plate. See figures 17 and 18. Holding Unit Down To Countertop IMPORTANT To ...
... brackets. Additional hold-down brackets have been provided. Position the cooktop in the cutout opening. Disconnect electrical supply to appliance, if equipped. 3. If gas line has been disconnected, check for servicing: 1. Please give the complete model and serial numbers of the unit located on the right side ... unit to the counter top. NOTE: A qualified servicer should disconnect and reconnect the gas supply. Open cabinet doors and locate screw holes at right and left and one on the cooktop model number plate. See figures 17 and 18. Holding Unit Down To Countertop IMPORTANT To ...
