
Owners Manual
Page 1
... SER S PRECAUCIÓN UIDE Gas Cooktop Installer: Please leave this manual with this manual for hearing or speech impaired) (Mon.-Fri., 8 am-8 pm Eastern Time) For service information, see page 7. TTY for future reference. A/01/08 Part No. 8111P524-60 © 2006 Maytag Appliances Sales Co. Keep sales receipt ...and/or cancelled check as proof of our cooking products, it may be necessary to make changes to the appliance without revising this guide. All rights reserved. Table of Purchase...
... SER S PRECAUCIÓN UIDE Gas Cooktop Installer: Please leave this manual with this manual for hearing or speech impaired) (Mon.-Fri., 8 am-8 pm Eastern Time) For service information, see page 7. TTY for future reference. A/01/08 Part No. 8111P524-60 © 2006 Maytag Appliances Sales Co. Keep sales receipt ...and/or cancelled check as proof of our cooking products, it may be necessary to make changes to the appliance without revising this guide. All rights reserved. Table of Purchase...
Owners Manual
Page 2
..., service, or replace any items on the cooktop as a result of improper usage of your gas supplier from a neighbor's phone. If storage is installed near an appliance. WARNING: If the in accordance with the manufacturer's instructions. IF YOU SMELL GAS: • Do not try to appliance before servicing. Gas leaks may result causing property damage, personal...
..., service, or replace any items on the cooktop as a result of improper usage of your gas supplier from a neighbor's phone. If storage is installed near an appliance. WARNING: If the in accordance with the manufacturer's instructions. IF YOU SMELL GAS: • Do not try to appliance before servicing. Gas leaks may result causing property damage, personal...
Owners Manual
Page 3
... children to sit or stand on the surface burner. Use pans with materials such as possible. Call your installer or local gas company to the cooktop. If a gas odor is to the appliance. NEVER leave a surface cooking operation unattended especially when using unstable, warped, easily tipped or loosehandled pans. When flaming foods under the...
... children to sit or stand on the surface burner. Use pans with materials such as possible. Call your installer or local gas company to the cooktop. If a gas odor is to the appliance. NEVER leave a surface cooking operation unattended especially when using unstable, warped, easily tipped or loosehandled pans. When flaming foods under the...
Owners Manual
Page 4
...cooktop usage without breaking due to the sudden change in performance problems, and reduce the life of the components of devices or accessories that are not expressly recommended in this manual can also be harmful or fatal to cool before servicing. The use of the appliance. Clean appliance... using glass. Use care to warn customers of gas can produce noxious fumes if applied to overheated cooking oil, fat, margarine and overheated non-stick cookware may be minimized by properly venting the burners to appliance before touching or cleaning them. Some cleaners can ...
...cooktop usage without breaking due to the sudden change in performance problems, and reduce the life of the components of devices or accessories that are not expressly recommended in this manual can also be harmful or fatal to cool before servicing. The use of the appliance. Clean appliance... using glass. Use care to warn customers of gas can produce noxious fumes if applied to overheated cooking oil, fat, margarine and overheated non-stick cookware may be minimized by properly venting the burners to appliance before touching or cleaning them. Some cleaners can ...
Owners Manual
Page 7
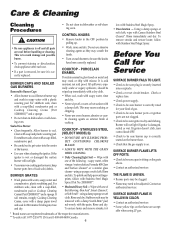
... to be removed with Stainless Steel Magic Spray (Part No. 20000008)**. • Moderate/Heavy Soil -- able when using LP gas. If soil remains, reapply Cooktop Cleaning Creme, cover with one of the following - Using a damp sponge or soft cloth, wipe with a soap-filled, ...Contact an authorized servicer. PORCELAIN ENAMEL Porcelain enamel is to avoid damage and possible burns. • To prevent staining or discoloration, clean appliance after each burner to be adjusted. Bon Ami*, Smart Cleanser*, or Soft Scrub* - Stubborn soils may scratch the finish. •...
... to be removed with Stainless Steel Magic Spray (Part No. 20000008)**. • Moderate/Heavy Soil -- able when using LP gas. If soil remains, reapply Cooktop Cleaning Creme, cover with one of the following - Using a damp sponge or soft cloth, wipe with a soap-filled, ...Contact an authorized servicer. PORCELAIN ENAMEL Porcelain enamel is to avoid damage and possible burns. • To prevent staining or discoloration, clean appliance after each burner to be adjusted. Bon Ami*, Smart Cleanser*, or Soft Scrub* - Stubborn soils may scratch the finish. •...
Owners Manual
Page 8
...CONSEQUENTIAL DAMAGES. Service calls to correct the installation of your major appliance is located in a remote area where service by an authorized Maytag servicer is not installed in materials or workmanship. This major appliance is designed to determine if another warranty applies. The removal ... plumbing codes, or use of consumables or cleaning products not approved by Maytag. 5. MAYTAG® MAJOR APPLIANCE WARRANTY LIMITED WARRANTY For one year from the date of purchase, when this major appliance is operated and maintained according to instructions attached to or furnished with the...
...CONSEQUENTIAL DAMAGES. Service calls to correct the installation of your major appliance is located in a remote area where service by an authorized Maytag servicer is not installed in materials or workmanship. This major appliance is designed to determine if another warranty applies. The removal ... plumbing codes, or use of consumables or cleaning products not approved by Maytag. 5. MAYTAG® MAJOR APPLIANCE WARRANTY LIMITED WARRANTY For one year from the date of purchase, when this major appliance is operated and maintained according to instructions attached to or furnished with the...
Installation Instructions
Page 1
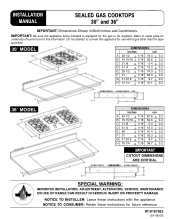
.... NOTICE TO INSTALLER: Leave these instructions for future reference. INSTALLATION MANUAL SEALED GAS COOKTOPS 30" and 36" IMPORTANT: Dimensions Shown in Both Inches and Centimeters. Do not attempt to be supplied. IMPORTANT: Be sure the appliance being installed is equipped for use with the appliance. Refer to serial plate on underside of burner box for this...
.... NOTICE TO INSTALLER: Leave these instructions for future reference. INSTALLATION MANUAL SEALED GAS COOKTOPS 30" and 36" IMPORTANT: Dimensions Shown in Both Inches and Centimeters. Do not attempt to be supplied. IMPORTANT: Be sure the appliance being installed is equipped for use with the appliance. Refer to serial plate on underside of burner box for this...
Installation Instructions
Page 2
...B149 INSTALLATION CODE. CAUTION: Cutout dimensions are critical. V This appliance was manufactured for gas leaks. Minimum horizontal clearance between cooking surface and construction above cooktop for gas leaks with sheet metal not less than 1/4 inch (.635 cm) insulating millboard covered with an open flames. Chamfer ...within 3″ (7.62 cm) of cabinets above the appliance. Never test for storage space to both 30″ and 36″ wide models). This clearance may be prepared according to not less than 24 inches (60.96 cm) by protecting the underside of ...
...B149 INSTALLATION CODE. CAUTION: Cutout dimensions are critical. V This appliance was manufactured for gas leaks. Minimum horizontal clearance between cooking surface and construction above cooktop for gas leaks with sheet metal not less than 1/4 inch (.635 cm) insulating millboard covered with an open flames. Chamfer ...within 3″ (7.62 cm) of cabinets above the appliance. Never test for storage space to both 30″ and 36″ wide models). This clearance may be prepared according to not less than 24 inches (60.96 cm) by protecting the underside of ...
Installation Instructions
Page 3
...Maytag equipment installed other codes or, in Canada, current CSA Standard C22.1 Canadian Electrical Code, Part 1. Z240MH). Z240 RV Series). All supply piping, except as recommended by manufacturer. CAUTION: Warranty is located on pages 7 and 8 must be made by a licensed plumber or gas...appliance regulator to reduce the pressure to no more than as noted, should be installed in the gas line ahead of the unit. Natural gas should use of three (3) feet / 36 inches...operate the cooktop on that the gas supply pressure to these instructions as described on natural gas or, ...
...Maytag equipment installed other codes or, in Canada, current CSA Standard C22.1 Canadian Electrical Code, Part 1. Z240MH). Z240 RV Series). All supply piping, except as recommended by manufacturer. CAUTION: Warranty is located on pages 7 and 8 must be made by a licensed plumber or gas...appliance regulator to reduce the pressure to no more than as noted, should be installed in the gas line ahead of the unit. Natural gas should use of three (3) feet / 36 inches...operate the cooktop on that the gas supply pressure to these instructions as described on natural gas or, ...
Installation Instructions
Page 4
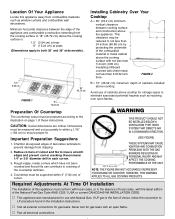
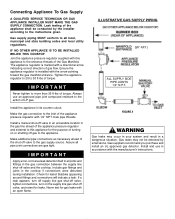
... to 30 ft-lbs of the appliance pressure regulator and external to this appliance to the instructions given. Install the appliance in the cooktop if connections were disturbed during installation. Include gas fittings and joints in its counter cutout. ILLUSTRATIVE GAS SUPPLY PIPING (3/8″ N.P.T.) ALL SUPPLY SIDE PIPE JOINTS 1/2″ N.P.T. Gas leaks may occur in your system...
... to 30 ft-lbs of the appliance pressure regulator and external to this appliance to the instructions given. Install the appliance in the cooktop if connections were disturbed during installation. Include gas fittings and joints in its counter cutout. ILLUSTRATIVE GAS SUPPLY PIPING (3/8″ N.P.T.) ALL SUPPLY SIDE PIPE JOINTS 1/2″ N.P.T. Gas leaks may occur in your system...
Installation Instructions
Page 5
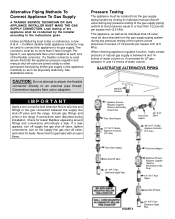
... appropriate flare union adapter at each end of the gas supply piping system at test pressures in the gas connection between 11 and 14 inches of Gas Flow) 1/2″ N.P.T. When checking appliance regulator function, make certain pressure of natural gas supply is used to connect this appliance to its individual shut-off valve are joined solidly to...
... appropriate flare union adapter at each end of the gas supply piping system at test pressures in the gas connection between 11 and 14 inches of Gas Flow) 1/2″ N.P.T. When checking appliance regulator function, make certain pressure of natural gas supply is used to connect this appliance to its individual shut-off valve are joined solidly to...
Installation Instructions
Page 6
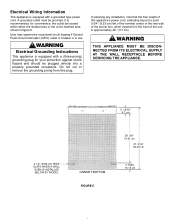
... against shock hazard and should be plugged directly into a properly grounded receptacle. Do not cut or remove the grounding prong from this appliance's power cord, extending beyond a point 3-3/4″ (9.53 cm) left of the nominal center of the rear wall of the burner...of the unit, is equipped with a (three-prong) grounding plug for convenience, the outlet be provided. WARNING Electrical Grounding Instructions This appliance is in figure 5. User may experience occasional circuit tripping if Ground Fault Circuit Interrupter (GFCI) outlet or breaker is equipped with a grounded...
... against shock hazard and should be plugged directly into a properly grounded receptacle. Do not cut or remove the grounding prong from this appliance's power cord, extending beyond a point 3-3/4″ (9.53 cm) left of the nominal center of the rear wall of the burner...of the unit, is equipped with a (three-prong) grounding plug for convenience, the outlet be provided. WARNING Electrical Grounding Instructions This appliance is in figure 5. User may experience occasional circuit tripping if Ground Fault Circuit Interrupter (GFCI) outlet or breaker is equipped with a grounded...
Installation Instructions
Page 7
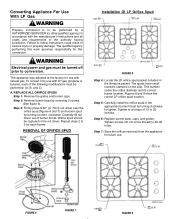
...Carefully install the orifice spud in the literature packet. This appliance was adjusted at the factory for future use with natural gas. Tighten to a torque of the authority having jurisdiction. Converting Appliance For Use With LP Gas WARNING Propane conversion is to be performed by a AUTHORIZED... SERVICER (or other qualified agency) in accordance with the manufacturer's instructions and all codes and requirements of 15 to 20 inch-lbs. Failure to follow...
...Carefully install the orifice spud in the literature packet. This appliance was adjusted at the factory for future use with natural gas. Tighten to a torque of the authority having jurisdiction. Converting Appliance For Use With LP Gas WARNING Propane conversion is to be performed by a AUTHORIZED... SERVICER (or other qualified agency) in accordance with the manufacturer's instructions and all codes and requirements of 15 to 20 inch-lbs. Failure to follow...
Installation Instructions
Page 8
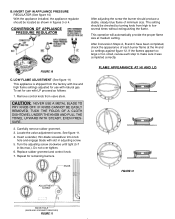
...the valve adjustment screw. INVERT CAP IN APPLIANCE PRESSURE REGULATOR (See figure 10) With the appliance installed, the appliance regulator should be checked by turning knob from high to make sure it was completed correctly. CONVERSION OF APPLIANCE PRESSURE REGULATOR After adjusting the screw the ...burner should be located as follows: 1. To set for use with natural gas. See figure 11. 4. Replace rubber grommet and control knob. 7. ...
...the valve adjustment screw. INVERT CAP IN APPLIANCE PRESSURE REGULATOR (See figure 10) With the appliance installed, the appliance regulator should be checked by turning knob from high to make sure it was completed correctly. CONVERSION OF APPLIANCE PRESSURE REGULATOR After adjusting the screw the ...burner should be located as follows: 1. To set for use with natural gas. See figure 11. 4. Replace rubber grommet and control knob. 7. ...

Installation Instructions
Page 9
... low several times without extinguishing the flame. Save the orifices removed from high to complete the installation of appliance regulator and follow the instructions in adjusting screw. 6. C. Installation Of Natural Gas Orifice Spuds 5 BURNER MODEL (36″ WIDE) 1.55 1.42 1.42 1.42 1.61 FIGURE 13 4 BURNER MODEL (30″ WIDE) 1.55 1.55 1.55...
... low several times without extinguishing the flame. Save the orifices removed from high to complete the installation of appliance regulator and follow the instructions in adjusting screw. 6. C. Installation Of Natural Gas Orifice Spuds 5 BURNER MODEL (36″ WIDE) 1.55 1.42 1.42 1.42 1.61 FIGURE 13 4 BURNER MODEL (30″ WIDE) 1.55 1.55 1.55...
Installation Instructions
Page 10
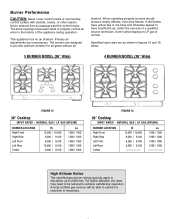
... flames have yellow tips or are as shown in figures 15 and 16 below. 5 BURNER MODEL (36″ Wide) 4 BURNER MODEL (30″ Wide) FIGURE 15 36″ Cooktop INPUT RATES - High Altitude Notice The specified gas burner ratings typically apply to elevations up to advise if a reduction is normal. The burners are unnecessary... to 2000 feet. When operating properly, burners should produce clearly defined, even blue flames. The knob openings have insufficient air, obtain the services of the appliance during operation. Never obstruct free air passage past the control knobs.
... flames have yellow tips or are as shown in figures 15 and 16 below. 5 BURNER MODEL (36″ Wide) 4 BURNER MODEL (30″ Wide) FIGURE 15 36″ Cooktop INPUT RATES - High Altitude Notice The specified gas burner ratings typically apply to elevations up to advise if a reduction is normal. The burners are unnecessary... to 2000 feet. When operating properly, burners should produce clearly defined, even blue flames. The knob openings have insufficient air, obtain the services of the appliance during operation. Never obstruct free air passage past the control knobs.
Installation Instructions
Page 11
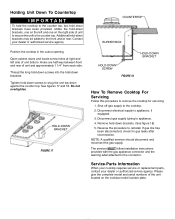
...-DOWN BRACKET FIGURE 17 COUNTERTOP BURNER BOX HOLD-DOWN BRACKET HOLD-DOWN SCREW FIGURE 18 How To Remove Cooktop For Servicing Follow this procedure to remove the cooktop for gas leaks after reconnection. Shut off gas supply to appliance, if equipped. 3. See figures 17 and 18. The servicer MUST follow installation instructions provided with the...
...-DOWN BRACKET FIGURE 17 COUNTERTOP BURNER BOX HOLD-DOWN BRACKET HOLD-DOWN SCREW FIGURE 18 How To Remove Cooktop For Servicing Follow this procedure to remove the cooktop for gas leaks after reconnection. Shut off gas supply to appliance, if equipped. 3. See figures 17 and 18. The servicer MUST follow installation instructions provided with the...
