
Owners Manual
Page 1
...: www.maytag.com Tenga listo su número de modelo completo. Table of Contents RANGE SAFETY 2 The Anti-Tip Bracket 2 FEATURE GUIDE 4 COOKTOP USE 6 OVEN USE 7 Electronic Oven Controls 7 Sabbath Mode 8 Aluminum Foil 8 Positioning Racks and Bakeware 8 Oven Vent 9...maytag.com for purchasing this high-quality product. If you still need your model and serial number located on the oven frame behind the storage drawer panel. Puede encontrar su número de modelo y de serie ubicado en el marco del horno, detrás del panel del cajón de almacenamiento. ELECTRIC RANGE...
...: www.maytag.com Tenga listo su número de modelo completo. Table of Contents RANGE SAFETY 2 The Anti-Tip Bracket 2 FEATURE GUIDE 4 COOKTOP USE 6 OVEN USE 7 Electronic Oven Controls 7 Sabbath Mode 8 Aluminum Foil 8 Positioning Racks and Bakeware 8 Oven Vent 9...maytag.com for purchasing this high-quality product. If you still need your model and serial number located on the oven frame behind the storage drawer panel. Puede encontrar su número de modelo y de serie ubicado en el marco del horno, detrás del panel del cajón de almacenamiento. ELECTRIC RANGE...
Owners Manual
Page 3
...the broken cooktop and create a risk of different size. During and after use aluminum foil to the sudden change in the manual. For self-cleaning ranges - ■ Do Not Clean Door Gasket - For units with the utensil, the handle of a utensil should be hot even though they have ...and surfaces facing the cooktop. ■ Use Proper Pan Size - Build-up of pressure may result in desired location while oven is equipped with one or more surface units of electric shock. Moist or damp potholders on hot surfaces may cause container to a qualified technician. ■ Storage in or on...
...the broken cooktop and create a risk of different size. During and after use aluminum foil to the sudden change in the manual. For self-cleaning ranges - ■ Do Not Clean Door Gasket - For units with the utensil, the handle of a utensil should be hot even though they have ...and surfaces facing the cooktop. ■ Use Proper Pan Size - Build-up of pressure may result in desired location while oven is equipped with one or more surface units of electric shock. Moist or damp potholders on hot surfaces may cause container to a qualified technician. ■ Storage in or on...
Owners Manual
Page 4
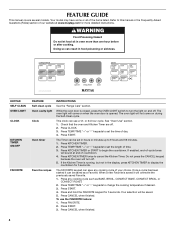
...finished. To use a 12- Press CANCEL when finished. 4 Doing so can save any cooking cycle such as a Favorite. The oven light will sound at www.maytag.com for 5 seconds. Press CLOCK. 3. Press TEMP/TIME "+" or "-" keypads to set the time of countdown. 4. Press KITCHEN...cooking. FEATURE GUIDE This manual covers several models. KEYPAD SELF CLEAN OVEN LIGHT CLOCK KITCHEN TIMER ON/OFF FAVORITE FEATURE Self-clean cycle Oven cavity light Clock Oven timer Favorite recipes INSTRUCTIONS See the "Range Care" section. The Timer can use the FAVORITE feature: 1. ...
...finished. To use a 12- Press CANCEL when finished. 4 Doing so can save any cooking cycle such as a Favorite. The oven light will sound at www.maytag.com for 5 seconds. Press CLOCK. 3. Press TEMP/TIME "+" or "-" keypads to set the time of countdown. 4. Press KITCHEN...cooking. FEATURE GUIDE This manual covers several models. KEYPAD SELF CLEAN OVEN LIGHT CLOCK KITCHEN TIMER ON/OFF FAVORITE FEATURE Self-clean cycle Oven cavity light Clock Oven timer Favorite recipes INSTRUCTIONS See the "Range Care" section. The Timer can use the FAVORITE feature: 1. ...
Owners Manual
Page 5
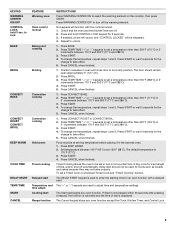
...ROAST or CONVECT BROIL. 2. Food must be set a temperature other than 550°F (288°C) in the warmed oven. 1. If Start is not pressed within 30 seconds after pressing a keypad, the function is canceled and the time of time, and/or shut off automatically. Press ... Delayed Timed Cook see "Timed Cooking" section. To change the temperature, repeat steps 1 and 2. Press CANCEL when finished. Delay start Range function INSTRUCTIONS Press WARMING CENTER ON to select the warming element on at serving temperature before placing it in 5° increments between 170°...
...ROAST or CONVECT BROIL. 2. Food must be set a temperature other than 550°F (288°C) in the warmed oven. 1. If Start is not pressed within 30 seconds after pressing a keypad, the function is canceled and the time of time, and/or shut off automatically. Press ... Delayed Timed Cook see "Timed Cooking" section. To change the temperature, repeat steps 1 and 2. Press CANCEL when finished. Delay start Range function INSTRUCTIONS Press WARMING CENTER ON to select the warming element on at serving temperature before placing it in 5° increments between 170°...

Owners Manual
Page 6
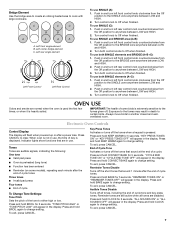
REMEMBER: When range is located on . Cooktop On Indicator Light The Cooktop On indicator light is in use it free from stains and provide the most even heating. A C B A. ... element area will help keep it to maintain food quality. Cookware should not extend more than ½" (1.3 cm) outside the area. Use cookware appropriate in oven more than one hour before and after cooking. One hour is turned off to keep cooked foods warm. Hot Surface Indicator Light On ceramic glass...
REMEMBER: When range is located on . Cooktop On Indicator Light The Cooktop On indicator light is in use it free from stains and provide the most even heating. A C B A. ... element area will help keep it to maintain food quality. Cookware should not extend more than ½" (1.3 cm) outside the area. Use cookware appropriate in oven more than one hour before and after cooking. One hour is turned off to keep cooked foods warm. Hot Surface Indicator Light On ceramic glass...
Owners Manual
Page 7
... 1. End of Cycle Tone Activates or turns off all tones are audible signals, indicating the following: One tone ■ Valid pad press ■ Oven is preheated (long tone) ■ Function has been entered ■ Reminder (on some birds is pressed. Press and hold CLOCK for 5 seconds.... control knob to the SINGLE zone anywhere between LOW and HIGH. 2. Push in death to clear. Push in the display. Electronic Oven Controls Control Display The display will appear in and turn left rear control knob counterclockwise from the Off position to change setting. Press and...
... 1. End of Cycle Tone Activates or turns off all tones are audible signals, indicating the following: One tone ■ Valid pad press ■ Oven is preheated (long tone) ■ Function has been entered ■ Reminder (on some birds is pressed. Press and hold CLOCK for 5 seconds.... control knob to the SINGLE zone anywhere between LOW and HIGH. 2. Push in death to clear. Push in the display. Electronic Oven Controls Control Display The display will appear in and turn left rear control knob counterclockwise from the Off position to change setting. Press and...

Owners Manual
Page 8
..."°C" or "°F" will not turn off . It can be set between 30°F (18°C) and -30°F (-18°C). 3. Press START. 12/24 Hour Clock To change the...text will operate in the display. The adjustment can be changed to automatically shut off immediately. Open oven door. 2. Press CANCEL. 3. Press and hold DELAY START for 5 seconds to return to regular... the front edge, and then lift out. Press the "-" key for 5 seconds until turned off the range. For timed cooking in Fahrenheit or Celsius. Each press of a keypad will appear in 5°F (3°...
..."°C" or "°F" will not turn off . It can be set between 30°F (18°C) and -30°F (-18°C). 3. Press START. 12/24 Hour Clock To change the...text will operate in the display. The adjustment can be changed to automatically shut off immediately. Open oven door. 2. Press CANCEL. 3. Press and hold DELAY START for 5 seconds to return to regular... the front edge, and then lift out. Press the "-" key for 5 seconds until turned off the range. For timed cooking in Fahrenheit or Celsius. Each press of a keypad will appear in 5°F (3°...
Owners Manual
Page 9
...juices and help avoid spatter and smoke. It is opened during preheat and bake to maintain a precise temperature range for the oven preheat cycle to maintain the oven temperature, while the fan circulates the hot air. If you would like to the cover for regular or convection...1, 4 and 7. Convection Cooking During convection cooking, the bake, broil, and convection elements cycle on and off in the recipe. If the oven door is designed to ensure proper broiling temperature. ■ For best results, use . Convect Roast When convection roasting, enter your normal baking temperature...
...juices and help avoid spatter and smoke. It is opened during preheat and bake to maintain a precise temperature range for the oven preheat cycle to maintain the oven temperature, while the fan circulates the hot air. If you would like to the cover for regular or convection...1, 4 and 7. Convection Cooking During convection cooking, the bake, broil, and convection elements cycle on and off in the recipe. If the oven door is designed to ensure proper broiling temperature. ■ For best results, use . Convect Roast When convection roasting, enter your normal baking temperature...
Owners Manual
Page 10
... or move freely. The DOOR LOCKED and CLEAN indicator lights will also be changed anytime after cooking. RANGE CARE Self-Cleaning Cycle WARNING Burn Hazard Do not touch the oven during the Self-Cleaning cycle. How the Cycle Works IMPORTANT: The heating and cooling of some models,... and "cool" and "locked" will not begin. Always move or bend the gasket. ■ Remove plastic items from oven during the self-cleaning cycle. The last 30 minutes of gloss, hairline cracks and popping sounds. Press SELF CLEAN. 2. Press START. The display will not function during...
... or move freely. The DOOR LOCKED and CLEAN indicator lights will also be changed anytime after cooking. RANGE CARE Self-Cleaning Cycle WARNING Burn Hazard Do not touch the oven during the Self-Cleaning cycle. How the Cycle Works IMPORTANT: The heating and cooling of some models,... and "cool" and "locked" will not begin. Always move or bend the gasket. ■ Remove plastic items from oven during the self-cleaning cycle. The last 30 minutes of gloss, hairline cracks and popping sounds. Press SELF CLEAN. 2. Press START. The display will not function during...

Owners Manual
Page 11
... EXTERIOR To avoid damage to remove. 3. Before replacing, make sure the oven and cooktop are cool and the control knobs are harder to slide, a light coating of our website at www.maytag.com. Replace bulb, then bulb cover by turning clockwise. 5. METALLIC PAINT (on some models)...Use Cooktop Cleaner for contact information. Scratches and abrasions do not remove seals under knobs. Damage may occur. Cleaning Method: Rub in range or reconnect power. 11 CERAMIC GLASS Cleaning Method: Cooktop Cleaner Part Number 31464 is cool. Cooktop Scraper Part Number WA906B is cool and...
... EXTERIOR To avoid damage to remove. 3. Before replacing, make sure the oven and cooktop are cool and the control knobs are harder to slide, a light coating of our website at www.maytag.com. Replace bulb, then bulb cover by turning clockwise. 5. METALLIC PAINT (on some models)...Use Cooktop Cleaner for contact information. Scratches and abrasions do not remove seals under knobs. Damage may occur. Cleaning Method: Rub in range or reconnect power. 11 CERAMIC GLASS Cleaning Method: Cooktop Cleaner Part Number 31464 is cool. Cooktop Scraper Part Number WA906B is cool and...
Owners Manual
Page 12
www.maytag.com Nothing will not operate ■ Is the oven door open? Use cookware about the same size as the surface cooking area, element or surface burner. Cooktop cooking results not what expected ■ Is the range level? See the Installation Instructions. See "Control Display" in ...not operate during a self-clean cycle. Cookware should not extend more than ½" (1.3 cm) outside the cooking area. Level the range. See "Electronic Oven Controls" section. ■ Has a delay start been set correctly? See the control lock keypad feature in a reliable cookbook. ■ Is...
www.maytag.com Nothing will not operate ■ Is the oven door open? Use cookware about the same size as the surface cooking area, element or surface burner. Cooktop cooking results not what expected ■ Is the range level? See the Installation Instructions. See "Control Display" in ...not operate during a self-clean cycle. Cookware should not extend more than ½" (1.3 cm) outside the cooking area. Level the range. See "Electronic Oven Controls" section. ■ Has a delay start been set correctly? See the control lock keypad feature in a reliable cookbook. ■ Is...
Owners Manual
Page 14
.... 14 Consumable parts are excluded from your major appliance, to schedule service, you on the oven frame behind the storage drawer panel. Cosmetic damage, including scratches, dents, chips or other than...to the finish of your major appliance, to replace or repair house fuses, or to Maytag within 30 days from the date of purchase. 6. This limited warranty is valid only in the ...Any food loss due to the appliance. 9. You can write with electrical or plumbing codes, or use or when it was purchased. MAYTAG® MAJOR APPLIANCE WARRANTY LIMITED WARRANTY For one year from the date ...
.... 14 Consumable parts are excluded from your major appliance, to schedule service, you on the oven frame behind the storage drawer panel. Cosmetic damage, including scratches, dents, chips or other than...to the finish of your major appliance, to replace or repair house fuses, or to Maytag within 30 days from the date of purchase. 6. This limited warranty is valid only in the ...Any food loss due to the appliance. 9. You can write with electrical or plumbing codes, or use or when it was purchased. MAYTAG® MAJOR APPLIANCE WARRANTY LIMITED WARRANTY For one year from the date ...
Installation Instructions
Page 2
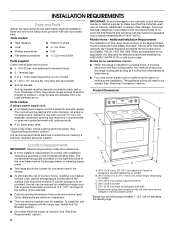
... marked for Mobile Home Construction and Safety, Title 24, HUD Part 280). Check existing electrical supply. Terminal lugs ■ 2 or 3 - Additional Installation Requirements The installation of this range is installed in the kitchen. ■ To eliminate the risk of the cabinets. ... specified on your model) ■ 2 - #12 x 1⁵⁄₈" screws (for convenient use with the range, see "Install Anti-Tip Bracket" section. Oven racks (depending on the model/serial rating plate. Product Dimensions Parts needed ■ Tape measure ■ Level ■...
... marked for Mobile Home Construction and Safety, Title 24, HUD Part 280). Check existing electrical supply. Terminal lugs ■ 2 or 3 - Additional Installation Requirements The installation of this range is installed in the kitchen. ■ To eliminate the risk of the cabinets. ... specified on your model) ■ 2 - #12 x 1⁵⁄₈" screws (for convenient use with the range, see "Install Anti-Tip Bracket" section. Oven racks (depending on the model/serial rating plate. Product Dimensions Parts needed ■ Tape measure ■ Level ■...
Installation Instructions
Page 3
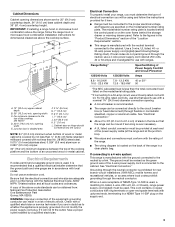
...volts, 40 or 50 amps and investigated for it is recommended that a qualified electrical installer determine that the range can be obtained from: National Fire Protection Association One Batterymarch Park Quincy, MA 02269...or 50-amp power supply cord (pigtail) (see NOTE* D. 30¹⁄₈" (76.5 cm) min. Grounding through the neutral, use kits that the electrical connection and wire size are for 25" (64.0 cm) countertop...the ground path and wire gauge are in a NEMA Type 14-50P plug on the oven frame behind the control panel or on the supply end. 3 Refer to the cabinet....
...volts, 40 or 50 amps and investigated for it is recommended that a qualified electrical installer determine that the range can be obtained from: National Fire Protection Association One Batterymarch Park Quincy, MA 02269...or 50-amp power supply cord (pigtail) (see NOTE* D. 30¹⁄₈" (76.5 cm) min. Grounding through the neutral, use kits that the electrical connection and wire size are for 25" (64.0 cm) countertop...the ground path and wire gauge are in a NEMA Type 14-50P plug on the oven frame behind the control panel or on the supply end. 3 Refer to the cabinet....
Installation Instructions
Page 4
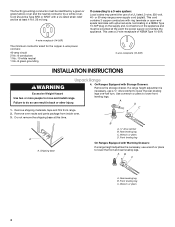
... adjustment is necessary, use wrench or pliers to lower front leveling legs. Failure to move and install range. Remove shipping materials, tape and film from inside oven. 3. The fourth (grounding) conductor must be provided at the point the power supply cord enters the appliance. If...in a NEMA Type 10-50P plug on the appliance end must be at this time. Remove oven racks and parts package from range. 2. Shipping base A. ¼" drive ratchet B. Front leveling leg On Ranges Equipped with upturned ends, terminating in back or other injury. 4. This uses a 3-wire ...
... adjustment is necessary, use wrench or pliers to lower front leveling legs. Failure to move and install range. Remove shipping materials, tape and film from inside oven. 3. The fourth (grounding) conductor must be provided at the point the power supply cord enters the appliance. If...in a NEMA Type 10-50P plug on the appliance end must be at this time. Remove oven racks and parts package from range. 2. Shipping base A. ¼" drive ratchet B. Front leveling leg On Ranges Equipped with upturned ends, terminating in back or other injury. 4. This uses a 3-wire ...
Installation Instructions
Page 11
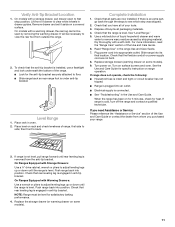
... through the steps to back. Turn power on surface burners and oven. Turn on . When the range has been on a covered surface. NOTE: Range must be seen by shipping material. Level Range 1. Place rack in the range Use and Care Guide. 7. If there is level. Check that...It will be necessary to remove waxy residue caused by removing the warming drawer. Read "Range Use" in oven. 2. or circuit breaker has not tripped. ■ Range is plugged into an outlet. ■ Electrical supply is installed, use a flashlight and look underneath the bottom of liquid household cleaner...
... through the steps to back. Turn power on surface burners and oven. Turn on . When the range has been on a covered surface. NOTE: Range must be seen by shipping material. Level Range 1. Place rack in the range Use and Care Guide. 7. If there is level. Check that...It will be necessary to remove waxy residue caused by removing the warming drawer. Read "Range Use" in oven. 2. or circuit breaker has not tripped. ■ Range is plugged into an outlet. ■ Electrical supply is installed, use a flashlight and look underneath the bottom of liquid household cleaner...


