
Owners Manual
Page 1
... 12 ACCESSORIES 13 WARRANTY 14 W10239459A If you still need your model and serial number located on the oven frame behind the storage drawer panel. You will need assistance, call us at www.maytag.com for purchasing this high-quality product. Puede encontrar su n&#...250;mero de modelo y de serie ubicado en el marco del horno, detrás del panel del cajón de almacenamiento. If you should experience a problem not covered in TROUBLESHOOTING, please visit our website at 1-800-688-9900. ELECTRIC RANGE...
... 12 ACCESSORIES 13 WARRANTY 14 W10239459A If you still need your model and serial number located on the oven frame behind the storage drawer panel. You will need assistance, call us at www.maytag.com for purchasing this high-quality product. Puede encontrar su n&#...250;mero de modelo y de serie ubicado en el marco del horno, detrás del panel del cajón de almacenamiento. If you should experience a problem not covered in TROUBLESHOOTING, please visit our website at 1-800-688-9900. ELECTRIC RANGE...
Owners Manual
Page 4
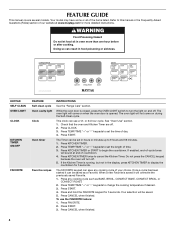
FEATURE GUIDE This manual covers several models. Your model may have some or all of your choice. This clock can use the FAVORITE feature:... the countdown. Press START. If enabled, end-of-cycle tones will sound at end of our website at www.maytag.com for 5 seconds. If the Kitchen Timer is closed, press the OVEN LIGHT switch to display the countdown for... KITCHEN TIMER ON/OFF FAVORITE FEATURE Self-clean cycle Oven cavity light Clock Oven timer Favorite recipes INSTRUCTIONS See the "Range Care" section. or 24-hour cycle. Press TEMP/TIME "+" or "-" keypads to set the time of time....
FEATURE GUIDE This manual covers several models. Your model may have some or all of your choice. This clock can use the FAVORITE feature:... the countdown. Press START. If enabled, end-of-cycle tones will sound at end of our website at www.maytag.com for 5 seconds. If the Kitchen Timer is closed, press the OVEN LIGHT switch to display the countdown for... KITCHEN TIMER ON/OFF FAVORITE FEATURE Self-clean cycle Oven cavity light Clock Oven timer Favorite recipes INSTRUCTIONS See the "Range Care" section. or 24-hour cycle. Press TEMP/TIME "+" or "-" keypads to set the time of time....

Owners Manual
Page 6
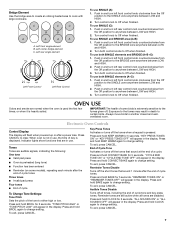
... light is located on . A C B A. Use the Warming Center element to heat cold foods. Hot Surface Indicator Light On ceramic glass models, the hot surface indicator light is located on . Use cookware appropriate in the same way as any surface cooking area is too hot to .... 6 Cookware should not extend more than ½" (1.3 cm) outside the area. Dual C. REMEMBER: When range is too hot to setting. Single Speed Heat™ Cooking Zone (on some models) during the Self-Cleaning cycle, the entire cooktop area may cycle on , the Cooktop On indicator light will...
... light is located on . A C B A. Use the Warming Center element to heat cold foods. Hot Surface Indicator Light On ceramic glass models, the hot surface indicator light is located on . Use cookware appropriate in the same way as any surface cooking area is too hot to .... 6 Cookware should not extend more than ½" (1.3 cm) outside the area. Dual C. REMEMBER: When range is too hot to setting. Single Speed Heat™ Cooking Zone (on some models) during the Self-Cleaning cycle, the entire cooktop area may cycle on , the Cooktop On indicator light will...
Owners Manual
Page 7
... the Off position to Off when finished. Turn both control knobs to the SINGLE zone anywhere between LOW and HIGH. 2. IMPORTANT: The health of some models), repeating each minute after the end-of-cycle tones Three tones ■ Invalid pad press Four tones ■ End of cycle To Change Tone Settings...
... the Off position to Off when finished. Turn both control knobs to the SINGLE zone anywhere between LOW and HIGH. 2. IMPORTANT: The health of some models), repeating each minute after the end-of-cycle tones Three tones ■ Invalid pad press Four tones ■ End of cycle To Change Tone Settings...
Owners Manual
Page 9
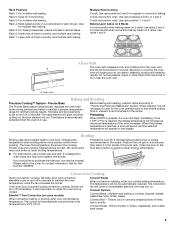
Also for the oven preheat cycle to maintain a precise temperature range for most broiling. Rack 1: Large cuts of the oven rack. Oven Vent A The oven vent releases hot air and moisture from the oven, and should ... grid in a broiler pan, then place it in intervals. If the oven door is pressed, the oven will not. The control will turn on some models) When convection baking or broiling, enter your normal baking temperature. Convect Options Convect Bake - Thicker cuts or unevenly shaped pieces of meat or poultry, and...
Also for the oven preheat cycle to maintain a precise temperature range for most broiling. Rack 1: Large cuts of the oven rack. Oven Vent A The oven vent releases hot air and moisture from the oven, and should ... grid in a broiler pan, then place it in intervals. If the oven door is pressed, the oven will not. The control will turn on some models) When convection baking or broiling, enter your normal baking temperature. Convect Options Convect Bake - Thicker cuts or unevenly shaped pieces of meat or poultry, and...
Owners Manual
Page 10
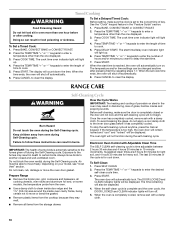
... Cycle WARNING Burn Hazard Do not touch the oven during the Self-Cleaning cycle. When the oven is time adjustable between 2 hours 30 minutes and 4 hours 30 minutes in 15-minute increments. Press TEMP/TIME "+" or "-" keypads to clear the display. Press START. The start time. 7.... models, the temperature probe from oven during the Self-Cleaning cycle. Timed Cooking WARNING Food Poisoning Hazard Do not let food sit in oven more than one hour before it has completely cooled. To stop the self-cleaning cycle at anytime, press the Cancel keypad. Prepare Range ...
... Cycle WARNING Burn Hazard Do not touch the oven during the Self-Cleaning cycle. When the oven is time adjustable between 2 hours 30 minutes and 4 hours 30 minutes in 15-minute increments. Press TEMP/TIME "+" or "-" keypads to clear the display. Press START. The start time. 7.... models, the temperature probe from oven during the Self-Cleaning cycle. Timed Cooking WARNING Food Poisoning Hazard Do not let food sit in oven more than one hour before it has completely cooled. To stop the self-cleaning cycle at anytime, press the Cancel keypad. Prepare Range ...

Owners Manual
Page 11
...WA906B is still warm. Store razor blades out of the reach of our website at www.maytag.com. When replacing knobs, make sure the oven and cooktop are cool and the control ... may affect the finish. For additional information, you can be cleaned as soon as the entire range is a standard 40-watt appliance bulb. Heavy soil, dark streaks, specks and discoloration ■...: ■ Glass cleaner, mild liquid cleaner or nonabrasive scrubbing pad: Gently clean around the model and serial number plate because scrubbing may occur to wear oven mitts while cleaning the cooktop. Burned...
...WA906B is still warm. Store razor blades out of the reach of our website at www.maytag.com. When replacing knobs, make sure the oven and cooktop are cool and the control ... may affect the finish. For additional information, you can be cleaned as soon as the entire range is a standard 40-watt appliance bulb. Heavy soil, dark streaks, specks and discoloration ■...: ■ Glass cleaner, mild liquid cleaner or nonabrasive scrubbing pad: Gently clean around the model and serial number plate because scrubbing may occur to wear oven mitts while cleaning the cooktop. Burned...
Owners Manual
Page 12
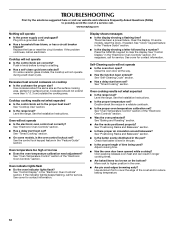
...while cooking? See the Installation Instructions. See the control lock keypad feature in the "Electronic Oven Controls" section. On some models, reset the clock, if needed. Level the range. Oven cooking results not what expected ■ Is the control knob set ? Use cookware about the same size as ...is the oven control lockout set ? See "Control Display" in the pan. ■ Is the proper length of time being used? www.maytag.com Nothing will not operate ■ Is the oven door open? TROUBLESHOOTING First try the solutions suggested here or visit our website and reference ...
...while cooking? See the Installation Instructions. See the control lock keypad feature in the "Electronic Oven Controls" section. On some models, reset the clock, if needed. Level the range. Oven cooking results not what expected ■ Is the control knob set ? Use cookware about the same size as ...is the oven control lockout set ? See "Control Display" in the pan. ■ Is the proper length of time being used? www.maytag.com Nothing will not operate ■ Is the oven door open? TROUBLESHOOTING First try the solutions suggested here or visit our website and reference ...

Owners Manual
Page 13
Canning Unit Kit (coil element models) Order Part Number 242905 Cooktop Care Kit (includes cleaner, protectant, and applicator pads) Order Part Number 31605 Cooktop Protectant Order Part Number 31463 ACCESSORIES Cooktop Cleaner (ceramic glass models) Order Part Number 31464 Cooktop Scraper (ceramic glass models) Order Part Number WA906B Stainless Steel Cleaner and Polish (stainless steel models) Order Part Number 31462 All-Purpose Appliance Cleaner Order Part Number 31682 Split-Rack with Removable Insert Order Part Number 4396927 Broiler Pan Order Part Number 4396923 13
Canning Unit Kit (coil element models) Order Part Number 242905 Cooktop Care Kit (includes cleaner, protectant, and applicator pads) Order Part Number 31605 Cooktop Protectant Order Part Number 31463 ACCESSORIES Cooktop Cleaner (ceramic glass models) Order Part Number 31464 Cooktop Scraper (ceramic glass models) Order Part Number WA906B Stainless Steel Cleaner and Polish (stainless steel models) Order Part Number 31462 All-Purpose Appliance Cleaner Order Part Number 31682 Split-Rack with Removable Insert Order Part Number 4396927 Broiler Pan Order Part Number 4396923 13
Owners Manual
Page 14
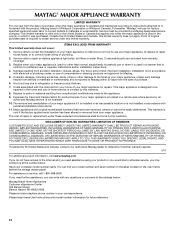
... improper installation, installation not in accordance with electrical or plumbing codes, or use of Whirlpool Corporation or Whirlpool Canada LP (hereafter "Maytag") will pay for factory specified parts and repair... future reference. 14 Service calls to obtain service under these User Instructions and model number information for repairs. Repairs when your major appliance is used in -home... plumbing. 2. This warranty is reported to schedule service, you would like to Maytag within 30 days from warranty coverage. 3. DISCLAIMER OF IMPLIED WARRANTIES; LIMITATION OF REMEDIES CUSTOMER'S...
... improper installation, installation not in accordance with electrical or plumbing codes, or use of Whirlpool Corporation or Whirlpool Canada LP (hereafter "Maytag") will pay for factory specified parts and repair... future reference. 14 Service calls to obtain service under these User Instructions and model number information for repairs. Repairs when your major appliance is used in -home... plumbing. 2. This warranty is reported to schedule service, you would like to Maytag within 30 days from warranty coverage. 3. DISCLAIMER OF IMPLIED WARRANTIES; LIMITATION OF REMEDIES CUSTOMER'S...
Installation Instructions
Page 2
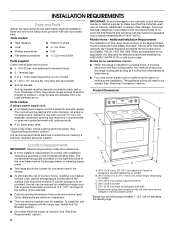
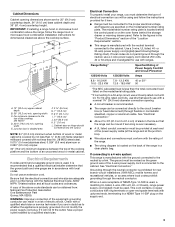
... drawer panel. To install the antitip bracket shipped with installation clearances specified on your model) ■ 2 - #12 x 1⁵⁄₈" screws (for use in the kitchen. ■ To eliminate the risk of this range is recommended that all electrical connections be installed. Additional Installation Requirements The installation of burns or fire by a licensed...
... drawer panel. To install the antitip bracket shipped with installation clearances specified on your model) ■ 2 - #12 x 1⁵⁄₈" screws (for use in the kitchen. ■ To eliminate the risk of this range is recommended that all electrical connections be installed. Additional Installation Requirements The installation of burns or fire by a licensed...
Installation Instructions
Page 3
... through the neutral conductor is prohibited for dimensional clearances above the range, follow the instructions provided for it here. ■ Range must conform with the rating of electric shock. A C B D GF FG H J IK E L A. 13" (33.0 cm) upper cabinet depth B. 30" (76.2 cm) min. The model/serial number rating plate is manufactured with upturned ends, terminating in...
... through the neutral conductor is prohibited for dimensional clearances above the range, follow the instructions provided for it here. ■ Range must conform with the rating of electric shock. A C B D GF FG H J IK E L A. 13" (33.0 cm) upper cabinet depth B. 30" (76.2 cm) min. The model/serial number rating plate is manufactured with upturned ends, terminating in...
Installation Instructions
Page 11
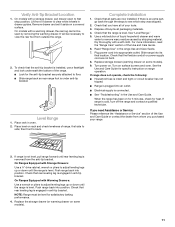
... cord into an outlet. ■ Electrical supply is plugged into appropriate outlet. When the range has been on a covered surface. On Ranges Equipped with Warming Drawers: Use a wrench or pliers to floor. ■ Slide range back so rear range foot is level. Remove drawer and set...See "Level Range." 5. Read "Range Use" in drawer guides. Turn power on some models). 9. or circuit breaker has not tripped. ■ Range is connected. ■ See "Troubleshooting" in anti-tip bracket. If range is not level, pull range forward until the range is cold, turn off the range and contact...
... cord into an outlet. ■ Electrical supply is plugged into appropriate outlet. When the range has been on a covered surface. On Ranges Equipped with Warming Drawers: Use a wrench or pliers to floor. ■ Slide range back so rear range foot is level. Remove drawer and set...See "Level Range." 5. Read "Range Use" in drawer guides. Turn power on some models). 9. or circuit breaker has not tripped. ■ Range is connected. ■ See "Troubleshooting" in anti-tip bracket. If range is not level, pull range forward until the range is cold, turn off the range and contact...


