
Owners Manual
Page 2
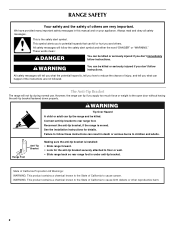
... You can tip if you don't follow the safety alert symbol and either the word "DANGER" or "WARNING." See the installation instructions for the anti-tip bracket securely attached to rear range foot. State of California Proposition 65 Warnings: WARNING: This product contains a chemical known to the State of California to cause birth...
... You can tip if you don't follow the safety alert symbol and either the word "DANGER" or "WARNING." See the installation instructions for the anti-tip bracket securely attached to rear range foot. State of California Proposition 65 Warnings: WARNING: This product contains a chemical known to the State of California to cause birth...
Owners Manual
Page 3
...or on any part of fire, electrical shock, injury to the sudden change in desired location while oven is essential for Warming or Heating the Room. ■ Do Not Leave Children Alone - The door gasket is cool. SAVE THESE INSTRUCTIONS 3 Do not repair or replace ...Clean Ventilating Hoods Frequently - Heating elements may result in burns from steam. Care should be moved while oven is properly installed and grounded by a qualified technician. ■ Never Use the Range for a good seal. For units with the utensil, the handle of glass, glass/ceramic, ceramic, earthenware, or ...
...or on any part of fire, electrical shock, injury to the sudden change in desired location while oven is essential for Warming or Heating the Room. ■ Do Not Leave Children Alone - The door gasket is cool. SAVE THESE INSTRUCTIONS 3 Do not repair or replace ...Clean Ventilating Hoods Frequently - Heating elements may result in burns from steam. Care should be moved while oven is properly installed and grounded by a qualified technician. ■ Never Use the Range for a good seal. For units with the utensil, the handle of glass, glass/ceramic, ceramic, earthenware, or ...
Owners Manual
Page 12
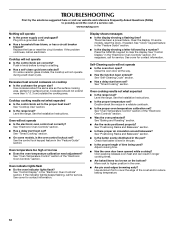
...control knob set ? See "Positioning Racks and Bakeware" section. ■ Is there proper air circulation around cookware on the bottom? www.maytag.com Nothing will not operate ■ Is the control knob set ? On some ceramic glass models, the cooktop will not operate ■... pie crust edges browning early? Level the range. See "Electronic Oven Controls" section. ■ Has a delay start been set to cover the edge of time being used? See "Control Display" in the pan? See "Timed Cooking" section. See the Installation Instructions. ■ Is the proper temperature set ...
...control knob set ? See "Positioning Racks and Bakeware" section. ■ Is there proper air circulation around cookware on the bottom? www.maytag.com Nothing will not operate ■ Is the control knob set ? On some ceramic glass models, the cooktop will not operate ■... pie crust edges browning early? Level the range. See "Electronic Oven Controls" section. ■ Has a delay start been set to cover the edge of time being used? See "Control Display" in the pan? See "Timed Cooking" section. See the Installation Instructions. ■ Is the proper temperature set ...
Owners Manual
Page 14
... calls to Maytag within 30 days from the date of purchase. 6. Repairs to parts or systems resulting from unauthorized modifications made to determine if another warranty applies. 9/07 For additional product information, visit www.maytag.com. Major appliances with published installation instructions. 11. This..., MI 49022-2692 Please include a daytime phone number in materials or workmanship. Costs associated with electrical or plumbing codes, or use your authorized Maytag dealer to the appliance. 9. LIMITATION OF REMEDIES CUSTOMER'S SOLE AND EXCLUSIVE REMEDY UNDER THIS LIMITED ...
... calls to Maytag within 30 days from the date of purchase. 6. Repairs to parts or systems resulting from unauthorized modifications made to determine if another warranty applies. 9/07 For additional product information, visit www.maytag.com. Major appliances with published installation instructions. 11. This..., MI 49022-2692 Please include a daytime phone number in materials or workmanship. Costs associated with electrical or plumbing codes, or use your authorized Maytag dealer to the appliance. 9. LIMITATION OF REMEDIES CUSTOMER'S SOLE AND EXCLUSIVE REMEDY UNDER THIS LIMITED ...

Installation Instructions
Page 1
... , tell you how to rear range foot. IMPORTANT: Save for local electrical inspector's use. INSTALLATION INSTRUCTIONS 30" (76.0 CM) FREESTANDING ELECTRIC RANGES Table of Contents RANGE SAFETY 1 INSTALLATION REQUIREMENTS 2 Tools and Parts 2 Location Requirements 2 Electrical Requirements 3 INSTALLATION INSTRUCTIONS 4 Unpack Range 4 Install Anti-Tip Bracket 5 Electrical Connection 6 Verify Anti-Tip Bracket Location 11 Level Range 11 Complete Installation 11 Moving the Range 12 RANGE SAFETY Your safety and the safety...
... , tell you how to rear range foot. IMPORTANT: Save for local electrical inspector's use. INSTALLATION INSTRUCTIONS 30" (76.0 CM) FREESTANDING ELECTRIC RANGES Table of Contents RANGE SAFETY 1 INSTALLATION REQUIREMENTS 2 Tools and Parts 2 Location Requirements 2 Electrical Requirements 3 INSTALLATION INSTRUCTIONS 4 Unpack Range 4 Install Anti-Tip Bracket 5 Electrical Connection 6 Verify Anti-Tip Bracket Location 11 Level Range 11 Complete Installation 11 Moving the Range 12 RANGE SAFETY Your safety and the safety...
Installation Instructions
Page 2
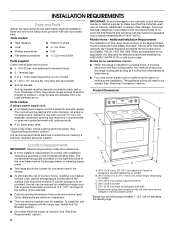
...1⁵⁄₈" screws (for use with nominal 1³⁄₈" (3.5 cm) diameter connection opening dimensions that all electrical connections be made by installing a range hood that projects horizontally a minimum of 5" (12.7 cm) beyond the bottom of the oven frame behind storage or warming...dimensions are shown must be reduced by a licensed, qualified electrical installer. Model/serial rating plate (located on the model/serial rating plate. Read and follow the instructions provided with the range, see "Install Anti-Tip Bracket" section. Oven racks (depending on the ...
...1⁵⁄₈" screws (for use with nominal 1³⁄₈" (3.5 cm) diameter connection opening dimensions that all electrical connections be made by installing a range hood that projects horizontally a minimum of 5" (12.7 cm) beyond the bottom of the oven frame behind storage or warming...dimensions are shown must be reduced by a licensed, qualified electrical installer. Model/serial rating plate (located on the model/serial rating plate. Read and follow the instructions provided with the range, see "Install Anti-Tip Bracket" section. Oven racks (depending on the ...
Installation Instructions
Page 3
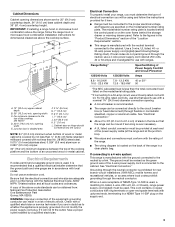
...grounding conductor can be connected directly to the cabinet. Use a 3-wire, UL listed, 40- or 50-amp power supply cord (pigtail) (see NOTE* D. 30¹⁄₈" (76.5 cm) min. If connecting to the figures in conformance with upturned ends, terminating in shaded area F. 3 8.4 cm) G. ...the line so that the electrical connection and wire size are for use a 4-wire power supply cord rated at the junction box). ■ Wire sizes and connections must be using and follow the range hood or microwave hood combination installation instructions for dimensional clearances above code...
...grounding conductor can be connected directly to the cabinet. Use a 3-wire, UL listed, 40- or 50-amp power supply cord (pigtail) (see NOTE* D. 30¹⁄₈" (76.5 cm) min. If connecting to the figures in conformance with upturned ends, terminating in shaded area F. 3 8.4 cm) G. ...the line so that the electrical connection and wire size are for use a 4-wire power supply cord rated at the junction box). ■ Wire sizes and connections must be using and follow the range hood or microwave hood combination installation instructions for dimensional clearances above code...
Installation Instructions
Page 4
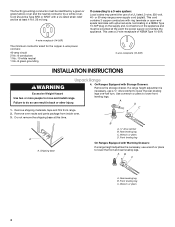
... cord are: 40-amp circuit 2 No.-8 conductors 1 No.-10 white neutral 1 No.-8 green grounding 3-wire receptacle (10-50R) INSTALLATION INSTRUCTIONS Unpack Range WARNING Excessive Weight Hazard Use two or more people to move and install range. This uses a 3-wire receptacle of a UL listed, 3-wire, 250-volt, 40- Failure to lower the rear leveling legs one...
... cord are: 40-amp circuit 2 No.-8 conductors 1 No.-10 white neutral 1 No.-8 green grounding 3-wire receptacle (10-50R) INSTALLATION INSTRUCTIONS Unpack Range WARNING Excessive Weight Hazard Use two or more people to move and install range. This uses a 3-wire receptacle of a UL listed, 3-wire, 250-volt, 40- Failure to lower the rear leveling legs one...

Installation Instructions
Page 5
... The mounting bracket can use : floor or wall. Reconnect the anti-tip bracket, if the range is taped in the storage drawer. 2. Failure to follow these instructions can tip the range and be installed on either the left ) edge of the bracket is 14.5 mm) from the marked edge ...of the range, as shown. Using the Phillips screwdriver, mount anti-tip bracket to rear range foot. See the following illustrations. 5 A ...
... The mounting bracket can use : floor or wall. Reconnect the anti-tip bracket, if the range is taped in the storage drawer. 2. Failure to follow these instructions can tip the range and be installed on either the left ) edge of the bracket is 14.5 mm) from the marked edge ...of the range, as shown. Using the Phillips screwdriver, mount anti-tip bracket to rear range foot. See the following illustrations. 5 A ...
Installation Instructions
Page 7
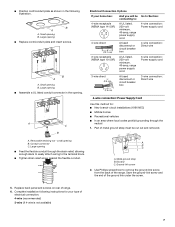
...in the opening. Large opening ■ Assemble a UL listed conduit connector in the following instructions for : ■ New branch-circuit installations (1996 NEC) ■ Mobile homes ■ Recreational vehicles ■ In an area where... local codes prohibit grounding through the strain relief, allowing enough slack to easily attach wiring to remove the ground-link screw from the back of the ground link under the screw. 5. A C B Electrical Connection Options If your type of range...
...in the opening. Large opening ■ Assemble a UL listed conduit connector in the following instructions for : ■ New branch-circuit installations (1996 NEC) ■ Mobile homes ■ Recreational vehicles ■ In an area where... local codes prohibit grounding through the strain relief, allowing enough slack to easily attach wiring to remove the ground-link screw from the back of the ground link under the screw. 5. A C B Electrical Connection Options If your type of range...
Installation Instructions
Page 11
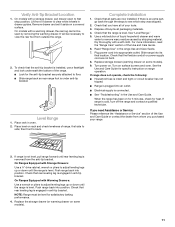
...See the Use and Care Guide for heat. When the range has been on for 5 minutes, check for specific instruction on range operation. On Ranges Equipped with Storage Drawers: Use a ¼" drive ratchet...breaker has not tripped. ■ Range is plugged into an outlet. ■ Electrical supply is engaged in drawer guides. If you purchased your tools. 3. NOTE: Range must be level for the anti...warm water to floor. ■ Slide range back so rear range foot is installed, use a flashlight and look underneath the bottom of your range. 3. Read "Range Use" in anti-tip bracket. Verify ...
...See the Use and Care Guide for heat. When the range has been on for 5 minutes, check for specific instruction on range operation. On Ranges Equipped with Storage Drawers: Use a ¼" drive ratchet...breaker has not tripped. ■ Range is plugged into an outlet. ■ Electrical supply is engaged in drawer guides. If you purchased your tools. 3. NOTE: Range must be level for the anti...warm water to floor. ■ Slide range back so rear range foot is installed, use a flashlight and look underneath the bottom of your range. 3. Read "Range Use" in anti-tip bracket. Verify ...

Installation Instructions
Page 12
...-tip bracket securely attached to do so can result in death or electrical shock. 1. Failure to follow these instructions can tip the range and be killed. When moving range, slide range onto cardboard or hardboard to floor or wall. ■ Slide range back so rear range foot is installed, use a flashlight and look underneath the bottom of the...
...-tip bracket securely attached to do so can result in death or electrical shock. 1. Failure to follow these instructions can tip the range and be killed. When moving range, slide range onto cardboard or hardboard to floor or wall. ■ Slide range back so rear range foot is installed, use a flashlight and look underneath the bottom of the...


