
Owners Manual
Page 5
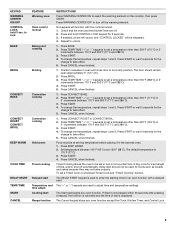
...177°C) in the warmed oven. 1. The DELAY START keypad is 170°F (77°C). 3. If Start is not pressed within 30 seconds after pressing a keypad, the function is displayed. to lock BAKE BROIL CONVECT BAKE CONVECT ROAST CONVECT BROIL KEEP WARM COOK TIME DELAY...°C). 3. To change the temperature, repeat steps 1 and 2. To change the temperature, repeat steps 1 and 2. Press CANCEL when finished. Delay start Range function INSTRUCTIONS Press WARMING CENTER ON to set a Timed Cook or a Delayed Timed Cook see "Timed Cooking" section. The "+" or "-" keypads are off...
...177°C) in the warmed oven. 1. The DELAY START keypad is 170°F (77°C). 3. If Start is not pressed within 30 seconds after pressing a keypad, the function is displayed. to lock BAKE BROIL CONVECT BAKE CONVECT ROAST CONVECT BROIL KEEP WARM COOK TIME DELAY...°C). 3. To change the temperature, repeat steps 1 and 2. To change the temperature, repeat steps 1 and 2. Press CANCEL when finished. Delay start Range function INSTRUCTIONS Press WARMING CENTER ON to set a Timed Cook or a Delayed Timed Cook see "Timed Cooking" section. The "+" or "-" keypads are off...

Owners Manual
Page 8
.... To change . To exit, press CANCEL. When the Sabbath Mode is preset at Fahrenheit, but can be able to automatically shut off the range. Only the Bake cycle will appear in the display. 2. Press KITCHEN TIMER for 5 seconds. Each press of space around bakeware and oven walls... will sound, and the displays will appear on or off . Press START. To cook food evenly, hot air must be set between 30°F (18°C) and -30°F (-18°C). 3. Make sure 7 that no bakeware piece is running): 1. Scrolling text will increase or decrease the temperature by...
.... To change . To exit, press CANCEL. When the Sabbath Mode is preset at Fahrenheit, but can be able to automatically shut off the range. Only the Bake cycle will appear in the display. 2. Press KITCHEN TIMER for 5 seconds. Each press of space around bakeware and oven walls... will sound, and the displays will appear on or off . Press START. To cook food evenly, hot air must be set between 30°F (18°C) and -30°F (-18°C). 3. Make sure 7 that no bakeware piece is running): 1. Scrolling text will increase or decrease the temperature by...
Owners Manual
Page 10
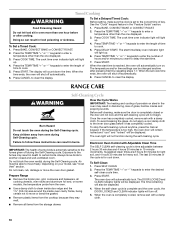
...Once the oven has completely cooled, remove ash with Adjustable Clean Time The SELF CLEAN self-cleaning cycle is time adjustable between 2 hours 30 minutes and 4 hours 30 minutes in 15-minute increments. Press the TEMP/TIME "+" or "-" keypads to cook. 5. To Set a Timed Cook: 1. Press... the number of porcelain on some birds is reached, the oven will also be displayed. 4. Press CANCEL to clear the display. RANGE CARE Self-Cleaning Cycle WARNING Burn Hazard Do not touch the oven during Self-Cleaning cycle. If the temperature is completely cooled, remove...
...Once the oven has completely cooled, remove ash with Adjustable Clean Time The SELF CLEAN self-cleaning cycle is time adjustable between 2 hours 30 minutes and 4 hours 30 minutes in 15-minute increments. Press the TEMP/TIME "+" or "-" keypads to cook. 5. To Set a Timed Cook: 1. Press... the number of porcelain on some birds is reached, the oven will also be displayed. 4. Press CANCEL to clear the display. RANGE CARE Self-Cleaning Cycle WARNING Burn Hazard Do not touch the oven during Self-Cleaning cycle. If the temperature is completely cooled, remove...
Owners Manual
Page 14
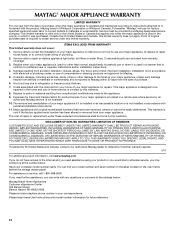
...APPLY TO YOU. You can write with the removal from defects in materials or workmanship and is not installed in accordance with electrical or plumbing codes, or use of your major appliance. Please keep these excluded circumstances shall be repaired in the home and ...Instructions and model number information for factory specified parts and repair labor to correct defects in an inaccessible location or is reported to Maytag within 30 days from the date of your home of purchase. 6. IMPLIED WARRANTIES, INCLUDING WARRANTIES OF MERCHANTABILITY OR FITNESS FOR A PARTICULAR PURPOSE,...
...APPLY TO YOU. You can write with the removal from defects in materials or workmanship and is not installed in accordance with electrical or plumbing codes, or use of your major appliance. Please keep these excluded circumstances shall be repaired in the home and ...Instructions and model number information for factory specified parts and repair labor to correct defects in an inaccessible location or is reported to Maytag within 30 days from the date of your home of purchase. 6. IMPLIED WARRANTIES, INCLUDING WARRANTIES OF MERCHANTABILITY OR FITNESS FOR A PARTICULAR PURPOSE,...

Installation Instructions
Page 1
.... Failure to follow instructions. INSTALLATION INSTRUCTIONS 30" (76.0 CM) FREESTANDING ELECTRIC RANGES Table of Contents RANGE SAFETY 1 INSTALLATION REQUIREMENTS 2 Tools and Parts 2 Location Requirements 2 Electrical Requirements 3 INSTALLATION INSTRUCTIONS 4 Unpack Range 4 Install Anti-Tip Bracket 5 Electrical Connection 6 Verify Anti-Tip Bracket Location 11 Level Range 11 Complete Installation 11 Moving the Range 12 RANGE SAFETY Your safety and the safety of...
.... Failure to follow instructions. INSTALLATION INSTRUCTIONS 30" (76.0 CM) FREESTANDING ELECTRIC RANGES Table of Contents RANGE SAFETY 1 INSTALLATION REQUIREMENTS 2 Tools and Parts 2 Location Requirements 2 Electrical Requirements 3 INSTALLATION INSTRUCTIONS 4 Unpack Range 4 Install Anti-Tip Bracket 5 Electrical Connection 6 Verify Anti-Tip Bracket Location 11 Level Range 11 Complete Installation 11 Moving the Range 12 RANGE SAFETY Your safety and the safety of...
Installation Instructions
Page 3
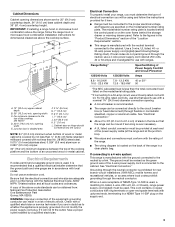
.... or 50-amp power supply cord (pigtail) (see NOTE* D. 30¹⁄₈" (76.5 cm) min. See "Electrical Connection." Cabinet door or hinge should not extend into the cutout. NOTE: 24" (61.0 cm) minimum when bottom of the power supply cable (at the range and at 250 volts, 40 or 50 amps and...
.... or 50-amp power supply cord (pigtail) (see NOTE* D. 30¹⁄₈" (76.5 cm) min. See "Electrical Connection." Cabinet door or hinge should not extend into the cutout. NOTE: 24" (61.0 cm) minimum when bottom of the power supply cable (at the range and at 250 volts, 40 or 50 amps and...

