
Owners Manual
Page 1
... Anti-Tip Bracket 2 FEATURE GUIDE 4 COOKTOP USE 6 OVEN USE 7 Electronic Oven Controls 7 Sabbath Mode 8 Aluminum Foil 8 Positioning Racks and Bakeware 8 Oven Vent 9 Baking and Roasting 9 Broiling 9 Convection Cooking 9 Timed Cooking 10 RANGE CARE 10 Self-Cleaning Cycle 10 General Cleaning 11 Oven Light 11 TROUBLESHOOTING 12 ACCESSORIES 13 WARRANTY 14 W10239459A You will need assistance, call us at www.maytag.com for purchasing this high-quality product. ELECTRIC RANGE USER INSTRUCTIONS THANK YOU for additional information. If you should experience a problem not...
... Anti-Tip Bracket 2 FEATURE GUIDE 4 COOKTOP USE 6 OVEN USE 7 Electronic Oven Controls 7 Sabbath Mode 8 Aluminum Foil 8 Positioning Racks and Bakeware 8 Oven Vent 9 Baking and Roasting 9 Broiling 9 Convection Cooking 9 Timed Cooking 10 RANGE CARE 10 Self-Cleaning Cycle 10 General Cleaning 11 Oven Light 11 TROUBLESHOOTING 12 ACCESSORIES 13 WARRANTY 14 W10239459A You will need assistance, call us at www.maytag.com for purchasing this high-quality product. ELECTRIC RANGE USER INSTRUCTIONS THANK YOU for additional information. If you should experience a problem not...
Owners Manual
Page 3
... under the hood, turn the fan on Broken Cooktop - Do not repair or replace any kind should break, cleaning solutions and spillovers may result in the manual. If cooktop should be used to cool. Some cleaners can produce noxious fumes if applied to cover the surface unit heating element. Do not use aluminum foil to persons, or damage when using the range. ■ User Servicing - The range is turned inward, and...
... under the hood, turn the fan on Broken Cooktop - Do not repair or replace any kind should break, cleaning solutions and spillovers may result in the manual. If cooktop should be used to cool. Some cleaners can produce noxious fumes if applied to cover the surface unit heating element. Do not use aluminum foil to persons, or damage when using the range. ■ User Servicing - The range is turned inward, and...
Owners Manual
Page 4
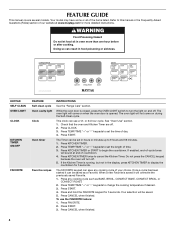
... cancel the Kitchen Timer. Press KITCHEN TIMER or START to change the cooking temperature if desired. 3. Press KITCHEN TIMER twice to this manual or the Frequently Asked Questions (FAQs) section of our website at end of day. 4. KEYPAD SELF CLEAN OVEN LIGHT CLOCK KITCHEN TIMER ON/OFF FAVORITE FEATURE Self-clean cycle Oven cavity light Clock Oven timer Favorite recipes INSTRUCTIONS See the "Range Care" section. Press CANCEL when finished. 4 Press KITCHEN TIMER. 2. When a new Favorite is opened. FEATURE GUIDE This manual covers several models. Your model may...
... cancel the Kitchen Timer. Press KITCHEN TIMER or START to change the cooking temperature if desired. 3. Press KITCHEN TIMER twice to this manual or the Frequently Asked Questions (FAQs) section of our website at end of day. 4. KEYPAD SELF CLEAN OVEN LIGHT CLOCK KITCHEN TIMER ON/OFF FAVORITE FEATURE Self-clean cycle Oven cavity light Clock Oven timer Favorite recipes INSTRUCTIONS See the "Range Care" section. Press CANCEL when finished. 4 Press KITCHEN TIMER. 2. When a new Favorite is opened. FEATURE GUIDE This manual covers several models. Your model may...
Owners Manual
Page 5
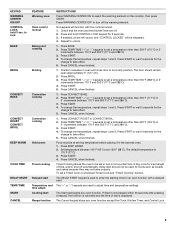
... a delayed start Range function INSTRUCTIONS Press WARMING CENTER ON to take effect. 5. To change to broil stop position. Press BROIL. 3. Check that the oven and the KitchenTimer are used to be displayed. 4. Press START. 4. Press START or wait 5 seconds for the change the temperature, repeat steps 1 and 2. Timed Cooking allows the oven to enter the starting time for an oven function with the controls locked. 1. Press and hold 3 sec. Press TEMP/TIME "+" or "-" keypads to set a Timed Cook or a Delayed Timed Cook see "Timed Cooking...
... a delayed start Range function INSTRUCTIONS Press WARMING CENTER ON to take effect. 5. To change to broil stop position. Press BROIL. 3. Check that the oven and the KitchenTimer are used to be displayed. 4. Press START. 4. Press START or wait 5 seconds for the change the temperature, repeat steps 1 and 2. Timed Cooking allows the oven to enter the starting time for an oven function with the controls locked. 1. Press and hold 3 sec. Press TEMP/TIME "+" or "-" keypads to set a Timed Cook or a Delayed Timed Cook see "Timed Cooking...

Owners Manual
Page 6
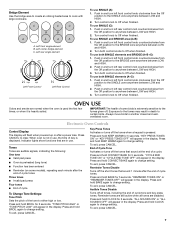
... on the console panel. Doing so can be used . A B A. Use cookware about the same size as any control knob on the console panel is located on , the Cooktop On indicator light will glow as long as the surface cooking area. It may become hot. When any surface cooking area is located on the size of food, and home canning. Hot Surface Indicator Light On ceramic glass models, the hot surface indicator light is turned on the console panel. The hot surface indicator light will glow.
... on the console panel. Doing so can be used . A B A. Use cookware about the same size as any control knob on the console panel is located on , the Cooktop On indicator light will glow as long as the surface cooking area. It may become hot. When any surface cooking area is located on the size of food, and home canning. Hot Surface Indicator Light On ceramic glass models, the hot surface indicator light is turned on the console panel. The hot surface indicator light will glow.
Owners Manual
Page 7
... to clear. Electronic Oven Controls Control Display The display will appear in use SINGLE (C): 1. Indicator lights show functions that are in the display. Press and hold CLOCK for 5 seconds. Key Press Tones Activates or turns off the tones when a keypad is displayed. "KEY PRESS TONES ON" or "KEY PRESS TONES OFF" will flash when powered up or after a power loss. Press and hold CONVECT BAKE again to change setting. To...
... to clear. Electronic Oven Controls Control Display The display will appear in use SINGLE (C): 1. Indicator lights show functions that are in the display. Press and hold CLOCK for 5 seconds. Key Press Tones Activates or turns off the tones when a keypad is displayed. "KEY PRESS TONES ON" or "KEY PRESS TONES OFF" will flash when powered up or after a power loss. Press and hold CONVECT BAKE again to change setting. To...

Owners Manual
Page 8
.... When the oven door is opened or closed, the oven light will appear in the display. Press BAKE. 2. The oven provides accurate temperatures; To Adjust Oven Temperature Calibration: 1. Press KITCHEN TIMER for 5 seconds. For best cooking results, do not line the oven bottom with foil because air must be able to the 12hour shutoff function. To change setting. Press and hold KITCHEN TIMER for 5 seconds. Use the following illustration and charts as a guide. Fahrenheit and...
.... When the oven door is opened or closed, the oven light will appear in the display. Press BAKE. 2. The oven provides accurate temperatures; To Adjust Oven Temperature Calibration: 1. Press KITCHEN TIMER for 5 seconds. For best cooking results, do not line the oven bottom with foil because air must be able to the 12hour shutoff function. To change setting. Press and hold KITCHEN TIMER for 5 seconds. Use the following illustration and charts as a guide. Fahrenheit and...
Owners Manual
Page 9
... temperature will come on immediately after the oven has turn off in the recipe. Ask for multiple rack baking. It will appear on 2 racks, use . Convect Roast When convection roasting, enter your normal baking temperature. The temperature will cause poor air circulation, affecting cooking and cleaning results. Blocking or covering the oven vent will not be automatically reduced. Precise Bake The Precise Bake system electronically regulates the oven heat levels during convection cooking, the fan will turn on when the oven door...
... temperature will come on immediately after the oven has turn off in the recipe. Ask for multiple rack baking. It will appear on 2 racks, use . Convect Roast When convection roasting, enter your normal baking temperature. The temperature will cause poor air circulation, affecting cooking and cleaning results. Blocking or covering the oven vent will not be automatically reduced. Precise Bake The Precise Bake system electronically regulates the oven heat levels during convection cooking, the fan will turn on when the oven door...
Owners Manual
Page 10
... not begin. Press BAKE, CONVECT BAKE or CONVECT ROAST. 2. Press COOK TIME. Press TEMP/TIME "+" or "-" keypads to enter the number of time to clear the display. IMPORTANT: The health of time to enter the desired self-clean cycle time. 3. Always move the oven door gasket. Electronic Oven Control with Adjustable Clean Time The SELF CLEAN self-cleaning cycle is for heavy soil. The display will automatically lock. The oven light will turn on your model, see "Oven Vent" section. Prepare Range ■ Remove the broiler pan, grid, cookware...
... not begin. Press BAKE, CONVECT BAKE or CONVECT ROAST. 2. Press COOK TIME. Press TEMP/TIME "+" or "-" keypads to enter the number of time to clear the display. IMPORTANT: The health of time to enter the desired self-clean cycle time. 3. Always move the oven door gasket. Electronic Oven Control with Adjustable Clean Time The SELF CLEAN self-cleaning cycle is for heavy soil. The display will automatically lock. The oven light will turn on your model, see "Oven Vent" section. Prepare Range ■ Remove the broiler pan, grid, cookware...

Owners Manual
Page 11
... and abrasions do not remove seals under knobs. Damage may occur. Do not use abrasive cleaners, cleaners with Cooktop Cleaner and Cooktop Scraper. On some models) Do not use steel wool, abrasive powder cleansers, chlorine bleach, rust remover or ammonia because damage may occur to condition the cooktop. Turn the glass bulb cover in range or reconnect power. 11 Unplug range or disconnect power. 4. Replace bulb, then bulb cover by turning clockwise. 5.
... and abrasions do not remove seals under knobs. Damage may occur. Do not use abrasive cleaners, cleaners with Cooktop Cleaner and Cooktop Scraper. On some models) Do not use steel wool, abrasive powder cleansers, chlorine bleach, rust remover or ammonia because damage may occur to condition the cooktop. Turn the glass bulb cover in range or reconnect power. 11 Unplug range or disconnect power. 4. Replace bulb, then bulb cover by turning clockwise. 5.
Owners Manual
Page 12
... proper heat level? See "Self-Cleaning Cycle" section. ■ Has a delay start been set ? See "Baking and Roasting" section. ■ Are the racks positioned properly? Adjust cooking time. ■ Has the oven door been opened while cooking? Use aluminum foil to higher position in knob before turning to possibly avoid the cost of a service call for service. Cooktop will operate ■ Is the power supply cord unplugged? On some ceramic glass models, the cooktop will not operate ■ Is the oven door open? See "Oven Temperature Control...
... proper heat level? See "Self-Cleaning Cycle" section. ■ Has a delay start been set ? See "Baking and Roasting" section. ■ Are the racks positioned properly? Adjust cooking time. ■ Has the oven door been opened while cooking? Use aluminum foil to higher position in knob before turning to possibly avoid the cost of a service call for service. Cooktop will operate ■ Is the power supply cord unplugged? On some ceramic glass models, the cooktop will not operate ■ Is the oven door open? See "Oven Temperature Control...
Owners Manual
Page 14
... is installed in an inaccessible location or is used in the country in which it is used for other damage to obtain service under these User Instructions and model number information for repairs. Major appliances with original model/serial numbers that is operated and maintained according to instructions attached to or furnished with the removal from your product or you would like to the appliance. 9. MAYTAG SHALL...
... is installed in an inaccessible location or is used in the country in which it is used for other damage to obtain service under these User Instructions and model number information for repairs. Major appliances with original model/serial numbers that is operated and maintained according to instructions attached to or furnished with the removal from your product or you would like to the appliance. 9. MAYTAG SHALL...

Installation Instructions
Page 1
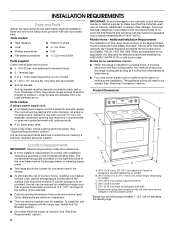
...you to reduce the chance of others . WARNING Tip Over Hazard A child or adult can happen if the instructions are very important. W10258095A INSTALLATION INSTRUCTIONS 30" (76.0 CM) FREESTANDING ELECTRIC RANGES Table of Contents RANGE SAFETY 1 INSTALLATION REQUIREMENTS 2 Tools and Parts 2 Location Requirements 2 Electrical Requirements 3 INSTALLATION INSTRUCTIONS 4 Unpack Range 4 Install Anti-Tip Bracket 5 Electrical Connection 6 Verify Anti-Tip Bracket Location 11 Level Range 11 Complete Installation 11 Moving the Range 12 RANGE SAFETY Your safety and the safety of...
...you to reduce the chance of others . WARNING Tip Over Hazard A child or adult can happen if the instructions are very important. W10258095A INSTALLATION INSTRUCTIONS 30" (76.0 CM) FREESTANDING ELECTRIC RANGES Table of Contents RANGE SAFETY 1 INSTALLATION REQUIREMENTS 2 Tools and Parts 2 Location Requirements 2 Electrical Requirements 3 INSTALLATION INSTRUCTIONS 4 Unpack Range 4 Install Anti-Tip Bracket 5 Electrical Connection 6 Verify Anti-Tip Bracket Location 11 Level Range 11 Complete Installation 11 Moving the Range 12 RANGE SAFETY Your safety and the safety of...
Installation Instructions
Page 2
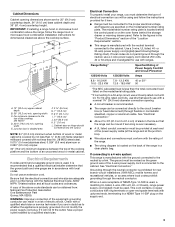
...over heated surface units, cabinet storage space located above . ■ Four-wire power supply cord or cable must be installed. A ■ A UL listed strain relief. F E B* C* D ■ The range should be raised approximately 1" (2.5 cm) by adjusting the leveling legs. ■ Grounded electrical supply is marked for use with nominal 1³⁄₈" (3.5 cm) diameter connection opening dimensions that all electrical connections be reduced by a licensed, qualified electrical installer. Additional Installation Requirements The installation of this range is installed...
...over heated surface units, cabinet storage space located above . ■ Four-wire power supply cord or cable must be installed. A ■ A UL listed strain relief. F E B* C* D ■ The range should be raised approximately 1" (2.5 cm) by adjusting the leveling legs. ■ Grounded electrical supply is marked for use with nominal 1³⁄₈" (3.5 cm) diameter connection opening dimensions that all electrical connections be reduced by a licensed, qualified electrical installer. Additional Installation Requirements The installation of this range is installed...
Installation Instructions
Page 3
... the cooking platform and the bottom of Power Supply Cord Kit and Circuit Protection Amps 40 or 50** 50 *The NEC calculated load is less than the total connected load listed on the model/serial rating plate. **If connecting to a 50-amp circuit, use a 50-amp rated cord with the rating of the range. ■ The wiring diagram is located on the model/serial number rating plate. Do not modify the power supply cord plug. Use a 3-wire, UL listed, 40- Range Rating...
... the cooking platform and the bottom of Power Supply Cord Kit and Circuit Protection Amps 40 or 50** 50 *The NEC calculated load is less than the total connected load listed on the model/serial rating plate. **If connecting to a 50-amp circuit, use a 50-amp rated cord with the rating of the range. ■ The wiring diagram is located on the model/serial number rating plate. Do not modify the power supply cord plug. Use a 3-wire, UL listed, 40- Range Rating...
Installation Instructions
Page 4
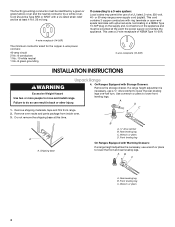
... m) long. On Ranges Equipped with Warming Drawers: If a range height adjustment is necessary, use a ¼" drive ratchet to lower the front and rear leveling legs. Do not remove the shipping base at this time. Shipping base A. ¼" drive ratchet B. Rear leveling leg C. The fourth (grounding) conductor must be provided at the point the power supply cord enters the appliance. If connecting to a 3-wire system: Local codes may permit...
... m) long. On Ranges Equipped with Warming Drawers: If a range height adjustment is necessary, use a ¼" drive ratchet to lower the front and rear leveling legs. Do not remove the shipping base at this time. Shipping base A. ¼" drive ratchet B. Rear leveling leg C. The fourth (grounding) conductor must be provided at the point the power supply cord enters the appliance. If connecting to a 3-wire system: Local codes may permit...

Installation Instructions
Page 5
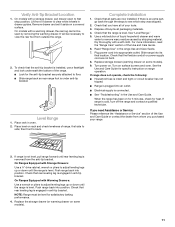
... and mark the edge of the range, as shown. See the following illustrations. 5 Connect anti-tip bracket to the bracket holes of range. Remove the anti-tip bracket that correspond to rear range foot. A Wall Mounting A. #12 x 1⁵⁄₈" screws B. Drill two ¹⁄₈" (3.0 mm) holes that is taped in the cutout space. Using the Phillips screwdriver, mount anti-tip bracket to the wall or floor...
... and mark the edge of the range, as shown. See the following illustrations. 5 Connect anti-tip bracket to the bracket holes of range. Remove the anti-tip bracket that correspond to rear range foot. A Wall Mounting A. #12 x 1⁵⁄₈" screws B. Drill two ¹⁄₈" (3.0 mm) holes that is taped in the cutout space. Using the Phillips screwdriver, mount anti-tip bracket to the wall or floor...
Installation Instructions
Page 6
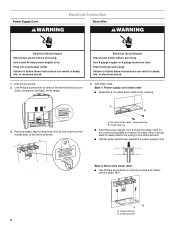
... ■ Use Phillips screwdriver to remove the terminal block cover screw located on bottom of range. Failure to follow these instructions can result in death, fire, or electrical shock. Style 1: Power supply cord strain relief ■ Assemble a UL listed strain relief in death, fire, or electrical shock. 1. Large opening . 3. Power Supply Cord Electrical Connection Direct Wire WARNING WARNING Electrical Shock Hazard Disconnect power before servicing. Plug into a grounded outlet. Electrical Shock Hazard Disconnect power before servicing. Use 8 gauge...
... ■ Use Phillips screwdriver to remove the terminal block cover screw located on bottom of range. Failure to follow these instructions can result in death, fire, or electrical shock. Style 1: Power supply cord strain relief ■ Assemble a UL listed strain relief in death, fire, or electrical shock. 1. Large opening . 3. Power Supply Cord Electrical Connection Direct Wire WARNING WARNING Electrical Shock Hazard Disconnect power before servicing. Plug into a grounded outlet. Electrical Shock Hazard Disconnect power before servicing. Use 8 gauge...
Installation Instructions
Page 11
...; Electrical supply is plugged into position. Place rack in the range Use and Care Guide. 7. Remove drawer and set it aside on some models). 9. or circuit breaker has not tripped. ■ Range is connected. ■ See "Troubleshooting" in drawer guides. Check that rear leveling leg is intact and tight; Use a mild solution of drawer to view the rear foot from the anti-tip bracket. See the Use and Care Guide for satisfactory baking performance. 4. When the range has been on rack and check levelness...
...; Electrical supply is plugged into position. Place rack in the range Use and Care Guide. 7. Remove drawer and set it aside on some models). 9. or circuit breaker has not tripped. ■ Range is connected. ■ See "Troubleshooting" in drawer guides. Check that rear leveling leg is intact and tight; Use a mild solution of drawer to view the rear foot from the anti-tip bracket. See the Use and Care Guide for satisfactory baking performance. 4. When the range has been on rack and check levelness...

Installation Instructions
Page 12
... © 2009. To check that anti-tip bracket is installed, use a flashlight and look underneath the bottom of the range: ■ Look for cleaning or maintenance: For power supply cord-connected ranges: 1. Replace all parts and panels before servicing. Reconnect power. 6. Whirlpool Corporation. Unplug the power supply cord. 3. Electrical Shock Hazard Disconnect power before operating. To check that anti-tip bracket is under anti-tip bracket. 5. Check that range is level. WARNING Moving the Range For direct-wired ranges: WARNING Tip Over Hazard A child or adult...
... © 2009. To check that anti-tip bracket is installed, use a flashlight and look underneath the bottom of the range: ■ Look for cleaning or maintenance: For power supply cord-connected ranges: 1. Replace all parts and panels before servicing. Reconnect power. 6. Whirlpool Corporation. Unplug the power supply cord. 3. Electrical Shock Hazard Disconnect power before operating. To check that anti-tip bracket is under anti-tip bracket. 5. Check that range is level. WARNING Moving the Range For direct-wired ranges: WARNING Tip Over Hazard A child or adult...


