
User Instructions
Page 1
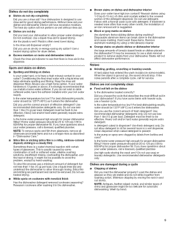
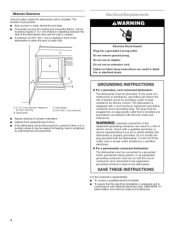
... of others . This will follow instructions. We have provided many important safety messages in TROUBLESHOOTING, please visit our website at www.maytag.com for additional information. Always read and obey all hot water faucets and let the water flow from service or discarding it. ... happen if the instructions are very important. If you and others are not followed. and 2) Load sharp knives with controls. [] Use the dishwasher only for its intended function. [] Use only detergents or rinse agents recommended for use . [] To avoid electrical shock hazard, the sides and...
... of others . This will follow instructions. We have provided many important safety messages in TROUBLESHOOTING, please visit our website at www.maytag.com for additional information. Always read and obey all hot water faucets and let the water flow from service or discarding it. ... happen if the instructions are very important. If you and others are not followed. and 2) Load sharp knives with controls. [] Use the dishwasher only for its intended function. [] Use only detergents or rinse agents recommended for use . [] To avoid electrical shock hazard, the sides and...
User Instructions
Page 2
...equipment-grounding conductor and a grounding plug. terminal or lead on open door. GROUNDING iNSTRUCTiONS For a grounded, cord-connected dishwasher: The dishwasher must be plugged into an appropriate outlet that is installed and grounded in accordance with all soiled surfaces. • Make...can result in a risk of electric shock. Remove labels from the dishes. Wash only plastic items marked "dishwasher safe." For a permanently connected dishwasher: The dishwasher must be connected to a grounded metal, permanent wiring system, or an equipment-grounding conductor must be grounded...
...equipment-grounding conductor and a grounding plug. terminal or lead on open door. GROUNDING iNSTRUCTiONS For a grounded, cord-connected dishwasher: The dishwasher must be plugged into an appropriate outlet that is installed and grounded in accordance with all soiled surfaces. • Make...can result in a risk of electric shock. Remove labels from the dishes. Wash only plastic items marked "dishwasher safe." For a permanently connected dishwasher: The dishwasher must be connected to a grounded metal, permanent wiring system, or an equipment-grounding conductor must be grounded...
User Instructions
Page 3
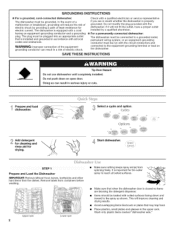
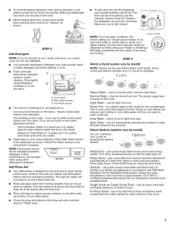
...options affect cycle length. Light Wash - This is designed to lock NOTE: For most water conditions, the factory setting of your dishwasher until the indicator window looks full. Auto Clean - Turn off . Press START/Cancel. Raises the water temperature in a cool, dry place. Tough Scrub (or ... approximately 155°F (68°C). Use for light food soil. Press Delay Hours. If you use detergent. • Use automatic dishwasher detergent only. Select Options (options vary by model) You can dry as shown. Store tightly closed detergent container in the final rinse to...
...options affect cycle length. Light Wash - This is designed to lock NOTE: For most water conditions, the factory setting of your dishwasher until the indicator window looks full. Auto Clean - Turn off . Press START/Cancel. Raises the water temperature in a cool, dry place. Tough Scrub (or ... approximately 155°F (68°C). Use for light food soil. Press Delay Hours. If you use detergent. • Use automatic dishwasher detergent only. Select Options (options vary by model) You can dry as shown. Store tightly closed detergent container in the final rinse to...
User Instructions
Page 4
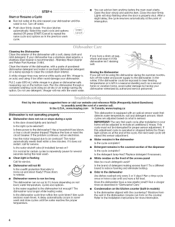
... an acid, and using it if the _P" dishwasher isn't draining well. Moisture from the vent in the dishwasher console can add an item anytime before the Clean light ... Odor in models) Is the dishwasher aligned with the countertop? Replace detergent if necessary. • White residue on the counter. Does the dishwasher have a full load. Select the wash cycle ...vinegar in the covered section of detergent making excess foam? In the U.S.A., www.maytag.com In Canada, www.maytag.ca Dishwasher is recommended - A delay automatically occurs in the previous wash cycle. IMPORTANT:...
... an acid, and using it if the _P" dishwasher isn't draining well. Moisture from the vent in the dishwasher console can add an item anytime before the Clean light ... Odor in models) Is the dishwasher aligned with the countertop? Replace detergent if necessary. • White residue on the counter. Does the dishwasher have a full load. Select the wash cycle ...vinegar in the covered section of detergent making excess foam? In the U.S.A., www.maytag.com In Canada, www.maytag.ca Dishwasher is recommended - A delay automatically occurs in the previous wash cycle. IMPORTANT:...
User Instructions
Page 5
...have questions about your water pressure, call a licensed, qualified plumber. Is the home water pressure high enough for proper dishwasher filling? Use recommended dishwasher detergents only. Use a liquid rinse aid to allow thorough rinsing. Spots and stains on dishes Spotting and filming on dishes... of dishes Did you use a stain removal product to see that you have questions about your water pressure, call for proper dishwasher fill. Detergent must be fresh to drink softened water, have excessive moisture. Silica film and etching are damaged during washing? Black...
...have questions about your water pressure, call a licensed, qualified plumber. Is the home water pressure high enough for proper dishwasher filling? Use recommended dishwasher detergents only. Use a liquid rinse aid to allow thorough rinsing. Spots and stains on dishes Spotting and filming on dishes... of dishes Did you use a stain removal product to see that you have questions about your water pressure, call for proper dishwasher fill. Detergent must be fresh to drink softened water, have excessive moisture. Silica film and etching are damaged during washing? Black...
User Instructions
Page 6
.... 3. DISCLAIMER OF IMPLIED WARRANTIES; Please keep this limited warranty does not apply. Service calls to correct the installation of your authorized Maytag dealer to determine if another warranty applies. 9/07 For additional product information, in a manner that have access to the Internet and... household use your product or you would like to schedule service, you on the right-hand or left-hand side of the dishwasher interior. Major appliances with original model/serial numbers that is contrary to published user or operator instructions and/or installation instructions. 4....
.... 3. DISCLAIMER OF IMPLIED WARRANTIES; Please keep this limited warranty does not apply. Service calls to correct the installation of your authorized Maytag dealer to determine if another warranty applies. 9/07 For additional product information, in a manner that have access to the Internet and... household use your product or you would like to schedule service, you on the right-hand or left-hand side of the dishwasher interior. Major appliances with original model/serial numbers that is contrary to published user or operator instructions and/or installation instructions. 4....
Installation Instructions
Page 2
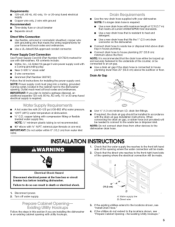
...alert symbol. These words mean: You can be killed or seriously injured if you and others are not followed. 2 TABLEOF CONTENTS DISHWASHER SAFETY 2 INSTALLATION REQUIREMENTS 3 Tools and Parts 3 Location Requirements 3 Electrical Requirements 4 Water Supply Requirements 5 Drain Requirements 5 INSTALLATION INSTRUCTIONS... Method 10 Adjust Leveler Legs 11 Choose Mounting Options 12 Install Dishwasher 13 Connect Dishwasher to Water Supply 14 Make Electrical Connections--Direct Wire Method 14 Attach Dishwasher to reduce the chance of others . All safety messages will follow...
...alert symbol. These words mean: You can be killed or seriously injured if you and others are not followed. 2 TABLEOF CONTENTS DISHWASHER SAFETY 2 INSTALLATION REQUIREMENTS 3 Tools and Parts 3 Location Requirements 3 Electrical Requirements 4 Water Supply Requirements 5 Drain Requirements 5 INSTALLATION INSTRUCTIONS... Method 10 Adjust Leveler Legs 11 Choose Mounting Options 12 Install Dishwasher 13 Connect Dishwasher to Water Supply 14 Make Electrical Connections--Direct Wire Method 14 Attach Dishwasher to reduce the chance of others . All safety messages will follow...
Installation Instructions
Page 3
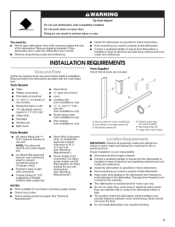
...provided with 3/8" N.P.T. See "Electrical Requirements." Countertop mounting screws (2) C. Motor should not touch the floor. • Do not install dishwasher over carpeted flooring. Mounting screws (8) D. Toekick panel seal (on some models) E. Damage from freezing to avoid damage to 16-... shock. Proper installation is installed to meet all electrical and plumbing national and local codes and ordinances. • Install the dishwasher as specified in these instructions. • Have everything you need to fit 7/8" (2.2 cm) hole (see "Electrical Requirements...
...provided with 3/8" N.P.T. See "Electrical Requirements." Countertop mounting screws (2) C. Motor should not touch the floor. • Do not install dishwasher over carpeted flooring. Mounting screws (8) D. Toekick panel seal (on some models) E. Damage from freezing to avoid damage to 16-... shock. Proper installation is installed to meet all electrical and plumbing national and local codes and ordinances. • Install the dishwasher as specified in these instructions. • Have everything you need to fit 7/8" (2.2 cm) hole (see "Electrical Requirements...
Installation Instructions
Page 4
.... C B Electrical Shock Hazard Plug into an appropriate outlet that the electrical installation is installed and grounded in accordance with the dishwasher; Dishwasher C. In the event of a malfunction or breakdown, grounding will reduce the risk of 255/8'' (65.1 cm) is properly ..._'D A. 2" (5.1 cm) minimum clearance for door opening for proper orientation. • Cabinet front perpendicular to floor. • If the dishwasher will be left unused for a period of least resistance for loading and unloading dishes. SAVE THESE iNSTRUCTiONS It is the customer's responsibility: &#...
.... C B Electrical Shock Hazard Plug into an appropriate outlet that the electrical installation is installed and grounded in accordance with the dishwasher; Dishwasher C. In the event of a malfunction or breakdown, grounding will reduce the risk of 255/8'' (65.1 cm) is properly ..._'D A. 2" (5.1 cm) minimum clearance for door opening for proper orientation. • Cabinet front perpendicular to floor. • If the dishwasher will be left unused for a period of least resistance for loading and unloading dishes. SAVE THESE iNSTRUCTiONS It is the customer's responsibility: &#...
Installation Instructions
Page 5
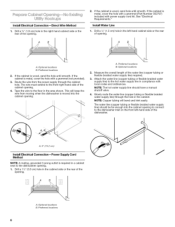
... flexible, armored or nonmetalic sheathed, copper wire with compression fitting or flexible braided water supply line. IMPORTANT: If you are installing the dishwasher in death or electrical shock. 1. copper tubing with grounding wire that the water supply line reaches to the front left-hand side of...--No Existing Utility Hookups." NOTE: Y2" minimum plastic tubing is resistant to the waste tee or disposer inlet. external pipe threads on the dishwasher. • Connect drain hose to waste tee or disposal inlet above drain trap in house plumbing. • Connect drain hose to install ...
... flexible, armored or nonmetalic sheathed, copper wire with compression fitting or flexible braided water supply line. IMPORTANT: If you are installing the dishwasher in death or electrical shock. 1. copper tubing with grounding wire that the water supply line reaches to the front left-hand side of...--No Existing Utility Hookups." NOTE: Y2" minimum plastic tubing is resistant to the waste tee or disposer inlet. external pipe threads on the dishwasher. • Connect drain hose to waste tee or disposal inlet above drain trap in house plumbing. • Connect drain hose to install ...
Installation Instructions
Page 6
...prong outlet is metal, cover the hole with power supply cord kit. See "Electrical Requirements." The wire must extend to the dishwasher inlet on the front left -hand cabinet side or the rear of the cabinet opening . Slowly route the water line (copper...or flexible braided water supply line) should have a manual shutoff valve. 4. Optional locations B. Drill a 1/2=(1.3 cm) hole in a cabinet next to the dishwasher opening . Preferred locations B. A. 6" (15.2 cm) Install Electrical Connection-- Preferred locations 6 Install Water Line 1. Preferred locations 2. If the cabinet is...
...prong outlet is metal, cover the hole with power supply cord kit. See "Electrical Requirements." The wire must extend to the dishwasher inlet on the front left -hand cabinet side or the rear of the cabinet opening . Slowly route the water line (copper...or flexible braided water supply line) should have a manual shutoff valve. 4. Optional locations B. Drill a 1/2=(1.3 cm) hole in a cabinet next to the dishwasher opening . Preferred locations B. A. 6" (15.2 cm) Install Electrical Connection-- Preferred locations 6 Install Water Line 1. Preferred locations 2. If the cabinet is...
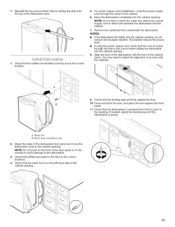
Installation Instructions
Page 7
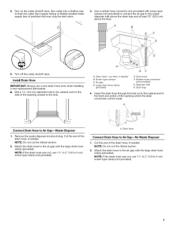
.... Remove the waste disposer knockout plug. Drain trap 4= Insert the drain hose through the hole cut , use a new drain hose even when installing a new replacement dishwasher. • Drill a 1V2"(3.8 cm) diameter hole in the cabinet and to the front and center of particles that may clog the inlet valve. 3= Use a rubber...
.... Remove the waste disposer knockout plug. Drain trap 4= Insert the drain hose through the hole cut , use a new drain hose even when installing a new replacement dishwasher. • Drill a 1V2"(3.8 cm) diameter hole in the cabinet and to the front and center of particles that may clog the inlet valve. 3= Use a rubber...
Installation Instructions
Page 9
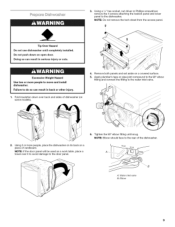
...compound to the 90 ° elbow fitting and connect the fitting to the rear of the dishwasher. 2. Tip Over Hazard Do not use dishwasher until snug. B A. Remove both panels and set aside on a piece of dishwasher (on open door. Tighten the 90 ° elbow fitting until completely installed. NOTE: ... can result in serious injury or cuts. Fold insulation down on some models). 4. Excessive Weight Hazard Use two or more people, place the dishwasher on its back on a covered surface. 5. Do not push down over it to avoid damage to do so can result in back or other...
...compound to the 90 ° elbow fitting and connect the fitting to the rear of the dishwasher. 2. Tip Over Hazard Do not use dishwasher until snug. B A. Remove both panels and set aside on a piece of dishwasher (on open door. Tighten the 90 ° elbow fitting until completely installed. NOTE: ... can result in serious injury or cuts. Fold insulation down on some models). 4. Excessive Weight Hazard Use two or more people, place the dishwasher on its back on a covered surface. 5. Do not push down over it to avoid damage to do so can result in back or other...
Installation Instructions
Page 10
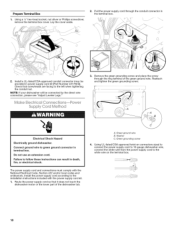
... 3. Reattach and tighten the green grounding screw. ._s,t.3t....;syw,.sJC t_¢]_.,. _.9C • Electrical Shock Hazard Electrically ground dishwasher. Install the power supply cord according to the installation instructions included with the National Electrical Code, Section 422 and/or local codes and ...electrical shock. Green grounding screw 4= Using UL-listed/CSA approved twist-on connectors sized to connect the power supply cord to 16-gauge dishwasher wire, connect the white wire from the power supply cord to the left when tightening the conduit nut. r fT , ,j 10 ...
... 3. Reattach and tighten the green grounding screw. ._s,t.3t....;syw,.sJC t_¢]_.,. _.9C • Electrical Shock Hazard Electrically ground dishwasher. Install the power supply cord according to the installation instructions included with the National Electrical Code, Section 422 and/or local codes and ...electrical shock. Green grounding screw 4= Using UL-listed/CSA approved twist-on connectors sized to connect the power supply cord to 16-gauge dishwasher wire, connect the white wire from the power supply cord to the left when tightening the conduit nut. r fT , ,j 10 ...
Installation Instructions
Page 11
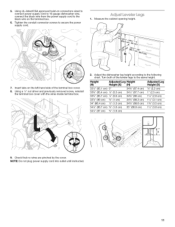
5, Using UL-listed/CSA approved twist-on connectors sized to connect power supply cord to 16-gauge dishwasher wire, connect the black wire from the power supply cord to the black wire on the left-hand side of the leveler legs to the ... to the following chart. Using a V4"nut driver and previously removed screw, reinstall the terminal box cover with the wires inside terminal box. 2, Adjust the dishwasher leg height according to secure the power supply cord. 1, Measure the cabinet opening height. 7. Turn both of the terminal box cover. 8. NOTE: Do not plug...
5, Using UL-listed/CSA approved twist-on connectors sized to connect power supply cord to 16-gauge dishwasher wire, connect the black wire from the power supply cord to the black wire on the left-hand side of the leveler legs to the ... to the following chart. Using a V4"nut driver and previously removed screw, reinstall the terminal box cover with the wires inside terminal box. 2, Adjust the dishwasher leg height according to secure the power supply cord. 1, Measure the cabinet opening height. 7. Turn both of the terminal box cover. 8. NOTE: Do not plug...
Installation Instructions
Page 12
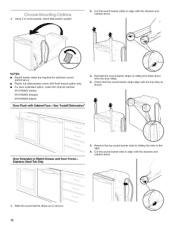
... align with the drawers and cabinet doors. NOTES: • Sound barrier strips are required for optimum sound performance. • Plastic tub dishwashers come with flush mount option only. • For door extended option, order trim strip kit number: W10189262 (white) W10189264 (bisque)...(black) Door Flush with the top strip as shown. 1= Using 2 or more people, stand dishwasher upright. 2. Check that the sound barrier strips align with Cabinet Face--See "Install Dishwasher" 3= Reinstall the sound barrier strips by sliding the strip to Match Drawer and Door Fronts-Stainless Steel...
... align with the drawers and cabinet doors. NOTES: • Sound barrier strips are required for optimum sound performance. • Plastic tub dishwashers come with flush mount option only. • For door extended option, order trim strip kit number: W10189262 (white) W10189264 (bisque)...(black) Door Flush with the top strip as shown. 1= Using 2 or more people, stand dishwasher upright. 2. Check that the sound barrier strips align with Cabinet Face--See "Install Dishwasher" 3= Reinstall the sound barrier strips by sliding the strip to Match Drawer and Door Fronts-Stainless Steel...
Installation Instructions
Page 13
...only 2, Grasp the sides of the cabinet doors. A. 7, Reinstall the top sound barrier strip by sliding the strip onto the top of the dishwasher door. 1, Check that the utilities are installed correctly and in the correct location. 5, For power supply cord installations--route the power supply cord .... 11. If needed, adjust the leveling leg until the dishwasher is on the console to avoid damage to the dishwasher. 3, Check that the leveling legs are taped to be even with the front of the dishwasher door panel and move the dishwasher close to back in the opening. Water line B. You ...
...only 2, Grasp the sides of the cabinet doors. A. 7, Reinstall the top sound barrier strip by sliding the strip onto the top of the dishwasher door. 1, Check that the utilities are installed correctly and in the correct location. 5, For power supply cord installations--route the power supply cord .... 11. If needed, adjust the leveling leg until the dishwasher is on the console to avoid damage to the dishwasher. 3, Check that the leveling legs are taped to be even with the front of the dishwasher door panel and move the dishwasher close to back in the opening. Water line B. You ...
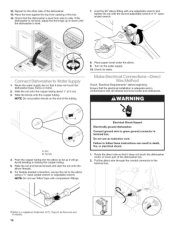
Installation Instructions
Page 14
....... Pull the direct wire through the conduit connector in death, fire, or electrical shock. 1. Check for the other side of the dishwasher tub. 2. NOTE: Do not use an extension cord. Failure to green ground connector in conformance with all national and local codes and... paper towel under the elbow. 9. Nut B. Ferrule 4. Dupont de Nemours and J Company. 14 Electrical Shock Hazard Electrically ground dishwasher. Check that the dishwasher is a registered trademark of the tub. 14. Repeat for leaks. For flexible braided connection, secure the nut to side. Do...
....... Pull the direct wire through the conduit connector in death, fire, or electrical shock. 1. Check for the other side of the dishwasher tub. 2. NOTE: Do not use an extension cord. Failure to green ground connector in conformance with all national and local codes and... paper towel under the elbow. 9. Nut B. Ferrule 4. Dupont de Nemours and J Company. 14 Electrical Shock Hazard Electrically ground dishwasher. Check that the dishwasher is a registered trademark of the tub. 14. Repeat for leaks. For flexible braided connection, secure the nut to side. Do...
Installation Instructions
Page 15
... with the wires inside terminal box. % C A. Green grounding screw 6= Using UL-listed/CSA-approved twist-on connectors sized to connect direct wire to 16-gauge dishwasher wire, connect the white wire from the power supply to the white wire on the bare ground wire. 4. At Wrap the ground wire hook clockwise...
... with the wires inside terminal box. % C A. Green grounding screw 6= Using UL-listed/CSA-approved twist-on connectors sized to connect direct wire to 16-gauge dishwasher wire, connect the white wire from the power supply to the white wire on the bare ground wire. 4. At Wrap the ground wire hook clockwise...

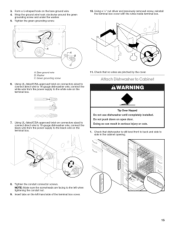
Installation Instructions
Page 16
...the lower dish rack. 3. Open the door. Reinstall the lower dish rack. 16 2. Use the countertop mounting screws to attach the dishwasher to the cabinet. 8. Place a towel over the pump assembly and spray arm of the counter. 7. Remove the towel from falling into... the pump area during installation. 6. Using a 1/8"drill bit, drill holes through the holes into the wood underside of the dishwasher to keep the screws from the dishwasher. 9. Insert the mounting screws (provided) through the side mounting strips. \ \\ 5. For wood underside counters only, use 1/8"drill...
...the lower dish rack. 3. Open the door. Reinstall the lower dish rack. 16 2. Use the countertop mounting screws to attach the dishwasher to the cabinet. 8. Place a towel over the pump assembly and spray arm of the counter. 7. Remove the towel from falling into... the pump area during installation. 6. Using a 1/8"drill bit, drill holes through the holes into the wood underside of the dishwasher to keep the screws from the dishwasher. 9. Insert the mounting screws (provided) through the side mounting strips. \ \\ 5. For wood underside counters only, use 1/8"drill...


