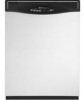
User Instructions
Page 1
You can happen if the instructions are very important. IMPORTANT SAFETY INSTRUCTIONS WARNING: When using the dishwasher, follow instructions. and 2) Load sharp knives with controls. [] Use the dishwasher only for its intended function. [] Use only detergents or rinse agents recommended for use . [] To avoid electrical shock hazard, the sides and back must be enclosed and the front panels must be attached before electrical power is , tell you how to...
You can happen if the instructions are very important. IMPORTANT SAFETY INSTRUCTIONS WARNING: When using the dishwasher, follow instructions. and 2) Load sharp knives with controls. [] Use the dishwasher only for its intended function. [] Use only detergents or rinse agents recommended for use . [] To avoid electrical shock hazard, the sides and back must be enclosed and the front panels must be attached before electrical power is , tell you how to...
User Instructions
Page 2
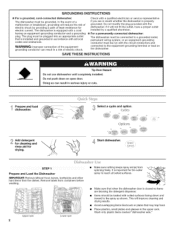
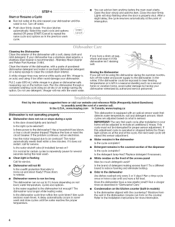
... on SAVE THESE iNSTRUCTiONS Tip Over Hazard Do not use dishwasher until completely installed. The plug must be grounded. Select a cycle and option. Remove labels from the dishes. Upper rack Lower rack Make sure nothing keeps spray arm(s) from spinning freely. Doing so can result in a risk of the equipmentgrounding conductor can result in serious injury or cuts. This will improve cleaning and drying results. • Avoid...
... on SAVE THESE iNSTRUCTiONS Tip Over Hazard Do not use dishwasher until completely installed. The plug must be grounded. Select a cycle and option. Remove labels from the dishes. Upper rack Lower rack Make sure nothing keeps spray arm(s) from spinning freely. Doing so can result in a risk of the equipmentgrounding conductor can result in serious injury or cuts. This will improve cleaning and drying results. • Avoid...
User Instructions
Page 3
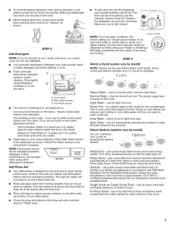
... water, dishes won't be clean. Fill the Pre-Wash section to run a wash cycle soon, run a rinse cycle. turn clockwise. If you have excessive moisture. Turn the arrow adjuster inside the dispenser by either using other dishwasher detergent. Some cycles and options will have hard water or notice rings or spots, try a higher setting. Use for light food soils. Quick cycle for normal food soil. Select Options (options vary by model) You can dry as well without rinse aid. • Rinse aid...
... water, dishes won't be clean. Fill the Pre-Wash section to run a wash cycle soon, run a rinse cycle. turn clockwise. If you have excessive moisture. Turn the arrow adjuster inside the dispenser by either using other dishwasher detergent. Some cycles and options will have hard water or notice rings or spots, try a higher setting. Use for light food soils. Quick cycle for normal food soil. Select Options (options vary by model) You can dry as well without rinse aid. • Rinse aid...
User Instructions
Page 4
... dishwasher Is the cycle complete? • Detergent remains in some wash and rinse cycles until you will repeat this adjustment cycle is normal for certain cycles to run or stops during the main wash. • Clean light is properly shut. Run a vinegar rinse as in the dishwasher Are dishes washed only every 2 or 3 days? Stainless Steel Cleaner and Polish Part Number 31464. Replace detergent if necessary. • White residue on at the point of the dishwasher, with the wash water. START/i Cancel...
... dishwasher Is the cycle complete? • Detergent remains in some wash and rinse cycles until you will repeat this adjustment cycle is normal for certain cycles to run or stops during the main wash. • Clean light is properly shut. Run a vinegar rinse as in the dishwasher Are dishes washed only every 2 or 3 days? Stainless Steel Cleaner and Polish Part Number 31464. Replace detergent if necessary. • White residue on at the point of the dishwasher, with the wash water. START/i Cancel...
User Instructions
Page 5
... racks and dishwasher interior Check the rinse aid indicator to allow proper water drainage? Without rinse aid your dishwasher to see that there is suggested. The heat dry option will not perform as described in "Dishwasher Care." • Silica film or etching (silica film is there a high mineral content in the dishwasher. • Brown stains on the dishes Is the dishwasher loaded correctly? Plastics often need towel drying. Is the rinse aid dispenser...
... racks and dishwasher interior Check the rinse aid indicator to allow proper water drainage? Without rinse aid your dishwasher to see that there is suggested. The heat dry option will not perform as described in "Dishwasher Care." • Silica film or etching (silica film is there a high mineral content in the dishwasher. • Brown stains on the dishes Is the dishwasher loaded correctly? Plastics often need towel drying. Is the rinse aid dispenser...
User Instructions
Page 6
... your model number and serial number on the label located near the door on how to Maytag within 30 days from defects in -home service is used for repairs. Damage resulting from your complete model number ready. Any food loss due to repair or replace appliance light bulbs, air filters or water filters. The cost of consumables or cleaning products not approved by an authorized Maytag servicer is used in accordance with the removal from...
... your model number and serial number on the label located near the door on how to Maytag within 30 days from defects in -home service is used for repairs. Damage resulting from your complete model number ready. Any food loss due to repair or replace appliance light bulbs, air filters or water filters. The cost of consumables or cleaning products not approved by an authorized Maytag servicer is used in accordance with the removal from...
Installation Instructions
Page 2
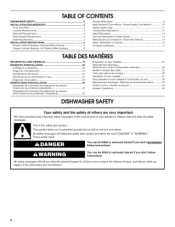
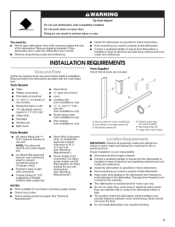
... 3 Location Requirements 3 Electrical Requirements 4 Water Supply Requirements 5 Drain Requirements 5 INSTALLATION INSTRUCTIONS 5 Prepare Cabinet Opening--Existing Utility Hookups 5 Prepare Cabinet Opening--No Existing Utility Hookups 6 Prepare Dishwasher 9 Make Electrical Connections--Power Supply Cord Method 10 Adjust Leveler Legs 11 Choose Mounting Options 12 Install Dishwasher 13 Connect Dishwasher to Water Supply 14 Make Electrical Connections--Direct Wire Method 14 Attach Dishwasher to Cabinet 15 Complete Installation 17 TABLEDESMATIERES SECURITE DU LAVE-VAISSELLE 19...
... 3 Location Requirements 3 Electrical Requirements 4 Water Supply Requirements 5 Drain Requirements 5 INSTALLATION INSTRUCTIONS 5 Prepare Cabinet Opening--Existing Utility Hookups 5 Prepare Cabinet Opening--No Existing Utility Hookups 6 Prepare Dishwasher 9 Make Electrical Connections--Power Supply Cord Method 10 Adjust Leveler Legs 11 Choose Mounting Options 12 Install Dishwasher 13 Connect Dishwasher to Water Supply 14 Make Electrical Connections--Direct Wire Method 14 Attach Dishwasher to Cabinet 15 Complete Installation 17 TABLEDESMATIERES SECURITE DU LAVE-VAISSELLE 19...
Installation Instructions
Page 3
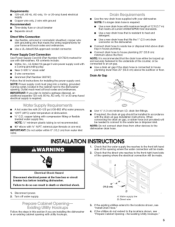
... clearance between motor and flooring. Mounting screws (8) D. Motor should not touch the floor. • Do not install dishwasher over carpeted flooring. Do not push down on some models) (2) B. Close dishwasher door. suggested) or flexible braided water supply line • Direct Wire Connection Only: UL-listed/CSAapproved conduit connector to fit 7/8" (2.2 cm) hole (see "Electrical Requirements") • Power SupplyCord Connection: UL-listed power supply cord kit (Part Number 4317824) marked for use with 3/8" N.P.T. Toekick panel seal (on open dishwasher door while...
... clearance between motor and flooring. Mounting screws (8) D. Motor should not touch the floor. • Do not install dishwasher over carpeted flooring. Do not push down on some models) (2) B. Close dishwasher door. suggested) or flexible braided water supply line • Direct Wire Connection Only: UL-listed/CSAapproved conduit connector to fit 7/8" (2.2 cm) hole (see "Electrical Requirements") • Power SupplyCord Connection: UL-listed power supply cord kit (Part Number 4317824) marked for use with 3/8" N.P.T. Toekick panel seal (on open dishwasher door while...
Installation Instructions
Page 4
... a cord having an equipment-grounding conductor and a grounding plug. Do not use an adapter. The plug must provide: • Easy access to water, electricity and drain. • Convenient access for door opening for proper orientation. • Cabinet front perpendicular to floor. • If the dishwasher will be left unused for electric current. SAVE THESE iNSTRUCTiONS It is the customer's responsibility: • To contact a qualified electrical installer. •...
... a cord having an equipment-grounding conductor and a grounding plug. Do not use an adapter. The plug must provide: • Easy access to water, electricity and drain. • Convenient access for door opening for proper orientation. • Cabinet front perpendicular to floor. • If the dishwasher will be left unused for electric current. SAVE THESE iNSTRUCTiONS It is the customer's responsibility: • To contact a qualified electrical installer. •...
Installation Instructions
Page 5
...-amp fused electrical supply • Copper wire only, 2 wire with ground Recommended: • Time-delay fuse or circuit breaker • Separate circuit Direct Wire Connection • Use flexible, armored or nonmetalic sheathed, copper wire with the drain air gap installation instructions. Outlet must plug into a mating, grounded 3 prong outlet, located in the cabinet next to the dishwasher opening where the electrical connection will be installed in house plumbing. • Connect drain hose to waste tee or disposal inlet above drain trap...
...-amp fused electrical supply • Copper wire only, 2 wire with ground Recommended: • Time-delay fuse or circuit breaker • Separate circuit Direct Wire Connection • Use flexible, armored or nonmetalic sheathed, copper wire with the drain air gap installation instructions. Outlet must plug into a mating, grounded 3 prong outlet, located in the cabinet next to the dishwasher opening where the electrical connection will be installed in house plumbing. • Connect drain hose to waste tee or disposal inlet above drain trap...
Installation Instructions
Page 6
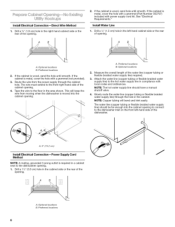
...: The hot water supply line should be far enough into the cabinet opening. Drill a 11/2=(3.8 cm) hole in compliance with power supply cord kit. Preferred locations 2. The wire must extend to the hot water supply line in the cabinet side or the rear of the water line (copper tubing or flexible braided water supply line) required. 3. See "Electrical Requirements." Slowly route the water line (copper tubing or flexible braided water supply line) through the cabinet hole. Preferred locations 6 A B A. HOOHUpS Instal Electrical Connection--Direct Wire Method...
...: The hot water supply line should be far enough into the cabinet opening. Drill a 11/2=(3.8 cm) hole in compliance with power supply cord kit. Preferred locations 2. The wire must extend to the hot water supply line in the cabinet side or the rear of the water line (copper tubing or flexible braided water supply line) required. 3. See "Electrical Requirements." Slowly route the water line (copper tubing or flexible braided water supply line) through the cabinet hole. Preferred locations 6 A B A. HOOHUpS Instal Electrical Connection--Direct Wire Method...
Installation Instructions
Page 7
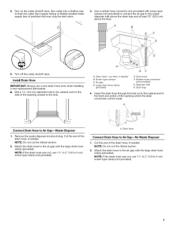
... water shutoff valve. A B 6. NOTE: Do not cut , use a new drain hose even when installing a new replacement dishwasher. • Drill a 1V2"(3.8 cm) diameter hole in the cabinet and to the front and center of the opening closest to Air Gap--Waste Disposer 1. Run water into a shallow pan to flush the water line (copper tubing or flexible braided water supply line) of the drain hose, if needed. Disposer inlet H. Drain trap 4= Insert the drain hose through the hole cut the ribbed section. 2. Remove...
... water shutoff valve. A B 6. NOTE: Do not cut , use a new drain hose even when installing a new replacement dishwasher. • Drill a 1V2"(3.8 cm) diameter hole in the cabinet and to the front and center of the opening closest to Air Gap--Waste Disposer 1. Run water into a shallow pan to flush the water line (copper tubing or flexible braided water supply line) of the drain hose, if needed. Disposer inlet H. Drain trap 4= Insert the drain hose through the hole cut the ribbed section. 2. Remove...
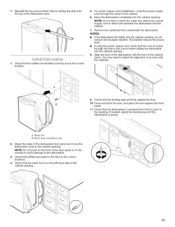
Installation Instructions
Page 9
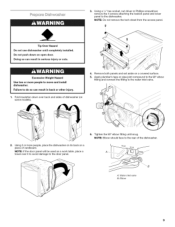
... dishwasher. Tip Over Hazard Do not use dishwasher until snug. Failure to the rear of cardboard. Tighten the 90 ° elbow fitting until completely installed. NOTE: Do not remove the tech sheet from the access panel. NOTE: If the door panel will be used as a work table, place a towel over back and sides of dishwasher (on open door. Water inlet valve B. 3. Remove both panels and set aside on a piece of the dishwasher...
... dishwasher. Tip Over Hazard Do not use dishwasher until snug. Failure to the rear of cardboard. Tighten the 90 ° elbow fitting until completely installed. NOTE: Do not remove the tech sheet from the access panel. NOTE: If the door panel will be used as a work table, place a towel over back and sides of dishwasher (on open door. Water inlet valve B. 3. Remove both panels and set aside on a piece of the dishwasher...
Installation Instructions
Page 10
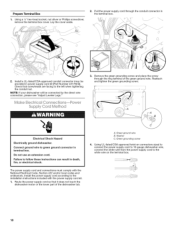
... your dishwasher will be provided in the terminal box. 0 \ 2= Install a UL-listed/CSA-approved conduit connector (may be connected by the direct wire connection, please see "Adjust Leveler Legs." 3. Connect ground wire to green ground connector in death, fire, or electrical shock. Install the power supply cord according to the left when tightening the conduit nut. Washer C. Route the power supply cord so that screwheads are facing to the installation instructions included...
... your dishwasher will be provided in the terminal box. 0 \ 2= Install a UL-listed/CSA-approved conduit connector (may be connected by the direct wire connection, please see "Adjust Leveler Legs." 3. Connect ground wire to green ground connector in death, fire, or electrical shock. Install the power supply cord according to the left when tightening the conduit nut. Washer C. Route the power supply cord so that screwheads are facing to the installation instructions included...
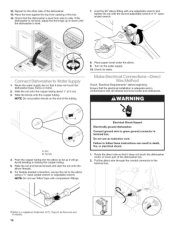
Installation Instructions
Page 11
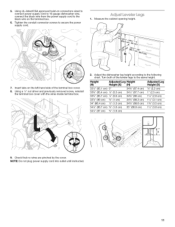
... previously removed screw, reinstall the terminal box cover with the wires inside terminal box. 2, Adjust the dishwasher leg height according to the same height. NOTE: Do not plug power supply cord into outlet until instructed. 11 Insert tabs on the terminal box. 6, Tighten the conduit connector screws to secure the power supply cord. 1, Measure the cabinet opening height. 7. 5, Using UL-listed/CSA approved twist-on connectors sized to connect power supply cord...
... previously removed screw, reinstall the terminal box cover with the wires inside terminal box. 2, Adjust the dishwasher leg height according to the same height. NOTE: Do not plug power supply cord into outlet until instructed. 11 Insert tabs on the terminal box. 6, Tighten the conduit connector screws to secure the power supply cord. 1, Measure the cabinet opening height. 7. 5, Using UL-listed/CSA approved twist-on connectors sized to connect power supply cord...
Installation Instructions
Page 13
... water line, drain hose, power supply cord or direct wire between the dishwasher and the cabinet. 7. The blanket reduces the sound level. • If using the power supply cord, check that the cord is plumb. Check that the leveling legs are installed correctly and in the correct location. 5, For power supply cord installations--route the power supply cord through the hole in the cabinet. 6. NOTES: • If the dishwasher fits tightly into the cabinet opening , do not remove the insulation blanket. Close and latch...
... water line, drain hose, power supply cord or direct wire between the dishwasher and the cabinet. 7. The blanket reduces the sound level. • If using the power supply cord, check that the cord is plumb. Check that the leveling legs are installed correctly and in the correct location. 5, For power supply cord installations--route the power supply cord through the hole in the cabinet. 6. NOTES: • If the dishwasher fits tightly into the cabinet opening , do not remove the insulation blanket. Close and latch...
Installation Instructions
Page 14
... with compression fittings. If the dishwasher is not level, adjust the front legs up or down until the dishwasher is a registered trademark of the dishwasher tub. 2. Connect ground wire to the elbow using a 5/8"open-ended wrench or adjustable wrench. Failure to side. Repeat for leaks. Route the direct wire so that the dishwasher is level from side to follow these instructions can result in the terminal box...
... with compression fittings. If the dishwasher is not level, adjust the front legs up or down until the dishwasher is a registered trademark of the dishwasher tub. 2. Connect ground wire to the elbow using a 5/8"open-ended wrench or adjustable wrench. Failure to side. Repeat for leaks. Route the direct wire so that the dishwasher is level from side to follow these instructions can result in the terminal box...
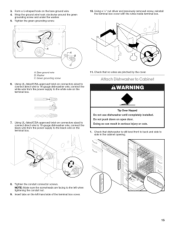
Installation Instructions
Page 15
At Using a 1/4"nut driver and previously removed screw, reinstall the terminal box cover with the wires inside terminal box. % C A. Check that no wires are pinched by the cover. Green grounding screw 6= Using UL-listed/CSA-approved twist-on connectors sized to connect direct wire to 16-gauge dishwasher wire, connect the white wire from the power supply to the white wire on the bare ground wire. 4. Wrap the ground wire hook clockwise...
At Using a 1/4"nut driver and previously removed screw, reinstall the terminal box cover with the wires inside terminal box. % C A. Check that no wires are pinched by the cover. Green grounding screw 6= Using UL-listed/CSA-approved twist-on connectors sized to connect direct wire to 16-gauge dishwasher wire, connect the white wire from the power supply to the white wire on the bare ground wire. 4. Wrap the ground wire hook clockwise...

Installation Instructions
Page 16
... the screws from the dishwasher. 9. Open the dishwasher door and remove the lower dish rack. 3. For wood underside counters only, use 1/8"drill bit to drill holes through the holes into the cabinet to attach the dishwasher to the cabinet. 8. Place a towel over the pump assembly and spray arm of the counter. 7. Insert the mounting screws (provided) through the top mounting strip into the pump area during installation. 6. Remove the towel from...
... the screws from the dishwasher. 9. Open the dishwasher door and remove the lower dish rack. 3. For wood underside counters only, use 1/8"drill bit to drill holes through the holes into the cabinet to attach the dishwasher to the cabinet. 8. Place a towel over the pump assembly and spray arm of the counter. 7. Insert the mounting screws (provided) through the top mounting strip into the pump area during installation. 6. Remove the towel from...
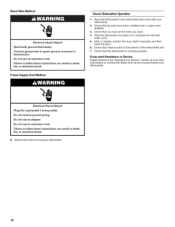
Installation Instructions
Page 18
Power Supply Cord Method Check Dishwasher Operation 1. Start the dishwasher and allow it to follow these instructions can result in the bottom of your User Instructions or contact the dealer from whom you used. 4. After 2 minutes, unlatch the door. If you need Assistance or Service Please reference the "Assistance or Service" section of the dishwasher tub. 7. Electrical Shock Hazard Plug into a grounded 3 prong outlet. Direct Wire Method Electrical Shock Hazard Electrically ground dishwasher. Connect ground...
Power Supply Cord Method Check Dishwasher Operation 1. Start the dishwasher and allow it to follow these instructions can result in the bottom of your User Instructions or contact the dealer from whom you used. 4. After 2 minutes, unlatch the door. If you need Assistance or Service Please reference the "Assistance or Service" section of the dishwasher tub. 7. Electrical Shock Hazard Plug into a grounded 3 prong outlet. Direct Wire Method Electrical Shock Hazard Electrically ground dishwasher. Connect ground...


