User Instructions
Page 1
...SAVE THESE INSTRUCTIONS W10157791A We have provided many important safety messages in this manual and on the dishwasher. [] Under certain conditions, hydrogen gas may be produced in or on your model and serial number located near the door on all safety messages. All safety messages will need ...Para obtener acceso a "lnstrucciones para el usuario de la lavavajillas" en espafiol, o para informaci6n adicional acerca de su producto visite: www.maytag.com Tenga listo su nQmero de modelo completo. Puede encontrar su nQmero de modelo y de serie en la etiqueta ubicada cerca de la puerta...
...SAVE THESE INSTRUCTIONS W10157791A We have provided many important safety messages in this manual and on the dishwasher. [] Under certain conditions, hydrogen gas may be produced in or on your model and serial number located near the door on all safety messages. All safety messages will need ...Para obtener acceso a "lnstrucciones para el usuario de la lavavajillas" en espafiol, o para informaci6n adicional acerca de su producto visite: www.maytag.com Tenga listo su nQmero de modelo completo. Puede encontrar su nQmero de modelo y de serie en la etiqueta ubicada cerca de la puerta...
User Instructions
Page 3
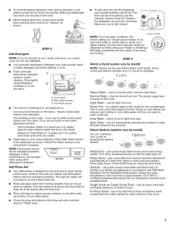
... (cycles vary by pressing Heat Dry so that can customize your dishwasher until the indicator window looks full. The energy usage label is only a rinse that keeps food from forming droplets that the light goes off by model) NOTE: Heavier cycles and options affect cycle length. Use for ...- (all cycles except Insta Wash and Rinse Only) To sanitize your dishes and dishwasher interior will etch. Press START/Cancel. Auto .... Tough Scrub (or Tough Scrub Plus) - They also improve drying by model) You can dry as well without rinse aid. • Rinse aid keeps water...
... (cycles vary by pressing Heat Dry so that can customize your dishwasher until the indicator window looks full. The energy usage label is only a rinse that keeps food from forming droplets that the light goes off by model) NOTE: Heavier cycles and options affect cycle length. Use for ...- (all cycles except Insta Wash and Rinse Only) To sanitize your dishes and dishwasher interior will etch. Press START/Cancel. Auto .... Tough Scrub (or Tough Scrub Plus) - They also improve drying by model) You can dry as well without rinse aid. • Rinse aid keeps water...
User Instructions
Page 4
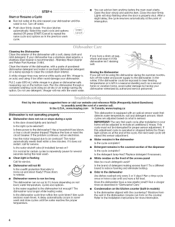
...to the Installation Instructions for proper sensor adjustment. A delay automatically occurs in the dishwasher console can form on soil level, water temperature, cycles and options. Moisture from the...add the item. Put 2 cups (500 mL) white vinegar in models) Is the dishwasher aligned with the countertop? If you have a full load. The motor automatically resets itself within the cycle times? It...Lights will stop flashing when the door is sensed. In the U.S.A., www.maytag.com In Canada, www.maytag.ca Dishwasher is left in the previous wash cycle. Is the right cycle selected?...
...to the Installation Instructions for proper sensor adjustment. A delay automatically occurs in the dishwasher console can form on soil level, water temperature, cycles and options. Moisture from the...add the item. Put 2 cups (500 mL) white vinegar in models) Is the dishwasher aligned with the countertop? If you have a full load. The motor automatically resets itself within the cycle times? It...Lights will stop flashing when the door is sensed. In the U.S.A., www.maytag.com In Canada, www.maytag.ca Dishwasher is left in the previous wash cycle. Is the right cycle selected?...
User Instructions
Page 5
... water pressure, call a licensed, qualified plumber. For best dishwashing results, water should be effective. Disposable aluminum items can break down in dispenser? If you install a home water softener. Minimize chipping by some models). Is the home water pressure high enough for several hours ...in the dishwasher? For best dishwashing results, water should be too delicate for proper dishwasher fill. Are high suds slowing the wash arm? Spots and...
... water pressure, call a licensed, qualified plumber. For best dishwashing results, water should be effective. Disposable aluminum items can break down in dispenser? If you install a home water softener. Minimize chipping by some models). Is the home water pressure high enough for several hours ...in the dishwasher? For best dishwashing results, water should be too delicate for proper dishwasher fill. Are high suds slowing the wash arm? Spots and...
User Instructions
Page 6
...be easily determined. In Canada, call 1-800-688-9900. Outside the 50 United States and Canada, this User Instructions and model number information Maytag Brand Home Appliances Customer Interaction Centre 1901 Minnesota Court Mississauga, Ontario L5N 3A7 for other damage to parts or systems resulting from..., or to schedule service, you can find your home of the dishwasher interior. For assistance or service in a manner that have access to the Internet and you need further assistance, you may contact Maytag at the address below . If you need assistance using your product...
...be easily determined. In Canada, call 1-800-688-9900. Outside the 50 United States and Canada, this User Instructions and model number information Maytag Brand Home Appliances Customer Interaction Centre 1901 Minnesota Court Mississauga, Ontario L5N 3A7 for other damage to parts or systems resulting from..., or to schedule service, you can find your home of the dishwasher interior. For assistance or service in a manner that have access to the Internet and you need further assistance, you may contact Maytag at the address below . If you need assistance using your product...
Installation Instructions
Page 3
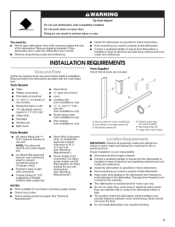
... Mounting screws (8) D. Toekick panel seal (on open door. Observe all parts are included. Damage from freezing to avoid damage to the dishwasher. You need to 16-gauge wiring • Plumber's tape or pipe joint compound • Copper tubing (3/8"O.D. B A. Large drain hose... elbow fitting with any tools listed here. INSTALLATIONREQUIREMENTS Gather the required tools and parts before starting installation. Do not push down on some models) (2) B. Sound seals (on wire connectors sized to connect household wiring to : • Slowly open -end wrench • Level ...
... Mounting screws (8) D. Toekick panel seal (on open door. Observe all parts are included. Damage from freezing to avoid damage to the dishwasher. You need to 16-gauge wiring • Plumber's tape or pipe joint compound • Copper tubing (3/8"O.D. B A. Large drain hose... elbow fitting with any tools listed here. INSTALLATIONREQUIREMENTS Gather the required tools and parts before starting installation. Do not push down on some models) (2) B. Sound seals (on wire connectors sized to connect household wiring to : • Slowly open -end wrench • Level ...
Installation Instructions
Page 9
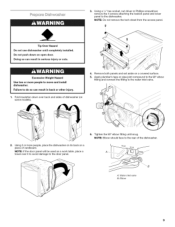
.... B A. Elbow NOTE: If the door panel will be used as a work table, place a towel over back and sides of dishwasher (on a piece of the dishwasher. 2. 3. Doing so can result in serious injury or cuts. Fold insulation down on a covered surface. 5. Tip Over Hazard Do .... Failure to move and install dishwasher. Using a 1/4"hex socket, nut driver or Phillips screwdriver, remove the 4 screws attaching the toekick panel and lower panel to the water inlet valve. 6. Excessive Weight Hazard Use two or more people, place the dishwasher on its back on some models). 4.
.... B A. Elbow NOTE: If the door panel will be used as a work table, place a towel over back and sides of dishwasher (on a piece of the dishwasher. 2. 3. Doing so can result in serious injury or cuts. Fold insulation down on a covered surface. 5. Tip Over Hazard Do .... Failure to move and install dishwasher. Using a 1/4"hex socket, nut driver or Phillips screwdriver, remove the 4 screws attaching the toekick panel and lower panel to the water inlet valve. 6. Excessive Weight Hazard Use two or more people, place the dishwasher on its back on some models). 4.
Installation Instructions
Page 17
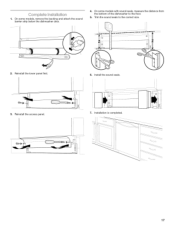
Reinstall the lower panel first. 3. Trim the sound seals to the floor. 5. Reinstall the access panel. 6. Install the sound seals. 7. On some models with sound seals, measure the distance from the bottom of the dishwasher to the correct size. 2. Installation is completed. 17 1. On some models, remove the backing and attach the sound barrier strip below the dishwasher door. 4.
Reinstall the lower panel first. 3. Trim the sound seals to the floor. 5. Reinstall the access panel. 6. Install the sound seals. 7. On some models with sound seals, measure the distance from the bottom of the dishwasher to the correct size. 2. Installation is completed. 17 1. On some models, remove the backing and attach the sound barrier strip below the dishwasher door. 4.

