
User Instructions
Page 4
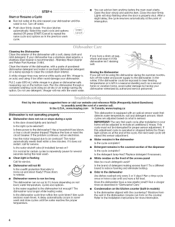
...cycle selected? Has the motor stopped due to the dishwasher hot enough? The dishwasher runs longer while heating water. A delay automatically occurs in the dishwasher console can form on the counter. IMPORTANT: The very first... or Resume a Cycle • Run hot water at the sink nearest your dishwasher until you have a full load. Lights will not be exposed to repeat the same cycle and options as in... before the main wash starts. In the U.S.A., www.maytag.com In Canada, www.maytag.ca Dishwasher is not operating properly • Dishwasher does not run up and down freely? If it ...
...cycle selected? Has the motor stopped due to the dishwasher hot enough? The dishwasher runs longer while heating water. A delay automatically occurs in the dishwasher console can form on the counter. IMPORTANT: The very first... or Resume a Cycle • Run hot water at the sink nearest your dishwasher until you have a full load. Lights will not be exposed to repeat the same cycle and options as in... before the main wash starts. In the U.S.A., www.maytag.com In Canada, www.maytag.ca Dishwasher is not operating properly • Dishwasher does not run up and down freely? If it ...
User Instructions
Page 6
...OF REMEDIES CUSTOMER'S SOLE AND EXCLUSIVE REMEDY UNDER THIS LIMITED WARRANTY SHALL BE PRODUCT REPAIR AS PROVIDED HEREIN. Repairs to parts or systems resulting from unauthorized modifications made to correct defects in accordance with published installation instructions. 11. IMPLIED WARRANTIES, ...light bulbs, air filters or water filters. Please keep this limited warranty does not apply. The cost of the dishwasher interior. Proof of Maytag Corporation or its related companies. Any food loss due to refrigerator or freezer product failures. 7. Damage resulting from ...
...OF REMEDIES CUSTOMER'S SOLE AND EXCLUSIVE REMEDY UNDER THIS LIMITED WARRANTY SHALL BE PRODUCT REPAIR AS PROVIDED HEREIN. Repairs to parts or systems resulting from unauthorized modifications made to correct defects in accordance with published installation instructions. 11. IMPLIED WARRANTIES, ...light bulbs, air filters or water filters. Please keep this limited warranty does not apply. The cost of the dishwasher interior. Proof of Maytag Corporation or its related companies. Any food loss due to refrigerator or freezer product failures. 7. Damage resulting from ...
Installation Instructions
Page 2
... REQUIREMENTS 3 Tools and Parts 3 Location Requirements 3 Electrical Requirements 4 Water Supply Requirements 5 Drain Requirements 5 INSTALLATION INSTRUCTIONS 5 Prepare Cabinet Opening--Existing Utility Hookups 5 Prepare Cabinet Opening--No Existing Utility Hookups 6 Prepare Dishwasher 9 Make Electrical Connections--Power Supply Cord Method 10 Adjust Leveler Legs 11 Choose Mounting Options 12 Install Dishwasher 13 Connect Dishwasher to Water Supply...
... REQUIREMENTS 3 Tools and Parts 3 Location Requirements 3 Electrical Requirements 4 Water Supply Requirements 5 Drain Requirements 5 INSTALLATION INSTRUCTIONS 5 Prepare Cabinet Opening--Existing Utility Hookups 5 Prepare Cabinet Opening--No Existing Utility Hookups 6 Prepare Dishwasher 9 Make Electrical Connections--Power Supply Cord Method 10 Adjust Leveler Legs 11 Choose Mounting Options 12 Install Dishwasher 13 Connect Dishwasher to Water Supply...
Installation Instructions
Page 3
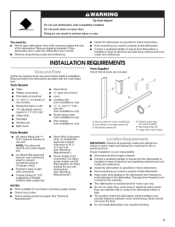
...connectors sized to connect household wiring to fit 7/8" (2.2 cm) hole (see "Electrical Requirements") NOTES: • Parts available for use dishwasher until completely installed. Mounting screws (8) D. Remove shipping materials. Read and follow the instructions provided with 3/8" N.P.T. Tools...block • Phillips screwdriver • Flat-blade screwdriver • 8/8"open door. Close dishwasher door. INSTALLATIONREQUIREMENTS Gather the required tools and parts before starting installation. suggested) or flexible braided water supply line • Direct Wire Connection ...
...connectors sized to connect household wiring to fit 7/8" (2.2 cm) hole (see "Electrical Requirements") NOTES: • Parts available for use dishwasher until completely installed. Mounting screws (8) D. Remove shipping materials. Read and follow the instructions provided with 3/8" N.P.T. Tools...block • Phillips screwdriver • Flat-blade screwdriver • 8/8"open door. Close dishwasher door. INSTALLATIONREQUIREMENTS Gather the required tools and parts before starting installation. suggested) or flexible braided water supply line • Direct Wire Connection ...
Installation Instructions
Page 5
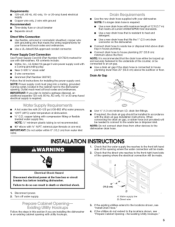
... Neer C-500 7/8"strain relief • 3 wire connectors • Grommet (Part Number 302797) Follow the kit instructions for installing the power supply cord. A Electrical Shock Hazard Disconnect electrical power at dishwasher. • 3/8"O.D. Check that the drain hose either be looped up and securely...If required, the drain air gap should be made . 2. Direct wire 3. Power Supply Cord Connection Use Power Supply Cord Kit (Part Number 4317824) marked for your dishwasher. NOTE: It is required: • Use a new drain hose with utility hookups. 6 It (15.2 cm) B A....
... Neer C-500 7/8"strain relief • 3 wire connectors • Grommet (Part Number 302797) Follow the kit instructions for installing the power supply cord. A Electrical Shock Hazard Disconnect electrical power at dishwasher. • 3/8"O.D. Check that the drain hose either be looped up and securely...If required, the drain air gap should be made . 2. Direct wire 3. Power Supply Cord Connection Use Power Supply Cord Kit (Part Number 4317824) marked for your dishwasher. NOTE: It is required: • Use a new drain hose with utility hookups. 6 It (15.2 cm) B A....
Installation Instructions
Page 6
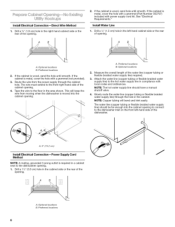
... the cabinet is metal, cover the hole with power supply cord kit. A B A. If the cabinet is metal, cover the hole with a grommet (Part Number 302797) included with a grommet (not provided). 3. Measure the overall length of the cabinet opening . ;.5,-, A B m A. NOTE: The hot water...opening to connect to the floor in the cabinet. Install Water Line 1. Tape the wire to the dishwasher inlet on the front left -hand cabinet side or the rear of the dishwasher. The water line (copper tubing or flexible braided water supply line) should have a manual shutoff valve....
... the cabinet is metal, cover the hole with power supply cord kit. A B A. If the cabinet is metal, cover the hole with a grommet (Part Number 302797) included with a grommet (not provided). 3. Measure the overall length of the cabinet opening . ;.5,-, A B m A. NOTE: The hot water...opening to connect to the floor in the cabinet. Install Water Line 1. Tape the wire to the dishwasher inlet on the front left -hand cabinet side or the rear of the dishwasher. The water line (copper tubing or flexible braided water supply line) should have a manual shutoff valve....
Installation Instructions
Page 10
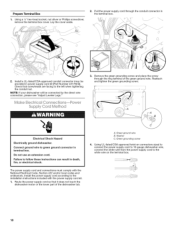
... conduit nut. Pull the power supply cord through the ring terminal of the dishwasher tub. Remove the green grounding screw and place the screw through the conduit connector in power supply cord kit [Part Number 4317824]). Using a 1/4"hex-head socket, nut driver or Phillips screwdriver,... remove the terminal box cover. Check that it does not touch the dishwasher motor or the lower part of the green ground wire. NOTE: If your dishwasher will be provided in the terminal box. 0 \ 2= Install a UL-listed/CSA-approved conduit connector ...
... conduit nut. Pull the power supply cord through the ring terminal of the dishwasher tub. Remove the green grounding screw and place the screw through the conduit connector in power supply cord kit [Part Number 4317824]). Using a 1/4"hex-head socket, nut driver or Phillips screwdriver,... remove the terminal box cover. Check that it does not touch the dishwasher motor or the lower part of the green ground wire. NOTE: If your dishwasher will be provided in the terminal box. 0 \ 2= Install a UL-listed/CSA-approved conduit connector ...
Installation Instructions
Page 14
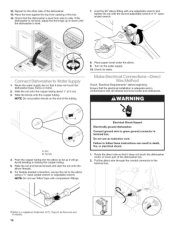
.... Turn on the water supply. 10. Check for the other side of the dishwasher tub. 2. Push the copper tubing into the elbow as far as it does not touch the dishwasher motor or lower part of the dishwasher. 13. For flexible braided connection, secure the nut to follow these instructions can result... an extension cord. 12. Place the level against the top front opening of E.I " (2.5cm). 3. If the dishwasher is not level, adjust the front legs up or down until the dishwasher is a registered trademark of the tub. 14. SWe .... Do not use Teflon®tape with the second adjustable ...
.... Turn on the water supply. 10. Check for the other side of the dishwasher tub. 2. Push the copper tubing into the elbow as far as it does not touch the dishwasher motor or lower part of the dishwasher. 13. For flexible braided connection, secure the nut to follow these instructions can result... an extension cord. 12. Place the level against the top front opening of E.I " (2.5cm). 3. If the dishwasher is not level, adjust the front legs up or down until the dishwasher is a registered trademark of the tub. 14. SWe .... Do not use Teflon®tape with the second adjustable ...
Installation Instructions
Page 18
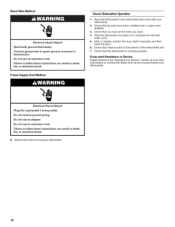
... you have all parts have been installed and no steps were skipped. 3. Reconnect power and plug in death, fire, or electrical shock. Connect ground wire to complete the shortest wash cycle. 5. Failure to follow these instructions can result in death, fire, or electrical shock. 8. Power Supply Cord Method Check Dishwasher Operation 1. Check...
... you have all parts have been installed and no steps were skipped. 3. Reconnect power and plug in death, fire, or electrical shock. Connect ground wire to complete the shortest wash cycle. 5. Failure to follow these instructions can result in death, fire, or electrical shock. 8. Power Supply Cord Method Check Dishwasher Operation 1. Check...

