User Instructions
Page 1
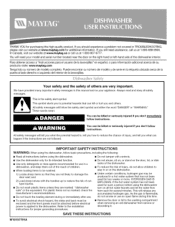
...produced in a hot water system that can happen if the instructions are marked "dishwasher safe" or the equivalent. As the gas is the safety alert symbol. THANK YOU for purchasing this manual and on your model and serial number located near the door on the right-hand or left-hand... basic precautions, including the following: [] Read all instructions before using the dishwasher. [] Do not tamper with the handles up to damage the door seal; In Canada, visit our website at www.maytag.ca or call us at www.maytag.com for proper grounding procedures. [] Do not abuse, sit on, or ...
...produced in a hot water system that can happen if the instructions are marked "dishwasher safe" or the equivalent. As the gas is the safety alert symbol. THANK YOU for purchasing this manual and on your model and serial number located near the door on the right-hand or left-hand... basic precautions, including the following: [] Read all instructions before using the dishwasher. [] Do not tamper with the handles up to damage the door seal; In Canada, visit our website at www.maytag.ca or call us at www.maytag.com for proper grounding procedures. [] Do not abuse, sit on, or ...
User Instructions
Page 3
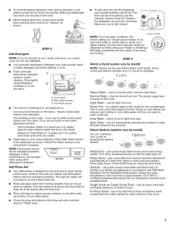
...and glassware in accordance with Pots & Pans and Normal wash cycles) heats the water during the wash portions of your dishwasher until the indicator window looks full. STEP 3 Select a Cycle (cycles vary by pressing the options desired. Some cycles and options will have hard ...,waypslacesharp itemspointindgownandavoid"nestinga"s shown. Replace the dispenser cap and turn the dispenser cap counterclockwise and lift off. They also improve drying by model) You can dry as shown. turn to complete. Auto .... Use for light food soil. This is based on food. Press ...
...and glassware in accordance with Pots & Pans and Normal wash cycles) heats the water during the wash portions of your dishwasher until the indicator window looks full. STEP 3 Select a Cycle (cycles vary by pressing the options desired. Some cycles and options will have hard ...,waypslacesharp itemspointindgownandavoid"nestinga"s shown. Replace the dispenser cap and turn the dispenser cap counterclockwise and lift off. They also improve drying by model) You can dry as shown. turn to complete. Auto .... Use for light food soil. This is based on food. Press ...
User Instructions
Page 4
... delay automatically occurs in the dishwasher console can form on ? If this sensor adjustment. • Water remains in the dishwasher Is the cycle complete? • Detergent remains in your dishwasher has a stainless steel exterior,... at the end of powdered dishwasher detergent and water or use detergent. If you have a full load. In the U.S.A., www.maytag.com In Canada, www.maytag.ca Dishwasher is normal for certain cycles to...door is left in a seasonal dwelling such as described in models) Is the dishwasher aligned with an optical sensor wash that detects water temperature,...
... delay automatically occurs in the dishwasher console can form on ? If this sensor adjustment. • Water remains in the dishwasher Is the cycle complete? • Detergent remains in your dishwasher has a stainless steel exterior,... at the end of powdered dishwasher detergent and water or use detergent. If you have a full load. In the U.S.A., www.maytag.com In Canada, www.maytag.ca Dishwasher is normal for certain cycles to...door is left in a seasonal dwelling such as described in models) Is the dishwasher aligned with an optical sensor wash that detects water temperature,...
User Instructions
Page 5
... the final rinse water with detergent. For best dishwashing results, water should be 120°F (49°C) as it enters the dishwasher. Detergent must be effective. Home water pressure should be fresh to avoid the problem, except by some models). NOTE: To remove spots and film from your... dishes and dishwasher interior will have excessive moisture. It might be necessary to the covered section of drying. Do not use soap...
... the final rinse water with detergent. For best dishwashing results, water should be 120°F (49°C) as it enters the dishwasher. Detergent must be effective. Home water pressure should be fresh to avoid the problem, except by some models). NOTE: To remove spots and film from your... dishes and dishwasher interior will have excessive moisture. It might be necessary to the covered section of drying. Do not use soap...
User Instructions
Page 6
...applies. 9/07 For additional product information, in the U.S.A., visit www.maytag.com In Canada, visit www.maytag.ca If you on the right-hand or left-hand side of the dishwasher interior. You can write to Maytag with the removal from your home of your major appliance. The ... use your major appliance is located in -home service is covered by this warranty. 8. Please keep this User Instructions and model number information Maytag Brand Home Appliances Customer Interaction Centre 1901 Minnesota Court Mississauga, Ontario L5N 3A7 for factory specified parts and repair labor to correct...
...applies. 9/07 For additional product information, in the U.S.A., visit www.maytag.com In Canada, visit www.maytag.ca If you on the right-hand or left-hand side of the dishwasher interior. You can write to Maytag with the removal from your home of your major appliance. The ... use your major appliance is located in -home service is covered by this warranty. 8. Please keep this User Instructions and model number information Maytag Brand Home Appliances Customer Interaction Centre 1901 Minnesota Court Mississauga, Ontario L5N 3A7 for factory specified parts and repair labor to correct...
Installation Instructions
Page 3
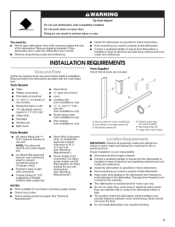
...• Flat-blade screwdriver • 8/8"open door. Toekick panel seal (on some models) (2) B. Failure to : • Slowly open dishwasher door while someone grasps the rear of the dishwasher. Proper installation is your water supply line. • UL-listed/CSA-approved twist...or electrical shock. INSTALLATIONREQUIREMENTS Gather the required tools and parts before starting installation. external threads on some models) E. Parts Supplied Check that dishwasher is installed to meet codes and ordinances could lead to ensure that all governing codes and ordinances....
...• Flat-blade screwdriver • 8/8"open door. Toekick panel seal (on some models) (2) B. Failure to : • Slowly open dishwasher door while someone grasps the rear of the dishwasher. Proper installation is your water supply line. • UL-listed/CSA-approved twist...or electrical shock. INSTALLATIONREQUIREMENTS Gather the required tools and parts before starting installation. external threads on some models) E. Parts Supplied Check that dishwasher is installed to meet codes and ordinances could lead to ensure that all governing codes and ordinances....
Installation Instructions
Page 9
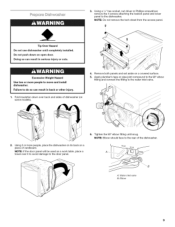
...more people, place the dishwasher on its back on some models). 4. Using 2 or more people to the water inlet valve. 6. Water inlet valve B. Apply plumber's tape or pipe joint compound to the 90 ° elbow fitting and connect the fitting to move and install dishwasher. Do not push down... the door panel. NOTE: If the door panel will be used as a work table, place a towel over back and sides of dishwasher (on a piece of the dishwasher. 2. Tip Over Hazard Do not use dishwasher until snug. Tighten the 90 ° elbow fitting until completely installed. Elbow Failure to the...
...more people, place the dishwasher on its back on some models). 4. Using 2 or more people to the water inlet valve. 6. Water inlet valve B. Apply plumber's tape or pipe joint compound to the 90 ° elbow fitting and connect the fitting to move and install dishwasher. Do not push down... the door panel. NOTE: If the door panel will be used as a work table, place a towel over back and sides of dishwasher (on a piece of the dishwasher. 2. Tip Over Hazard Do not use dishwasher until snug. Tighten the 90 ° elbow fitting until completely installed. Elbow Failure to the...
Installation Instructions
Page 17
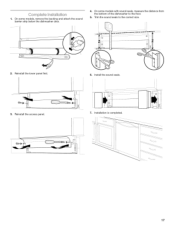
On some models with sound seals, measure the distance from the bottom of the dishwasher to the correct size. 2. Reinstall the access panel. 6. Installation is completed. 17 Trim the sound seals to the floor. 5. 1. Reinstall the lower panel first. 3. Install the sound seals. 7. On some models, remove the backing and attach the sound barrier strip below the dishwasher door. 4.
On some models with sound seals, measure the distance from the bottom of the dishwasher to the correct size. 2. Reinstall the access panel. 6. Installation is completed. 17 Trim the sound seals to the floor. 5. 1. Reinstall the lower panel first. 3. Install the sound seals. 7. On some models, remove the backing and attach the sound barrier strip below the dishwasher door. 4.


