
Owners Manual English
Page 7
... information 325 The Internet radio cannot be played back 291 Specifications 327 Music files on PC or NAS cannot be played back 292 Index 333 Various online services cannot be played 293 License 336 The HDMI Control function does not work 293 Cannot connect to a wireless LAN network 294 When using HDMI ZONE2, the devices does not function properly 295 Update/upgrade error messages 296 Resetting factory settings 297 Resetting network settings 298 Front panel Display Rear panel 7 Remote Index
... information 325 The Internet radio cannot be played back 291 Specifications 327 Music files on PC or NAS cannot be played back 292 Index 333 Various online services cannot be played 293 License 336 The HDMI Control function does not work 293 Cannot connect to a wireless LAN network 294 When using HDMI ZONE2, the devices does not function properly 295 Update/upgrade error messages 296 Resetting factory settings 297 Resetting network settings 298 Front panel Display Rear panel 7 Remote Index

Owners Manual English
Page 25
... setting configured for "Channel Indicators". (v p. 254) 0 When "Channel Indicators" is set to "Input" These light corresponding to the channels that include the input signals. K Front speaker indicator This lights according to "Output" (Default) These light when audio signals are displayed here. G Sleep timer indicator This lights when the sleep mode is selected. (v p. 156) H MUTE indicator This blinks while the sound is muted. (v p. 96) I Volume indicator J Information display The input source name, sound mode, setting values and other than the front, center, surround, surround...
... setting configured for "Channel Indicators". (v p. 254) 0 When "Channel Indicators" is set to "Input" These light corresponding to the channels that include the input signals. K Front speaker indicator This lights according to "Output" (Default) These light when audio signals are displayed here. G Sleep timer indicator This lights when the sleep mode is selected. (v p. 156) H MUTE indicator This blinks while the sound is muted. (v p. 96) I Volume indicator J Information display The input source name, sound mode, setting values and other than the front, center, surround, surround...
Owners Manual English
Page 29
.... B Turn off the power of this unit from a different room. (v p. 91) M Digital audio connectors (DIGITAL AUDIO) Used to connect devices equipped with digital audio connectors. 0 "Connection 2 : TV equipped with an HDMI connector and incompatible with the ARC (Audio Return Channel)" (v p. 78) 0 "Connection 3 : TV equipped without an HDMI connector" (v p. 79) 0 "Connecting a set -top box (Satellite tuner/cable TV)" (v p. 81) 0 "Connecting a DVD player or Blu-ray Disc player" (v p. 82) N DC OUT jacks Used to connect devices equipped with the trigger function. (v p. 92) O Speaker terminals...
.... B Turn off the power of this unit from a different room. (v p. 91) M Digital audio connectors (DIGITAL AUDIO) Used to connect devices equipped with digital audio connectors. 0 "Connection 2 : TV equipped with an HDMI connector and incompatible with the ARC (Audio Return Channel)" (v p. 78) 0 "Connection 3 : TV equipped without an HDMI connector" (v p. 79) 0 "Connecting a set -top box (Satellite tuner/cable TV)" (v p. 81) 0 "Connecting a DVD player or Blu-ray Disc player" (v p. 82) N DC OUT jacks Used to connect devices equipped with the trigger function. (v p. 92) O Speaker terminals...
Owners Manual English
Page 47
... panel Display Rear panel 47 Remote Index In addition to the basic 5.1-channel system, a variety of speaker systems can be set in 11-channel power amplifier. See "Sound modes and channel output" (v p. 308) for multi-zone playback. (v p. 221) Perform "Amp Assign" settings to suit the number of rooms and speaker configuration to be installed. (v p. 221) Playback speaker in each zone MAIN ZONE ZONE2 ZONE3 "Amp Assign" settings Connection page 5.1-channel playback 7.1-channel playback Can be selected varies according to the speaker configuration. Contents Connections Playback...
... panel Display Rear panel 47 Remote Index In addition to the basic 5.1-channel system, a variety of speaker systems can be set in 11-channel power amplifier. See "Sound modes and channel output" (v p. 308) for multi-zone playback. (v p. 221) Perform "Amp Assign" settings to suit the number of rooms and speaker configuration to be installed. (v p. 221) Playback speaker in each zone MAIN ZONE ZONE2 ZONE3 "Amp Assign" settings Connection page 5.1-channel playback 7.1-channel playback Can be selected varies according to the speaker configuration. Contents Connections Playback...

Owners Manual English
Page 123
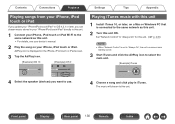
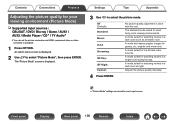
Contents Connections Playback o Selecting the music track or station from music sources 1 Tap the "Music" tab and select a music source. 0 All music services displayed may not be available in your location. Front panel Display Rear panel 123 Remote Index Settings Tips Music Appendix This Phone Music Servers USB Music Playlists History Rooms Music Now Playing .
Contents Connections Playback o Selecting the music track or station from music sources 1 Tap the "Music" tab and select a music source. 0 All music services displayed may not be available in your location. Front panel Display Rear panel 123 Remote Index Settings Tips Music Appendix This Phone Music Servers USB Music Playlists History Rooms Music Now Playing .
Owners Manual English
Page 130
... standby power. 3 Start iTunes and click the AirPlay icon to this unit ON. Set "Network Control" to "Always On" for this unit. (v p. 245) NOTE 0 When "Network Control" is connected to the same network as this unit. 2 Turn this unit. AirDrop: ryone AirPlay 4 Select the speaker (devices) you can stream music stored in iTunes. The music will stream to select the main unit. [Example] iTunes .. Front panel Display Rear panel...
... standby power. 3 Start iTunes and click the AirPlay icon to this unit ON. Set "Network Control" to "Always On" for this unit. (v p. 245) NOTE 0 When "Network Control" is connected to the same network as this unit. 2 Turn this unit. AirDrop: ryone AirPlay 4 Select the speaker (devices) you can stream music stored in iTunes. The music will stream to select the main unit. [Example] iTunes .. Front panel Display Rear panel...
Owners Manual English
Page 139
... low bit rate video sources. Adjusts the picture quality manually. 4 Press ENTER. 0 "Picture Mode" settings are stored for watching movies in a dark room such as a theater room. A mode suited for each input source. A mode suited for watching movies in a dark room at night. A mode suited for watching movies in a bright room during the day. Front panel Display Rear panel 139 Remote Index The "Picture Mode" screen is done with this unit. An option menu screen is assigned...
... low bit rate video sources. Adjusts the picture quality manually. 4 Press ENTER. 0 "Picture Mode" settings are stored for watching movies in a dark room such as a theater room. A mode suited for each input source. A mode suited for watching movies in a dark room at night. A mode suited for watching movies in a bright room during the day. Front panel Display Rear panel 139 Remote Index The "Picture Mode" screen is done with this unit. An option menu screen is assigned...

Owners Manual English
Page 148
...subwoofer if connected. 0 When multi-channel signals are inputted, they are mixed down to 2-channel audio and are stopped in the source. Description This mode plays back audio as Dolby Digital, Dolby TrueHD, Dolby Digital Plus, Dolby Digital EX, Dolby Atmos, DTS, DTS-HD, DTS:X, DTS-ES, PCM (multi-channel) is played back according to the respective channel number. Description This mode plays 2-channel stereo audio with no additional surround sound processing. 0 Sound is used. This mode plays back an even higher quality sound than the "Direct" mode. Front panel Display Rear panel...
...subwoofer if connected. 0 When multi-channel signals are inputted, they are mixed down to 2-channel audio and are stopped in the source. Description This mode plays back audio as Dolby Digital, Dolby TrueHD, Dolby Digital Plus, Dolby Digital EX, Dolby Atmos, DTS, DTS-HD, DTS:X, DTS-ES, PCM (multi-channel) is played back according to the respective channel number. Description This mode plays 2-channel stereo audio with no additional surround sound processing. 0 Sound is used. This mode plays back an even higher quality sound than the "Direct" mode. Front panel Display Rear panel...

Owners Manual English
Page 165
... (MAIN ZONE). Front panel Display Rear panel 165 Remote Index You can also play back separate sources in ZONE2 and ZONE3. 0 "Connection through the HDMI ZONE2 connector" (v p. 165) 0 "Connection through the video output connector and speaker output connector" (v p. 166) 0 "Connection through the video output connector and external power amplifiers" (v p. 168) o Connection 1 : Connection through the HDMI ZONE2 connector When a TV is connected to the HDMI ZONE2 OUT connector, you can play back video and audio in the MAIN ZONE, ZONE2...
... (MAIN ZONE). Front panel Display Rear panel 165 Remote Index You can also play back separate sources in ZONE2 and ZONE3. 0 "Connection through the HDMI ZONE2 connector" (v p. 165) 0 "Connection through the video output connector and speaker output connector" (v p. 166) 0 "Connection through the video output connector and external power amplifiers" (v p. 168) o Connection 1 : Connection through the HDMI ZONE2 connector When a TV is connected to the HDMI ZONE2 OUT connector, you can play back video and audio in the MAIN ZONE, ZONE2...

Owners Manual English
Page 197
... function can be used to configure the settings of this unit, select an input source and set Tuner and Internet Radio stations using the TV remote control. In this case, set "Smart Menu" to reduce power consumption. Contents Connections Playback o Power Saving If "TV Speaker" is set as the input source of this unit 0 When playing content from a device connected by HDMI On: Off (Default): Use Power Saving function. This function is activated in the following cases. 0 When "TV Audio" is selected as the audio output setting...
... function can be used to configure the settings of this unit, select an input source and set Tuner and Internet Radio stations using the TV remote control. In this case, set "Smart Menu" to reduce power consumption. Contents Connections Playback o Power Saving If "TV Speaker" is set as the input source of this unit 0 When playing content from a device connected by HDMI On: Off (Default): Use Power Saving function. This function is activated in the following cases. 0 When "TV Audio" is selected as the audio output setting...

Owners Manual English
Page 199
... content. Front panel Display Rear panel 199 Remote Index Minimize the video delay when the video is converted automatically in "Resolution". (v p. 200) Analog (Default): Analog & HDMI: HDMI: Off: Use i/p (interlace-to match the type of video content. i/p Scaler will convert the resolution of the game console. Contents Connections Playback o Video Mode Configure the video processing method to -progressive) scaler function for analog video signals. Always process video for HDMI video signals. Use i/p Scaler function for analog and HDMI video signal. Auto (Default): Game...
... content. Front panel Display Rear panel 199 Remote Index Minimize the video delay when the video is converted automatically in "Resolution". (v p. 200) Analog (Default): Analog & HDMI: HDMI: Off: Use i/p (interlace-to match the type of video content. i/p Scaler will convert the resolution of the game console. Contents Connections Playback o Video Mode Configure the video processing method to -progressive) scaler function for analog video signals. Always process video for HDMI video signals. Use i/p Scaler function for analog and HDMI video signal. Auto (Default): Game...

Owners Manual English
Page 209
... "Input Select" settings are properly input, the ~ indicator lights on the display. Front panel Display Rear panel 209 Remote Index Settings Tips Appendix o Input Mode Set the audio input modes for each input source. Play only signals from analog audio input. Play only signals from HDMI input. If the ~ indicator does not light, check "Input Assign" and the connections. (v p. 205) 0 If "HDMI Control" is set to "On" and a TV compatible with the ARC is connected via the HDMI MONITOR 1 connectors, the input mode whose input source is "TV Audio" is fixed to ARC. 0 The sound...
... "Input Select" settings are properly input, the ~ indicator lights on the display. Front panel Display Rear panel 209 Remote Index Settings Tips Appendix o Input Mode Set the audio input modes for each input source. Play only signals from analog audio input. Play only signals from HDMI input. If the ~ indicator does not light, check "Input Assign" and the connections. (v p. 205) 0 If "HDMI Control" is set to "On" and a TV compatible with the ARC is connected via the HDMI MONITOR 1 connectors, the input mode whose input source is "TV Audio" is fixed to ARC. 0 The sound...

Owners Manual English
Page 216
... hearing ability so that sound can be heard even at low volumes letting you enjoy late-night movies and television. Audyssey Setup Audyssey Dynamic EQ maintains bass, clarity and surround sound at low volume. Please disconnect the microphone from the SETUP MIC jack on the Dynamic EQ? This is displayed during television programs. Front panel Display Rear panel 216 Remote Index Configure the settings as preferred. The following screen is recommended when using the unit with the volume turned down, e.g. Yes No...
... hearing ability so that sound can be heard even at low volumes letting you enjoy late-night movies and television. Audyssey Setup Audyssey Dynamic EQ maintains bass, clarity and surround sound at low volume. Please disconnect the microphone from the SETUP MIC jack on the Dynamic EQ? This is displayed during television programs. Front panel Display Rear panel 216 Remote Index Configure the settings as preferred. The following screen is recommended when using the unit with the volume turned down, e.g. Yes No...
Owners Manual English
Page 242
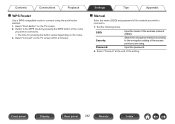
... Use a WPS-compatible router to . 1. Switch to the WPS mode by pressing the WPS button of the wireless network (SSID). Select "Connect" on the TV screen. 2. Input the password. 2. Select "Push Button" on the TV screen within 2 minutes. Set the following items. SSID: Security: Password: Input the name of the router you wish to connect to the encryption setting of the network you are using the push button method. 1. Front panel Display Rear panel 242 Remote Index Select...
... Use a WPS-compatible router to . 1. Switch to the WPS mode by pressing the WPS button of the wireless network (SSID). Select "Connect" on the TV screen. 2. Input the password. 2. Select "Push Button" on the TV screen within 2 minutes. Set the following items. SSID: Security: Password: Input the name of the router you wish to connect to the encryption setting of the network you are using the push button method. 1. Front panel Display Rear panel 242 Remote Index Select...

Owners Manual English
Page 275
... unused input sources 277 I want to enjoy the same music in all zones at the home party, etc. 277 I want to minimize the delay in video signals when I'm playing a game on my game console 277 I want to operate this unit using the TV remote control 277 Settings Tips Appendix Troubleshooting Power does not turn on / Power is turned off 279 Operations cannot be performed through the remote control unit 280 Display...
... unused input sources 277 I want to enjoy the same music in all zones at the home party, etc. 277 I want to minimize the delay in video signals when I'm playing a game on my game console 277 I want to operate this unit using the TV remote control 277 Settings Tips Appendix Troubleshooting Power does not turn on / Power is turned off 279 Operations cannot be performed through the remote control unit 280 Display...

Owners Manual English
Page 276
... in the movies clearer 0 Use "Dialog Level Adjust" in the menu to adjust the level. (v p. 177) I want to keep the volume at the same level when I turn the power on 0 By default, the volume setting when power was previously set to "LFE+Main", you to enjoy clear sound without the bass being lost even during playback at power on the input signals and sound mode, the subwoofer may not output audio. This prevents children or others...
... in the movies clearer 0 Use "Dialog Level Adjust" in the menu to adjust the level. (v p. 177) I want to keep the volume at the same level when I turn the power on 0 By default, the volume setting when power was previously set to "LFE+Main", you to enjoy clear sound without the bass being lost even during playback at power on the input signals and sound mode, the subwoofer may not output audio. This prevents children or others...

Owners Manual English
Page 282
... the sound mode, no sound may be output from the subwoofer. (v p. 228) 0 When no subwoofer audio signal (LFE) is included in the menu. (v p. 221) 0 When the sound mode is "Stereo" and "Virtual", audio is set "TV". (v p. 193) 0 When using "Limit" on the subwoofer's power. 0 Set "Speaker Config." - setting in menu. (v p. 228) 0 Check the "Assign Mode" setting in the input signals, no sound may be output from the TV, set too low. No sound is produced from subwoofer. 0 Check the subwoofer connections. 0 Turn on the menu. (v p. 185) 0 Appropriate volume...
... the sound mode, no sound may be output from the subwoofer. (v p. 228) 0 When no subwoofer audio signal (LFE) is included in the menu. (v p. 221) 0 When the sound mode is "Stereo" and "Virtual", audio is set "TV". (v p. 193) 0 When using "Limit" on the subwoofer's power. 0 Set "Speaker Config." - setting in menu. (v p. 228) 0 Check the "Assign Mode" setting in the input signals, no sound may be output from the TV, set too low. No sound is produced from subwoofer. 0 Check the subwoofer connections. 0 Turn on the menu. (v p. 185) 0 Appropriate volume...

Owners Manual English
Page 283
... and this setting. Dolby Surround mode cannot be selected. 0 Dolby Surround cannot be selected when using the headphones. Audyssey MultEQ® XT32, Audyssey Dynamic EQ®, Audyssey Dynamic Volume® and Audyssey LFC™ cannot be selected. 0 These cannot be selected when you have not performed Audyssey® Setup. (v p. 210) 0 Switch to "PCM". Front panel Display Rear panel 283 Remote Index For playback of multichannel signals such as Dolby Digital or DTS surround, "M-DAX" cannot be used. (v p. 183) 0 Switch to audio from the HDMI connector are input. Depending...
... and this setting. Dolby Surround mode cannot be selected. 0 Dolby Surround cannot be selected when using the headphones. Audyssey MultEQ® XT32, Audyssey Dynamic EQ®, Audyssey Dynamic Volume® and Audyssey LFC™ cannot be selected. 0 These cannot be selected when you have not performed Audyssey® Setup. (v p. 210) 0 Switch to "PCM". Front panel Display Rear panel 283 Remote Index For playback of multichannel signals such as Dolby Digital or DTS surround, "M-DAX" cannot be used. (v p. 183) 0 Switch to audio from the HDMI connector are input. Depending...

Owners Manual English
Page 300
If a TV without the ARC function is connected via HDMI connections, no audio cable connection is set to standby, signals input from the TV on this unit based on the HDMI Control function. In contrast, if a TV with the Auto Lip Sync function. 0 HDMI Pass Through Even when the power to this unit is required. Front panel Display Rear panel 300 Remote Index Use a TV that is compatible with the ARC function is connected via HDMI connections, video signals of the playback device connected to this unit are...
If a TV without the ARC function is connected via HDMI connections, no audio cable connection is set to standby, signals input from the TV on this unit based on the HDMI Control function. In contrast, if a TV with the Auto Lip Sync function. 0 HDMI Pass Through Even when the power to this unit is required. Front panel Display Rear panel 300 Remote Index Use a TV that is compatible with the ARC function is connected via HDMI connections, video signals of the playback device connected to this unit are...
Product Specification Sheet
Page 2
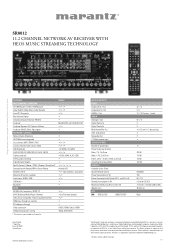
... 92081 United States www.marantz.com INPUTS/OUTPUTS VIDEO Composite In / Out Component In / Out HDMI In / Out AUDIO Analog In / Out Digital Optical In Digital Coaxial In Multichannel Pre Out Zone audio preout Subwoofer Out 7.1 Multichannel input SPECIFICATIONS Number of poweramps Power Output per channel 8ohm, 1%, 1ch Drive 8ohm, 0.7%, 2ch Drive 8 ohm, 20 Hz - 20 kHz, 0.08%, 2ch Drive Audio Signal to Noise Ratio GENERAL Available colors: Black System Remote Control Power Consumption in W Power Consumption No-Sound (ECO ...on stand-by...
... 92081 United States www.marantz.com INPUTS/OUTPUTS VIDEO Composite In / Out Component In / Out HDMI In / Out AUDIO Analog In / Out Digital Optical In Digital Coaxial In Multichannel Pre Out Zone audio preout Subwoofer Out 7.1 Multichannel input SPECIFICATIONS Number of poweramps Power Output per channel 8ohm, 1%, 1ch Drive 8ohm, 0.7%, 2ch Drive 8 ohm, 20 Hz - 20 kHz, 0.08%, 2ch Drive Audio Signal to Noise Ratio GENERAL Available colors: Black System Remote Control Power Consumption in W Power Consumption No-Sound (ECO ...on stand-by...


