NR1602N_ENG_CD-ROM_v00
Page 18
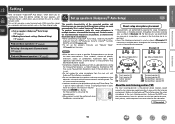
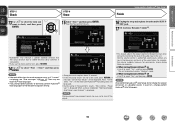
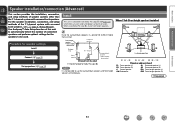
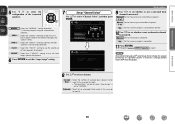
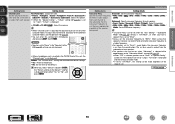
...FL SW C FR ( : Measuring positions) ( : Measuring positions) SL *M SBL SBR FL Front speaker (L) FR Front speaker (R) C Center speaker SW Subwoofer SR SL *M SR SBL SBR SL Surround speaker (L) SR Surround speaker (R) SBL Surround back speaker (L) SBR Surround back speaker (R) About the main listening position...area, as Radio Frequency Interference (RFI) may be placed away from this unit to automatically make the optimal settings for the subwoofer. For best results, we recommend you to connect this position to six positions). • Even if the listening environment is...
...FL SW C FR ( : Measuring positions) ( : Measuring positions) SL *M SBL SBR FL Front speaker (L) FR Front speaker (R) C Center speaker SW Subwoofer SR SL *M SR SBL SBR SL Surround speaker (L) SR Surround speaker (R) SBL Surround back speaker (L) SBR Surround back speaker (R) About the main listening position...area, as Radio Frequency Interference (RFI) may be placed away from this unit to automatically make the optimal settings for the subwoofer. For best results, we recommend you to connect this position to six positions). • Even if the listening environment is...
NR1602N_ENG_CD-ROM_v00
Page 19
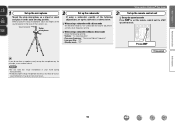
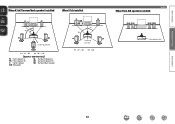
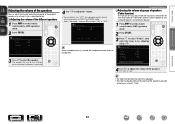
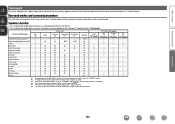
...AMP vSee overleaf If you do not have a tripod or stand, set up the subwoofer as sound reflections may give inaccurate results. Sound receptor Setup microphone 2 Set up the subwoofer If using a subwoofer with a direct mode Set the direct mode to a seat back or wall as ...shown below. nn When using a subwoofer capable of the following settings: • Volume : "12 o'clock position" •...
...AMP vSee overleaf If you do not have a tripod or stand, set up the subwoofer as sound reflections may give inaccurate results. Sound receptor Setup microphone 2 Set up the subwoofer If using a subwoofer with a direct mode Set the direct mode to a seat back or wall as ...shown below. nn When using a subwoofer capable of the following settings: • Volume : "12 o'clock position" •...
NR1602N_ENG_CD-ROM_v00
Page 20
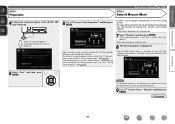
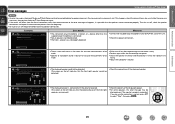
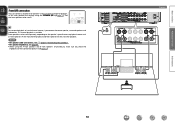
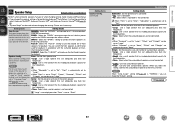
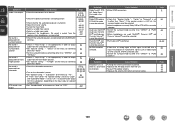
..., a test tone is displayed. For setup of 7.1-channel speaker playback using surround back speakers. vSee overleaf Information 17 Audyssey Auto Setup Detect Check Front Center Subwoofer Surround S.Back Yes Yes Yes Yes Yes 2spkrs Retry Next Measure [ENTER] Enter MultEQ [RETURN] Cancel NOTE If a connected speaker is connected, the following items.... Next [ENTER] Enter [RETURN] Cancel 5 Select "Next" and then press ENTER. 6 Use ui to the SETUP MIC jack of when the front speakers, center speaker, subwoofer, and surround speakers have been detected.
..., a test tone is displayed. For setup of 7.1-channel speaker playback using surround back speakers. vSee overleaf Information 17 Audyssey Auto Setup Detect Check Front Center Subwoofer Surround S.Back Yes Yes Yes Yes Yes 2spkrs Retry Next Measure [ENTER] Enter MultEQ [RETURN] Cancel NOTE If a connected speaker is connected, the following items.... Next [ENTER] Enter [RETURN] Cancel 5 Select "Next" and then press ENTER. 6 Use ui to the SETUP MIC jack of when the front speakers, center speaker, subwoofer, and surround speakers have been detected.
NR1602N_ENG_CD-ROM_v00
Page 22
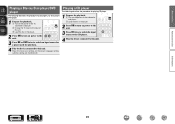
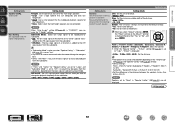
...enters "Medium" mode. Check Distance Check Ch.Level Check Crossover Check Next Store [ENTER] Enter MultEQ [RETURN] Cancel • Subwoofers may measure a greater reported distance than the actual distance due to added electrical delay common in the dynamism and clarity of a ...Dynamic Volume® on Dynamic Volume? Sp.Config. Auto Setup is displayed. Optimal volume control is performed automatically without any loss in subwoofers. • If you want to select "Yes", and then press ENTER. Please unplug microphone. MultEQ Turn on • Use ...
...enters "Medium" mode. Check Distance Check Ch.Level Check Crossover Check Next Store [ENTER] Enter MultEQ [RETURN] Cancel • Subwoofers may measure a greater reported distance than the actual distance due to added electrical delay common in the dynamism and clarity of a ...Dynamic Volume® on Dynamic Volume? Sp.Config. Auto Setup is displayed. Optimal volume control is performed automatically without any loss in subwoofers. • If you want to select "Yes", and then press ENTER. Please unplug microphone. MultEQ Turn on • Use ...
NR1602N_ENG_CD-ROM_v00
Page 23
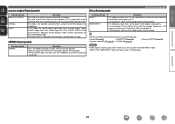
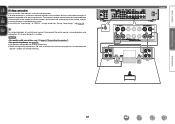
...again when the surroundings are quieter. • Check the speaker installation and the direction in which the speakers are facing. • Adjust the subwoofer's volume. • The displayed speaker could not be detected. (The screen on the left indicates that the speakers are not connected properly. ... Speaker:None Front R • There is too much noise in the room for accurate measurements to be made. • Speaker or subwoofer sound is too low for accurate measurements to turn off the power before checking speaker connections. Retry Audyssey Auto Setup [ ] Cancel MultEQ...
...again when the surroundings are quieter. • Check the speaker installation and the direction in which the speakers are facing. • Adjust the subwoofer's volume. • The displayed speaker could not be detected. (The screen on the left indicates that the speakers are not connected properly. ... Speaker:None Front R • There is too much noise in the room for accurate measurements to be made. • Speaker or subwoofer sound is too low for accurate measurements to turn off the power before checking speaker connections. Retry Audyssey Auto Setup [ ] Cancel MultEQ...
NR1602N_ENG_CD-ROM_v00
Page 27
...player/DVD player The following describes the procedure for playing CD player. 1 Prepare for playback. Make the necessary settings on the power of the TV, subwoofer and player. w Load the disc in the player. 2 Press ON to switch an input source for a player used for playback. e Load ... the input source to the CD player. 4 Play the device connected to this unit. 4 Play the device connected to the input of the subwoofer and player. Advanced version Information BD 24 w Change the TV input to this unit. q Turn on the player (language setting, subtitles setting, ...
...player/DVD player The following describes the procedure for playing CD player. 1 Prepare for playback. Make the necessary settings on the power of the TV, subwoofer and player. w Load the disc in the player. 2 Press ON to switch an input source for a player used for playback. e Load ... the input source to the CD player. 4 Play the device connected to this unit. 4 Play the device connected to the input of the subwoofer and player. Advanced version Information BD 24 w Change the TV input to this unit. q Turn on the player (language setting, subtitles setting, ...
NR1602N_ENG_CD-ROM_v00
Page 52
... type of noise that from the front speakers (L/R) is played back at the same level from the front left and right speakers and subwoofer. • If multichannel signals are input, they are mixed down to the original sound quality. Direct listening mode Selecting a listening mode... PCM (multi-channel) is detected, and the playback mode switches automatically to stop the analogue video circuit. Basic version Advanced version marantz original listening mode Listening mode type MULTI CH STEREO VIRTUAL AUTO Description This mode is for enjoying surround effects using only the front ...
... type of noise that from the front speakers (L/R) is played back at the same level from the front left and right speakers and subwoofer. • If multichannel signals are input, they are mixed down to the original sound quality. Direct listening mode Selecting a listening mode... PCM (multi-channel) is detected, and the playback mode switches automatically to stop the analogue video circuit. Basic version Advanced version marantz original listening mode Listening mode type MULTI CH STEREO VIRTUAL AUTO Description This mode is for enjoying surround effects using only the front ...
NR1602N_ENG_CD-ROM_v00
Page 54
... 90˚ - 110˚ GSpeaker abbreviationsH FL Front speaker (L) SL Surround speaker (L) FR Front speaker (R) SR Surround speaker (R) C Center speaker FHL Front height speaker (L) SW Subwoofer FHR Front height speaker (R) vSee overleaf Information 51 For the speaker installation, connection, and setup methods of the 7.1-channel system with Dolby Pro Logic gz...
... 90˚ - 110˚ GSpeaker abbreviationsH FL Front speaker (L) SL Surround speaker (L) FR Front speaker (R) SR Surround speaker (R) C Center speaker FHL Front height speaker (L) SW Subwoofer FHR Front height speaker (R) vSee overleaf Information 51 For the speaker installation, connection, and setup methods of the 7.1-channel system with Dolby Pro Logic gz...
NR1602N_ENG_CD-ROM_v00
Page 55
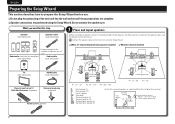
Basic version Advanced version When 6.1ch (Surround back speaker) installed When 5.1ch installed FL SW z2 z1 FR C SL SR Listening position SB z1 22˚ - 30˚ z2 90˚ - 110˚ GSpeaker abbreviationsH FL Front speaker (L) SL Surround speaker (L) FR Front speaker (R) SR Surround speaker (R) C Center speaker SB Surround back speaker SW Subwoofer FL SW C z1 z2 SL Listening position FR SR z1 22˚ - 30˚ z2 120˚ When Front A/B speakers installed Install FL(B) FL(A) SW FR(A) FR(B) Listening position Information 52
Basic version Advanced version When 6.1ch (Surround back speaker) installed When 5.1ch installed FL SW z2 z1 FR C SL SR Listening position SB z1 22˚ - 30˚ z2 90˚ - 110˚ GSpeaker abbreviationsH FL Front speaker (L) SL Surround speaker (L) FR Front speaker (R) SR Surround speaker (R) C Center speaker SB Surround back speaker SW Subwoofer FL SW C z1 z2 SL Listening position FR SR z1 22˚ - 30˚ z2 120˚ When Front A/B speakers installed Install FL(B) FL(A) SW FR(A) FR(B) Listening position Information 52
NR1602N_ENG_CD-ROM_v00
Page 59
... the A front speakers and B front speakers simultaneously, make sure you check the impedance of a multichannel source, if you connect the center speaker, surround speakers and subwoofers, 5.1-channel playback is available. In this unit and use them for 2-channel playback. For surround playback of the connected speakers (vpage 53). Connect SW FL...
... the A front speakers and B front speakers simultaneously, make sure you check the impedance of a multichannel source, if you connect the center speaker, surround speakers and subwoofers, 5.1-channel playback is available. In this unit and use them for 2-channel playback. For surround playback of the connected speakers (vpage 53). Connect SW FL...
NR1602N_ENG_CD-ROM_v00
Page 61
... output) of the woofer sent to the tweeter, which affects the sound quality of the tweeter, and you connect the center speaker, surround speakers and subwoofers, 5.1-channel playback is to connect separate amplifiers to the tweeter terminals and woofer terminals of a multichannel source, if you can use the front speakers via...
... output) of the woofer sent to the tweeter, which affects the sound quality of the tweeter, and you connect the center speaker, surround speakers and subwoofers, 5.1-channel playback is to connect separate amplifiers to the tweeter terminals and woofer terminals of a multichannel source, if you can use the front speakers via...
NR1602N_ENG_CD-ROM_v00
Page 63
...(2sp) Measure Set up "Channel Select" Use ui to step 10. Skip Set for no measuring of front speakers for no subwoofer to be used . Subwoofer Select for playback. F.HEIGHT Select the "F.HEIGHT" setting to use the second set to "NORMAL". Measure Set for ZONE2 and output... the audio in power amplifier for measuring a subwoofer. Surround Back Select the number of a change the speaker connections or subwoofer volume. In this case, go to select "Channel Select", and then press ENTER. Audyssey Auto Setup Preparation...
...(2sp) Measure Set up "Channel Select" Use ui to step 10. Skip Set for no measuring of front speakers for no subwoofer to be used . Subwoofer Select for playback. F.HEIGHT Select the "F.HEIGHT" setting to use the second set to "NORMAL". Measure Set for ZONE2 and output... the audio in power amplifier for measuring a subwoofer. Surround Back Select the number of a change the speaker connections or subwoofer volume. In this case, go to select "Channel Select", and then press ENTER. Audyssey Auto Setup Preparation...
NR1602N_ENG_CD-ROM_v00
Page 67
... Rear 4 Use o p to adjust the volume of the speakers. (o : front, p: rear) • The fader function does not affect the subwoofer. • The fader can adjust the channel level either according to the playback sources or to suit your taste, as described below. Basic version Advanced... speaker). 1 Press AMP to set the remote control unit to select the speaker. Information BD 64 Channel Level Front L Front R Subwoofer -8.5dB -11.5dB 0.0dB Subwoofer ON 3 Use ui to AMP-operation mode. 2 Press CH LVL. Channel Level Front L Front R -8.5dB -11.5dB Convenient ...
... Rear 4 Use o p to adjust the volume of the speakers. (o : front, p: rear) • The fader function does not affect the subwoofer. • The fader can adjust the channel level either according to the playback sources or to suit your taste, as described below. Basic version Advanced... speaker). 1 Press AMP to set the remote control unit to select the speaker. Information BD 64 Channel Level Front L Front R Subwoofer -8.5dB -11.5dB 0.0dB Subwoofer ON 3 Use ui to AMP-operation mode. 2 Press CH LVL. Channel Level Front L Front R -8.5dB -11.5dB Convenient ...
NR1602N_ENG_CD-ROM_v00
Page 90
...small speaker that can not be possible to "Yes". set if necessary. Center : Set the presence and size of a subwoofer. • Yes : Use a subwoofer. • No : Select when a subwoofer is not connected. Surround : Set the presence and size of the surround speakers. • Large : Use a large ... mode. vSee overleaf Information BD 87 You can be used for determining frequencies. Setting items Speaker Config. (Continued) System Setup Setting details Subwoofer : Set the presence of the center speaker. (vpage 89) as the • Large : Use a large speaker that has inadequate ...
...small speaker that can not be possible to "Yes". set if necessary. Center : Set the presence and size of a subwoofer. • Yes : Use a subwoofer. • No : Select when a subwoofer is not connected. Surround : Set the presence and size of the surround speakers. • Large : Use a large ... mode. vSee overleaf Information BD 87 You can be used for determining frequencies. Setting items Speaker Config. (Continued) System Setup Setting details Subwoofer : Set the presence of the center speaker. (vpage 89) as the • Large : Use a large speaker that has inadequate ...
NR1602N_ENG_CD-ROM_v00
Page 91
... when you can be selected differ depending on the "Amp Assign" (vpage 87) and "Speaker Config." (vpage 87) settings. • Default settings : Front L / Front R / Center / Subwoofer / F.Height L / F.Height R : 3.60 m (12.0 ft) Surround L / Surround R / S.Back L / S.Back R : 3.00 m (10.0 ft) • Set the ...output from the listening position to the default?" "S.Back" setting (vpage 87) is displayed. Measure beforehand the distance from the subwoofer. • "Subwoofer Mode" can be set when "Speaker Config." - prompt is set to "Yes". • Play music or a movie source...
... when you can be selected differ depending on the "Amp Assign" (vpage 87) and "Speaker Config." (vpage 87) settings. • Default settings : Front L / Front R / Center / Subwoofer / F.Height L / F.Height R : 3.60 m (12.0 ft) Surround L / Surround R / S.Back L / S.Back R : 3.00 m (10.0 ft) • Set the ...output from the listening position to the default?" "S.Back" setting (vpage 87) is displayed. Measure beforehand the distance from the subwoofer. • "Subwoofer Mode" can be set when "Speaker Config." - prompt is set to "Yes". • Play music or a movie source...
NR1602N_ENG_CD-ROM_v00
Page 92
...the adjusted values are set to the defaults. Set the Crossover Frequency to suit the bass reproduction capability of the speaker size. "Subwoofer Mode" (vpage 88) setting is output from each speaker. vSee overleaf Information BD 89 System Setup Setting items Setting details Crossover...the "Speaker Config." - To adjust the channel level separately for each channel to "Small" at "Speaker Config." prompt is output from the subwoofer or front speakers. • The speakers that is selected, speakers set when the "Bass Setting" - being used. • "Crossover Freq."...
...the adjusted values are set to the defaults. Set the Crossover Frequency to suit the bass reproduction capability of the speaker size. "Subwoofer Mode" (vpage 88) setting is output from each speaker. vSee overleaf Information BD 89 System Setup Setting items Setting details Crossover...the "Speaker Config." - To adjust the channel level separately for each channel to "Small" at "Speaker Config." prompt is output from the subwoofer or front speakers. • The speakers that is selected, speakers set when the "Bass Setting" - being used. • "Crossover Freq."...
NR1602N_ENG_CD-ROM_v00
Page 123
...S MULTI CH STEREO S VIRTUAL S Center D D D D D D D D D D D D D D Channel output Surround L/R Surround Back L/R Front Height L/R D Dz2 Dz2 D D D D D D D D D D D D D D D D D D D D D D D D D D D D D D D D D D Subwoofer Dz3 D D D D D D D D D D D D D D D D HT-EQ (vpage 81) S S S S S S S S S S S S S Surr.Parameter (vpage 81) DRC z4 (vpage 81) D. z3 Only when "Subwoofer Mode" is set . LFE z6 (vpage 81) S S S S S S S S S S S S Information 120 Comp z5 (vpage 81) S S S S S S S S S S S S S S S S S S S S S S S S S z1 During...
...S MULTI CH STEREO S VIRTUAL S Center D D D D D D D D D D D D D D Channel output Surround L/R Surround Back L/R Front Height L/R D Dz2 Dz2 D D D D D D D D D D D D D D D D D D D D D D D D D D D D D D D D D D Subwoofer Dz3 D D D D D D D D D D D D D D D D HT-EQ (vpage 81) S S S S S S S S S S S S S Surr.Parameter (vpage 81) DRC z4 (vpage 81) D. z3 Only when "Subwoofer Mode" is set . LFE z6 (vpage 81) S S S S S S S S S S S S Information 120 Comp z5 (vpage 81) S S S S S S S S S S S S S S S S S S S S S S S S S z1 During...
NR1602N_ENG_CD-ROM_v00
Page 132
... Check if "Amp Assign" is set to "LFE", no sound may be selected. • Run Audyssey® Auto Setup. are set to "Large", and "Subwoofer Mode" is set appropriately in order to output audio from the front height speakers. • Set "Speaker Config." - "Center" or "Surround" is set appropriately ... are connected. • Check if the surround speakers are used, MultEQ®, Dynamic EQ® and Dynamic Volume® cannot be output from the subwoofers, depending on the input signal or selected surround mode. • Set "Decode Mode" on the menu to "Auto" or "DTS". 87 87 46...
... Check if "Amp Assign" is set to "LFE", no sound may be selected. • Run Audyssey® Auto Setup. are set to "Large", and "Subwoofer Mode" is set appropriately in order to output audio from the front height speakers. • Set "Speaker Config." - "Center" or "Surround" is set appropriately ... are connected. • Check if the surround speakers are used, MultEQ®, Dynamic EQ® and Dynamic Volume® cannot be output from the subwoofers, depending on the input signal or selected surround mode. • Set "Decode Mode" on the menu to "Auto" or "DTS". 87 87 46...

NR1602N_ENG_CD-ROM_v00
Page 138
... Speaker Connect 53 Install 51 Set up 15, 21, 59 Speaker Config 87 Speaker impedance 126 Speaker Setup 87 Standby Source 90 Still Picture 104 Subwoofer setting 16 Surround back speaker 52, 54 Surround mode 46, 120 Surr.Parameter 81 Switching the front speakers 23 sYCC601 color 126 System Setup 86...
... Speaker Connect 53 Install 51 Set up 15, 21, 59 Speaker Config 87 Speaker impedance 126 Speaker Setup 87 Standby Source 90 Still Picture 104 Subwoofer setting 16 Surround back speaker 52, 54 Surround mode 46, 120 Surr.Parameter 81 Switching the front speakers 23 sYCC601 color 126 System Setup 86...
NR1602N_ENG_GettingStarted_UG_v00
Page 8
nnSpeaker connections are complete. Subwoofer (with built-in a position 60 to 90 cm higher than ear level. Connect the speaker cables to connect the speaker cables, see the speaker instruction ...; SL SR Listening position z1 22˚ - 30˚ z2 120˚ FL FR C SW SL SR SBL SBR Front speaker (L) Front speaker (R) Center speaker Subwoofer Surround speaker (L) Surround speaker (R) Surround back speaker (L) Surround back speaker (R) • Install the surround speakers in amplifier) (sold separately) Audio cable (sold separately) C SBL FL...
nnSpeaker connections are complete. Subwoofer (with built-in a position 60 to 90 cm higher than ear level. Connect the speaker cables to connect the speaker cables, see the speaker instruction ...; SL SR Listening position z1 22˚ - 30˚ z2 120˚ FL FR C SW SL SR SBL SBR Front speaker (L) Front speaker (R) Center speaker Subwoofer Surround speaker (L) Surround speaker (R) Surround back speaker (L) Surround back speaker (R) • Install the surround speakers in amplifier) (sold separately) Audio cable (sold separately) C SBL FL...


