NR1602N_ENG_CD-ROM_v00
Page 18
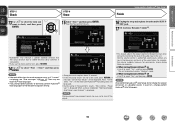
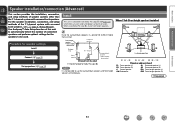
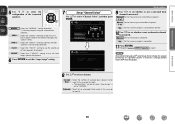
...", which allows you to connect this position to calculate speaker distance, level, polarity, and the optimum crossover value for the subwoofer. This is the position where listeners would normally sit or where one would normally sit alone within the listening environment. To ...FL SW C FR ( : Measuring positions) ( : Measuring positions) SL *M SBL SBR FL Front speaker (L) FR Front speaker (R) C Center speaker SW Subwoofer SR SL *M SR SBL SBR SL Surround speaker (L) SR Surround speaker (R) SBL Surround back speaker (L) SBR Surround back speaker (R) About the main listening ...
...", which allows you to connect this position to calculate speaker distance, level, polarity, and the optimum crossover value for the subwoofer. This is the position where listeners would normally sit or where one would normally sit alone within the listening environment. To ...FL SW C FR ( : Measuring positions) ( : Measuring positions) SL *M SBL SBR FL Front speaker (L) FR Front speaker (R) C Center speaker SW Subwoofer SR SL *M SR SBL SBR SL Surround speaker (L) SR Surround speaker (R) SBL Surround back speaker (L) SBR Surround back speaker (R) About the main listening ...
NR1602N_ENG_CD-ROM_v00
Page 19
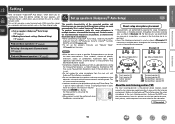
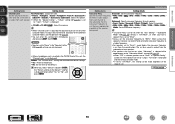
... setup microphone in the main listening position. Press AMP vSee overleaf If you do not have a tripod or stand, set up the subwoofer as sound reflections may give inaccurate results. Information 16 operation mode. Basic version Advanced version Set up speakers (Audyssey® Auto Setup)...the sound receptor to "On" and disable the volume adjustment and crossover frequency setting. Sound receptor Setup microphone 2 Set up the subwoofer If using a subwoofer with a direct mode Set the direct mode to the level of the following adjustments, set up the microphone on a tripod ...
... setup microphone in the main listening position. Press AMP vSee overleaf If you do not have a tripod or stand, set up the subwoofer as sound reflections may give inaccurate results. Information 16 operation mode. Basic version Advanced version Set up speakers (Audyssey® Auto Setup)...the sound receptor to "On" and disable the volume adjustment and crossover frequency setting. Sound receptor Setup microphone 2 Set up the subwoofer If using a subwoofer with a direct mode Set the direct mode to the level of the following adjustments, set up the microphone on a tripod ...
NR1602N_ENG_CD-ROM_v00
Page 20
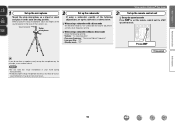
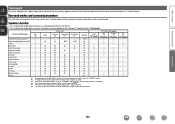
...; Measure" and then press ENTER. For setting, perform steps 7 to select "Auto Setup Start" and then press ENTER. Audyssey Auto Setup Detect Check Front Center Subwoofer Surround S.Back Yes Yes Yes Yes Yes 2spkrs Retry Next Measure [ENTER] Enter MultEQ [RETURN] Cancel NOTE If a connected speaker is displayed. It also corrects... Assign"" (vpage 59). . Next [ENTER] Enter [RETURN] Cancel 5 Select "Next" and then press ENTER. 6 Use ui to 10 of when the front speakers, center speaker, subwoofer, and surround speakers have been detected.
...; Measure" and then press ENTER. For setting, perform steps 7 to select "Auto Setup Start" and then press ENTER. Audyssey Auto Setup Detect Check Front Center Subwoofer Surround S.Back Yes Yes Yes Yes Yes 2spkrs Retry Next Measure [ENTER] Enter MultEQ [RETURN] Cancel NOTE If a connected speaker is displayed. It also corrects... Assign"" (vpage 59). . Next [ENTER] Enter [RETURN] Cancel 5 Select "Next" and then press ENTER. 6 Use ui to 10 of when the front speakers, center speaker, subwoofer, and surround speakers have been detected.
NR1602N_ENG_CD-ROM_v00
Page 22
... check, and then press ENTER. 15 Select "Store" and then press ENTER. Auto Setup is performed automatically without any loss in subwoofers. • If you change speaker positions or orientation, perform Audyssey® Auto Setup again to find the optimal equalizer settings. •... data will be sure not to store calculation result. When saving is displayed. NOTE During saving of a change the speaker connections or subwoofer volume. NOTE After performing Audyssey® Auto Setup, do not change , perform Audyssey® Auto Setup again. is completed, "Storing...
... check, and then press ENTER. 15 Select "Store" and then press ENTER. Auto Setup is performed automatically without any loss in subwoofers. • If you change speaker positions or orientation, perform Audyssey® Auto Setup again to find the optimal equalizer settings. •... data will be sure not to store calculation result. When saving is displayed. NOTE During saving of a change the speaker connections or subwoofer volume. NOTE After performing Audyssey® Auto Setup, do not change , perform Audyssey® Auto Setup again. is completed, "Storing...
NR1602N_ENG_CD-ROM_v00
Page 23
...with the polarity reversed. (The screen on the left indicates that the polarity phases of the front right speakers are facing. • Adjust the subwoofer's volume. • The displayed speaker could not be detected. (The screen on the left indicates that the speakers are sure the connection is... correct, press ui to be made . • Speaker or subwoofer sound is too low for accurate measurements to select "Skip", then press ENTER. 20 Measures • Connect the included setup microphone to the ...
...with the polarity reversed. (The screen on the left indicates that the polarity phases of the front right speakers are facing. • Adjust the subwoofer's volume. • The displayed speaker could not be detected. (The screen on the left indicates that the speakers are sure the connection is... correct, press ui to be made . • Speaker or subwoofer sound is too low for accurate measurements to select "Skip", then press ENTER. 20 Measures • Connect the included setup microphone to the ...
NR1602N_ENG_CD-ROM_v00
Page 27
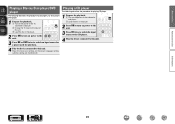
... following describes the procedure for playing Blu-ray Disc player/ DVD player. 1 Prepare for playback. Make the necessary settings on the power of the TV, subwoofer and player. q Turn on the player (language setting, subtitles setting, etc.) beforehand. Advanced version Information BD 24 q Turn on power to the unit. 3 Press BD.... e Load the disc in the player. 2 Press ON to turn on the power of this unit. 4 Play the device connected to the input of the subwoofer and player.
... following describes the procedure for playing Blu-ray Disc player/ DVD player. 1 Prepare for playback. Make the necessary settings on the power of the TV, subwoofer and player. q Turn on the player (language setting, subtitles setting, etc.) beforehand. Advanced version Information BD 24 q Turn on power to the unit. 3 Press BD.... e Load the disc in the player. 2 Press ON to turn on the power of this unit. 4 Play the device connected to the input of the subwoofer and player.
NR1602N_ENG_CD-ROM_v00
Page 52
... This is the mode for enjoying stereo sound from the front left and right speakers and subwoofer. • If multichannel signals are input, they are mixed down to the corresponding mode. Basic version Advanced version marantz original listening mode Listening mode type MULTI CH STEREO VIRTUAL AUTO Description This mode is for...
... This is the mode for enjoying stereo sound from the front left and right speakers and subwoofer. • If multichannel signals are input, they are mixed down to the corresponding mode. Basic version Advanced version marantz original listening mode Listening mode type MULTI CH STEREO VIRTUAL AUTO Description This mode is for...
NR1602N_ENG_CD-ROM_v00
Page 54
... 90˚ - 110˚ GSpeaker abbreviationsH FL Front speaker (L) SL Surround speaker (L) FR Front speaker (R) SR Surround speaker (R) C Center speaker FHL Front height speaker (L) SW Subwoofer FHR Front height speaker (R) vSee overleaf Information 51 Basic version Advanced version Speaker installation/connection (Advanced) This section provides the installation, connection, and setup methods...
... 90˚ - 110˚ GSpeaker abbreviationsH FL Front speaker (L) SL Surround speaker (L) FR Front speaker (R) SR Surround speaker (R) C Center speaker FHL Front height speaker (L) SW Subwoofer FHR Front height speaker (R) vSee overleaf Information 51 Basic version Advanced version Speaker installation/connection (Advanced) This section provides the installation, connection, and setup methods...
NR1602N_ENG_CD-ROM_v00
Page 55
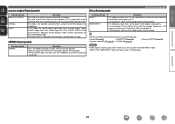
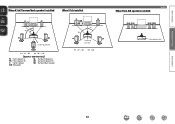
Basic version Advanced version When 6.1ch (Surround back speaker) installed When 5.1ch installed FL SW z2 z1 FR C SL SR Listening position SB z1 22˚ - 30˚ z2 90˚ - 110˚ GSpeaker abbreviationsH FL Front speaker (L) SL Surround speaker (L) FR Front speaker (R) SR Surround speaker (R) C Center speaker SB Surround back speaker SW Subwoofer FL SW C z1 z2 SL Listening position FR SR z1 22˚ - 30˚ z2 120˚ When Front A/B speakers installed Install FL(B) FL(A) SW FR(A) FR(B) Listening position Information 52
Basic version Advanced version When 6.1ch (Surround back speaker) installed When 5.1ch installed FL SW z2 z1 FR C SL SR Listening position SB z1 22˚ - 30˚ z2 90˚ - 110˚ GSpeaker abbreviationsH FL Front speaker (L) SL Surround speaker (L) FR Front speaker (R) SR Surround speaker (R) C Center speaker SB Surround back speaker SW Subwoofer FL SW C z1 z2 SL Listening position FR SR z1 22˚ - 30˚ z2 120˚ When Front A/B speakers installed Install FL(B) FL(A) SW FR(A) FR(B) Listening position Information 52
NR1602N_ENG_CD-ROM_v00
Page 59
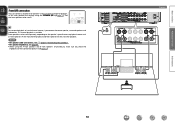
... speaker impedance, see page 53. • When using the A front speakers and B front speakers simultaneously, make sure you connect the center speaker, surround speakers and subwoofers, 5.1-channel playback is available. Connect SW FL(B) FL(A) FR(A) FR(B) Information 56 In this unit and use them for 2-channel playback. For surround playback of...
... speaker impedance, see page 53. • When using the A front speakers and B front speakers simultaneously, make sure you connect the center speaker, surround speakers and subwoofers, 5.1-channel playback is available. Connect SW FL(B) FL(A) FR(A) FR(B) Information 56 In this unit and use them for 2-channel playback. For surround playback of...
NR1602N_ENG_CD-ROM_v00
Page 61
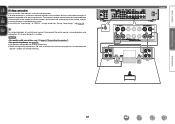
... is to connect separate amplifiers to the tweeter, which affects the sound quality of the tweeter, and you connect the center speaker, surround speakers and subwoofers, 5.1-channel playback is available. Connect qw (L) FL SW q w FR (R) Information 58 For surround playback of speakers compatible with bi-amp connections. • When making bi...
... is to connect separate amplifiers to the tweeter, which affects the sound quality of the tweeter, and you connect the center speaker, surround speakers and subwoofers, 5.1-channel playback is available. Connect qw (L) FL SW q w FR (R) Information 58 For surround playback of speakers compatible with bi-amp connections. • When making bi...
NR1602N_ENG_CD-ROM_v00
Page 63
...for playback. 6 Press RETURN to exit the "Amp Assign" setting. 7 Set up speakers 9 Use o p to select the configuration of a subwoofer. 11 Press RETURN. NORMAL ZONE2 SPKR-C Select the "NORMAL" setting to page 17 STEP1 Preparation step 6. Proceed to perform 7.1-channel playback using ...the surround back speakers. MultEQ Amp Assign Channel Select Auto Setup Start [ENTER] Enter [RETURN] Cancel Channel Select Surround Back Subwoofer Measure(2sp) Measure Set up "Channel Select" Use ui to assign the unit's built-in stereo. Basic version Advanced version 5 Use ...
...for playback. 6 Press RETURN to exit the "Amp Assign" setting. 7 Set up speakers 9 Use o p to select the configuration of a subwoofer. 11 Press RETURN. NORMAL ZONE2 SPKR-C Select the "NORMAL" setting to page 17 STEP1 Preparation step 6. Proceed to perform 7.1-channel playback using ...the surround back speakers. MultEQ Amp Assign Channel Select Auto Setup Start [ENTER] Enter [RETURN] Cancel Channel Select Surround Back Subwoofer Measure(2sp) Measure Set up "Channel Select" Use ui to assign the unit's built-in stereo. Basic version Advanced version 5 Use ...
NR1602N_ENG_CD-ROM_v00
Page 67
... -11.5dB Convenient functions nnAdjusting the volume of groups of the buttons is pressed. 4 Use o p to AMP-operation mode. 2 Press CH LVL. Subwoofer OFF 3 Press i to select "Fader", then select the item to be set switches each time one of speakers (Fader function) This function lets you ... surround back speaker). 1 Press AMP to set the remote control unit to adjust the volume. • You can directly turn "OFF" the subwoofer outputs during 2-channel playback in DIRECT or STEREO mode. When a headphone jack is adjusted to the lowest value of the different speakers 1 Press ...
... -11.5dB Convenient functions nnAdjusting the volume of groups of the buttons is pressed. 4 Use o p to AMP-operation mode. 2 Press CH LVL. Subwoofer OFF 3 Press i to select "Fader", then select the item to be set switches each time one of speakers (Fader function) This function lets you ... surround back speaker). 1 Press AMP to set the remote control unit to adjust the volume. • You can directly turn "OFF" the subwoofer outputs during 2-channel playback in DIRECT or STEREO mode. When a headphone jack is adjusted to the lowest value of the different speakers 1 Press ...
NR1602N_ENG_CD-ROM_v00
Page 90
...that can not be used for playback in power amplifier for playback. Center : Set the presence and size of a subwoofer. • Yes : Use a subwoofer. • No : Select when a subwoofer is "NORMAL", you can be set in stereo. "Large" is not displayed when "Front" is automatically set to... "Small". Setting items Speaker Config. (Continued) System Setup Setting details Subwoofer : Set the presence of the center speaker. (vpage 89) as the • Large : Use a large speaker that has inadequate playback ...
...that can not be used for playback in power amplifier for playback. Center : Set the presence and size of a subwoofer. • Yes : Use a subwoofer. • No : Select when a subwoofer is "NORMAL", you can be set in stereo. "Large" is not displayed when "Front" is automatically set to... "Small". Setting items Speaker Config. (Continued) System Setup Setting details Subwoofer : Set the presence of the center speaker. (vpage 89) as the • Large : Use a large speaker that has inadequate playback ...
NR1602N_ENG_CD-ROM_v00
Page 91
... Lz / S.Back Rz / F.Height L / F.Height R : Select the speaker. NOTE Speakers set to the defaults. When you can be output from the subwoofer. • LFE+Main : The low range signal of the front height speakers. • Large : Use a large speaker that can adequately play back low frequencies... speaker that can make the "F.Height" setting. zz When the "Speaker Config." - vSee overleaf Information BD 88 Subwoofer Mode : Select low range signals to be reproduced by subwoofer. • LFE : The low range signal of the channel set to "Small" speaker size is added to...
... Lz / S.Back Rz / F.Height L / F.Height R : Select the speaker. NOTE Speakers set to the defaults. When you can be output from the subwoofer. • LFE+Main : The low range signal of the front height speakers. • Large : Use a large speaker that can adequately play back low frequencies... speaker that can make the "F.Height" setting. zz When the "Speaker Config." - vSee overleaf Information BD 88 Subwoofer Mode : Select low range signals to be reproduced by subwoofer. • LFE : The low range signal of the channel set to "Small" speaker size is added to...
NR1602N_ENG_CD-ROM_v00
Page 92
...the maximum frequency • 40Hz / 60Hz / 80Hz / 90Hz / 100Hz / 110Hz / 120Hz / 150Hz / 200Hz / of the bass signal output 250Hz from the subwoofer or front speakers. • The speakers that is selected, speakers set to "Small". • Always set for each speaker. • Front / Center / Surround ...either "Yes" or "No", and press ENTER. can enter this unit, the "Channel Level" is output from the sound output. "Subwoofer Mode" (vpage 88) setting is displayed. Basic version Advanced version Setting items Setting details Channel Level Test Tone Start : Output test tone...
...the maximum frequency • 40Hz / 60Hz / 80Hz / 90Hz / 100Hz / 110Hz / 120Hz / 150Hz / 200Hz / of the bass signal output 250Hz from the subwoofer or front speakers. • The speakers that is selected, speakers set to "Small". • Always set for each speaker. • Front / Center / Surround ...either "Yes" or "No", and press ENTER. can enter this unit, the "Channel Level" is output from the sound output. "Subwoofer Mode" (vpage 88) setting is displayed. Basic version Advanced version Setting items Setting details Channel Level Test Tone Start : Output test tone...
NR1602N_ENG_CD-ROM_v00
Page 123
...the audio output channels or surround parameters that can be selected when a Dolby Digital or DTS signal or DVD-Audio is played. z3 Only when "Subwoofer Mode" is set . z6 This item can be selected when a Dolby TrueHD signal is played. z2 A signal for each surround mode. z4 ... Surround modes and surround parameters This table shows the speakers that can be selected when a Dolby Digital or DTS signal is output from the subwoofer. Symbols in a movie theater. z5 This item can be used in each surround mode and the surround parameters adjustable in each channel contained in...
...the audio output channels or surround parameters that can be selected when a Dolby Digital or DTS signal or DVD-Audio is played. z3 Only when "Subwoofer Mode" is set . z6 This item can be selected when a Dolby TrueHD signal is played. z2 A signal for each surround mode. z4 ... Surround modes and surround parameters This table shows the speakers that can be selected when a Dolby Digital or DTS signal is output from the subwoofer. Symbols in a movie theater. z5 This item can be used in each surround mode and the surround parameters adjustable in each channel contained in...
NR1602N_ENG_CD-ROM_v00
Page 132
...46 Page 12 12 12 12 Information 129 C 6, 87, 88 • Check whether the audio device power is produced from surround back speaker. "Subwoofer" on the subwoofer's power. • Set "Speaker Config." - C 3, 8, 9, 10, 11, 12, 13, 14 • Check the speaker connections and ...speakers. • Set "Speaker Config." - Cause/Solution Page • Check the connections for "Speaker Config." are set to "Large", and "Subwoofer Mode" is set to "LFE", no sound may be selected. • Switch the surround mode to other than "DIRECT" or "PURE DIRECT"....
...46 Page 12 12 12 12 Information 129 C 6, 87, 88 • Check whether the audio device power is produced from surround back speaker. "Subwoofer" on the subwoofer's power. • Set "Speaker Config." - C 3, 8, 9, 10, 11, 12, 13, 14 • Check the speaker connections and ...speakers. • Set "Speaker Config." - Cause/Solution Page • Check the connections for "Speaker Config." are set to "Large", and "Subwoofer Mode" is set to "LFE", no sound may be selected. • Switch the surround mode to other than "DIRECT" or "PURE DIRECT"....

NR1602N_ENG_CD-ROM_v00
Page 138
... Speaker Connect 53 Install 51 Set up 15, 21, 59 Speaker Config 87 Speaker impedance 126 Speaker Setup 87 Standby Source 90 Still Picture 104 Subwoofer setting 16 Surround back speaker 52, 54 Surround mode 46, 120 Surr.Parameter 81 Switching the front speakers 23 sYCC601 color 126 System Setup 86...
... Speaker Connect 53 Install 51 Set up 15, 21, 59 Speaker Config 87 Speaker impedance 126 Speaker Setup 87 Standby Source 90 Still Picture 104 Subwoofer setting 16 Surround back speaker 52, 54 Surround mode 46, 120 Surr.Parameter 81 Switching the front speakers 23 sYCC601 color 126 System Setup 86...
NR1602N_ENG_GettingStarted_UG_v00
Page 8
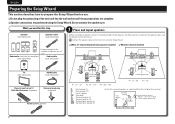
For details on how to the speakers. Subwoofer (with built-in a position 60 to the main unit using the Setup Wizard. Surround speaker Front speaker 60 - 90 cm Surround back speaker (When 7.1-channel ...; SL SR Listening position z1 22˚ - 30˚ z2 120˚ FL FR C SW SL SR SBL SBR Front speaker (L) Front speaker (R) Center speaker Subwoofer Surround speaker (L) Surround speaker (R) Surround back speaker (L) Surround back speaker (R) • Install the surround speakers in amplifier) (sold separately) Audio cable (sold separately) C SBL FL...
For details on how to the speakers. Subwoofer (with built-in a position 60 to the main unit using the Setup Wizard. Surround speaker Front speaker 60 - 90 cm Surround back speaker (When 7.1-channel ...; SL SR Listening position z1 22˚ - 30˚ z2 120˚ FL FR C SW SL SR SBL SBR Front speaker (L) Front speaker (R) Center speaker Subwoofer Surround speaker (L) Surround speaker (R) Surround back speaker (L) Surround back speaker (R) • Install the surround speakers in amplifier) (sold separately) Audio cable (sold separately) C SBL FL...


