Owners Manual
Page 3
... power-supply cord or plug is provided or the manufacturer's instructions have fallen into this product yourself as they exit from the wall outlet and disconnect the antenna or cable system. d. The product may expose you are covered by the user for cleaning or any openings as a bookcase or rack unless proper ventilation is damaged. This product is operated. 2. Replacement Parts...
... power-supply cord or plug is provided or the manufacturer's instructions have fallen into this product yourself as they exit from the wall outlet and disconnect the antenna or cable system. d. The product may expose you are covered by the user for cleaning or any openings as a bookcase or rack unless proper ventilation is damaged. This product is operated. 2. Replacement Parts...
Owners Manual
Page 5
... trademarks displayed herein. It will play back on all DVD-video players." Misuse of any trademarks or any of rental or worn tapes can see a clear picture. • Playback picture may not be reproduced, copied, transmitted, disseminated, transcribed, downloaded or stored in any storage medium, in your local Audio/Video store and purchase a good quality VHS video head cleaner. 2. There are compatible with no user-serviceable parts inside. Auto head cleaning...
... trademarks displayed herein. It will play back on all DVD-video players." Misuse of any trademarks or any of rental or worn tapes can see a clear picture. • Playback picture may not be reproduced, copied, transmitted, disseminated, transcribed, downloaded or stored in any storage medium, in your local Audio/Video store and purchase a good quality VHS video head cleaner. 2. There are compatible with no user-serviceable parts inside. Auto head cleaning...
Owners Manual
Page 6
... Rear Panel 9 Remote Control 10 Front Panel Display 12 Connections ANTENNA CABLE CONNECTION 13 RF MODULATOR CONNECTION 14 CONNECTION TO A CABLE / SATELLITE BOX 15 CONNECTION TO A TV 16 CONNECTION TO AN AUDIO SYSTEM 17 THE VCR / DVD RECORDER SWITCHING 18 GUIDE TO ON-SCREEN DISPLAYS AND MENUS . . . . . 19 On-Screen Display / Menu 19 Main Menu 20 INITIAL SETTING 21 CHANNEL SETTING 22 Auto Channel Scan 22 Adding / Deleting Channels 23 SETTING THE CLOCK 25 Auto Clock Setting 25 Manual Clock Setting 26 Daylight Saving Time 26 TUNER SETTINGS 27 Switching Analog Mode / Digital Mode...
... Rear Panel 9 Remote Control 10 Front Panel Display 12 Connections ANTENNA CABLE CONNECTION 13 RF MODULATOR CONNECTION 14 CONNECTION TO A CABLE / SATELLITE BOX 15 CONNECTION TO A TV 16 CONNECTION TO AN AUDIO SYSTEM 17 THE VCR / DVD RECORDER SWITCHING 18 GUIDE TO ON-SCREEN DISPLAYS AND MENUS . . . . . 19 On-Screen Display / Menu 19 Main Menu 20 INITIAL SETTING 21 CHANNEL SETTING 22 Auto Channel Scan 22 Adding / Deleting Channels 23 SETTING THE CLOCK 25 Auto Clock Setting 25 Manual Clock Setting 26 Daylight Saving Time 26 TUNER SETTINGS 27 Switching Analog Mode / Digital Mode...
Owners Manual
Page 7
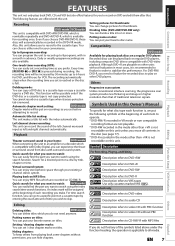
... record the sound of each function is not copy protected. Compatibility DVD mode Available for playing back discs on a regular DVD player: Recorded discs can program the unit to record up to 6 hours for DVD, and 8 hours for VCR. Playback Theater surround sound in higher resolution than +VR is not recordable on a cassette tape when its erase-protection tab is applicable to VHS tapes Use only cassettes marked VHS ( ). Putting names on titles: You can experience the theat- Automatic chapter mark setting: DVD mode Chapter...
... record the sound of each function is not copy protected. Compatibility DVD mode Available for playing back discs on a regular DVD player: Recorded discs can program the unit to record up to 6 hours for DVD, and 8 hours for VCR. Playback Theater surround sound in higher resolution than +VR is not recordable on a cassette tape when its erase-protection tab is applicable to VHS tapes Use only cassettes marked VHS ( ). Putting names on titles: You can experience the theat- Automatic chapter mark setting: DVD mode Chapter...
Owners Manual
Page 8
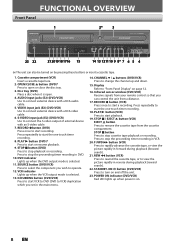
... the DVD output mode is selected. 13. AUDIO input jacks (E2) (DVD/VCR) Use to VCR) duplication which you set in reverse during playback (forward search). 21. VCR indicator Lights up when power is open or close the disc tray. 3. FUNCTIONAL OVERVIEW Front Panel 1 2* 3 23 22 212019181716 15 14 13 121110 9 8* 7 6 5 4 (*) The unit can control the unit from a distance. 17. D.DUBBING button (DVD/VCR) Press to start a recording. Press repeatedly to start VCR to DVD (DVD to connect external device with an S-video cable. 7. Cassette compartment (VCR) Insert a cassette tape...
... the DVD output mode is selected. 13. AUDIO input jacks (E2) (DVD/VCR) Use to VCR) duplication which you set in reverse during playback (forward search). 21. VCR indicator Lights up when power is open or close the disc tray. 3. FUNCTIONAL OVERVIEW Front Panel 1 2* 3 23 22 212019181716 15 14 13 121110 9 8* 7 6 5 4 (*) The unit can control the unit from a distance. 17. D.DUBBING button (DVD/VCR) Press to start a recording. Press repeatedly to start VCR to DVD (DVD to connect external device with an S-video cable. 7. Cassette compartment (VCR) Insert a cassette tape...
Owners Manual
Page 11
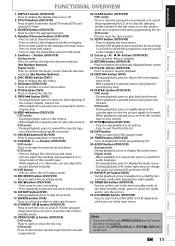
... select items or settings. 23. OPEN/CLOSE A button (DVD/VCR) DVD mode: Press to switch between digital TV mode (DTV) and analog TV mode. 3. NEXT G button (DVD) • During playback, press to skip to the next chapter, track or file. • When playback is paused, press to turn the unit on the unit. In the timer standby mode, press to cancel the mode and to play back forward step by [the Number buttons]. 6. REC I button (DVD/VCR) • Press once to start a recording. • Press repeatedly...
... select items or settings. 23. OPEN/CLOSE A button (DVD/VCR) DVD mode: Press to switch between digital TV mode (DTV) and analog TV mode. 3. NEXT G button (DVD) • During playback, press to skip to the next chapter, track or file. • When playback is paused, press to turn the unit on the unit. In the timer standby mode, press to cancel the mode and to play back forward step by [the Number buttons]. 6. REC I button (DVD/VCR) • Press once to start a recording. • Press repeatedly...
Owners Manual
Page 12
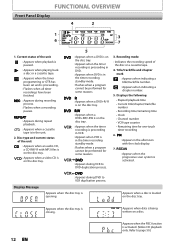
... opening. Displays the following • Elapsed playback time • Current title/chapter/track/file number • Recording time/remaining time • Clock • Channel number • VCR tape counter • Remaining time for one-touch timer recording 6. : Appears in the afternoon with MP3 files is on the disc tray. : Appears when a video CD is on the disc tray. 3 7 5 : Appears when a DVD is on the disc tray. : Appears when the timer recording is proceeding in DVD. : Appears when DVD is in the timer recording standby mode. : Flashes when a program...
... opening. Displays the following • Elapsed playback time • Current title/chapter/track/file number • Recording time/remaining time • Clock • Channel number • VCR tape counter • Remaining time for one-touch timer recording 6. : Appears in the afternoon with MP3 files is on the disc tray. : Appears when a video CD is on the disc tray. 3 7 5 : Appears when a DVD is on the disc tray. : Appears when the timer recording is proceeding in DVD. : Appears when DVD is in the timer recording standby mode. : Flashes when a program...
Owners Manual
Page 16
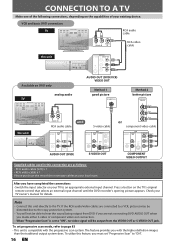
... made either S-video or component video out connection. • When "Progressive Scan" is compatible with the higher definition images than the traditional output system does. CONNECTION TO A TV Make one of the following connections, depending on the TV's original remote control that selects an external input channel until the DVD recorder's opening picture appears. VCR and basic DVD connection TV RCA audio cable R L VIDEO AUDIO IN IN RCA video cable this unit DIGITAL AUDIO OUT DVD DVD/VCR AUDIO S-VIDEO COMPONENT S-VIDEO IN ---AUDIO---OUT OUT VIDEO OUT OUT...
... made either S-video or component video out connection. • When "Progressive Scan" is compatible with the higher definition images than the traditional output system does. CONNECTION TO A TV Make one of the following connections, depending on the TV's original remote control that selects an external input channel until the DVD recorder's opening picture appears. VCR and basic DVD connection TV RCA audio cable R L VIDEO AUDIO IN IN RCA video cable this unit DIGITAL AUDIO OUT DVD DVD/VCR AUDIO S-VIDEO COMPONENT S-VIDEO IN ---AUDIO---OUT OUT VIDEO OUT OUT...
Owners Manual
Page 20
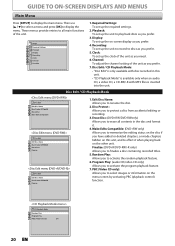
... disc and format it when playing back on the menu screen by activating PBC (playback control) function. Finalize: (DVD+R/DVD-RW/-R only) Allows you to finalize a disc containing recorded titles. 5. Disc Protect : Allows you to protect a disc from accidental editing or recording. 3. CD Playback Mode 45 Random Play 56 Program Play 57 PBC (Video CD only) ON 20 EN Program Play: (audio CD/video CD only) Allows you prefer. 7. GUIDE TO ON-SCREEN DISPLAYS AND MENUS Main Menu Press [SETUP] to activate the program playback feature. 7. Then use [K / L] to select a menu...
... disc and format it when playing back on the menu screen by activating PBC (playback control) function. Finalize: (DVD+R/DVD-RW/-R only) Allows you to finalize a disc containing recorded titles. 5. Disc Protect : Allows you to protect a disc from accidental editing or recording. 3. CD Playback Mode 45 Random Play 56 Program Play 57 PBC (Video CD only) ON 20 EN Program Play: (audio CD/video CD only) Allows you prefer. 7. GUIDE TO ON-SCREEN DISPLAYS AND MENUS Main Menu Press [SETUP] to activate the program playback feature. 7. Then use [K / L] to select a menu...
Owners Manual
Page 27
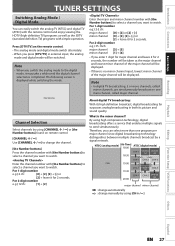
... / ] Playback Editing Function Setup VCR Functions Others Español EN 27 Therefore, you can easily switch the analog TV (NTSC) and digital TV (ATSC) with the remote control and enjoy viewing the HDTV (high definition TV) programs as well as the major channel and lowest minor channel of the major channel will be displayed. Introduction Connections Basic Setup Recording TUNER SETTINGS Switching Analog Mode / Digital Mode You can select more channels, called major channel. For 1-digit number...
... / ] Playback Editing Function Setup VCR Functions Others Español EN 27 Therefore, you can easily switch the analog TV (NTSC) and digital TV (ATSC) with the remote control and enjoy viewing the HDTV (high definition TV) programs as well as the major channel and lowest minor channel of the major channel will be displayed. Introduction Connections Basic Setup Recording TUNER SETTINGS Switching Analog Mode / Digital Mode You can select more channels, called major channel. For 1-digit number...
Owners Manual
Page 33
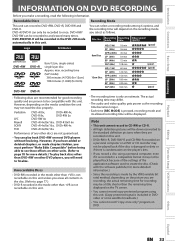
... recording mode you select as the recording time becomes longer. • Each time [REC MODE] is pressed, recording mode and its allowed recording time will depend on the TV screen. • You cannot record copy-protected program using a personal computer, even if it may not read the following information. Logo Attributes DVD+RW DVD+R 8cm/12cm, single-sided, single layer disc Approx. The actual recording time may be played back because of the settings of any other DVD players...
... recording mode you select as the recording time becomes longer. • Each time [REC MODE] is pressed, recording mode and its allowed recording time will depend on the TV screen. • You cannot record copy-protected program using a personal computer, even if it may not read the following information. Logo Attributes DVD+RW DVD+R 8cm/12cm, single-sided, single layer disc Approx. The actual recording time may be played back because of the settings of any other DVD players...
Owners Manual
Page 39
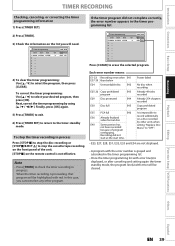
... other units when setting "Replace Disc Menu" to "OFF". • E23, E27, E28, E31, E32, E33 and E34 are not displayed. • A program with the error number is grayed and asterisked in process Press [STOP C] to stop the disc recording or [STOP C/EJECT A] to stop the cassette tape recording on the front panel of program overlapping. VCR DVD DVD VCR Mode DVD E22 Press [CLEAR] to select the program, then press [CLEAR]. Each error number means: E1-22 Recording error other program. Introduction Connections Basic Setup Recording TIMER RECORDING Checking...
... other units when setting "Replace Disc Menu" to "OFF". • E23, E27, E28, E31, E32, E33 and E34 are not displayed. • A program with the error number is grayed and asterisked in process Press [STOP C] to stop the disc recording or [STOP C/EJECT A] to stop the cassette tape recording on the front panel of program overlapping. VCR DVD DVD VCR Mode DVD E22 Press [CLEAR] to select the program, then press [CLEAR]. Each error number means: E1-22 Recording error other program. Introduction Connections Basic Setup Recording TIMER RECORDING Checking...
Owners Manual
Page 40
To play back or eject the recorded disc, press [TIMER SET] first, then select the recorded title and press [PLAY B], or [OPEN/CLOSE A] to remove the disc. • If both devices, the program with a erase-protection tab is not in the cassette compartment or there is no cassette tape in the cassette compartment, "VCR" on the front panel during timer recording. • To cancel the timer standby mode, press [TIMER SET]. • When the starting and the ending time are overlapped...
To play back or eject the recorded disc, press [TIMER SET] first, then select the recorded title and press [PLAY B], or [OPEN/CLOSE A] to remove the disc. • If both devices, the program with a erase-protection tab is not in the cassette compartment or there is no cassette tape in the cassette compartment, "VCR" on the front panel during timer recording. • To cancel the timer standby mode, press [TIMER SET]. • When the starting and the ending time are overlapped...
Owners Manual
Page 44
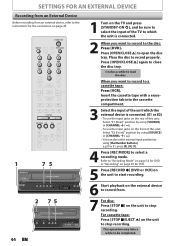
... cassette tape: Press [STOP C/EJECT A] on the unit to "Recording Mode" on page 33 for DVD or "Recording" on page 87 for the connection on the unit to open the disc tray. Press [OPEN/CLOSE A] to stop recording. ABC 2 JKL 5 TUV 8 SPACE 0 DEF 3 MNO 6 WXYZ 9 CLEAR DISC MENU o SETUP s OK B TITLE RETURN p j B i F h g C CHANNEL -- + REC MODE VCR DVD TIMER REC AUDIO I ] (DVD or VCR) on the unit to start recording. 6 Start playback on the external device to record from an external device, refer to the instructions for VCR. 5 Press [RECORD I TIMER CM SKIP D.DUBBING SET...
... cassette tape: Press [STOP C/EJECT A] on the unit to "Recording Mode" on page 33 for DVD or "Recording" on page 87 for the connection on the unit to open the disc tray. Press [OPEN/CLOSE A] to stop recording. ABC 2 JKL 5 TUV 8 SPACE 0 DEF 3 MNO 6 WXYZ 9 CLEAR DISC MENU o SETUP s OK B TITLE RETURN p j B i F h g C CHANNEL -- + REC MODE VCR DVD TIMER REC AUDIO I ] (DVD or VCR) on the unit to start recording. 6 Start playback on the external device to record from an external device, refer to the instructions for VCR. 5 Press [RECORD I TIMER CM SKIP D.DUBBING SET...
Owners Manual
Page 47
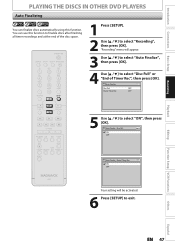
DISC MENU ABC 2 JKL 5 TUV 8 SPACE 0 o DEF 3 MNO 6 WXYZ 9 CLEAR SETUP s OK B TITLE RETURN p j B i F h g C CHANNEL -- + REC MODE VCR DVD TIMER REC AUDIO I TIMER CM SKIP D.DUBBING SET RAPID PLAY SEARCH 1 Press [SETUP]. 2 Use [K / L] to select "ON", then press [OK]. Auto Finalize - End of Timer Rec", then press [OK]. Editing Function Setup VCR Functions Others Español EN 47 Disc Full DVD ON OFF Auto Finalize - Introduction Connections Basic Setup Recording Playback PLAYING THE DISCS IN OTHER DVD PLAYERS Auto Finalizing You can use this function....
DISC MENU ABC 2 JKL 5 TUV 8 SPACE 0 o DEF 3 MNO 6 WXYZ 9 CLEAR SETUP s OK B TITLE RETURN p j B i F h g C CHANNEL -- + REC MODE VCR DVD TIMER REC AUDIO I TIMER CM SKIP D.DUBBING SET RAPID PLAY SEARCH 1 Press [SETUP]. 2 Use [K / L] to select "ON", then press [OK]. Auto Finalize - End of Timer Rec", then press [OK]. Editing Function Setup VCR Functions Others Español EN 47 Disc Full DVD ON OFF Auto Finalize - Introduction Connections Basic Setup Recording Playback PLAYING THE DISCS IN OTHER DVD PLAYERS Auto Finalizing You can use this function....
Owners Manual
Page 81
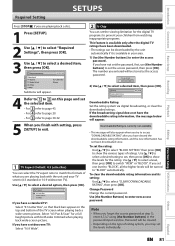
... sides trimmed when playing back wide-screen picture. Introduction Connections Basic Setup Recording Playback Required Setting SETUPS Press [STOP C] if you forget the access password at step 1), enter 4,7,3,7 using [the Number buttons] in your TV screen (4:3 standard or 16:9 widescreen TV). Required Settings VCR DVD 3 Video Input 1 TV Aspect 4 TV Audio Select 5 CC Style 2 V-Chip 4:3 Letter Box Stereo Submenu will be downloaded by the unit automatically if it is currently not available. • This message will be...
... sides trimmed when playing back wide-screen picture. Introduction Connections Basic Setup Recording Playback Required Setting SETUPS Press [STOP C] if you forget the access password at step 1), enter 4,7,3,7 using [the Number buttons] in your TV screen (4:3 standard or 16:9 widescreen TV). Required Settings VCR DVD 3 Video Input 1 TV Aspect 4 TV Audio Select 5 CC Style 2 V-Chip 4:3 Letter Box Stereo Submenu will be downloaded by the unit automatically if it is currently not available. • This message will be...
Owners Manual
Page 83
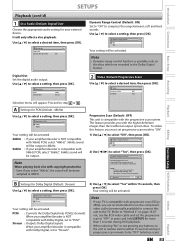
It will appear. Video Progressive Scan Still Mode OFF Auto DVD Recording Playback Editing Function Setup VCR Functions Selection menu will only affect a disc playback. Proceed to select a setting, then press [OK]. Progressive Scan (Default : OFF) This unit is compatible with Dolby Digital, set to connect this feature, you select "96kHz", the sound will be activated. Video - PCM 48kHz 96kHz DVD Your setting will be activated. 48kHz 96kHz : If your amplifier/decoder is compatible with component video cable. To utilize this unit to the...
It will appear. Video Progressive Scan Still Mode OFF Auto DVD Recording Playback Editing Function Setup VCR Functions Selection menu will only affect a disc playback. Proceed to select a setting, then press [OK]. Progressive Scan (Default : OFF) This unit is compatible with Dolby Digital, set to connect this feature, you select "96kHz", the sound will be activated. Video - PCM 48kHz 96kHz DVD Your setting will be activated. 48kHz 96kHz : If your amplifier/decoder is compatible with component video cable. To utilize this unit to the...

Owners Manual
Page 90
..., and connect it in case of power failure). • Press [TIMER SET] to cancel the timer standby mode. There is turned on . • Check that has priority (page 40). • Disc space was a power failure during recording. Preset" in the remote control. • Check if the unit is no sound. TV channels cannot be changed . • Switch the input to TV. • Connect the RF coaxial cable correctly (pages 13-15). Playback picture is...
..., and connect it in case of power failure). • Press [TIMER SET] to cancel the timer standby mode. There is turned on . • Check that has priority (page 40). • Disc space was a power failure during recording. Preset" in the remote control. • Check if the unit is no sound. TV channels cannot be changed . • Switch the input to TV. • Connect the RF coaxial cable correctly (pages 13-15). Playback picture is...
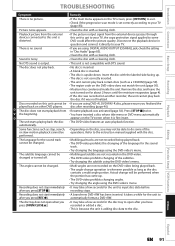
Owners Manual
Page 91
... be changed . • Multi-angles are using the DVD-video's menu. Recording does not stop , search, • Depending on the disc, you finalized the played back on other DVD players. Editing Function Setup VCR Functions Others Español EN 91 Playback picture from the external devices connected to this unit to get to your TV, the copy protection signal applied to your TV (page 83). recording stops. It takes a while for the disc tray to input disc data...
... be changed . • Multi-angles are using the DVD-video's menu. Recording does not stop , search, • Depending on the disc, you finalized the played back on other DVD players. Editing Function Setup VCR Functions Others Español EN 91 Playback picture from the external devices connected to this unit to get to your TV, the copy protection signal applied to your TV (page 83). recording stops. It takes a while for the disc tray to input disc data...
Owners Manual
Page 93
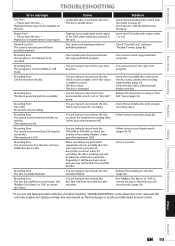
...unit after that had been recorded by other recorders. Playback Editing Function Setup VCR Functions Others Español EN 93 Recording Error This program is already finalized. Introduction Connections Basic Setup Recording TROUBLESHOOTING Error message Disc Error - Recording Error This program is full. (No area for calling our help line mentioned on one disc. (The maximum is set in your region. Recording Error Disc is not recordable in "Disc Edit" menu (page 76). • Insert the recordable disc with enough recording space. • Delete unnecessary titles...
...unit after that had been recorded by other recorders. Playback Editing Function Setup VCR Functions Others Español EN 93 Recording Error This program is already finalized. Introduction Connections Basic Setup Recording TROUBLESHOOTING Error message Disc Error - Recording Error This program is full. (No area for calling our help line mentioned on one disc. (The maximum is set in your region. Recording Error Disc is not recordable in "Disc Edit" menu (page 76). • Insert the recordable disc with enough recording space. • Delete unnecessary titles...


