Owners Manual
Page 4
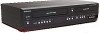
...technology must be displayed in a horizontal and stable position. This product incorporates copyright protection technology that not all high definition television sets are fully compatible with insufficient ventilation for servicing. Reverse engineering or disassembly is protected by U.S. In case of picture problems with...is intended for Progressive Scan Output Consumers should note that is prohibited. Do not block the ventilation holes on this 525p DVD player, please contact our customer service center. 4 EN Do not place the unit directly on top of this product ...
...technology must be displayed in a horizontal and stable position. This product incorporates copyright protection technology that not all high definition television sets are fully compatible with insufficient ventilation for servicing. Reverse engineering or disassembly is protected by U.S. In case of picture problems with...is intended for Progressive Scan Output Consumers should note that is prohibited. Do not block the ventilation holes on this 525p DVD player, please contact our customer service center. 4 EN Do not place the unit directly on top of this product ...
Owners Manual
Page 6
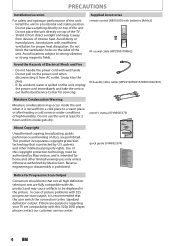
...VCR / DVD RECORDER SWITCHING 18 GUIDE TO ON-SCREEN DISPLAYS AND MENUS . . . . . 19 On-Screen Display / Menu 19 Main Menu 20 INITIAL SETTING 21 CHANNEL SETTING 22 Auto Channel Scan 22 Adding / Deleting Channels 23 SETTING THE CLOCK 25 Auto Clock Setting 25 Manual Clock Setting...Closed Caption 30 Closed Caption Style 31 Recording INFORMATION ON DVD RECORDING 33 BEFORE RECORDING 34 Make Recording Compatible 34 Setting for Auto Chapter 34 BASIC RECORDING & ONE-TOUCH TIMER RECORDING 35 TIMER RECORDING 37 Hints for Timer Recording 40 OVERWRITING UNNECESSARY TITLE 41 Overwriting from...
...VCR / DVD RECORDER SWITCHING 18 GUIDE TO ON-SCREEN DISPLAYS AND MENUS . . . . . 19 On-Screen Display / Menu 19 Main Menu 20 INITIAL SETTING 21 CHANNEL SETTING 22 Auto Channel Scan 22 Adding / Deleting Channels 23 SETTING THE CLOCK 25 Auto Clock Setting 25 Manual Clock Setting...Closed Caption 30 Closed Caption Style 31 Recording INFORMATION ON DVD RECORDING 33 BEFORE RECORDING 34 Make Recording Compatible 34 Setting for Auto Chapter 34 BASIC RECORDING & ONE-TOUCH TIMER RECORDING 35 TIMER RECORDING 37 Hints for Timer Recording 40 OVERWRITING UNNECESSARY TITLE 41 Overwriting from...
Owners Manual
Page 7
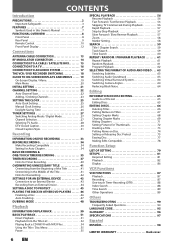
... surround sound in most cases, it is pressed during recording, the recording time will be played back on regular DVD players, including computer DVD drives compatible with MP3 files Setting / clearing chapter marks: You can easily set / clear chapter marks on titles. EN 7 Editing Function Setup VCR Functions Others Español Introduction Connections Basic Setup FEATURES...
... surround sound in most cases, it is pressed during recording, the recording time will be played back on regular DVD players, including computer DVD drives compatible with MP3 files Setting / clearing chapter marks: You can easily set / clear chapter marks on titles. EN 7 Editing Function Setup VCR Functions Others Español Introduction Connections Basic Setup FEATURES...
Owners Manual
Page 8
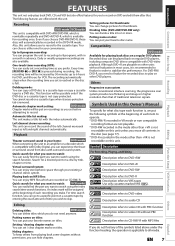
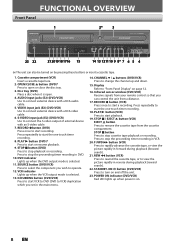
... to connect external device with an S-video cable. 7. AUDIO input jacks (E2) (DVD/VCR) Use to open . 4. SOURCE button (DVD/VCR) Press to start recording. VCR indicator Lights up when the DVD output mode is selected. 13. Press repeatedly to select the component you set in the main menu. 14. STOP C button Press to turn on . 8 EN STANDBY...
... to connect external device with an S-video cable. 7. AUDIO input jacks (E2) (DVD/VCR) Use to open . 4. SOURCE button (DVD/VCR) Press to start recording. VCR indicator Lights up when the DVD output mode is selected. 13. Press repeatedly to select the component you set in the main menu. 14. STOP C button Press to turn on . 8 EN STANDBY...
Owners Manual
Page 10
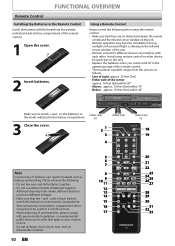
... hazards such as follows. - DISC MENU ABC 2 JKL 5 TUV 8 SPACE 0 o DEF 3 MNO 6 WXYZ 9 CLEAR SETUP s OK B TITLE RETURN p j B i F h g C CHANNEL -- + REC MODE VCR DVD TIMER REC AUDIO I TIMER CM SKIP D.DUBBING SET RAPID PLAY SEARCH 18 19 20 21 22 23 24 2625 27 28 29 30 31 32 33 10 EN Avoid using...
... hazards such as follows. - DISC MENU ABC 2 JKL 5 TUV 8 SPACE 0 o DEF 3 MNO 6 WXYZ 9 CLEAR SETUP s OK B TITLE RETURN p j B i F h g C CHANNEL -- + REC MODE VCR DVD TIMER REC AUDIO I TIMER CM SKIP D.DUBBING SET RAPID PLAY SEARCH 18 19 20 21 22 23 24 2625 27 28 29 30 31 32 33 10 EN Avoid using...
Owners Manual
Page 11
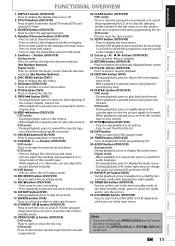
... clear the program once entered in the main menu. RAPID PLAY button (DVD) During playback, press to set in the timer programming list, etc. TIMER SET button (DVD/VCR) Press to playback in reverse. 11. FUNCTIONAL OVERVIEW Introduction Connections Basic Setup Recording Playback 1. DISPLAY button (DVD/VCR) Press to switch between digital TV mode (DTV) and analog TV...
... clear the program once entered in the main menu. RAPID PLAY button (DVD) During playback, press to set in the timer programming list, etc. TIMER SET button (DVD/VCR) Press to playback in reverse. 11. FUNCTIONAL OVERVIEW Introduction Connections Basic Setup Recording Playback 1. DISPLAY button (DVD/VCR) Press to switch between digital TV mode (DTV) and analog TV...
Owners Manual
Page 12
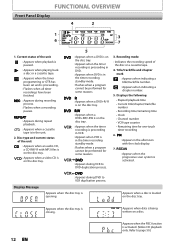
... tape. : Appears when the timer programming or OTR has been set and is proceeding. : Flashes when all timer recordings have been finished. : Appears during recording process. : Flashes when a recording pauses. : Appears during VCR to DVD duplication process. 3. Appears when the disc tray is in the timer recording standby mode. : Flashes when a program cannot be performed for some...
... tape. : Appears when the timer programming or OTR has been set and is proceeding. : Flashes when all timer recordings have been finished. : Appears during recording process. : Flashes when a recording pauses. : Appears during VCR to DVD duplication process. 3. Appears when the disc tray is in the timer recording standby mode. : Flashes when a program cannot be performed for some...
Owners Manual
Page 13
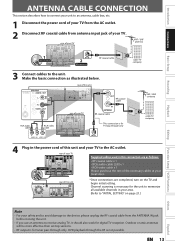
.../CB IN PR /CR ANTENNA R R IN ---VIDEO---OUT OUT RF coaxial cable rear of this unit DIGITAL AUDIO OUT DVD DVD/VCR AUDIO S-VIDEO COMPONENT S-VIDEO IN ---AUDIO---OUT OUT VIDEO OUT OUT Y L L IN COAXIAL L OUT R PB /...AUDIO IN VIDEO IN This connection is for digital TV reception. Introduction Connections Basic Setup Recording ANTENNA CABLE CONNECTION This section describes how to connect your unit to the AC outlet....for TV loop through only ANT. Outdoor or attic antennas will be more effective than set-top versions. • RF output is not possible. EN 13 rear of your...
.../CB IN PR /CR ANTENNA R R IN ---VIDEO---OUT OUT RF coaxial cable rear of this unit DIGITAL AUDIO OUT DVD DVD/VCR AUDIO S-VIDEO COMPONENT S-VIDEO IN ---AUDIO---OUT OUT VIDEO OUT OUT Y L L IN COAXIAL L OUT R PB /...AUDIO IN VIDEO IN This connection is for digital TV reception. Introduction Connections Basic Setup Recording ANTENNA CABLE CONNECTION This section describes how to connect your unit to the AC outlet....for TV loop through only ANT. Outdoor or attic antennas will be more effective than set-top versions. • RF output is not possible. EN 13 rear of your...
Owners Manual
Page 14
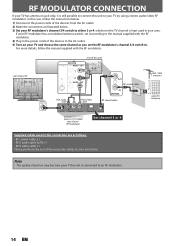
...outlet. 5) Turn on your local store. Note • The quality of the necessary cables at your TV and choose the same channel as you set it is connected to either 3 or 4, whichever the TV channel is least used in this connection are as illustrated below . 1) Disconnect the ... to your TV by using a stereo audio/video RF modulator. For more details, follow the instructions below . 3) Set your RF modulator's channel 3/4 switch to an RF modulator. 14 EN In this unit S-VIDEO DVD/VCR DVD OUT DVD/VCR DIGITAL AUDIO S-VIDEO COMPONENT S-VIDEO IN ---AUDIO---OUT IN --- If your TV ANT.
...outlet. 5) Turn on your local store. Note • The quality of the necessary cables at your TV and choose the same channel as you set it is connected to either 3 or 4, whichever the TV channel is least used in this connection are as illustrated below . 1) Disconnect the ... to your TV by using a stereo audio/video RF modulator. For more details, follow the instructions below . 3) Set your RF modulator's channel 3/4 switch to an RF modulator. 14 EN In this unit S-VIDEO DVD/VCR DVD OUT DVD/VCR DIGITAL AUDIO S-VIDEO COMPONENT S-VIDEO IN ---AUDIO---OUT IN --- If your TV ANT.
Owners Manual
Page 16
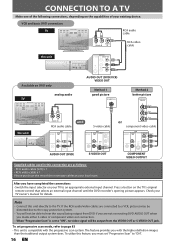
...OUT OUT Y L L IN COAXIAL L OUT R PB /CB IN PR /CR ANTENNA R R IN ---VIDEO---OUT DVD/VCR S-VIDEO IN ---AUDIO---OUT L L IN R R IN ---VIDEO---OUT Available on your local store. To set progressive scan mode, refer to "ON", no video signal will not be output from...TV's original remote control that selects an external input channel until the DVD recorder's opening picture appears. After you have completed the connections • Switch the input selector on DVD only analog audio TV AUDIO OUT (DVD/VCR) VIDEO OUT Method 1 good picture S-VIDEO IN Method 2 better ...
...OUT OUT Y L L IN COAXIAL L OUT R PB /CB IN PR /CR ANTENNA R R IN ---VIDEO---OUT DVD/VCR S-VIDEO IN ---AUDIO---OUT L L IN R R IN ---VIDEO---OUT Available on your local store. To set progressive scan mode, refer to "ON", no video signal will not be output from...TV's original remote control that selects an external input channel until the DVD recorder's opening picture appears. After you have completed the connections • Switch the input selector on DVD only analog audio TV AUDIO OUT (DVD/VCR) VIDEO OUT Method 1 good picture S-VIDEO IN Method 2 better ...
Owners Manual
Page 17
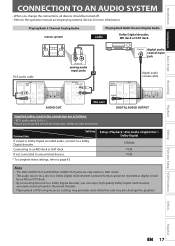
... DAT deck R L AUDIO IN analog audio input jacks RCA audio cable DIGITAL AUDIO OUT DVD AUDIO S-VIDEO COMPONENT OUT VIDEO OUT Y L OUT PB /CB COAXIAL R PR /CR DIGITAL AUDIO OUT DVD DVD/VCR AUDIO S-VIDEO COMPONENT S-VIDEO IN ---AUDIO---OUT OUT VIDEO OUT OUT Y L L IN...DVD using incorrect settings may generate noise distortion and may also damage the speakers. Setup >Playback >Disc Audio >Digital Out > Dolby Digital STREAM PCM PCM Note • The DVD AUDIO OUT and DIGITAL AUDIO OUT jacks are as heard in a Dolby Digital multi channel surround format cannot be recorded...
... DAT deck R L AUDIO IN analog audio input jacks RCA audio cable DIGITAL AUDIO OUT DVD AUDIO S-VIDEO COMPONENT OUT VIDEO OUT Y L OUT PB /CB COAXIAL R PR /CR DIGITAL AUDIO OUT DVD DVD/VCR AUDIO S-VIDEO COMPONENT S-VIDEO IN ---AUDIO---OUT OUT VIDEO OUT OUT Y L L IN...DVD using incorrect settings may generate noise distortion and may also damage the speakers. Setup >Playback >Disc Audio >Digital Out > Dolby Digital STREAM PCM PCM Note • The DVD AUDIO OUT and DIGITAL AUDIO OUT jacks are as heard in a Dolby Digital multi channel surround format cannot be recorded...
Owners Manual
Page 18
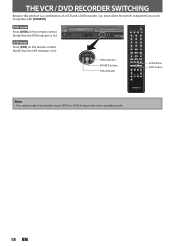
... AUDIO I TIMER CM SKIP D.DUBBING SET RAPID PLAY SEARCH VCR button DVD button Note • You cannot switch to operate with [SOURCE]. DVD mode Press [DVD] on the remote control. (Verify that the DVD indicator is lit.) VCR mode Press [VCR] on the remote control. (Verify that the VCR indicator is a combination of a VCR and a DVD recorder, you must select first which...
... AUDIO I TIMER CM SKIP D.DUBBING SET RAPID PLAY SEARCH VCR button DVD button Note • You cannot switch to operate with [SOURCE]. DVD mode Press [DVD] on the remote control. (Verify that the DVD indicator is lit.) VCR mode Press [VCR] on the remote control. (Verify that the VCR indicator is a combination of a VCR and a DVD recorder, you must select first which...
Owners Manual
Page 19
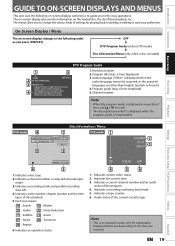
...4 11 0:00:00 5 Disc Information / Menu 1 VCR mode 1 DVD+RW CH 2 2 12:00AM 2 CH 21 Stereo 3 HQ(1Hr) 1:01 6 3 1. EN 19 Others Español Indicates a channel number or selected external input mode. 3. Indicates a recording mode and possible recording time left. 4. Broadcast station 2. Program guide (max.... on the disc you the information on -screen display give you inserted. The menus allow you to change the various kinds of settings for explanation. Program title (max. 2 lines displayed) 3. SP 0:00:00 HIFI 4 5 6 1. Indicates an operation status...
...4 11 0:00:00 5 Disc Information / Menu 1 VCR mode 1 DVD+RW CH 2 2 12:00AM 2 CH 21 Stereo 3 HQ(1Hr) 1:01 6 3 1. EN 19 Others Español Indicates a channel number or selected external input mode. 3. Indicates a recording mode and possible recording time left. 4. Broadcast station 2. Program guide (max.... on the disc you the information on -screen display give you inserted. The menus allow you to change the various kinds of settings for explanation. Program title (max. 2 lines displayed) 3. SP 0:00:00 HIFI 4 5 6 1. Indicates an operation status...
Owners Manual
Page 20
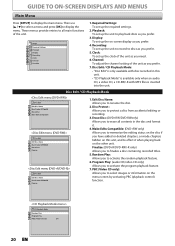
...back on the other unit. PBC (Video CD only): Allows you prefer. 3. Setup 1 Required Settings 2 Playback 3 Display 4 Recording 5 Clock 6 Channel 7 Disc Edit 1. Erase Disc: (DVD+RW/DVD-RWonly) Allows you to erase all main functions of the unit as you to select images or ... entries to rename the disc. 2. Display: To set up the on-screen display as you to activate the random playback feature. 6. Then use [K / L] to select a menu and press [OK] to finalize a disc containing recorded titles. 5. Finalize: (DVD+R/DVD-RW/-R only) Allows you to all contents in...
...back on the other unit. PBC (Video CD only): Allows you prefer. 3. Setup 1 Required Settings 2 Playback 3 Display 4 Recording 5 Clock 6 Channel 7 Disc Edit 1. Erase Disc: (DVD+RW/DVD-RWonly) Allows you to erase all main functions of the unit as you to select images or ... entries to rename the disc. 2. Display: To set up the on-screen display as you to activate the random playback feature. 6. Then use [K / L] to select a menu and press [OK] to finalize a disc containing recorded titles. 5. Finalize: (DVD+R/DVD-RW/-R only) Allows you to all contents in...
Owners Manual
Page 21
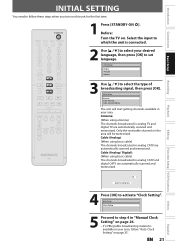
...o DEF 3 MNO 6 WXYZ 9 CLEAR SETUP s OK B TITLE RETURN p j B i F h g C CHANNEL -- + REC MODE VCR DVD TIMER REC AUDIO I TIMER CM SKIP D.DUBBING SET RAPID PLAY SEARCH 1 Press [STANDBY-ON y]. Select the input to which the unit is available in your area, follow these steps when you turn ... Setup Antenna Cable (Analog) Cable (Analog / Digital) The unit will be memorized. EN 21 Introduction Connections Basic Setup Recording INITIAL SETTING You need to follow "Auto Clock Setting" on . STANDBY-ON SOURCE DTV/TV DISPLAY OPEN/CLOSE A .@/: 1 GHI 4 PQRS 7 . CH 1 Auto ...
...o DEF 3 MNO 6 WXYZ 9 CLEAR SETUP s OK B TITLE RETURN p j B i F h g C CHANNEL -- + REC MODE VCR DVD TIMER REC AUDIO I TIMER CM SKIP D.DUBBING SET RAPID PLAY SEARCH 1 Press [STANDBY-ON y]. Select the input to which the unit is available in your area, follow these steps when you turn ... Setup Antenna Cable (Analog) Cable (Analog / Digital) The unit will be memorized. EN 21 Introduction Connections Basic Setup Recording INITIAL SETTING You need to follow "Auto Clock Setting" on . STANDBY-ON SOURCE DTV/TV DISPLAY OPEN/CLOSE A .@/: 1 GHI 4 PQRS 7 . CH 1 Auto ...
Owners Manual
Page 22
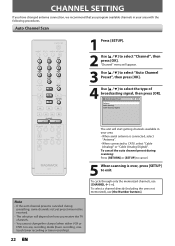
... (Analog/Digital)". CHANNEL SETTING If you have changed antenna connection, we recommend that you receive the TV channels. • You cannot change the channel when either VCR or DVD is in any recording mode (basic recording, onetouch timer recording or timer recording). 22 EN To cancel... TUV 8 SPACE 0 DEF 3 MNO 6 WXYZ 9 CLEAR DISC MENU o SETUP s OK B TITLE RETURN p j B i F h g C CHANNEL -- + REC MODE VCR DVD TIMER REC AUDIO I TIMER CM SKIP D.DUBBING SET RAPID PLAY SEARCH 1 Press [SETUP]. 2 Use [K / L] to select the type of broadcasting signal, then press [OK].
... (Analog/Digital)". CHANNEL SETTING If you have changed antenna connection, we recommend that you receive the TV channels. • You cannot change the channel when either VCR or DVD is in any recording mode (basic recording, onetouch timer recording or timer recording). 22 EN To cancel... TUV 8 SPACE 0 DEF 3 MNO 6 WXYZ 9 CLEAR DISC MENU o SETUP s OK B TITLE RETURN p j B i F h g C CHANNEL -- + REC MODE VCR DVD TIMER REC AUDIO I TIMER CM SKIP D.DUBBING SET RAPID PLAY SEARCH 1 Press [SETUP]. 2 Use [K / L] to select the type of broadcasting signal, then press [OK].
Owners Manual
Page 23
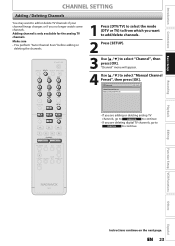
...Recording CHANNEL SETTING Adding / Deleting Channels You may want to continue. Adding channel is only available for the analog TV channels. ABC 2 JKL 5 TUV 8 SPACE 0 DEF 3 MNO 6 WXYZ 9 CLEAR DISC MENU o SETUP s OK B TITLE RETURN p j B i F h g C CHANNEL -- + REC MODE VCR DVD... TIMER REC AUDIO I TIMER CM SKIP D.DUBBING SET RAPID PLAY SEARCH 3 Use [K / L] to select "Manual Channel Preset", then press [OK]. Channel VCR DVD Auto Channel Preset Manual Channel Preset • If you are adding or deleting ...
...Recording CHANNEL SETTING Adding / Deleting Channels You may want to continue. Adding channel is only available for the analog TV channels. ABC 2 JKL 5 TUV 8 SPACE 0 DEF 3 MNO 6 WXYZ 9 CLEAR DISC MENU o SETUP s OK B TITLE RETURN p j B i F h g C CHANNEL -- + REC MODE VCR DVD... TIMER REC AUDIO I TIMER CM SKIP D.DUBBING SET RAPID PLAY SEARCH 3 Use [K / L] to select "Manual Channel Preset", then press [OK]. Channel VCR DVD Auto Channel Preset Manual Channel Preset • If you are adding or deleting ...
Owners Manual
Page 24
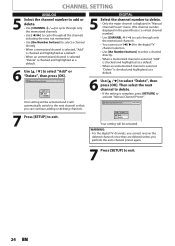
...deleting channels. 7 Press [SETUP] to exit. Manual Channel Preset VCR DVD DTV 2 (CH - - - ) Add Delete Your setting will be activated and it will be activated. Manual Channel Preset VCR DVD CH 2 Add Delete Your setting will automatically switch to the next channel so that you perform the... auto channel preset again. 7 Press [SETUP] to exit. 24 EN CHANNEL SETTING ANALOG 5 Select the channel number to add or ...
...deleting channels. 7 Press [SETUP] to exit. Manual Channel Preset VCR DVD DTV 2 (CH - - - ) Add Delete Your setting will be activated and it will be activated. Manual Channel Preset VCR DVD CH 2 Add Delete Your setting will automatically switch to the next channel so that you perform the... auto channel preset again. 7 Press [SETUP] to exit. 24 EN CHANNEL SETTING ANALOG 5 Select the channel number to add or ...
Owners Manual
Page 25
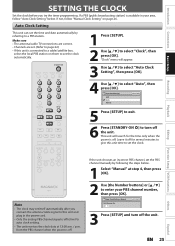
.../CLOSE A .@/: 1 GHI 4 PQRS 7 . Manual Set Channel No. Auto Clock Setting VCR DVD OFF Auto Manual 5 Press [SETUP] to exit. 6 Press [STANDBY-ON y] to turn off for several minutes to give this unit time to a PBS station. Note • The clock may set the clock. Introduction Connections Basic Setup Recording Playback SETTING THE CLOCK Set the clock before you...
.../CLOSE A .@/: 1 GHI 4 PQRS 7 . Manual Set Channel No. Auto Clock Setting VCR DVD OFF Auto Manual 5 Press [SETUP] to exit. 6 Press [STANDBY-ON y] to turn off for several minutes to give this unit time to a PBS station. Note • The clock may set the clock. Introduction Connections Basic Setup Recording Playback SETTING THE CLOCK Set the clock before you...
Owners Manual
Page 26
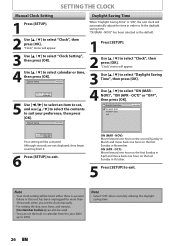
...to select calendar or time, then press [OK]. OCT)" or "OFF", then press [OK]. OCT) OFF VCR DVD JAN / 01 / 2007 ( MON ) 12: 00 AM Your setting will be used. • You can set the built-in October. 5 Press [SETUP] to exit. NOV): Move forward one hour on the second Sunday... Saving Time", then press [OK]. Daylight Saving Time ON (MAR - NOV) ON (APR - Note • Your clock setting will automatically adjust the time in November. Clock Setting VCR DVD 4 Use [K / L] to select "Clock", then press [OK]. Although seconds are not displayed, they begin counting from the...
...to select calendar or time, then press [OK]. OCT)" or "OFF", then press [OK]. OCT) OFF VCR DVD JAN / 01 / 2007 ( MON ) 12: 00 AM Your setting will be used. • You can set the built-in October. 5 Press [SETUP] to exit. NOV): Move forward one hour on the second Sunday... Saving Time", then press [OK]. Daylight Saving Time ON (MAR - NOV) ON (APR - Note • Your clock setting will automatically adjust the time in November. Clock Setting VCR DVD 4 Use [K / L] to select "Clock", then press [OK]. Although seconds are not displayed, they begin counting from the...


