User manual, English (US)
Page 1
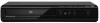
...only, it at www.magnavox.com/support © 2009 Funai Electric Co., Ltd. PRECAUTIONS IMPORTANT SAFETY INSTRUCTIONS 2 About the Discs 5 Playable Discs 5 Unplayable Discs 5 SETUP Connections 6 Connection to a TV 6 HDMI Audio 7 HDMI Mode and Actual Output Signals 7 Connection to RF Modulator (Not... 4 ANT. For more details, follow the instructions below. 1) Disconnect the power cords of your TV has antenna in your area. DVD / CD Player MDV3000/F7 INSTRUCCIONES EN ESPAÑOL INCLUIDAS. Supplied Accessories Contents PRECAUTIONS SETUP Español INFORMATION DVD FUNCTIONS...
...only, it at www.magnavox.com/support © 2009 Funai Electric Co., Ltd. PRECAUTIONS IMPORTANT SAFETY INSTRUCTIONS 2 About the Discs 5 Playable Discs 5 Unplayable Discs 5 SETUP Connections 6 Connection to a TV 6 HDMI Audio 7 HDMI Mode and Actual Output Signals 7 Connection to RF Modulator (Not... 4 ANT. For more details, follow the instructions below. 1) Disconnect the power cords of your TV has antenna in your area. DVD / CD Player MDV3000/F7 INSTRUCCIONES EN ESPAÑOL INCLUIDAS. Supplied Accessories Contents PRECAUTIONS SETUP Español INFORMATION DVD FUNCTIONS...
User manual, English (US)
Page 2
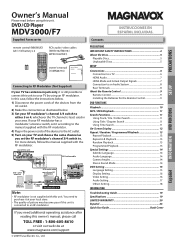
...the following measures: 1) Reorient or relocate the receiving antenna. 2) Increase the separation between the equipment and receiver. 3) Connect the equipment into the apparatus, the apparatus has been exposed to qualified service personnel. If this equipment does cause harmful interference...for CLASS ll (Double Insulation) IMPORTANT SAFETY INSTRUCTIONS 1. The exclamation point within an equilateral triangle is connected. 4) Consult the dealer or an experienced radio /TV technician for your outlet, consult an electrician for replacement of the polarized or grounding-type plug. Keep ...
...the following measures: 1) Reorient or relocate the receiving antenna. 2) Increase the separation between the equipment and receiver. 3) Connect the equipment into the apparatus, the apparatus has been exposed to qualified service personnel. If this equipment does cause harmful interference...for CLASS ll (Double Insulation) IMPORTANT SAFETY INSTRUCTIONS 1. The exclamation point within an equilateral triangle is connected. 4) Consult the dealer or an experienced radio /TV technician for your outlet, consult an electrician for replacement of the polarized or grounding-type plug. Keep ...
User manual, English (US)
Page 3
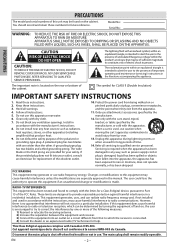
...in accordance with your fingers or objects into beam. Notice for Progressive Scan Output • Consumers should note that the user switch the connection to dust or strong vibration. • Avoid a place with wet hands. • Do not pull on it from an AC outlet... are questions regarding your local recycling regulations. • Batteries should remove the cover or attempt to be displayed in accordance with your TV set compatibility with the same or equivalent type. CAUTION: Visible and invisible laser radiation when open and interlocks defeated. Dew Condensation Warning...
...in accordance with your fingers or objects into beam. Notice for Progressive Scan Output • Consumers should note that the user switch the connection to dust or strong vibration. • Avoid a place with wet hands. • Do not pull on it from an AC outlet... are questions regarding your local recycling regulations. • Batteries should remove the cover or attempt to be displayed in accordance with your TV set compatibility with the same or equivalent type. CAUTION: Visible and invisible laser radiation when open and interlocks defeated. Dew Condensation Warning...
User manual, English (US)
Page 6
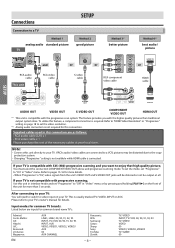
...higher quality pictures than 5 seconds. This is required. Admiral: Curtis Mathis: GE: Hitachi: JVC: Kenwood: LXI-Series: Magnavox: EN AUX LINE1, LINE2, 00, 90, 91, 92, 93 INPUT, TV / VCR, 00, 90, 91, 92, 93 INPUT, AUX VIDEO, VIDEO1, VIDEO2, VIDEO3 AUX 00 AUX CHANNEL Panasonic... in "Video" menu. Note: • Connect this feature, a component connection is usually marked TV / VIDEO, INPUT or AUX. TV / VIDEO INPUT, TV / VCR, 00, 90, 91, 92, 93 TV / VIDEO VIDEO 00 VIDEO1, VIDEO2, VIDEO3 TV / GAME 00 You must select the connection COMPONENT VIDEO OUT above and progressive scanning mode...
...higher quality pictures than 5 seconds. This is required. Admiral: Curtis Mathis: GE: Hitachi: JVC: Kenwood: LXI-Series: Magnavox: EN AUX LINE1, LINE2, 00, 90, 91, 92, 93 INPUT, TV / VCR, 00, 90, 91, 92, 93 INPUT, AUX VIDEO, VIDEO1, VIDEO2, VIDEO3 AUX 00 AUX CHANNEL Panasonic... in "Video" menu. Note: • Connect this feature, a component connection is usually marked TV / VIDEO, INPUT or AUX. TV / VIDEO INPUT, TV / VCR, 00, 90, 91, 92, 93 TV / VIDEO VIDEO 00 VIDEO1, VIDEO2, VIDEO3 TV / GAME 00 You must select the connection COMPONENT VIDEO OUT above and progressive scanning mode...
User manual, English (US)
Page 7
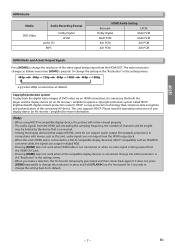
...digital content protection system). Note: • When using HDCP-incompatible display device, the picture will not be limited by the device that is connected. • Among the display device(s) that support HDMI, some do not support audio output (for example, projectors). If it is necessary ... to change the setting in the "Resolution" in the settings menu. • When you make a selection, the TV monitor temporarily goes blank and then comes back again. In connections with device such as this unit, audio signals are not output from the HDMI output jack. • When this ...
...digital content protection system). Note: • When using HDCP-incompatible display device, the picture will not be limited by the device that is connected. • Among the display device(s) that support HDMI, some do not support audio output (for example, projectors). If it is necessary ... to change the setting in the "Resolution" in the settings menu. • When you make a selection, the TV monitor temporarily goes blank and then comes back again. In connections with device such as this unit, audio signals are not output from the HDMI output jack. • When this ...
User manual, English (US)
Page 8
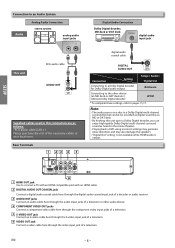
.... Rear Terminals 1 23 4 5 Digital Audio Connection Dolby Digital decoder, MD deck or DAT deck COAXIAL digital audio input jack digital audio coaxial cable DIGITAL AUDIO OUT Connection Setting Setup > Audio> Digital Out Connecting to connect a TV with an HDMI compatible port with an HDMI cable.... 2 DIGITAL AUDIO OUT COAXIAL jack Connect a digital audio coaxial cable here through the digital audio ...
.... Rear Terminals 1 23 4 5 Digital Audio Connection Dolby Digital decoder, MD deck or DAT deck COAXIAL digital audio input jack digital audio coaxial cable DIGITAL AUDIO OUT Connection Setting Setup > Audio> Digital Out Connecting to connect a TV with an HDMI compatible port with an HDMI cable.... 2 DIGITAL AUDIO OUT COAXIAL jack Connect a digital audio coaxial cable here through the digital audio ...
User manual, English (US)
Page 10
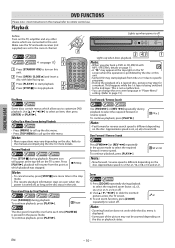
Make sure the TV and audio receiver (not supplied) are connected to this unit. 2 Press [OPEN / CLOSE A] and insert a disc with MP3 ... function, press [ZOOM] repeatedly to select off . 2) Use [K / L / s / B] to slide the zoomed picture across the TV screen. R.Stop Note: • To cancel resume, press [STOP C] one frame each time [PAUSE F] is pressed in the pause mode... due to specific programs. • During the playback of the picture may not be zoomed depending on the TV screen. Note: • Zooming function does not work while the disc menu is displayed. • Some...
Make sure the TV and audio receiver (not supplied) are connected to this unit. 2 Press [OPEN / CLOSE A] and insert a disc with MP3 ... function, press [ZOOM] repeatedly to select off . 2) Use [K / L / s / B] to slide the zoomed picture across the TV screen. R.Stop Note: • To cancel resume, press [STOP C] one frame each time [PAUSE F] is pressed in the pause mode... due to specific programs. • During the playback of the picture may not be zoomed depending on the TV screen. Note: • Zooming function does not work while the disc menu is displayed. • Some...
User manual, English (US)
Page 16
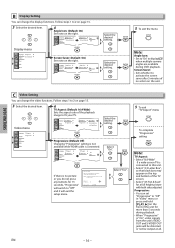
...Video Audio Others Language TV Aspect Display Progressive Video Audio TV Aspect Progressive 16:9 Wide 4:3 Letter Box 4:3 Pan & Scan Progressive: (Default: Off) Changing "Progressive" setting is not available while HDMI cable is connected to display when multiple ...TV Aspect Progressive On Off Select the desired setting. B Display Setting You can change the display functions. Yes Progressive On No Select: K / L Set:ENTER Select "Yes". 5 To exit "TV Aspect" menu To complete "Progressive" setting Note: TV Aspect: • Select "16:9 Wide" if a wide-screen TV is connected...
...Video Audio Others Language TV Aspect Display Progressive Video Audio TV Aspect Progressive 16:9 Wide 4:3 Letter Box 4:3 Pan & Scan Progressive: (Default: Off) Changing "Progressive" setting is not available while HDMI cable is connected to display when multiple ...TV Aspect Progressive On Off Select the desired setting. B Display Setting You can change the display functions. Yes Progressive On No Select: K / L Set:ENTER Select "Yes". 5 To exit "TV Aspect" menu To complete "Progressive" setting Note: TV Aspect: • Select "16:9 Wide" if a wide-screen TV is connected...

User manual, English (US)
Page 17
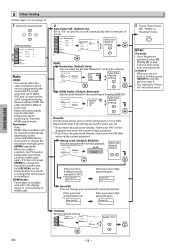
... following condition: - Sound Menu: (Default: Off) You can set to "LPCM". - Down Sampling: (Default: On) Set to a TV using AUDIO OUT jacks. - py Video Audio General DRC Reverberation Sound Menu Digital Out Dual mono Down Sampling DRC Reverberation Sound Menu Digital Out Normal... set the reverberation effect. DVD FUNCTIONS D Audio Setting Choose the appropriate audio settings for classic music • Sound Menu is connected to "On" when outputting in 48kHz. Language Display Video Audio General Dual mono Down Sampling DRC Reverberation Sound Menu Digital Out Dual...
... following condition: - Sound Menu: (Default: Off) You can set to "LPCM". - Down Sampling: (Default: On) Set to a TV using AUDIO OUT jacks. - py Video Audio General DRC Reverberation Sound Menu Digital Out Dual mono Down Sampling DRC Reverberation Sound Menu Digital Out Normal... set the reverberation effect. DVD FUNCTIONS D Audio Setting Choose the appropriate audio settings for classic music • Sound Menu is connected to "On" when outputting in 48kHz. Language Display Video Audio General Dual mono Down Sampling DRC Reverberation Sound Menu Digital Out Dual...
User manual, English (US)
Page 18
...On) Set to "On" to its default. HDMI Audio: • This feature is available only when the display device is connected by the connected TV, except when this unit off automatically after entering the current password. Resolution: • Auto: HDMI video resolution will not be ...distorted temporarily when switching to 2 on the connected HDMI device. New PIN: You can select the desired "Resolution" among the ...
...On) Set to "On" to its default. HDMI Audio: • This feature is available only when the display device is connected by the connected TV, except when this unit off automatically after entering the current password. Resolution: • Auto: HDMI video resolution will not be ...distorted temporarily when switching to 2 on the connected HDMI device. New PIN: You can select the desired "Resolution" among the ...
User manual, English (US)
Page 19
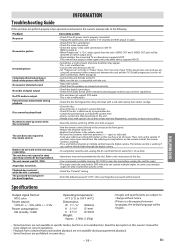
.... -Press and hold any button on its surface. -Reset the unit by the disc. The remote control is not a malfunction. -Connect the unit directly to the TV. -Make sure the disc is "On", video signals from the radio by pressing buttons on some discs. - 19 - Read the description... or picture Distorted picture Completely distorted picture or black / white picture with their polarities (+ / - The password for all . -Check whether the connected TV or other device supports HDCP. (This unit will be permitted by switching off the unit, then on again. -Aim the remote control directly at ...
.... -Press and hold any button on its surface. -Reset the unit by the disc. The remote control is not a malfunction. -Connect the unit directly to the TV. -Make sure the disc is "On", video signals from the radio by pressing buttons on some discs. - 19 - Read the description... or picture Distorted picture Completely distorted picture or black / white picture with their polarities (+ / - The password for all . -Check whether the connected TV or other device supports HDCP. (This unit will be permitted by switching off the unit, then on again. -Aim the remote control directly at ...
User manual, English (US)
Page 24
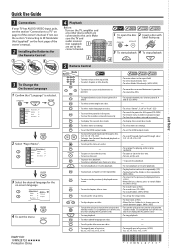
...; To skip tracks or files. • When file list / folder list is selected. Make sure the TV and audio receiver (not supplied) 1 are connected to this unit. If not, see the section "Connection to a TV" on page 6 of the owner's manual. OPEN/CLOSE 1 STANDBY-ON 3 To start playback 4 To ...• To repeat between your chosen point of A and B. • To select camera angles on a disc. • To repeat between your TV has AUDIO / VIDEO input jacks, see the section "Connecting to RF Modulator (Not Supplied)" on a disc. • To magnify part of a picture. (x2, x3, x4, x1/2, x1/3, x1/4)...
...; To skip tracks or files. • When file list / folder list is selected. Make sure the TV and audio receiver (not supplied) 1 are connected to this unit. If not, see the section "Connection to a TV" on page 6 of the owner's manual. OPEN/CLOSE 1 STANDBY-ON 3 To start playback 4 To ...• To repeat between your chosen point of A and B. • To select camera angles on a disc. • To repeat between your TV has AUDIO / VIDEO input jacks, see the section "Connecting to RF Modulator (Not Supplied)" on a disc. • To magnify part of a picture. (x2, x3, x4, x1/2, x1/3, x1/4)...


