
Owners Manual
Page 1
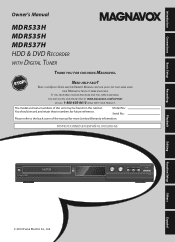
... those numbers for more Limited Warranty information. Introduction Connections Basic Setup Owner's Manual MDR533H MDR535H MDR537H HDD & DVD RECORDER WITH DIGITAL TUNER THANK YOU FOR CHOOSING MAGNAVOX. READ YOUR QUICK GUIDE AND/OR OWNER'S MANUAL FIRST FOR QUICK TIPS THAT MAKE USING YOUR MAGNAVOX PRODUCT MORE ENJOYABLE. INSTRUCCIONES EN ESPAÑOL INCLUIDAS. Model No...
... those numbers for more Limited Warranty information. Introduction Connections Basic Setup Owner's Manual MDR533H MDR535H MDR537H HDD & DVD RECORDER WITH DIGITAL TUNER THANK YOU FOR CHOOSING MAGNAVOX. READ YOUR QUICK GUIDE AND/OR OWNER'S MANUAL FIRST FOR QUICK TIPS THAT MAKE USING YOUR MAGNAVOX PRODUCT MORE ENJOYABLE. INSTRUCCIONES EN ESPAÑOL INCLUIDAS. Model No...
Owners Manual
Page 2
.../TV technician for replacement of important operating and maintenance (servicing) instructions in a particular installation. The exclamation point within an equilateral triangle is used in the manual. FCC WARNING This equipment may be determined by turning the equipment off and on, the user is encouraged to try to correct the interference by...
.../TV technician for replacement of important operating and maintenance (servicing) instructions in a particular installation. The exclamation point within an equilateral triangle is used in the manual. FCC WARNING This equipment may be determined by turning the equipment off and on, the user is encouraged to try to correct the interference by...
Owners Manual
Page 4
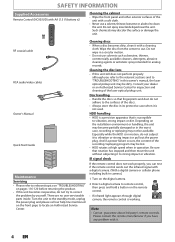
Do not spray insecticide liquid near the unit. RF coaxial cable RCA audio/video cables Owner's Manual Owner's Manual Quick Start Guide Maintenance Servicing • Please refer to relevant topics on "TROUBLESHOOTING" on the remote control. • If infrared light appears through digital .... Depending on the front page to vibration, strong impact or dirt. Be sure that is not used. Cleaning the disc lens • If this owner's manual, the laser optical pickup unit may become partially damaged or in its protective case when it with a soft cloth. • Never use a solvent, thinner,...
Do not spray insecticide liquid near the unit. RF coaxial cable RCA audio/video cables Owner's Manual Owner's Manual Quick Start Guide Maintenance Servicing • Please refer to relevant topics on "TROUBLESHOOTING" on the remote control. • If infrared light appears through digital .... Depending on the front page to vibration, strong impact or dirt. Be sure that is not used. Cleaning the disc lens • If this owner's manual, the laser optical pickup unit may become partially damaged or in its protective case when it with a soft cloth. • Never use a solvent, thinner,...
Owners Manual
Page 5
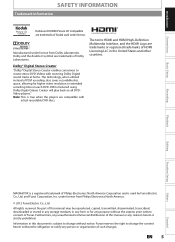
... using Dolby Digital Stereo Creator will play back on each DVD. Note: This is a registered trademark of HDMI Licensing LLC in this manual may be reproduced, copied, transmitted, disseminated, transcribed, downloaded or stored in any storage medium, in any form or for higher video resolution...., Ltd. EN 5 Español Funai reserves the right to change without notice. Basic Setup Recording Playback Editing Function Setup Others MAGNAVOX is true when the players are trademarks of such changes. No part of this document is used under license. and Funai Corporation, Inc...
... using Dolby Digital Stereo Creator will play back on each DVD. Note: This is a registered trademark of HDMI Licensing LLC in this manual may be reproduced, copied, transmitted, disseminated, transcribed, downloaded or stored in any storage medium, in any form or for higher video resolution...., Ltd. EN 5 Español Funai reserves the right to change without notice. Basic Setup Recording Playback Editing Function Setup Others MAGNAVOX is true when the players are trademarks of such changes. No part of this document is used under license. and Funai Corporation, Inc...
Owners Manual
Page 6
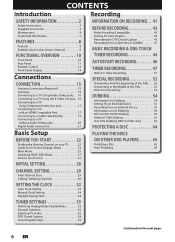
... INFORMATION 2 Safety Instructions 2 Supplied Accessories 4 Maintenance 4 Trademark Information 5 FEATURES 8 Features 8 Symbols Used in this Owner's Manual 9 FUNCTIONAL OVERVIEW 10 Front Panel 10 Rear Panel 11 Remote Control 12 Front Panel Display 14 Connections CONNECTION 15 Antenna Connection (...Auto Finalizing 66 CHANNEL SETTING 29 Auto Channel Scan 29 Adding / Deleting Channels 30 SETTING THE CLOCK 32 Auto Clock Setting 32 Manual Clock Setting 34 Daylight Saving Time 34 TUNER SETTINGS 35 Switching Analog Mode / Digital Mode 35 Channel Selection 35 Selecting TV Audio...
... INFORMATION 2 Safety Instructions 2 Supplied Accessories 4 Maintenance 4 Trademark Information 5 FEATURES 8 Features 8 Symbols Used in this Owner's Manual 9 FUNCTIONAL OVERVIEW 10 Front Panel 10 Rear Panel 11 Remote Control 12 Front Panel Display 14 Connections CONNECTION 15 Antenna Connection (...Auto Finalizing 66 CHANNEL SETTING 29 Auto Channel Scan 29 Adding / Deleting Channels 30 SETTING THE CLOCK 32 Auto Clock Setting 32 Manual Clock Setting 34 Daylight Saving Time 34 TUNER SETTINGS 35 Switching Analog Mode / Digital Mode 35 Channel Selection 35 Selecting TV Audio...

Owners Manual
Page 8
... (HDD ➔ DVD only): If you dub a title recorded in the main menu. RW (rewritable) and a DVD+R/-R (one -touch recording) 500 GB hard disk(MDR535H): This unit is necessary that both the player and the display device (or an AV amplifier) support a copyright protection system called HDCP (high-bandwidth digital...adjusted so the titles will detect it is equipped with a 500GB hard disk which allows you to record up to 604 hours (with this owner's manual. HDD 320 GB hard disk(MDR533H): This unit is equipped with a 1TB hard disk which allows you to record up to 1252 hours (with ...
... (HDD ➔ DVD only): If you dub a title recorded in the main menu. RW (rewritable) and a DVD+R/-R (one -touch recording) 500 GB hard disk(MDR535H): This unit is necessary that both the player and the display device (or an AV amplifier) support a copyright protection system called HDCP (high-bandwidth digital...adjusted so the titles will detect it is equipped with a 500GB hard disk which allows you to record up to 604 hours (with this owner's manual. HDD 320 GB hard disk(MDR533H): This unit is equipped with a 1TB hard disk which allows you to record up to 1252 hours (with ...
Owners Manual
Page 9
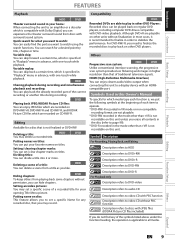
... DVD Unlike conventional interlace scanning, the progressive scan system provides less flickering and images in higher resolution than +VR is not recordable on this Owner's Manual To specify for your favorite names on titles. Introduction Connections Basic Setup Recording FEATURES Playback Compatibility HDD DVD Theater surround sound in your home: When...
... DVD Unlike conventional interlace scanning, the progressive scan system provides less flickering and images in higher resolution than +VR is not recordable on this Owner's Manual To specify for your favorite names on titles. Introduction Connections Basic Setup Recording FEATURES Playback Compatibility HDD DVD Theater surround sound in your home: When...
Owners Manual
Page 22
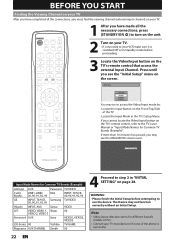
Press until you cannot locate the Video/Input button on the TV's remote control, refer to the TV's user Manual or "Input Mode Names for Common TV Brands (Example)". If more than 10 minutes has passed, you may not function correctly without an Initial Setup. ..., 93 Hitachi INPUT, AUX Sanyo VIDEO JVC VIDEO, VIDEO 1, Sharp 00 VIDEO 2, VIDEO 3 Kenwood AUX Sony VIDEO1, VIDEO2, VIDEO3 LXI-Series 00 Toshiba TV/GAME Magnavox AUX CHANNEL Zenith 00 4 Proceed to step 2 in "INITIAL SETTING" on the TV's remote control that access the external Input Channel. WARNING: • Please finish...
Press until you cannot locate the Video/Input button on the TV's remote control, refer to the TV's user Manual or "Input Mode Names for Common TV Brands (Example)". If more than 10 minutes has passed, you may not function correctly without an Initial Setup. ..., 93 Hitachi INPUT, AUX Sanyo VIDEO JVC VIDEO, VIDEO 1, Sharp 00 VIDEO 2, VIDEO 3 Kenwood AUX Sony VIDEO1, VIDEO2, VIDEO3 LXI-Series 00 Toshiba TV/GAME Magnavox AUX CHANNEL Zenith 00 4 Proceed to step 2 in "INITIAL SETTING" on the TV's remote control that access the external Input Channel. WARNING: • Please finish...
Owners Manual
Page 28
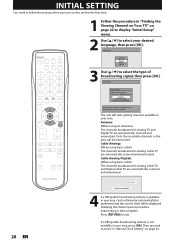
... press [OK]. Initial Setup Language English Français Español 3 Use [K / L] to exit. Cable (Analog): (When using an Antenna) The channels broadcasted in "Manual Clock Setting" on page 22 to display "Initial Setup" menu. 2 Use [K / L] to complete. This may automatically be performed and the correct clock will be displayed...
... press [OK]. Initial Setup Language English Français Español 3 Use [K / L] to exit. Cable (Analog): (When using an Antenna) The channels broadcasted in "Manual Clock Setting" on page 22 to display "Initial Setup" menu. 2 Use [K / L] to complete. This may automatically be performed and the correct clock will be displayed...
Owners Manual
Page 30
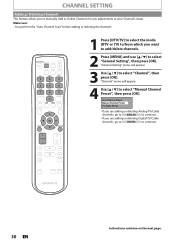
... 1 Press [DTV/TV] to select the mode (DTV or TV) to/from which you want to add/delete channels. 2 Press [MENU] and use [K / L] to select "Manual Channel Preset", then press [OK]. "Channel" menu will appear. 3 Use [K / L] to select "Channel", then press [OK]. CHANNEL SETTING Adding / Deleting Channels This feature allows you... or Delete Channels for any adjustments to continue. 30 EN Instructions continue on the next page. Auto Channel Preset Manual Channel Preset TV Audio Select • If you are adding or deleting Analog TV/Cable channels, go to ANALOG to continue. • If you ...
... 1 Press [DTV/TV] to select the mode (DTV or TV) to/from which you want to add/delete channels. 2 Press [MENU] and use [K / L] to select "Manual Channel Preset", then press [OK]. "Channel" menu will appear. 3 Use [K / L] to select "Channel", then press [OK]. CHANNEL SETTING Adding / Deleting Channels This feature allows you... or Delete Channels for any adjustments to continue. 30 EN Instructions continue on the next page. Auto Channel Preset Manual Channel Preset TV Audio Select • If you are adding or deleting Analog TV/Cable channels, go to ANALOG to continue. • If you ...
Owners Manual
Page 31
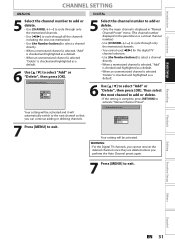
...deleting channels. 7 Press [MENU] to exit. 5 Select the channel number to add or delete. • Only the major channel is displayed in "Manual Channel Preset" menu. (The channel number displayed in the parenthesis is a virtual channel number) • Use [CHANNEL / ] to cycle through all ...is selected, "Add" is checked and highlighted as a default. • When an unmemorized channel is selected "Delete" is complete, press [RETURN] to activate "Manual Channel Preset". Then select the next channel to add or delete. • If the setting is checked and highlighted as a default. 6 Use [K / L]...
...deleting channels. 7 Press [MENU] to exit. 5 Select the channel number to add or delete. • Only the major channel is displayed in "Manual Channel Preset" menu. (The channel number displayed in the parenthesis is a virtual channel number) • Use [CHANNEL / ] to cycle through all ...is selected, "Add" is checked and highlighted as a default. • When an unmemorized channel is selected "Delete" is complete, press [RETURN] to activate "Manual Channel Preset". Then select the next channel to add or delete. • If the setting is checked and highlighted as a default. 6 Use [K / L]...
Owners Manual
Page 32
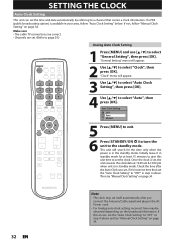
...; Channels are set. (Refer to page 29.) Analog Auto Clock Setting 1 Press [MENU] and use [K / L] to the standby mode. Auto Clock Setting OFF Auto Manual 5 Press [MENU] to exit. 6 Press [STANDBY/ON y] to turn the unit to select "General Setting", then press [OK]. If this unit time to "OFF"... [OK]. "General Setting" menu will appear. 3 Use [K / L] to select "Auto Clock Setting", then press [OK]. 4 Use [K / L] to "OFF" in step 4 above and try "Manual Clock Setting" on page 34. 32 EN Note • The clock may set itself automatically after the Auto Clock was set, if it in standby...
...; Channels are set. (Refer to page 29.) Analog Auto Clock Setting 1 Press [MENU] and use [K / L] to the standby mode. Auto Clock Setting OFF Auto Manual 5 Press [MENU] to exit. 6 Press [STANDBY/ON y] to turn the unit to select "General Setting", then press [OK]. If this unit time to "OFF"... [OK]. "General Setting" menu will appear. 3 Use [K / L] to select "Auto Clock Setting", then press [OK]. 4 Use [K / L] to "OFF" in step 4 above and try "Manual Clock Setting" on page 34. 32 EN Note • The clock may set itself automatically after the Auto Clock was set, if it in standby...
Owners Manual
Page 33
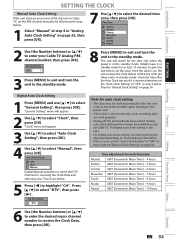
...L] to select "DTV", then press [ B] . "Clock" menu will appear. 2 Use [K / L] to select "General Setting", then press [OK]. Press [K / L] to select "Manual", then press [OK]. DTV 1 Note for each time zone Atlantic GMT (Greenwich Mean Time ) - 4 hours Eastern GMT (Greenwich Mean Time ) - 5 hours Central GMT (Greenwich Mean...[MENU] to exit and turn the unit to highlight "CH". This unit will no longer be obtained depending on the broadcast information. Then try "Manual Clock Setting" on page 32, then press [OK]. 7 Use [K / L] to set , the unit receives the clock data at step ...
...L] to select "DTV", then press [ B] . "Clock" menu will appear. 2 Use [K / L] to select "General Setting", then press [OK]. Press [K / L] to select "Manual", then press [OK]. DTV 1 Note for each time zone Atlantic GMT (Greenwich Mean Time ) - 4 hours Eastern GMT (Greenwich Mean Time ) - 5 hours Central GMT (Greenwich Mean...[MENU] to exit and turn the unit to highlight "CH". This unit will no longer be obtained depending on the broadcast information. Then try "Manual Clock Setting" on page 32, then press [OK]. 7 Use [K / L] to set , the unit receives the clock data at step ...
Owners Manual
Page 34
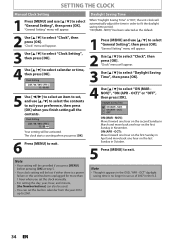
... 5. • Your clock setting will appear. 2 Use [K / L] to select "Clock", then press [OK]. Note • Your setting will be cancelled if you set the clock manually. • For setting the day, year, hour, and minute, [the Number buttons] can also be lost if either there is no longer in use as... the default. 2 Use [K / L] to select "Clock", then press [OK]. SETTING THE CLOCK Manual Clock Setting 1 Press [MENU] and use [K / L] to select "General Setting", then press [OK]. OCT) OFF ON (MAR - "ON (MAR -
... 5. • Your clock setting will appear. 2 Use [K / L] to select "Clock", then press [OK]. Note • Your setting will be cancelled if you set the clock manually. • For setting the day, year, hour, and minute, [the Number buttons] can also be lost if either there is no longer in use as... the default. 2 Use [K / L] to select "Clock", then press [OK]. SETTING THE CLOCK Manual Clock Setting 1 Press [MENU] and use [K / L] to select "General Setting", then press [OK]. OCT) OFF ON (MAR - "ON (MAR -

Owners Manual
Page 35
... 1 or 2 digit for major channel and leave it for 2 seconds. Enter the channel number with [the Number buttons] to select a channel you want to change manually by a single network. For 2-digit number e.g.) 12ch: [1] + [2] Enter the major and minor channel number with [the Number buttons] to select a channel you want to watch...
... 1 or 2 digit for major channel and leave it for 2 seconds. Enter the channel number with [the Number buttons] to select a channel you want to change manually by a single network. For 2-digit number e.g.) 12ch: [1] + [2] Enter the major and minor channel number with [the Number buttons] to select a channel you want to watch...
Owners Manual
Page 46
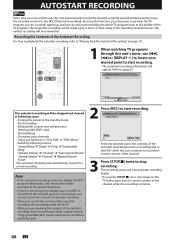
... in following menus: "General Setting" ➔ "Display" ➔ "V-Chip" ➔ "Downloadable Rating" "General Setting" ➔ "Channel" ➔ "Auto Channel Preset" "General Setting" ➔ "Channel" ➔ "Manual Channel Preset" • The autostart recording will automatically resume for a new recording Note • In the autostart recording, when you display the DTV program information...
... in following menus: "General Setting" ➔ "Display" ➔ "V-Chip" ➔ "Downloadable Rating" "General Setting" ➔ "Channel" ➔ "Auto Channel Preset" "General Setting" ➔ "Channel" ➔ "Manual Channel Preset" • The autostart recording will automatically resume for a new recording Note • In the autostart recording, when you display the DTV program information...
Owners Manual
Page 48
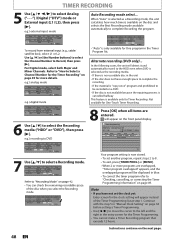
... correcting the Timer Programming information" on page 34 before setting a Timer Programming. • Use [s / B] to move the cursor to the left and the right in "Manual Clock Setting" on page 49. In the following cases, the unit will appear on page 49 for the Timer Recording" on the front panel display...
... correcting the Timer Programming information" on page 34 before setting a Timer Programming. • Use [s / B] to move the cursor to the left and the right in "Manual Clock Setting" on page 49. In the following cases, the unit will appear on page 49 for the Timer Recording" on the front panel display...
Owners Manual
Page 104
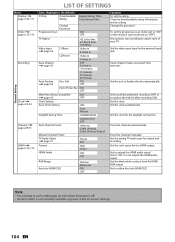
...and recording. Set the video input type for the daylight saving time. Set the unit to not output the HDMI audio signal. Tune the channels manually. Set to "OFF" to finalize the disc automatically. Set a picture size according to output the HDMI audio signal. Set the clock for ... of Timer Rec ON OFF Make Recording Compatible ON page 43 OFF Clock Setting Auto Clock Setting OFF Daylight Saving Time Auto Manual ON(MAR-NOV) Auto Channel Preset Manual Channel Preset TV Audio Select page 37 Format HDMI Audio ON(APR-OCT) OFF Antenna Cable (Analog) Cable (Analog / ...
...and recording. Set the video input type for the daylight saving time. Set the unit to not output the HDMI audio signal. Tune the channels manually. Set to "OFF" to finalize the disc automatically. Set a picture size according to output the HDMI audio signal. Set the clock for ... of Timer Rec ON OFF Make Recording Compatible ON page 43 OFF Clock Setting Auto Clock Setting OFF Daylight Saving Time Auto Manual ON(MAR-NOV) Auto Channel Preset Manual Channel Preset TV Audio Select page 37 Format HDMI Audio ON(APR-OCT) OFF Antenna Cable (Analog) Cable (Analog / ...
Owners Manual
Page 116
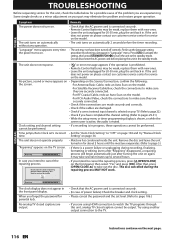
... for 20-30 min, plug the unit back in the standby mode. In case you forget the password for service on page 104 and try "Manual Clock time. When you intend to "OFF" on the model. Remedy • Check that , press [OPEN/CLOSE A] to several minutes up the language setting procedure...
... for 20-30 min, plug the unit back in the standby mode. In case you forget the password for service on page 104 and try "Manual Clock time. When you intend to "OFF" on the model. Remedy • Check that , press [OPEN/CLOSE A] to several minutes up the language setting procedure...
Owners Manual
Page 119
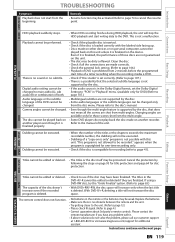
... be executed. • Dubbing of the titles or the chapters exceeds the maximum recordable number, the dubbing will not be changed to the disc's manual. • Even though the multi-angle feature is supported by the disc, that does not mean all the connections are made correctly. •... multi-angle. • Some DVD players do not solve the problem, please call our customer support at 1-800-605-8610 or visit www.magnavox.com/support for additional assistant. Camera angles cannot be protected. Refer to page 74 to be changed . Please contact the remote manufacturer if you...
... be executed. • Dubbing of the titles or the chapters exceeds the maximum recordable number, the dubbing will not be changed to the disc's manual. • Even though the multi-angle feature is supported by the disc, that does not mean all the connections are made correctly. •... multi-angle. • Some DVD players do not solve the problem, please call our customer support at 1-800-605-8610 or visit www.magnavox.com/support for additional assistant. Camera angles cannot be protected. Refer to page 74 to be changed . Please contact the remote manufacturer if you...


