User manual, English (US)
Page 1
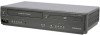
... TV VHF / UHF antenna rear of the unit to the AC outlet. 5) Turn on Unit for the First Time 8 Clock Setting...8 Function Overview 9 Front Panel Indicator Lights 9 Selecting DVD or VCR Operation 9 Front & Rear Terminals 9 Remote Control...10 Installing the Batteries for Timer...http://www.magnavox.com/support Supplied Accessories remote control unit (NB622UD / NB672UD) RCA audio / video cables (WPZ0102TM018 / WPZ0102LTE01) AA (1.5 V DC) battery x 2 owner's manual Owner's Manual (1VMN28435) Connecting to RF Modulator (Not Supplied) If your TV has antenna in Hi-Fi Stereo 11 Other...
... TV VHF / UHF antenna rear of the unit to the AC outlet. 5) Turn on Unit for the First Time 8 Clock Setting...8 Function Overview 9 Front Panel Indicator Lights 9 Selecting DVD or VCR Operation 9 Front & Rear Terminals 9 Remote Control...10 Installing the Batteries for Timer...http://www.magnavox.com/support Supplied Accessories remote control unit (NB622UD / NB672UD) RCA audio / video cables (WPZ0102TM018 / WPZ0102LTE01) AA (1.5 V DC) battery x 2 owner's manual Owner's Manual (1VMN28435) Connecting to RF Modulator (Not Supplied) If your TV has antenna in Hi-Fi Stereo 11 Other...
User manual, English (US)
Page 2
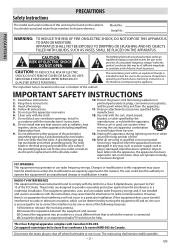
...: TO REDUCE THE RISK OF ELECTRIC SHOCK, DO NOT REMOVE COVER (OR BACK). Follow all instructions. 5. This equipment generates, uses, and can be determined by turning the equipment off and on, the user is intended to alert the user to shut off when find trouble or not in the literature accompanying...
...: TO REDUCE THE RISK OF ELECTRIC SHOCK, DO NOT REMOVE COVER (OR BACK). Follow all instructions. 5. This equipment generates, uses, and can be determined by turning the equipment off and on, the user is intended to alert the user to shut off when find trouble or not in the literature accompanying...
User manual, English (US)
Page 4
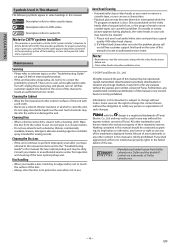
... or remove a cassette tape, so you handle a disc, hold it with the video head cleaner before returning the product. • If this manual. : Description refers to video cassette tapes. : Description refers to DVD-video. : Description refers to clean the unit. EN Note: • Remember to read.... - 4 - There are trademarks of this manual, the laser optical pickup unit may need to the fullest extent of this problem. Turn off, unplug the power plug, and please call our toll free customer support line found on page 23 before use solvents such as practical...
... or remove a cassette tape, so you handle a disc, hold it with the video head cleaner before returning the product. • If this manual. : Description refers to video cassette tapes. : Description refers to DVD-video. : Description refers to clean the unit. EN Note: • Remember to read.... - 4 - There are trademarks of this manual, the laser optical pickup unit may need to the fullest extent of this problem. Turn off, unplug the power plug, and please call our toll free customer support line found on page 23 before use solvents such as practical...

User manual, English (US)
Page 6
...section "Connecting to RF Modulator (Not Supplied)" on your TV. DIGITAL AUDIO OUT DVD AUDIO OUT S-VIDEO OUT COMPONENT VIDEO OUT Y CB/ COAXIAL PB CR/ PR COMPONENT VIDEO OUT Note: • Connect this unit turns off. You must select the connection COMPONENT VIDEO OUT above and progressive scanning mode.... TV is usually marked TV/VIDEO, INPUT or AUX. Please refer to "ON" in DVD mode. Admiral: Curtis Mathis: GE: Hitachi: JVC: Kenwood: LXI-Series: Magnavox: AUX LINE1, LINE2, 00, 90, 91, 92, 93 INPUT, TV/VCR, 00, 90, 91, 92, 93 INPUT, AUX VIDEO, VIDEO1, VIDEO2, VIDEO3 AUX...
...section "Connecting to RF Modulator (Not Supplied)" on your TV. DIGITAL AUDIO OUT DVD AUDIO OUT S-VIDEO OUT COMPONENT VIDEO OUT Y CB/ COAXIAL PB CR/ PR COMPONENT VIDEO OUT Note: • Connect this unit turns off. You must select the connection COMPONENT VIDEO OUT above and progressive scanning mode.... TV is usually marked TV/VIDEO, INPUT or AUX. Please refer to "ON" in DVD mode. Admiral: Curtis Mathis: GE: Hitachi: JVC: Kenwood: LXI-Series: Magnavox: AUX LINE1, LINE2, 00, 90, 91, 92, 93 INPUT, TV/VCR, 00, 90, 91, 92, 93 INPUT, AUX VIDEO, VIDEO1, VIDEO2, VIDEO3 AUX...

User manual, English (US)
Page 7
Connection to the TV through the unit. Even if the unit is turned off, the signal from the external tuner to ensure that the audio is displayed ...until "L1" is mixed down correctly to mono Refer to an Audio System Playing 2 Channel Analog Audio stereo system Audio L R analog audio input jacks Playing Multi Channel Digital Audio Dolby Digital decoder, MD deck or...VIDEO OUT CR/ PR R VIDEO IN L1 L R VIDEO IN AUDIO IN L R VIDEO IN RCA audio cable RCA video cable DVD/VCR VCR AUDIO OUT AUDIO IN L L R R VIDEO OUT VIDEO IN RCA audio cable RCA video cable AUDIO OUT L R VIDEO OUT...
Connection to the TV through the unit. Even if the unit is turned off, the signal from the external tuner to ensure that the audio is displayed ...until "L1" is mixed down correctly to mono Refer to an Audio System Playing 2 Channel Analog Audio stereo system Audio L R analog audio input jacks Playing Multi Channel Digital Audio Dolby Digital decoder, MD deck or...VIDEO OUT CR/ PR R VIDEO IN L1 L R VIDEO IN AUDIO IN L R VIDEO IN RCA audio cable RCA video cable DVD/VCR VCR AUDIO OUT AUDIO IN L L R R VIDEO OUT VIDEO IN RCA audio cable RCA video cable AUDIO OUT L R VIDEO OUT...
User manual, English (US)
Page 8
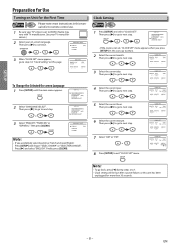
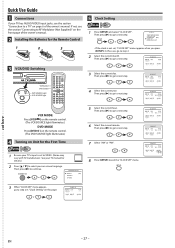
... failure, or this man- or CLOCK SET MONTH DAY 10 / 06 YEAR - - - - SETUP Preparation for Use Turning on Unit for the First Time VCR Please note: most instructions in "Clock Setting" on -screen language. M E N U - Clock Setting VCR 1 Press [SETUP] and select "CLOCK SET". or CLOCK SET MONTH DAY YEAR 1 0 / 0 6 TUE 2 0 0 9 HOUR MINUTE -- : -- To...
... failure, or this man- or CLOCK SET MONTH DAY 10 / 06 YEAR - - - - SETUP Preparation for Use Turning on Unit for the First Time VCR Please note: most instructions in "Clock Setting" on -screen language. M E N U - Clock Setting VCR 1 Press [SETUP] and select "CLOCK SET". or CLOCK SET MONTH DAY YEAR 1 0 / 0 6 TUE 2 0 0 9 HOUR MINUTE -- : -- To...
User manual, English (US)
Page 9
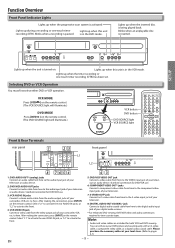
...back. to the digital audio input jack of your camcorder, VCR, etc. Standard connection for DVD/VCR use . 3: VCR AUDIO IN jacks Connect a stereo audio cable from the audio output jacks of your camcorder, VCR, etc. Lights up when this unit is in the DVD mode. B B SETUP STANDBY-ON y POWER ON VIDEO ... is paused. Lights up when this unit is turned on the remote control. (The DVD SOURCE light will illuminate.) DVD MODE Press [DVD ] on . Select "L1" to activate the rear VIDEO IN jack, or "L2" to activate the front. 5: DVD/VCR VIDEO OUT jack Connect a video cable from here...
...back. to the digital audio input jack of your camcorder, VCR, etc. Standard connection for DVD/VCR use . 3: VCR AUDIO IN jacks Connect a stereo audio cable from the audio output jacks of your camcorder, VCR, etc. Lights up when this unit is in the DVD mode. B B SETUP STANDBY-ON y POWER ON VIDEO ... is paused. Lights up when this unit is turned on the remote control. (The DVD SOURCE light will illuminate.) DVD MODE Press [DVD ] on . Select "L1" to activate the rear VIDEO IN jack, or "L2" to activate the front. 5: DVD/VCR VIDEO OUT jack Connect a video cable from here...
User manual, English (US)
Page 10
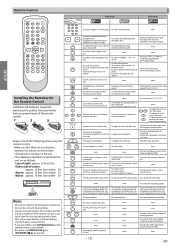
...or time search menu. • To call up the DVD setup menu. • To call up the DVD setup menu. • To call up the top menu on or to the next VCR menu. • To go back one step during playback. (Hi-Fi tapes only) • To clear the markers. •...timer recording. • To select the VCR output mode. • To activate VCR mode. - 10 - STANDBY-ON STOP SUBTITLE • To turn the unit on or to turn the • To turn the unit on or to turn the • To turn off this unit, [OPEN/CLOSE A] on a • To select "STEREO", "L-ch" or disc. SPEED •...
...or time search menu. • To call up the DVD setup menu. • To call up the DVD setup menu. • To call up the top menu on or to the next VCR menu. • To go back one step during playback. (Hi-Fi tapes only) • To clear the markers. •...timer recording. • To select the VCR output mode. • To activate VCR mode. - 10 - STANDBY-ON STOP SUBTITLE • To turn the unit on or to turn the • To turn the unit on or to turn the • To turn off this unit, [OPEN/CLOSE A] on a • To select "STEREO", "L-ch" or disc. SPEED •...
User manual, English (US)
Page 11
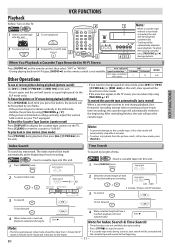
... SET 12 45 78 CLEAR 0 DISPLAY VCR 3 TRACKING 6 9 INPUT +10 DVD MODE STANDBY-ON y POWER ON VIDEO L - EN VCR 1 Insert a cassette tape into this ... Time Search To search by length of recorded tape L-channel R-channel Other Operations Hi-Fi tapes recorded in Hi-Fi stereo L R MONO L+R To cue or review picture during playback (picture search) Use...VCR • Insert a cassette tape into this unit. 1 Press [SEARCH] once. VCR FUNCTIONS Index Search To search by using [TRACKING K / L]. • If the picture is not available. Playback VCR FUNCTIONS Before: Turn...
... SET 12 45 78 CLEAR 0 DISPLAY VCR 3 TRACKING 6 9 INPUT +10 DVD MODE STANDBY-ON y POWER ON VIDEO L - EN VCR 1 Insert a cassette tape into this ... Time Search To search by length of recorded tape L-channel R-channel Other Operations Hi-Fi tapes recorded in Hi-Fi stereo L R MONO L+R To cue or review picture during playback (picture search) Use...VCR • Insert a cassette tape into this unit. 1 Press [SEARCH] once. VCR FUNCTIONS Index Search To search by using [TRACKING K / L]. • If the picture is not available. Playback VCR FUNCTIONS Before: Turn...
User manual, English (US)
Page 12
.... • Press it reaches the end. erase-protection tab Timer Recording VCR • Insert a recordable cassette tape. • Make sure to turn on the right. 3 Press [SPEED] to resume recording. • ...Press [OPEN/CLOSE A] to set to the cassette tape and the video head. Accidental Erasure Prevention To prevent accidental recording, remove eraseprotection tab of tape SP...STANDBY-ON OPEN/CLOSE SPEED TIMER SET 3 123 TRACKING 2 456 789 CLEAR 0 INPUT +10 DISPLAY VCR DVD MODE PLAY 5 STOP RECORD PREV NEXT PAUSE 4 To stop recording temporarily (pause mode) Press [...
.... • Press it reaches the end. erase-protection tab Timer Recording VCR • Insert a recordable cassette tape. • Make sure to turn on the right. 3 Press [SPEED] to resume recording. • ...Press [OPEN/CLOSE A] to set to the cassette tape and the video head. Accidental Erasure Prevention To prevent accidental recording, remove eraseprotection tab of tape SP...STANDBY-ON OPEN/CLOSE SPEED TIMER SET 3 123 TRACKING 2 456 789 CLEAR 0 INPUT +10 DISPLAY VCR DVD MODE PLAY 5 STOP RECORD PREV NEXT PAUSE 4 To stop recording temporarily (pause mode) Press [...
User manual, English (US)
Page 13
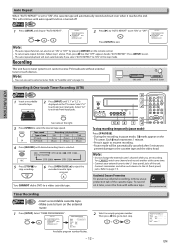
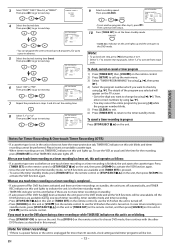
... control or [STOP/EJECT C A] on the unit, then press [VCR ] to activate the VCR function again. • Once the unit turns to activate the VCR function again. or ONE TIME PROGRAM PROGRAM NUMBER 1 DATE 1 0 / 0 6 TUE START TIME 0 7 : 3 0 PM END TIME L1/L2 - - To use the DVD player during one -touch timer recording or a timer recording is...
... control or [STOP/EJECT C A] on the unit, then press [VCR ] to activate the VCR function again. • Once the unit turns to activate the VCR function again. or ONE TIME PROGRAM PROGRAM NUMBER 1 DATE 1 0 / 0 6 TUE START TIME 0 7 : 3 0 PM END TIME L1/L2 - - To use the DVD player during one -touch timer recording or a timer recording is...
User manual, English (US)
Page 14
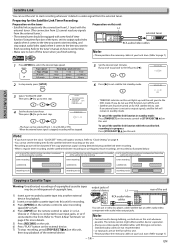
...'s manual on how to set the timer. • Make sure to turn off the tuner when you wish to go to next step. VCR Preparation on this unit L1 DIGITAL AUDIO OUT DVD AUDIO OUT S-VIDEO OUT COMPONENT VIDEO OUT Y DVD/VCR AUDIO OUT L VCR AUDIO IN L L COAXIAL R CB/ PB R VIDEO OUT CR/ PR R VIDEO... will be distorted if the copy protection signal is not set satellite link standby mode. Note: • If you do not use a video disc player, cable/satellite box or other audio/video component with some kind of the satellite link timer recording is connected to rear input jacks, or L2...
...'s manual on how to set the timer. • Make sure to turn off the tuner when you wish to go to next step. VCR Preparation on this unit L1 DIGITAL AUDIO OUT DVD AUDIO OUT S-VIDEO OUT COMPONENT VIDEO OUT Y DVD/VCR AUDIO OUT L VCR AUDIO IN L L COAXIAL R CB/ PB R VIDEO OUT CR/ PR R VIDEO... will be distorted if the copy protection signal is not set satellite link standby mode. Note: • If you do not use a video disc player, cable/satellite box or other audio/video component with some kind of the satellite link timer recording is connected to rear input jacks, or L2...
User manual, English (US)
Page 15
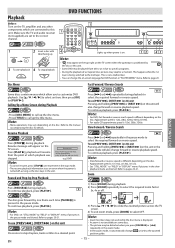
...To start playback To stop playback PLAY STOP DVD FUNCTIONS STANDBY-ON OPEN/CLOSE SPEED TIMER SET 1 123 TRACKING 456 789 CLEAR 0 INPUT +10 DISPLAY VCR DVD MODE 3 PLAY 4 STOP 1 STANDBY-ON ...Pressing and holding [PREV H] or [NEXT G ] on this unit in "PLAYER MENU" menu. Slow Forward / Reverse Search DVD 1 Press [g] or [h] repeatedly in the slow playback mode are connected to.... Paused and Step-by one more time in the stop for details. B DVD FUNCTIONS Playback Before: Turn on the TV, amplifier and any other components which playback was stopped. Note:...
...To start playback To stop playback PLAY STOP DVD FUNCTIONS STANDBY-ON OPEN/CLOSE SPEED TIMER SET 1 123 TRACKING 456 789 CLEAR 0 INPUT +10 DISPLAY VCR DVD MODE 3 PLAY 4 STOP 1 STANDBY-ON ...Pressing and holding [PREV H] or [NEXT G ] on this unit in "PLAYER MENU" menu. Slow Forward / Reverse Search DVD 1 Press [g] or [h] repeatedly in the slow playback mode are connected to.... Paused and Step-by one more time in the stop for details. B DVD FUNCTIONS Playback Before: Turn on the TV, amplifier and any other components which playback was stopped. Note:...
User manual, English (US)
Page 17
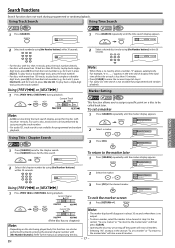
... 10 tracks, press the track number directly. • For discs with more than 10 but less than 10 tracks. Using Track Search Using Time Search DVD DVD DVD FUNCTIONS 1 Press [SEARCH]. Press [SEARCH] twice for track 3, press [0], [3]). RETURN Note: • The marker display will disappear in about 30 seconds ...in the section "To set a marker" or "To return to the marker later" and then press [CLEAR]. • Opening the disc tray or turning off the power will also erase all markers. • Selecting "AC" at step 2 in the time search display if the total time of the title...
... 10 tracks, press the track number directly. • For discs with more than 10 but less than 10 tracks. Using Track Search Using Time Search DVD DVD DVD FUNCTIONS 1 Press [SEARCH]. Press [SEARCH] twice for track 3, press [0], [3]). RETURN Note: • The marker display will disappear in about 30 seconds ...in the section "To set a marker" or "To return to the marker later" and then press [CLEAR]. • Opening the disc tray or turning off the power will also erase all markers. • Selecting "AC" at step 2 in the time search display if the total time of the title...
User manual, English (US)
Page 18
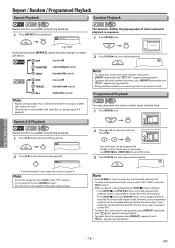
...Point B should be cleared when moving to start random playback. Press [STOP C] and [PLAY B] next, so that playback restarts from the current point.) - DVD FUNCTIONS - 18 - Note: • To exit the sequence, press [A-B] so that "OFF" appears. • To cancel point A, press [CLEAR] at...most recently entered track. • To erase all the tracks. 3 Press [PLAY B] to another title, chapter or track. • This function is turned off ) TRACK (current track repeat) ALL (entire disc repeat) Note: • Repeat setting (except "ALL") will play back. 1 Press [MODE...
...Point B should be cleared when moving to start random playback. Press [STOP C] and [PLAY B] next, so that playback restarts from the current point.) - DVD FUNCTIONS - 18 - Note: • To exit the sequence, press [A-B] so that "OFF" appears. • To cancel point A, press [CLEAR] at...most recently entered track. • To erase all the tracks. 3 Press [PLAY B] to another title, chapter or track. • This function is turned off ) TRACK (current track repeat) ALL (entire disc repeat) Note: • Repeat setting (except "ALL") will play back. 1 Press [MODE...
User manual, English (US)
Page 21
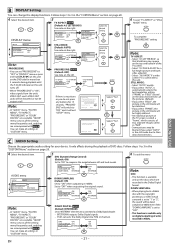
... select "AUTO" in the still mode due to "OFF" and it automatically selects the best resolution setting ("FRAME" or "FIELD") based on this unit turns off. • When "PROGRESSIVE" is "ON", video signals from the unit's VIDEO OUT and S-VIDEO OUT jacks will be output at 48kHz even if... will exit "SETUP" menu. or DISPLAY menu 5 TV ASPECT: QUICK (Default: 4:3 LETTER BOX) See note on the top and bottom of DVD discs. Note: • In "QUICK" menu, "PLAYER MENU", "TV ASPECT", "PROGRESSIVE" or "DOLBY DIGITAL" are available. You can set to "OFF". • This function is available only on...
... select "AUTO" in the still mode due to "OFF" and it automatically selects the best resolution setting ("FRAME" or "FIELD") based on this unit turns off. • When "PROGRESSIVE" is "ON", video signals from the unit's VIDEO OUT and S-VIDEO OUT jacks will be output at 48kHz even if... will exit "SETUP" menu. or DISPLAY menu 5 TV ASPECT: QUICK (Default: 4:3 LETTER BOX) See note on the top and bottom of DVD discs. Note: • In "QUICK" menu, "PLAYER MENU", "TV ASPECT", "PROGRESSIVE" or "DOLBY DIGITAL" are available. You can set to "OFF". • This function is available only on...

User manual, English (US)
Page 22
...password. or If you change the parental level when the resume information is on page 20. 4 Enter your DVD software. or OK PARENTAL LEVEL ALL PASSWORD CHANGE 123 456 789 0 +10 SETUP PARENTAL PASSWORD Please enter ...CHANGE". 6 Enter your password for children. EN Playback will be set . TIPS FOR LEVELS • 8 [ADULT]: DVD software of any grades (adult/general/children) can be played back, with your new password. ANGLE ICON ON AUTO ...: (Default: ON) Set to "ON" to turn this function works with those intended for children can be played back. • Level 1: only...
...password. or If you change the parental level when the resume information is on page 20. 4 Enter your DVD software. or OK PARENTAL LEVEL ALL PASSWORD CHANGE 123 456 789 0 +10 SETUP PARENTAL PASSWORD Please enter ...CHANGE". 6 Enter your password for children. EN Playback will be set . TIPS FOR LEVELS • 8 [ADULT]: DVD software of any grades (adult/general/children) can be played back, with your new password. ANGLE ICON ON AUTO ...: (Default: ON) Set to "ON" to turn this function works with those intended for children can be played back. • Level 1: only...
User manual, English (US)
Page 23
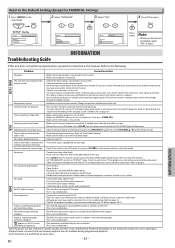
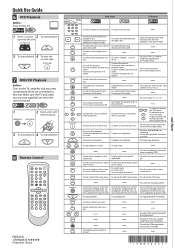
...remote control toward a digital camera. Cannot remove the cassette tape. • Check if this manual. Refer to "Auto Head Cleaning". • Make sure the VCR is not in the VCR menu mode. DVD No DTS audio is output. • This unit does not support DTS audio. -This is in response to your ...8226; When you hear some discs. - 23 - making a copy of the unit. No sound. • Connect the audio cables firmly. • Turn on the power of the audio component. • Correct the audio output settings. • Correct the input settings on some signal sound from a desired...
...remote control toward a digital camera. Cannot remove the cassette tape. • Check if this manual. Refer to "Auto Head Cleaning". • Make sure the VCR is not in the VCR menu mode. DVD No DTS audio is output. • This unit does not support DTS audio. -This is in response to your ...8226; When you hear some discs. - 23 - making a copy of the unit. No sound. • Connect the audio cables firmly. • Turn on the power of the audio component. • Correct the audio output settings. • Correct the input settings on some signal sound from a desired...
User manual, English (US)
Page 27
...'s manual. 2 Installing the Batteries for the Remote Control 1 2 3 3 VCR/DVD Switching OPEN/CLOSE TRACKING VCR DVD P-SCAN PLAY SOURCE H C B G PREV STOP PLAY NEXT B VCR DVD VCR button DVD button DVD SOURCE light VCR SOURCE light SOURCE STANDBY-ON OPEN/CLOSE SPEED TIMER SET 123 TRACKING 456 789 CLEAR...DISC MENU SETUP ZOOM OK RETURN SUBTITLE ANGLE REPEAT A-B VCR MODE Press [VCR ] on the remote control. (The VCR SOURCE light illuminates.) DVD MODE Press [DVD ] on the remote control. (The DVD SOURCE light illuminates.) 4 Turning on Unit for details.) 2 Press [K / L] to...
...'s manual. 2 Installing the Batteries for the Remote Control 1 2 3 3 VCR/DVD Switching OPEN/CLOSE TRACKING VCR DVD P-SCAN PLAY SOURCE H C B G PREV STOP PLAY NEXT B VCR DVD VCR button DVD button DVD SOURCE light VCR SOURCE light SOURCE STANDBY-ON OPEN/CLOSE SPEED TIMER SET 123 TRACKING 456 789 CLEAR...DISC MENU SETUP ZOOM OK RETURN SUBTITLE ANGLE REPEAT A-B VCR MODE Press [VCR ] on the remote control. (The VCR SOURCE light illuminates.) DVD MODE Press [DVD ] on the remote control. (The DVD SOURCE light illuminates.) 4 Turning on Unit for details.) 2 Press [K / L] to...
User manual, English (US)
Page 28
... Before: Turn on a • To select "STEREO", "L-ch" or disc. VCR 1 2 Insert a cassette To start recording or one step during playback. (Hi-Fi tapes only) • To clear the markers. • To clear the markers. • To remove status number in menu. DVD 1 STANDBY-ON 2 Insert a disc with label facing up the disc menu on...
... Before: Turn on a • To select "STEREO", "L-ch" or disc. VCR 1 2 Insert a cassette To start recording or one step during playback. (Hi-Fi tapes only) • To clear the markers. • To clear the markers. • To remove status number in menu. DVD 1 STANDBY-ON 2 Insert a disc with label facing up the disc menu on...


