User manual, English (US)
Page 1
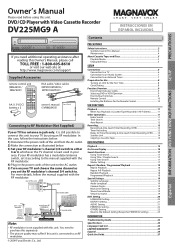
...DVD/VCR AUDIO OUT L R VIDEO OUT RCA audio cable RCA video cable rear of TV VHF / UHF antenna rear of your TV by using this Owner's Manual, please call TOLL FREE : 1-800-605-8610 or visit our web site at http://www.magnavox.com/support Supplied Accessories remote control... this unit is least used in Hi-Fi Stereo 11 Other Operations 11 Index Search...11 ...Player with this case, follow the manual supplied with the RF modulator. 4) Plug in the power cords of the unit from the AC outlet. 2) Make the connection as you set it is not supplied with Video Cassette Recorder DV225MG9...
...DVD/VCR AUDIO OUT L R VIDEO OUT RCA audio cable RCA video cable rear of TV VHF / UHF antenna rear of your TV by using this Owner's Manual, please call TOLL FREE : 1-800-605-8610 or visit our web site at http://www.magnavox.com/support Supplied Accessories remote control... this unit is least used in Hi-Fi Stereo 11 Other Operations 11 Index Search...11 ...Player with this case, follow the manual supplied with the RF modulator. 4) Plug in the power cords of the unit from the AC outlet. 2) Make the connection as you set it is not supplied with Video Cassette Recorder DV225MG9...

User manual, English (US)
Page 7
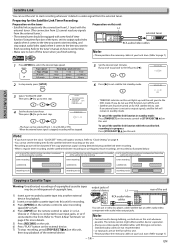
... COAXIAL R CB/ PB R VIDEO OUT CR/ PR R VIDEO IN L1 L R VIDEO IN AUDIO IN L R VIDEO IN RCA audio cable RCA video cable DVD/VCR VCR AUDIO OUT AUDIO IN L L R R VIDEO OUT VIDEO IN RCA audio cable RCA video cable AUDIO OUT L R VIDEO OUT Using the unit with an external ... to mono Refer to "Front & Rear Terminals" on your remote control until "L1" is output to the TV through the unit. Do not change channels during a recording. EN Connection to an Audio System Playing 2 Channel Analog Audio stereo system Audio L R analog audio input jacks Playing Multi Channel ...
... COAXIAL R CB/ PB R VIDEO OUT CR/ PR R VIDEO IN L1 L R VIDEO IN AUDIO IN L R VIDEO IN RCA audio cable RCA video cable DVD/VCR VCR AUDIO OUT AUDIO IN L L R R VIDEO OUT VIDEO IN RCA audio cable RCA video cable AUDIO OUT L R VIDEO OUT Using the unit with an external ... to mono Refer to "Front & Rear Terminals" on your remote control until "L1" is output to the TV through the unit. Do not change channels during a recording. EN Connection to an Audio System Playing 2 Channel Analog Audio stereo system Audio L R analog audio input jacks Playing Multi Channel ...
User manual, English (US)
Page 8
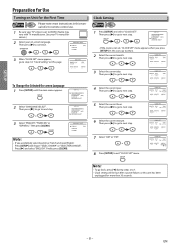
... step. Then press [B] to go to 7. • Clock setting will be lost after a power failure, or this unit has been unplugged for the First Time VCR Please note: most instructions in "Clock Setting" on this man- SETUP CLOCK SET MONTH DAY YEAR 1 0 / 0 6 TUE 2 0 0 9 HOUR MINUTE 05 : 40 AM/PM - - or...Then press [B] to go to next step. STANDBY-ON or LANGUAGE SELECT B ENGLISH [ON] FRANCAIS ESPAÑOL 3 When "CLOCK SET" menu appears, go to remote control use. 1 Be sure your on Unit for more than 30 seconds. - 8 - ual refer to next step. AM/PM - - Clock Setting...
... step. Then press [B] to go to 7. • Clock setting will be lost after a power failure, or this unit has been unplugged for the First Time VCR Please note: most instructions in "Clock Setting" on this man- SETUP CLOCK SET MONTH DAY YEAR 1 0 / 0 6 TUE 2 0 0 9 HOUR MINUTE 05 : 40 AM/PM - - or...Then press [B] to go to next step. STANDBY-ON or LANGUAGE SELECT B ENGLISH [ON] FRANCAIS ESPAÑOL 3 When "CLOCK SET" menu appears, go to remote control use. 1 Be sure your on Unit for more than 30 seconds. - 8 - ual refer to next step. AM/PM - - Clock Setting...
User manual, English (US)
Page 9
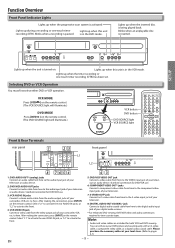
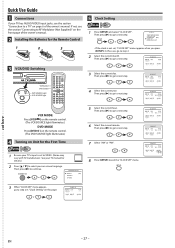
...DVD MODE Press [DVD ] on the remote control. Select "L1" to activate the rear AUDIO IN jacks, or "L2" to the audio input jack of your television or audio device. to the digital audio input jack of your digital audio receiver. * For enhanced DVD viewing. Standard connection for DVD/VCR use . 3: VCR AUDIO IN jacks Connect a stereo...to here. y VCR MODE Press [VCR ] on the remote control. (The VCR SOURCE light will illuminate.) OPEN/CLOSE TRACKING VCR DVD P-SCAN PLAY SOURCE H C B G PREV STOP PLAY NEXT VCR DVD VCR button DVD button DVD SOURCE light VCR SOURCE light SOURCE ...
...DVD MODE Press [DVD ] on the remote control. Select "L1" to activate the rear AUDIO IN jacks, or "L2" to the audio input jack of your television or audio device. to the digital audio input jack of your digital audio receiver. * For enhanced DVD viewing. Standard connection for DVD/VCR use . 3: VCR AUDIO IN jacks Connect a stereo...to here. y VCR MODE Press [VCR ] on the remote control. (The VCR SOURCE light will illuminate.) OPEN/CLOSE TRACKING VCR DVD P-SCAN PLAY SOURCE H C B G PREV STOP PLAY NEXT VCR DVD VCR button DVD button DVD SOURCE light VCR SOURCE light SOURCE ...
User manual, English (US)
Page 10
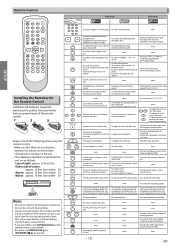
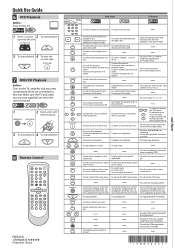
...recording speed. TITLE TRACKING TRACKING • To call up the VCR menu. "R-ch". • To select "HIFI" or "MONO" mode during playback. (Hi-Fi tapes only) • To clear the markers. • ...turn the unit on a disc. Remote Control SETUP STANDBY-ON OPEN/CLOSE SPEED TIMER SET 12 45 78 CLEAR 0 DISPLAY VCR 3 TRACKING 6 9 INPUT +10 DVD MODE PLAY STOP RECORD PREV NEXT PAUSE...EJECT C A] on a • To select "STEREO", "L-ch" or disc. mine its position. • To select an item on the remote control is not to the next VCR menu. • To go back one frame &#...
...recording speed. TITLE TRACKING TRACKING • To call up the VCR menu. "R-ch". • To select "HIFI" or "MONO" mode during playback. (Hi-Fi tapes only) • To clear the markers. • ...turn the unit on a disc. Remote Control SETUP STANDBY-ON OPEN/CLOSE SPEED TIMER SET 12 45 78 CLEAR 0 DISPLAY VCR 3 TRACKING 6 9 INPUT +10 DVD MODE PLAY STOP RECORD PREV NEXT PAUSE...EJECT C A] on a • To select "STEREO", "L-ch" or disc. mine its position. • To select an item on the remote control is not to the next VCR menu. • To go back one frame &#...
User manual, English (US)
Page 11
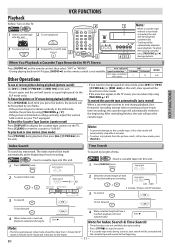
...Other Operations Hi-Fi tapes recorded in Hi-Fi stereo L R MONO L+R To cue or review picture during playback, fastforward or recording (except timer recording and one frame. • If the picture begins to vibrate vertically in the SLP mode only) To freeze the picture on the remote control, then select...0 DISPLAY VCR 3 TRACKING 6 9 INPUT +10 DVD MODE STANDBY-ON y POWER ON VIDEO L - Note: • To prevent damage to stop the search. • The time gap between index marks should be more fast or slow mode. • If the noise bars appear on the remote control is reached...
...Other Operations Hi-Fi tapes recorded in Hi-Fi stereo L R MONO L+R To cue or review picture during playback, fastforward or recording (except timer recording and one frame. • If the picture begins to vibrate vertically in the SLP mode only) To freeze the picture on the remote control, then select...0 DISPLAY VCR 3 TRACKING 6 9 INPUT +10 DVD MODE STANDBY-ON y POWER ON VIDEO L - Note: • To prevent damage to stop the search. • The time gap between index marks should be more fast or slow mode. • If the noise bars appear on the remote control is reached...
User manual, English (US)
Page 12
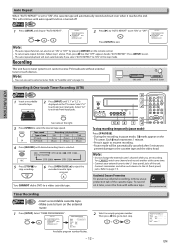
... F.FWD STOP/EJECT PLAY RECORD 56 4 1 6 STANDBY-ON OPEN/CLOSE SPEED TIMER SET 3 123 TRACKING 2 456 789 CLEAR 0 INPUT +10 DISPLAY VCR DVD MODE PLAY 5 STOP RECORD PREV NEXT PAUSE 4 To stop recording. Select "TIMER PROGRAMMING". - EN Note: • The auto repeat function can also...can also be automatically canceled after 5 minutes to prevent damage to the cassette tape and the video head. INPUT See note on the right. 3 Press [SPEED] to "Satellite Link" on the remote control. • To cancel auto repeat function, follow step 1 above. Auto Repeat When "AUTO REPEAT"...
... F.FWD STOP/EJECT PLAY RECORD 56 4 1 6 STANDBY-ON OPEN/CLOSE SPEED TIMER SET 3 123 TRACKING 2 456 789 CLEAR 0 INPUT +10 DISPLAY VCR DVD MODE PLAY 5 STOP RECORD PREV NEXT PAUSE 4 To stop recording. Select "TIMER PROGRAMMING". - EN Note: • The auto repeat function can also...can also be automatically canceled after 5 minutes to prevent damage to the cassette tape and the video head. INPUT See note on the right. 3 Press [SPEED] to "Satellite Link" on the remote control. • To cancel auto repeat function, follow step 1 above. Auto Repeat When "AUTO REPEAT"...
User manual, English (US)
Page 13
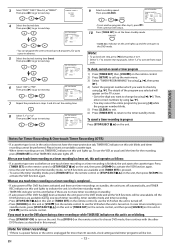
...Press [STANDBY-ON] to use the VCR when the unit is finished, the unit ejects the cassette tape. Press [DVD ] on the remote control to choose DVD mode, then continue with step 2. 10 Press [TIMER SET] to use the VCR when the unit is pressed. &#...remote control or [STOP/EJECT C A] on the unit, then press [VCR ] to the timer standby mode, no more than 30 seconds, clock setting and all the VCR functions will be performed. REC SPEED - - Then continue with the other DVD features as usual until [TIMER SET] is turned off. • Press [SOURCE] on . To use the DVD player...
...Press [STANDBY-ON] to use the VCR when the unit is finished, the unit ejects the cassette tape. Press [DVD ] on the remote control to choose DVD mode, then continue with step 2. 10 Press [TIMER SET] to use the VCR when the unit is pressed. &#...remote control or [STOP/EJECT C A] on the unit, then press [VCR ] to the timer standby mode, no more than 30 seconds, clock setting and all the VCR functions will be performed. REC SPEED - - Then continue with the other DVD features as usual until [TIMER SET] is turned off. • Press [SOURCE] on . To use the DVD player...
User manual, English (US)
Page 14
...DVD function, turn off the unit. • Satellite unit must be equipped with RCA-type connectors. or SATELLITE LINK 0 1 : 0 0 PM 2 In stop recording, press [STOP/EJECT C A] on the existing timer recording. To cancel the satellite link function in standby mode: Press [TIMER SET] on the remote control...Link You can use a video disc player, cable/satellite box or other audio/video component with audio/video output jacks. SETUP 3 Select "SATELLITE LINK". output jacks of external device AUDIO OUT L or R VIDEO OUT L1 RCA audio/video cables DVD/VCR VCR AUDIO OUT AUDIO IN L L R ...
...DVD function, turn off the unit. • Satellite unit must be equipped with RCA-type connectors. or SATELLITE LINK 0 1 : 0 0 PM 2 In stop recording, press [STOP/EJECT C A] on the existing timer recording. To cancel the satellite link function in standby mode: Press [TIMER SET] on the remote control...Link You can use a video disc player, cable/satellite box or other audio/video component with audio/video output jacks. SETUP 3 Select "SATELLITE LINK". output jacks of external device AUDIO OUT L or R VIDEO OUT L1 RCA audio/video cables DVD/VCR VCR AUDIO OUT AUDIO IN L L R ...
User manual, English (US)
Page 16
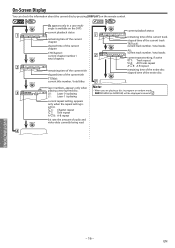
L0: Layer 0 is playing L1: Layer 1 is playing current repeat setting, appears only when the repeat setting is available on the remote control. DVD DVD DISPLAY 1 11/16 0:00:00 - 0:03:30 DISPLAY 2 1/3 0:00:00 - 1:23:45 DISPLAY 3 T L1 DISPLAY appears only in ...program or random mode, PROGRAM (or RANDOM) will be displayed instead of 2 . 4 DVD FUNCTIONS - 16 - C: Chapter repeat T: Title repeat A B: A-B repeat bit rate: the amount of audio and video data currently being read DISPLAY current playback status 1 ...
L0: Layer 0 is playing L1: Layer 1 is playing current repeat setting, appears only when the repeat setting is available on the remote control. DVD DVD DISPLAY 1 11/16 0:00:00 - 0:03:30 DISPLAY 2 1/3 0:00:00 - 1:23:45 DISPLAY 3 T L1 DISPLAY appears only in ...program or random mode, PROGRAM (or RANDOM) will be displayed instead of 2 . 4 DVD FUNCTIONS - 16 - C: Chapter repeat T: Title repeat A B: A-B repeat bit rate: the amount of audio and video data currently being read DISPLAY current playback status 1 ...
User manual, English (US)
Page 23
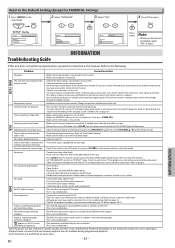
...the progressive mode is not a malfunction. Playback picture is turned on the DVD. -This is not a malfunction. Video or color fades in this manual. If not, press [VCR ] on the remote control so that you confirm infrared light through the digital camera. Distorted picture. ...VCR menu mode. Press [VCR ] on the remote control to your TV. Refer to page 6. Refer to "Auto Head Cleaning". • Make sure the VCR is working . • Press and hold any button on the remote control. The remote control is not in the stop for audio or subtitles on . DVD...
...the progressive mode is not a malfunction. Playback picture is turned on the DVD. -This is not a malfunction. Video or color fades in this manual. If not, press [VCR ] on the remote control so that you confirm infrared light through the digital camera. Distorted picture. ...VCR menu mode. Press [VCR ] on the remote control to your TV. Refer to page 6. Refer to "Auto Head Cleaning". • Make sure the VCR is working . • Press and hold any button on the remote control. The remote control is not in the stop for audio or subtitles on . DVD...
User manual, English (US)
Page 24
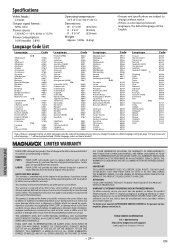
Specifications Video heads : 4-heads Output signal format : NTSC color Power source : 120 V AC +/- 10 %, 60 Hz +/- 0.5 % Power consumption : 16 W...packaging affording an equal degree of God. THIS WARRANTY DOES NOT COVER PACKING MATERIALS, ANY ACCESSORIES (EXCEPT REMOTE CONTROL), ANY COSMETIC PARTS, COMPLETE ASSEMBLY PARTS, DEMO OR FLOOR MODELS. FUNAI CORP. To locate your ...for general service inquiries, please contact us at: FUNAI SERVICE CORPORATION Tel :1-800-605-8610 http://www.magnavox.com/support 2200 Spiegel Drive, Groveport, OH 43125 - 24 - This product is extended only to ...
Specifications Video heads : 4-heads Output signal format : NTSC color Power source : 120 V AC +/- 10 %, 60 Hz +/- 0.5 % Power consumption : 16 W...packaging affording an equal degree of God. THIS WARRANTY DOES NOT COVER PACKING MATERIALS, ANY ACCESSORIES (EXCEPT REMOTE CONTROL), ANY COSMETIC PARTS, COMPLETE ASSEMBLY PARTS, DEMO OR FLOOR MODELS. FUNAI CORP. To locate your ...for general service inquiries, please contact us at: FUNAI SERVICE CORPORATION Tel :1-800-605-8610 http://www.magnavox.com/support 2200 Spiegel Drive, Groveport, OH 43125 - 24 - This product is extended only to ...
User manual, English (US)
Page 27
..., see the section "Connection to a TV" on page 6 of the owner's manual. 2 Installing the Batteries for the Remote Control 1 2 3 3 VCR/DVD Switching OPEN/CLOSE TRACKING VCR DVD P-SCAN PLAY SOURCE H C B G PREV STOP PLAY NEXT B VCR DVD VCR button DVD button DVD SOURCE light VCR SOURCE light SOURCE STANDBY-ON OPEN/CLOSE SPEED TIMER SET 123 TRACKING 456 789 CLEAR 0 INPUT +10 DISPLAY...
..., see the section "Connection to a TV" on page 6 of the owner's manual. 2 Installing the Batteries for the Remote Control 1 2 3 3 VCR/DVD Switching OPEN/CLOSE TRACKING VCR DVD P-SCAN PLAY SOURCE H C B G PREV STOP PLAY NEXT B VCR DVD VCR button DVD button DVD SOURCE light VCR SOURCE light SOURCE STANDBY-ON OPEN/CLOSE SPEED TIMER SET 123 TRACKING 456 789 CLEAR 0 INPUT +10 DISPLAY...
User manual, English (US)
Page 28
... select camera angles on a disc. • To select audio languages on a • To select "STEREO", "L-ch" or disc. DISC MENU • To call up the top menu on / off. &#... 3 4 To stop playback STOP PLAY 8 Remote Control STANDBY-ON OPEN/CLOSE SPEED TIMER SET 12 45 78 CLEAR 0 DISPLAY VCR 3 TRACKING 6 9 INPUT +10 DVD MODE PLAY STOP RECORD PREV NEXT PAUSE TITLE SEARCH... the VCR menu. • To select the recording speed. OPEN/CLOSE 3 4 To start playback tape into standby mode for A-B repeat. "R-ch". • To select "HIFI" or "MONO" mode during playback. (Hi-Fi tapes...
... select camera angles on a disc. • To select audio languages on a • To select "STEREO", "L-ch" or disc. DISC MENU • To call up the top menu on / off. &#... 3 4 To stop playback STOP PLAY 8 Remote Control STANDBY-ON OPEN/CLOSE SPEED TIMER SET 12 45 78 CLEAR 0 DISPLAY VCR 3 TRACKING 6 9 INPUT +10 DVD MODE PLAY STOP RECORD PREV NEXT PAUSE TITLE SEARCH... the VCR menu. • To select the recording speed. OPEN/CLOSE 3 4 To start playback tape into standby mode for A-B repeat. "R-ch". • To select "HIFI" or "MONO" mode during playback. (Hi-Fi tapes...


