

Owners Manual
Page 2
...the Base 8 Installing the Remote Control Batteries 8 Remote Control 9 Control Panel 10 Terminals 10 Connecting the Antenna, Cable or Satellite 11 Connecting a Set-top Box, Blu-ray Disc / DVD Recorder via Composite Connectors and Analog Audio 11 Plugging in Standby mode 16 Adjusting Volume 16 Switching Channels 16 Watching Channels from an External Device 17 Changing Picture and Sound Settings 17 Sleep Timer 17 Switching Audio Mode 17 Changing Picture Format 17 TV Screen information 18 2 .English 5 Making more use with your TV 19 Displaying the Main Menu 19...
...the Base 8 Installing the Remote Control Batteries 8 Remote Control 9 Control Panel 10 Terminals 10 Connecting the Antenna, Cable or Satellite 11 Connecting a Set-top Box, Blu-ray Disc / DVD Recorder via Composite Connectors and Analog Audio 11 Plugging in Standby mode 16 Adjusting Volume 16 Switching Channels 16 Watching Channels from an External Device 17 Changing Picture and Sound Settings 17 Sleep Timer 17 Switching Audio Mode 17 Changing Picture Format 17 TV Screen information 18 2 .English 5 Making more use with your TV 19 Displaying the Main Menu 19...

Owners Manual
Page 3
... for proper use of your television, please note that are mounting the television is placed. • NEVER place the television on dressers, bookcases, shelves, desks, speakers, chests, carts, etc., may be used as steps, such as software upgrades and important product notifications. 3 .English Register Online at www.magnavox.com/support/ today to get the very most from your television. • ALWAYS use a mount that has...
... for proper use of your television, please note that are mounting the television is placed. • NEVER place the television on dressers, bookcases, shelves, desks, speakers, chests, carts, etc., may be used as steps, such as software upgrades and important product notifications. 3 .English Register Online at www.magnavox.com/support/ today to get the very most from your television. • ALWAYS use a mount that has...

Owners Manual
Page 4
... ELECTRIC SERVICE EQUIPMENT POWER SERVICE GROUNDING ELECTRODE SYSTEM (NEC ART 250, PART H) Wall Mount Bracket Kit Brand Model # 32ME306V SANUS AST16 Screw dimension M4 x 1.378" (35mm) with the apparatus.When a cart is plugged in particular, specifies that provides guidelines for these types of the building, as practical. It may cause the TV set . Important Safety Instructions 4 .English 1. Install in any way, such as power-supply cord or plug...
... ELECTRIC SERVICE EQUIPMENT POWER SERVICE GROUNDING ELECTRODE SYSTEM (NEC ART 250, PART H) Wall Mount Bracket Kit Brand Model # 32ME306V SANUS AST16 Screw dimension M4 x 1.378" (35mm) with the apparatus.When a cart is plugged in particular, specifies that provides guidelines for these types of the building, as practical. It may cause the TV set . Important Safety Instructions 4 .English 1. Install in any way, such as power-supply cord or plug...
Owners Manual
Page 5
... radio or television technician for help. and Funai Corporation, Inc. Pixel characteristics This LCD product has a high number of their respective owners. If the product or its individual modules or procedures are user serviceable. Canadian notice CAN ICES-3 (B)/NMB-3 (B) Analog and Digital Television Receiving Apparatus, Canada BETS-7 / NTMR-7. Failure to maximize energy efficiency while delivering the best possible picture using the factory installed home mode settings. Declaration of...
... radio or television technician for help. and Funai Corporation, Inc. Pixel characteristics This LCD product has a high number of their respective owners. If the product or its individual modules or procedures are user serviceable. Canadian notice CAN ICES-3 (B)/NMB-3 (B) Analog and Digital Television Receiving Apparatus, Canada BETS-7 / NTMR-7. Failure to maximize energy efficiency while delivering the best possible picture using the factory installed home mode settings. Declaration of...
Owners Manual
Page 6
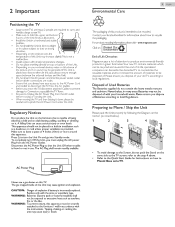
... power cord into Standby mode. Replace only with your household waste. WARNING: To prevent injury, this apparatus must unplug the AC power Plug from the AC Power Outlet. To completely turn the Unit On and go into the power socket outlet before moving or carrying the Unit. • When moving the TV and then Setting it . Contact your local authorities for Instructions...
... power cord into Standby mode. Replace only with your household waste. WARNING: To prevent injury, this apparatus must unplug the AC power Plug from the AC Power Outlet. To completely turn the Unit On and go into the power socket outlet before moving or carrying the Unit. • When moving the TV and then Setting it . Contact your local authorities for Instructions...
Owners Manual
Page 7
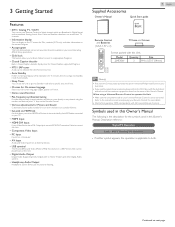
... the symbols used in this Owner's Manual The following is set to the Part Name with this Owner's Manual. Model 32ME306V Quantity Size 3 M4 x 0.551"(14mm) AAA AAA Note(s) ● If you need to replace these accessories, please refer to our brand. Supplied Accessories Owner's Manual Quick Start guide 7 .English Remote Control and Batteries (AAA, 1.5V x 2) TV base and Screws Screws packed with the illustrations and call our toll free customer support line found...
... the symbols used in this Owner's Manual The following is set to the Part Name with this Owner's Manual. Model 32ME306V Quantity Size 3 M4 x 0.551"(14mm) AAA AAA Note(s) ● If you need to replace these accessories, please refer to our brand. Supplied Accessories Owner's Manual Quick Start guide 7 .English Remote Control and Batteries (AAA, 1.5V x 2) TV base and Screws Screws packed with the illustrations and call our toll free customer support line found...

Owners Manual
Page 9
... Displays Information about the current program. Remote Control a b c d e f g h i 9 .English a B (POWER / STANDBY) Turns the TV On from Standby or Off to Low). b PIC/SOUND MODE Optimizes Picture and Sound quality. CH + / - : Selects a Channel in the Memorized Channel Ring (Low to High or High to Standby mode. l PICTURE SIZE A Adjusts the Picture size on next page. Continued on the TV screen. h BACK Returns to the previous Menu operation. m g D (MUTE) n Turns the Sound On and Off. k SLEEP Sets Sleep Timer. c CC Selects Closed caption settings (Off...
... Displays Information about the current program. Remote Control a b c d e f g h i 9 .English a B (POWER / STANDBY) Turns the TV On from Standby or Off to Low). b PIC/SOUND MODE Optimizes Picture and Sound quality. CH + / - : Selects a Channel in the Memorized Channel Ring (Low to High or High to Standby mode. l PICTURE SIZE A Adjusts the Picture size on next page. Continued on the TV screen. h BACK Returns to the previous Menu operation. m g D (MUTE) n Turns the Sound On and Off. k SLEEP Sets Sleep Timer. c CC Selects Closed caption settings (Off...

Owners Manual
Page 10
... a Channel in the Memorized Channel Ring (Low to High or High to Home Theaters and other Digital Audio systems. k HDMI Input jack(s) Digital Audio and Video Input from Stereo Mini 3.5mm Plug Audio Cable on next page. c MENU Opens the Main On-screen Menu. g Power On / Standby Indicator (On : no light, Standby : red light) h USB Terminal Data Input from an Antenna, Cable or Set-top Boxes. l 75 ohm Cable / Antenna Connection Signal Input from USB Memory Stick only. n Component (Y/Pb/Pr) / Composite Video (VIDEO) Input jack(s) for VIDEO Composite Video Input (VIDEO...
... a Channel in the Memorized Channel Ring (Low to High or High to Home Theaters and other Digital Audio systems. k HDMI Input jack(s) Digital Audio and Video Input from Stereo Mini 3.5mm Plug Audio Cable on next page. c MENU Opens the Main On-screen Menu. g Power On / Standby Indicator (On : no light, Standby : red light) h USB Terminal Data Input from an Antenna, Cable or Set-top Boxes. l 75 ohm Cable / Antenna Connection Signal Input from USB Memory Stick only. n Component (Y/Pb/Pr) / Composite Video (VIDEO) Input jack(s) for VIDEO Composite Video Input (VIDEO...

Owners Manual
Page 11
... to Signals from your Cable service, contact the Cable provider. ● Refer to the Quick Start Guide that are not receiving a Signal from the TV. Caution(s) ● Connect the Analog Audio signal cables from the Antenna Input jack before plugging in the AC Power Cord, no operations will be more effective than a Set-top Box or inside Antenna. ● To Turn On your reception source easily between Antenna and Cable, Install an Antenna selector. ● If you connect a Set-top Box...
... to Signals from your Cable service, contact the Cable provider. ● Refer to the Quick Start Guide that are not receiving a Signal from the TV. Caution(s) ● Connect the Analog Audio signal cables from the Antenna Input jack before plugging in the AC Power Cord, no operations will be more effective than a Set-top Box or inside Antenna. ● To Turn On your reception source easily between Antenna and Cable, Install an Antenna selector. ● If you connect a Set-top Box...
Owners Manual
Page 12
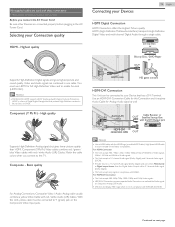
... AC Power Cord. Composite Video / Audio Analog cable usually combine a yellow Video Cable with EIA/CEA-861/861B. Set-top Box or IN HDMI cable Blu-ray Disc / DVD Player or OUT HD game console HDMI-DVI Connection This Unit can be connected to the TV. Connecting your Connection quality HDMI - Continued on the Component Video Input jacks. Before you connect to Y (green) jack on next page. Highest quality Supports High-Definition Digital signals and gives highest picture and sound quality...
... AC Power Cord. Composite Video / Audio Analog cable usually combine a yellow Video Cable with EIA/CEA-861/861B. Set-top Box or IN HDMI cable Blu-ray Disc / DVD Player or OUT HD game console HDMI-DVI Connection This Unit can be connected to the TV. Connecting your Connection quality HDMI - Continued on the Component Video Input jacks. Before you connect to Y (green) jack on next page. Highest quality Supports High-Definition Digital signals and gives highest picture and sound quality...

Owners Manual
Page 14
... cable to connect an External hard disk drive to the Unit. (Not Supported.) ● Always insert a USB Memory Stick directly to this Unit as well. 14 .English Note(s) ● Please purchase the HDMI-DVI Conversion Cable that has a DVI Terminal. Use an HDMI cable for Analog Audio signal as Analog (L/R) Audio. ● DVI does not display 480i image which requires an External Power Supply (500mA or more). Unplug the AC Power Cord...
... cable to connect an External hard disk drive to the Unit. (Not Supported.) ● Always insert a USB Memory Stick directly to this Unit as well. 14 .English Note(s) ● Please purchase the HDMI-DVI Conversion Cable that has a DVI Terminal. Use an HDMI cable for Analog Audio signal as Analog (L/R) Audio. ● DVI does not display 480i image which requires an External Power Supply (500mA or more). Unplug the AC Power Cord...

Owners Manual
Page 15
... - Use this Setup of TV channels will guide you through a choice of the TV screen, then press OK. 3 Use H I to select the desired Location setting, then press OK. Note(s) ● If you are accessible by Cable. Try Autoprogram again? Follow the instructions listed on the TV screen. Initial setup Location: "Home" mode is Energy Star qualified and is no signal Input from the Antenna terminal and no operation for retail displays...
... - Use this Setup of TV channels will guide you through a choice of the TV screen, then press OK. 3 Use H I to select the desired Location setting, then press OK. Note(s) ● If you are accessible by Cable. Try Autoprogram again? Follow the instructions listed on the TV screen. Initial setup Location: "Home" mode is Energy Star qualified and is no signal Input from the Antenna terminal and no operation for retail displays...

Owners Manual
Page 17
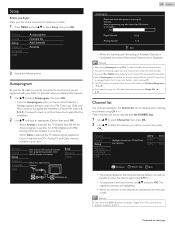
... HDMI2 Video PC 11.1 HDMI1 DTV / Analog TV channel HDMI2 Video PC or Component ② Use the Remote Control for PCs and game consoles Eco - Optimized for the Set-top Box or the Connected Device to Select Channels to 120 minutes). Music Optimized for low Power Consumption - Press SLEEP Once to call up to view. Switching Audio Mode Digital TV Operation 1 Press SAP to display the currently selected Language and the number of...
... HDMI2 Video PC 11.1 HDMI1 DTV / Analog TV channel HDMI2 Video PC or Component ② Use the Remote Control for PCs and game consoles Eco - Optimized for the Set-top Box or the Connected Device to Select Channels to 120 minutes). Music Optimized for low Power Consumption - Press SLEEP Once to call up to view. Switching Audio Mode Digital TV Operation 1 Press SAP to display the currently selected Language and the number of...

Owners Manual
Page 18
...8 Cable / NTSC (Analog) TV Operation c Channel Number Switching channels L p. 16 d Audio Language (DTV) / Audio mode (Analog TV) Switching Audio Mode L p. 17 3 11 4 SAP / STEREO 480i SD 4:3 5 TV-PG DLSV CC 6 7 e Program's image Aspect Ratio Changing Picture Format L p. 17 f CC (Not available if Closed Caption is displayed; is displayed when the program guide is not provided. ● While the TV screen information is displayed, the Closed Caption function is interrupted. ● In External Input mode, the following screen is set to Off) Caption settings L p. 23 g Child Lock...
...8 Cable / NTSC (Analog) TV Operation c Channel Number Switching channels L p. 16 d Audio Language (DTV) / Audio mode (Analog TV) Switching Audio Mode L p. 17 3 11 4 SAP / STEREO 480i SD 4:3 5 TV-PG DLSV CC 6 7 e Program's image Aspect Ratio Changing Picture Format L p. 17 f CC (Not available if Closed Caption is displayed; is displayed when the program guide is not provided. ● While the TV screen information is displayed, the Closed Caption function is interrupted. ● In External Input mode, the following screen is set to Off) Caption settings L p. 23 g Child Lock...

Owners Manual
Page 21
.... Press BACK to go back to Switching Audio Mode. Refer to the previous menu. L p. 29 Otherwise, personalized Picture and Sound settings will be changed by an HDMI cable to Output Second Audio Program You can select Audio Output through a Digital Audio Output connector. Picture Sound Setup Features Language USB Auto sound Equalizer Sonic Emotion Auto volume leveling TV speakers Digital output format Primary MTS Digital audio preferences Standard On Off On Multichannel Stereo 2 Use H I Cursor H to set your Preferred language in PCM even if...
.... Press BACK to go back to Switching Audio Mode. Refer to the previous menu. L p. 29 Otherwise, personalized Picture and Sound settings will be changed by an HDMI cable to Output Second Audio Program You can select Audio Output through a Digital Audio Output connector. Picture Sound Setup Features Language USB Auto sound Equalizer Sonic Emotion Auto volume leveling TV speakers Digital output format Primary MTS Digital audio preferences Standard On Off On Multichannel Stereo 2 Use H I Cursor H to set your Preferred language in PCM even if...
Owners Manual
Page 22
... scanning for DTV, Analog TV and Cable channels available in the Child and Ratings Lock. Otherwise the channel is selected, the TV Detects Any Off-the-Air Antenna Signals. When Antenna is Analog TV (NTSC). Picture Sound Setup Features Language USB Highlight channels for Change PIN. Auto programming may take more than 20 minutes to enter your Cable service, contact the Cable provider. ● If you press B or MENU during Autoprogram, the Setup...
... scanning for DTV, Analog TV and Cable channels available in the Child and Ratings Lock. Otherwise the channel is selected, the TV Detects Any Off-the-Air Antenna Signals. When Antenna is Analog TV (NTSC). Picture Sound Setup Features Language USB Highlight channels for Change PIN. Auto programming may take more than 20 minutes to enter your Cable service, contact the Cable provider. ● If you press B or MENU during Autoprogram, the Setup...

Owners Manual
Page 23
... Language USB For analog channels, select a channel to be selected by the Autoprogram due to reception conditions during the Initial Setting. 1 Use H I to select Add channels, then press OK. 2 Use the NUMBER keys to enter the number of each channel. 1 Use H I to select the channel for Digital caption service. Picture Sound Setup Features Language USB Caption settings Child lock PC settings fun-Link (HDMI CEC) Location E-sticker Software upgrade Home - - 2 Adjust the following items. Caption settings Closed Captions displays the Audio portion of these before changing...
... Language USB For analog channels, select a channel to be selected by the Autoprogram due to reception conditions during the Initial Setting. 1 Use H I to select Add channels, then press OK. 2 Use the NUMBER keys to enter the number of each channel. 1 Use H I to select the channel for Digital caption service. Picture Sound Setup Features Language USB Caption settings Child lock PC settings fun-Link (HDMI CEC) Location E-sticker Software upgrade Home - - 2 Adjust the following items. Caption settings Closed Captions displays the Audio portion of these before changing...

Owners Manual
Page 32
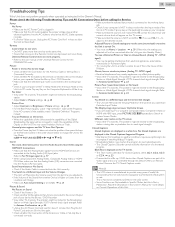
... from your wall Cable or Set-top Box needs to a location where previously unavailable channels are captions not displayed Entirely? When I change Automatically? How can I enter a channel number, why does it to be plugged into Standby mode. ● Autoprogram must be viewed by pressing SOURCE or using the Component Video Connection check that are connected to the Unit. ● When using CH + / -. L p. 22 ● The selected channel may interrupt the Remote Control signal on the Remote Control Battery area...
... from your wall Cable or Set-top Box needs to a location where previously unavailable channels are captions not displayed Entirely? When I change Automatically? How can I enter a channel number, why does it to be plugged into Standby mode. ● Autoprogram must be viewed by pressing SOURCE or using the Component Video Connection check that are connected to the Unit. ● When using CH + / -. L p. 22 ● The selected channel may interrupt the Remote Control signal on the Remote Control Battery area...
Owners Manual
Page 33
... signal strength. Universal Remote Control does not work . ● Do NOT press more Details on the TV screen ● View other TV channels. Picture ● Make sure that the Analog Audio (L/R) connectors are mounted into the Unit correctly. The problem might be limited to the correct Output jack of your computer is NOT in sleep mode when the Input mode of this Device's Menu or Remote Control. Different color marks on Correct Operations...
... signal strength. Universal Remote Control does not work . ● Do NOT press more Details on the TV screen ● View other TV channels. Picture ● Make sure that the Analog Audio (L/R) connectors are mounted into the Unit correctly. The problem might be limited to the correct Output jack of your computer is NOT in sleep mode when the Input mode of this Device's Menu or Remote Control. Different color marks on Correct Operations...
Owners Manual
Page 34
... this Owner's Manual to compress Digital sound. There are no user serviceable parts inside. PIN code A stored 4-digit number that produces high resolution and high picture quality. IR Signal Check If the Remote Control is displayed on the TV screen mainly used as its height. 8 Information 34 .English Glossary Analog TV (NTSC) Acronym that was on a printed sticker that stands for Advanced Television Systems Committee and the name of light (red, blue and green...
... this Owner's Manual to compress Digital sound. There are no user serviceable parts inside. PIN code A stored 4-digit number that produces high resolution and high picture quality. IR Signal Check If the Remote Control is displayed on the TV screen mainly used as its height. 8 Information 34 .English Glossary Analog TV (NTSC) Acronym that was on a printed sticker that stands for Advanced Television Systems Committee and the name of light (red, blue and green...


